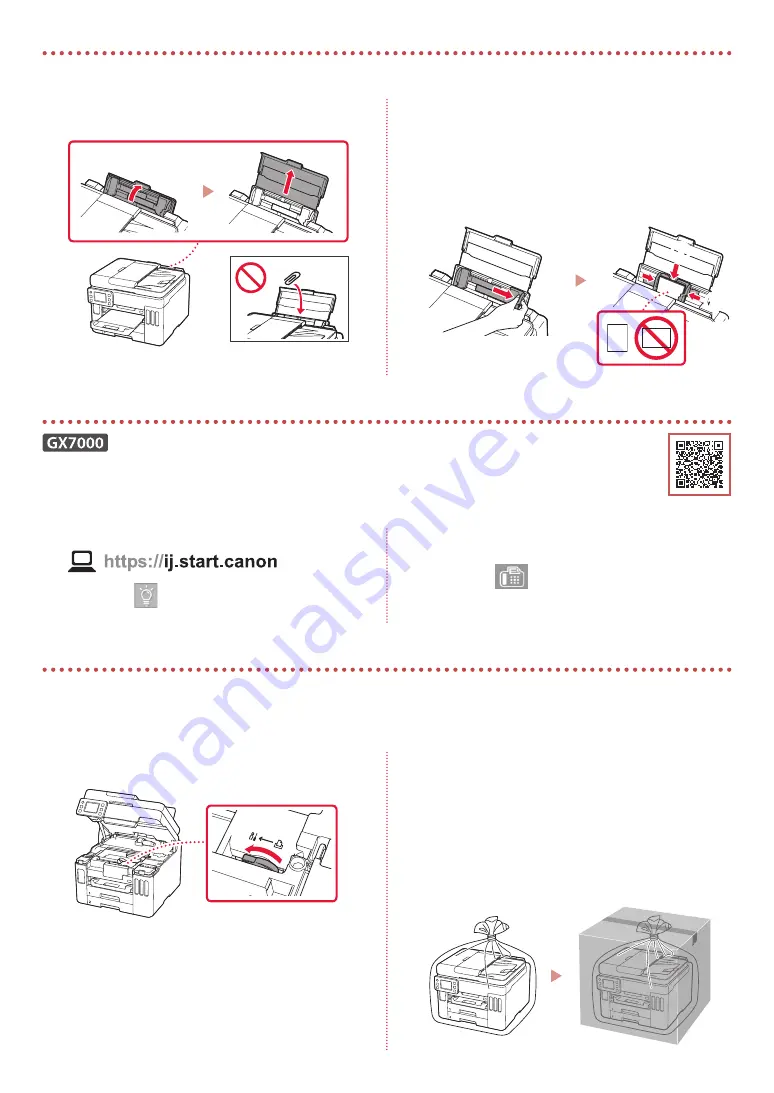
background image

8

Abra a tampa da bandeja traseira e estenda o 
suporte de papel.

Deslize a guia do papel da direita até a 
extremidade direita.

Coloque várias folhas de papel com o lado a 
ser impresso virado para cima e deslize a guia 
do papel lateral em direção à borda da pilha de 
papel.

a

b

Transportando a Impressora

Ao mudar a posição da impressora, verifique o seguinte. Consulte o 

Manual On-line

 para obter detalhes.

Verifique se a posição da alavanca de válvula de tinta está 
fechada.

Embale a impressora em um saco plástico caso ocorra 
vazamento de tinta.

• 

Coloque a impressora em uma caixa resistente de modo 
que a parte inferior fique virada para baixo, usando material 
de proteção suficiente para garantir o transporte seguro.

• 

Não incline a impressora. A tinta pode vazar.

• 

Manuseie com cuidado e garanta que a caixa permaneça 
na horizontal, e NÃO de cabeça para baixo ou de lado, 
pois a impressora pode ser danificada e a tinta da 
impressora pode vazar.

• 

Quando um agente de transporte estiver manuseando o 
transporte da impressora, marque a caixa com "ESTE LADO 
PARA CIMA" para manter a parte inferior da impressora 
virada para baixo. Marque também com "FRÁGIL" ou 
"MANUSEAR COM CUIDADO".

Colocando papel

Usando a função de fax

A função de fax da sua impressora requer configuração. Consulte o 

Guia de configuração de FAX

.


Acesse o Guia de configuração de FAX

Acesse o site da Canon.

Clique em 


Consulte Funções 

Recomendadas

.

Clique em 

Funções/Serviços

.

Clique em 


Configurando o FAX

.

Содержание GX7000 Series

Страница 1: ...ro Para Come ar Lea primero Informaci n de seguridad e informaci n importante ap ndice Gu a de inicio Getting Started Read Safety and Important Information addendum first Questo manuale d istruzione f...

Страница 2: ...ndicadas por cones Conectando a um computador smartphone ou tablet p gina 6 Instalando a impressora p gina 1 Segurando a impressora Las ilustraciones y las capturas de pantalla que se utilizan en esta...

Страница 3: ...material still attached may cause the printer to malfunction 2 Open the scanning unit cover remove and dispose of the orange tape and protective material inside a b 3 Close the scanning unit cover Ope...

Страница 4: ...owing screen appears tap your country or region to select 5 Set the date and then tap OK 6 Set the time and then tap OK 7 Tap OK 4 Pouring Ink Important This product requires careful handling of ink I...

Страница 5: ...inlet 5 Slowly stand the ink bottle upside down and push down to pour the ink If the ink does not pour gently remove the ink bottle and try again a b 6 Gently remove the ink bottle from the inlet Be...

Страница 6: ...om the printer Pull out Cassette 1 upper from the printer 3 Slide apart the paper guides Slide the right paper guide to the right edge Align the front paper guide with the Letter or A4 mark 4 Load Let...

Страница 7: ...ding Information To Canon in Safety and Important Information 9 Check that the following screen appears If you will use the printer without connecting any other devices setup is now complete Select th...

Страница 8: ...steps are for Windows users 6 Click Download 7 Run the downloaded file Follow the on screen instructions This may take some time To connect to a smartphone as well see 6 b Connecting to a Smartphone...

Страница 9: ...Canon_ij_ If Canon_ij_ appears Proceed to step 3 If Canon_ij_ does not appear Proceed to step 4 3 Tap the network name SSID that starts with Canon_ij_ 4 Open the installed app and follow the on scree...

Страница 10: ...d with its bottom facing down using sufficient protective material to ensure safe transport Do not tilt the printer Ink may leak Please handle with care and ensure the box remains flat and NOT turned...

Страница 11: ...a adherido podr a provocar un mal funcionamiento de la impresora 2 Abra la cubierta unidad de escaneado retire y tire la cinta naranja y el material de protecci n que hay dentro a b 3 Cierre la cubier...

Страница 12: ...i n para seleccionarlo 5 Establezca la fecha y a continuaci n toque OK 6 Establezca la hora y a continuaci n toque OK 7 Toque OK 4 Verter la tinta Importante Este producto requiere un tratamiento cuid...

Страница 13: ...el frasco de tinta boca abajo y empuje hacia abajo para verter la tinta Si la tinta no se vierte retire suavemente el frasco de tinta e int ntelo de nuevo a b 6 Retire suavemente el frasco de tinta de...

Страница 14: ...resora Retire el Cassette 1 superior de la impresora 3 Separe las gu as del papel desliz ndolas Deslice la gu a del papel derecha hacia el borde derecho Alinee la gu a del papel frontal con la marca C...

Страница 15: ...a Canon en Informaci n de seguridad e informaci n importante 9 Compruebe que aparezca la siguiente pantalla Si va a utilizar la impresora sin conectar con ning n otro dispositivo la configuraci n ya s...

Страница 16: ...rios de Windows 6 Haga clic en Descargar 7 Ejecute el archivo descargado Siga las instrucciones que aparezcan en pantalla Esto puede llevar alg n tiempo Para conectar con un tel fono inteligente tambi...

Страница 17: ...anon_ij_ contin e en el paso 3 Si no se muestra Canon_ij_ contin e en el paso 4 3 Toque el nombre de red SSID que empieza con Canon_ij_ 4 Abra la aplicaci n instalada y luego siga las instrucciones en...

Страница 18: ...iente material de protecci n para garantizar un transporte seguro No incline la impresora De lo contrario es posible que la tinta se derrame Manipule con cuidado y aseg rese de que la caja permanece e...

Страница 19: ...m ainda anexado pode causar problemas de funcionamento na impressora 2 Abra a unidade de digitaliza o tampa remova e descarte a fita laranja e o material de prote o que est o dentro a b 3 Feche a unid...

Страница 20: ...a toque em seu pa s ou regi o para selecionar 5 Defina a data e em seguida toque em OK 6 Defina a hora e em seguida toque em OK 7 Toque em OK 4 Colocando tinta Importante Este produto requer manuseio...

Страница 21: ...te a garrafa de tinta de cabe a para baixo e empurre para baixo para despejar a tinta Se a tinta n o for despejada remova lentamente a garrafa de tinta e tente novamente a b 6 Remova lentamente a garr...

Страница 22: ...ova o cassete da impressora Remova o Cassete 1 superior da impressora 3 Separe as guias do papel Deslize a guia do papel direita at a borda direita Alinhe a guia do papel frontal com a marca o Letter...

Страница 23: ...ra a Canon em Informa es Importantes e Sobre Seguran a 9 Verifique se a tela a seguir aparece Se voc for usar a impressora sem conectar nenhum outro dispositivo a configura o estar conclu da Selecione...

Страница 24: ...ra usu rios do Windows 6 Clique em Download 7 Execute o arquivo baixado Siga as instru es na tela Isso pode levar algum tempo Para conectar a um smartphone tamb m consulte 6 b Conectando a um smartpho...

Страница 25: ..._ij_ Se Canon_ij_ aparecer prossiga para a etapa 3 Se Canon_ij_ n o aparecer prossiga para a etapa 4 3 Toque no nome da rede SSID que come a com Canon_ij_ 4 Abra o aplicativo instalado e siga as instr...

Страница 26: ...da para baixo usando material de prote o suficiente para garantir o transporte seguro N o incline a impressora A tinta pode vazar Manuseie com cuidado e garanta que a caixa permane a na horizontal e N...

Страница 27: ...fix risque d entra ner un dysfonctionnement 2 Ouvrez l unit de num risation capot retirez et jetez tout bande orange et mat riau protecteur se trouvant l int rieur a b 3 Fermez l unit de num risation...

Страница 28: ...ion de votre choix 5 D finissez la date puis touchez OK 6 D finissez l heure puis touchez OK 7 Touchez OK 4 Versement de l encre Important Ce produit n cessite que l encre soit manipul e avec pr cauti...

Страница 29: ...v e 5 Renversez lentement la bouteille d encre et appuyez pour faire couler l encre Si l encre ne coule pas retirez d licatement la bouteille d encre et faites une nouvelle tentative a b 6 Retirez dou...

Страница 30: ...imprimante Retirez la cassette 1 sup rieure de l imprimante 3 Faites glisser s par ment les guides papier Faites glisser le guide papier droit vers le bord droit Alignez le guide papier avant sur la...

Страница 31: ...ions importantes 9 Assurez vous que l cran suivant s affiche Pour utiliser l imprimante sans connecter aucun autre p riph rique la configuration est termin e S lectionnez la m thode de connexion corre...

Страница 32: ...chaque ordinateur 1 Acc s au site Web Canon partir de votre ordinateur 2 S lectionnez Configuration 3 Entrez le nom de mod le de votre imprimante et cliquez sur Acc der 4 Cliquez sur D marrer 5 Clique...

Страница 33: ...Si Canon_ij_ n appara t pas Passez l tape 4 3 Touchez le nom de r seau SSID qui commence par Canon_ij_ 4 Ouvrez l application install e puis suivez les instructions affich es l cran par l application...

Страница 34: ...pour garantir un transport en toute s curit N inclinez pas l imprimante L encre risque de couler Manipulez le carton avec pr cautions et assurez vous que celui ci reste plat et n est pas tourn l enve...

Страница 35: ...1 1 2 1 2 a b 3 b a 3 1 URL https ij start canon...

Страница 36: ...2 2 ON 3 Yes 4 5 OK 6 OK 7 OK 4 1...

Страница 37: ...3 2 3 BK 4 5 a b 6 b a 7 8 9 2 8 C M Y...

Страница 38: ...4 10 b a 5 1 OK 2 1 3 Letter A4 4 Letter A4 a b 5 6...

Страница 39: ...5 7 OK 8 8 Next Canon 9 8...

Страница 40: ...6 a 6 1 Canon 2 3 4 5 B Windows 6 7 6 b 7 8 6 a EasySetup exe 3 win SETUP exe...

Страница 41: ...6 b 7 1 Canon PRINT Inkjet SELPHY Canon PRINT App Store Google Play Canon 2 Wi Fi SSID Canon_ij_ iOS SSID Canon_ij_ Canon_ij_ 3 Canon_ij_ 4 3 SSID Canon_ij_ 4 6 b 8 8...

Страница 42: ...8 1 2 3 a b 1 Canon 2 3 4...

Страница 43: ...1 1 2 1 2 a b 3 b a 3 1 URL https ij start canon...

Страница 44: ...2 2 ON 3 Yes 4 5 OK 6 OK 7 OK 4 1...

Страница 45: ...3 2 3 BK 4 5 a b 6 b a 7 8 9 2 8 C M Y...

Страница 46: ...4 10 b a 5 1 OK 2 1 3 Letter A4 4 Letter A4 a b 5 6...

Страница 47: ...5 7 OK 8 8 Next Canon 9 8...

Страница 48: ...6 a 6 1 Canon 2 3 4 5 B Windows 6 7 6 b 7 8 6 a EasySetup exe 3 win SETUP exe...

Страница 49: ...6 b 7 1 Canon PRINT Inkjet SELPHY Canon PRINT App Store Google Play Canon 2 Wi Fi SSID Canon_ij_ iOS SSID Canon_ij_ Canon_ij_ 3 Canon_ij_ 4 3 SSID Canon_ij_ 4 6 b 8 8...

Страница 50: ...8 1 2 3 a b 1 Canon 2 3 4...

Страница 51: ...8 1 1 2 2 3 3 a b 1 1 Canon 2 2 3 3 4 4...

Страница 52: ...6 b 7 1 1 Canon PRINT Inkjet SELPHY Google Play App Store Canon PRINT Canon 2 2 _Canon_ij SSID Wi Fi iOS _Canon_ij SSID 3 _Canon_ij 4 _Canon_ij 3 3 _Canon_ij SSID 4 4 6 b 8 8...

Страница 53: ...6 a 6 1 1 Canon 2 2 3 3 4 4 5 5 B Windows 6 6 Download 7 7 7 6 b 8 6 a 3 EasySetup exe SETUP exe win...

Страница 54: ...5 7 7 OK 8 8 8 Next Canon 9 9 8...

Страница 55: ...4 10 1 b a 5 1 1 OK 2 2 1 3 3 Letter A4 4 4 A4 Letter a b 5 5 6 6...

Страница 56: ...3 2 2 3 3 BK 4 4 5 5 a b 6 6 b a 7 7 8 8 9 9 8 2 C M Y...

Страница 57: ...2 2 2 ON 3 3 Yes 4 4 5 5 OK 6 6 OK 7 7 OK 4 1 1...

Страница 58: ...1 1 2 1 1 2 2 a b 3 3 b a 3 1 1 URL https ij start canon...

Страница 59: ...nos EUA e ou em outros pa ses App Store uma marca registrada da Apple Inc registradas nos EUA e em outros pa ses Google Play uma marca registrada do Google LLC Marcas comerciales Windows es una marca...

Страница 60: ...navigateur Acc s au Manuel en ligne Do seu navegador Acesse o Manual On line Desde su navegador Acceso al Manual en l nea Access Online Manual From your browser PRINTED IN XXXXXXXX QT6 3589 V02 CANON...

Отзывы: