Canon G600 Series Скачать руководство пользователя страница 6

4

Setting Up the Printer
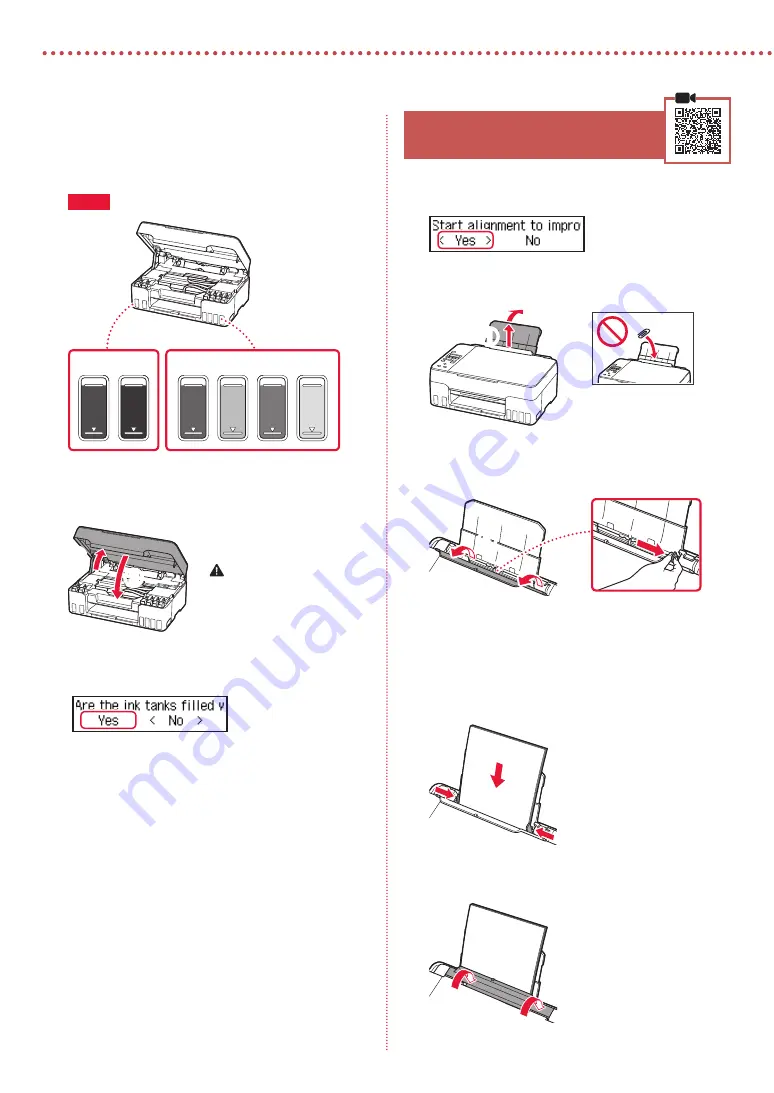
Repeat steps 2 through 7 to pour all ink for all 
colors into the ink tanks for each color.

• 

Pour the supplied ink that matches the color of the 
tank cap.

C

M

Y

R

GY

BK

Check!

Close the scanning unit / cover.

• 

Open the scanning unit / cover fully and then close it.

b

a

 Caution

Watch your fingers.

10 

Use the 

[

 and 

]

 buttons to select 

Yes

, and 

then press the 

OK

 button.

 6. Loading Paper

Use the 

[

 and 

]

 buttons to select 

Yes

, and 

then press the 

OK

 button.

Extend the paper support.

a

b

Open the feed slot cover and slide the right-
hand side paper guide to the far right.

a

b

Load paper.

• 

Load 2 or more sheets of Letter or A4 sized plain 
paper.

• 

Slide the side paper guide against the edge of the 
paper stack.

a

b

Close the feed slot cover.

Содержание G600 Series

Страница 1: ...Lea primero Informaci n de seguridad e informaci n importante ap ndice Gu a de inicio Getting Started Read Safety and Important Information addendum first...

Страница 2: ...impresora Conexi n con un ordenador tel fono inteligente o tableta p gina 6 Instalaci n de la impresora p gina 1 Installing the Printer page 1 Connecting to a Computer Smartphone or Tablet page 6 Hold...

Страница 3: ...e tape 2 Open the scanning unit cover remove and dispose of the orange tape and protective material inside a b 3 Installing the Print Heads 1 Open the print head locking cover 2 Take out each print he...

Страница 4: ...ose the scanning unit cover Open the scanning unit cover fully and then close it b a Caution Watch your fingers 4 Turning on the Printer 1 Connect the power cord Back 2 Press the ON button 3 When the...

Страница 5: ...gray tank cap on the left of the printer 3 Hold the GY gray ink bottle upright and gently twist the bottle cap to remove Check GY 4 Align the nozzle of the ink bottle with the inlet 5 Slowly stand the...

Страница 6: ...close it b a Caution Watch your fingers 10 Use the and buttons to select Yes and then press the OK button 6 Loading Paper 1 Use the and buttons to select Yes and then press the OK button 2 Extend the...

Страница 7: ...follow the instructions if the displayed code is written below 1890 Protective material remaining 2 Removing Packing Materials on page 1 1470 1471 Print heads are not installed correctly 3 Installing...

Страница 8: ...puter 2 Select Set Up 3 Enter your printer s model name and click Go 4 Click Start 5 Click B Connecting to a Computer Smartphone The following steps are for Windows users 6 Click Download 7 Run the do...

Страница 9: ...SSID that starts with Canon_ij_ If Canon_ij_ appears Proceed to step 3 If Canon_ij_ does not appear Proceed to step 4 3 Tap the network name SSID that starts with Canon_ij_ 4 Open the installed app an...

Страница 10: ...e Online Manual for details Check that both joint buttons are pressed down completely to avoid ink leaks Check that the position of the ink valve lever is closed Pack the printer in a plastic bag in c...

Страница 11: ...2 Abra la cubierta unidad de escaneado retire y tire la cinta naranja y el material de protecci n que hay dentro a b 3 Instalar los cabezales de impresi n 1 Abra la cubierta de bloqueo del cabezal de...

Страница 12: ...r 7 Cierre la cubierta unidad de escaneado Abra la cubierta unidad de escaneado completamente y luego ci rrela b a Precauci n Tenga cuidado con los dedos 4 Encender la impresora 1 Conecte el cable de...

Страница 13: ...la izquierda de la impresora 3 Sujete el frasco de tinta GY gris hacia arriba y gire suavemente la tapa del frasco para retirarla Comprobar GY 4 Alinee la boquilla del frasco de tinta con la entrada 5...

Страница 14: ...n Tenga cuidado con los dedos 10 Use los botones y para seleccionar S Yes y a continuaci n pulse el bot n OK 6 Carga del papel 1 Use los botones y para seleccionar S Yes y a continuaci n pulse el bot...

Страница 15: ...1890 Material de protecci n restante 2 Retirar los materiales de protecci n en la p gina 1 1470 1471 Los cabezales de impresi n no est n instalados correctamente 3 Instalar los cabezales de impresi n...

Страница 16: ...modelo de su impresora y haga clic en Ir 4 Haga clic en Iniciar 5 Haga clic en B Conexi n con un ordenador tel fono inteligente Los siguientes pasos son para usuarios de Windows 6 Haga clic en Descar...

Страница 17: ...con Canon_ij_ Si se muestra Canon_ij_ contin e en el paso 3 Si no se muestra Canon_ij_ contin e en el paso 4 3 Toque el nombre de red SSID que empieza con Canon_ij_ 4 Abra la aplicaci n instalada y lu...

Страница 18: ...ra obtener m s informaci n Compruebe que ambos botones de uni n se hayan presionado hacia abajo completamente para evitar derrames de tinta Compruebe que la palanca de v lvula de tinta est en la posic...

Страница 19: ...a marca comercial de Apple Inc registradas en EE UU y en otros pa ses Google Play es una marca comercial registrada de Google LLC Trademarks Windows is a trademark or registered trademark of Microsoft...

Страница 20: ...Desde su navegador Acceso al Manual en l nea Access Online Manual From your browser PRINTED IN XXXXXXXX CANON INC 2020 XXXXXXXX QT6 4022 V01...

Отзывы: