background image

51

Ad
v

anced

Functions

E

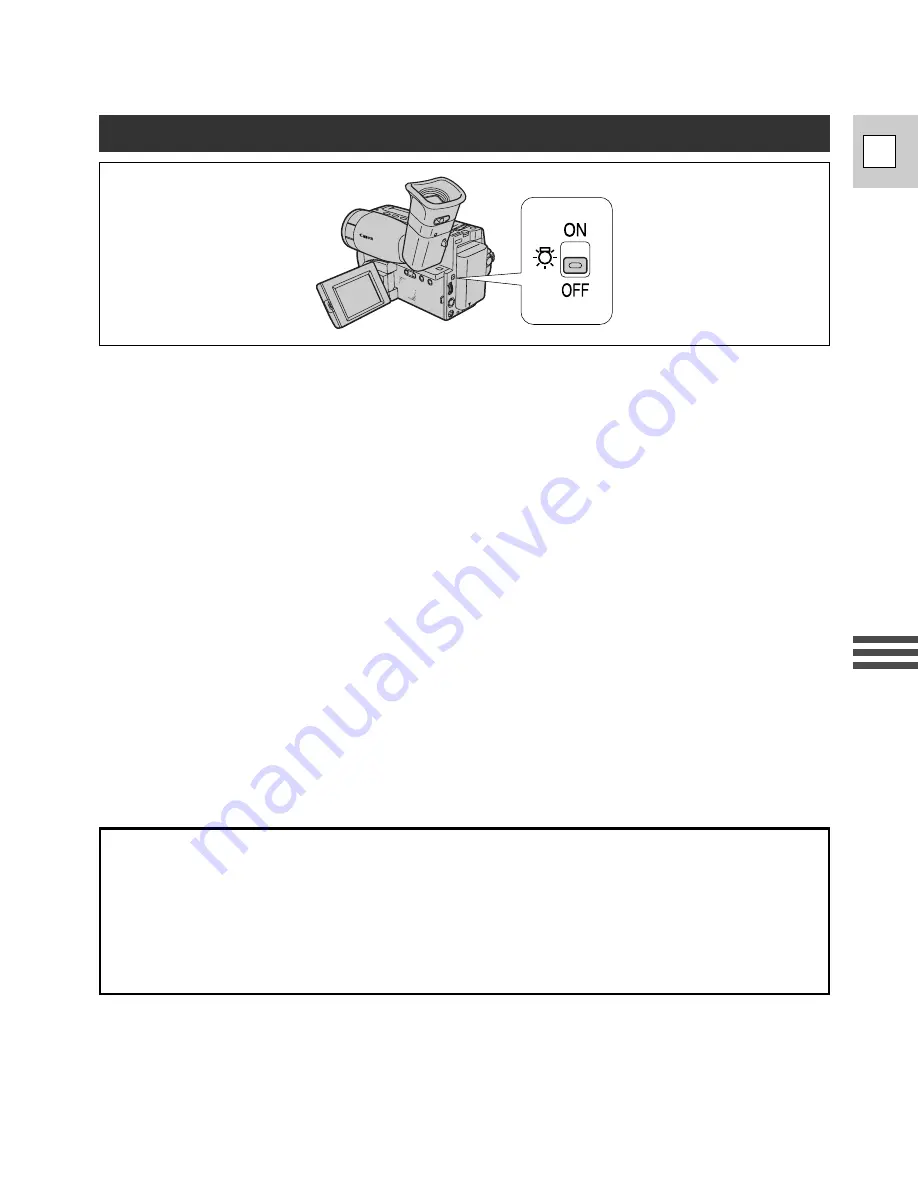
The built-in video light allows you to make clear, colorful recordings of poorly lit scenes. You can
even record in complete darkness.
The recommended distance between the subject and camcorder is about 5 feet (2 m).

1. Turn the program selector to any of the camera modes except Spotlight mode.
2. Slide the light switch to the 

ON position to turn on the video light.

• The light will only turn on in camera mode.
• When inserting or ejecting a cassette the video light turns off automatically.

3. Make your recording.
4. When you have finished using the light, slide the switch back to the OFF

position.

Notes:

• Continuous recording time is reduced with continued use of the video light.

For longer recordings you may prefer to use a power adapter.

• The light becomes hot during use — keep it away from plastic or flammable materials, and do not

touch it.

• Do not knock the light, especially during use.
• Do not use the wide-converter lens or the tele-converter lens with the video light.
• When the bulb has reached the end of its life, contact your nearest Canon Service Center.

Caution:

• Do not touch the bulb protector during and after use of the video light. It and surrounding areas

become hot.

Using the Built-in Video Light

DANGER

• Not to be handled by children.
• Emits intense heat and light.
• Use with caution to reduce the risk of fire or injury.
• Keep a safe distance between the Video Light and human or material subjects when using

and until cool.

• Turn light off when not in use.

Содержание ES8600

Страница 1: ...8mm VIDEO CAMCORDER Instruction Manual CAMESCOPE ET LECTEUR VIDEO 8 mm Mode d emploi VIDEOCAMARA Y GRABADORA DE VIDEO 8mm Manual de instrucciones ENGLISH FRANÇAIS ESPAÑOL NTSC E F Es ...

Страница 2: ...t and receiver Connect the equipment into an outlet on a circuit different from that to which the receiver is connected Consult the dealer or an experienced radio TV technician for help Do not make any changes or modifications to the equipment unless otherwise specified in the manual If such changes or modifications should be made you could be required to stop operation of the equipment Canon U S ...

Страница 3: ... may cause the product and cart combination to overturn 10 Power Sources The CA 550KA Compact Power Adapter should be operated only from the type of power source indicated on the marking label If you are not sure of the type of power supply to your home consult your product dealer or local power company Regarding other power sources such as battery power refer to instructions in this manual 11 Pol...

Страница 4: ...r objects have fallen into the product c If the product has been exposed to rain or water d If the product does not operate normally even if you follow the operating instructions Adjust only those controls that are covered by the operation instructions Improper adjustment of other controls may result in damage and will often require extensive work by a qualified technician to restore the product t...

Страница 5: ...djusting the Exposure Manually 43 Taking Still Pictures Photo Mode 46 Using Digital Effects 47 Using the Built in Video Light 51 Simple Editing to a VCR 52 PAL TV Playback 53 Preparing the Camera 54 Notes on Using the Batteries 56 Video System 59 Optional Accessories 60 Cautions and Maintenance 63 Troubleshooting 67 Screen Displays 70 Specifications 72 Index 73 Introduction Quick Overview Advanced...

Страница 6: ...ssories Getting started To get started we suggest that you master the basic operations of the camcorder first before moving on to use its full range of features For quick reference in addition to the contents and index please refer to Finding Your Way Around the ES8600 p 8 Screen displays p 70 Troubleshooting in case you run into any problems p 67 Note that capital letters are used to refer to set...

Страница 7: ...tely new way to use a video camera FlexiZone Control The built in video light brightens at the touch of a switch Recording in low light or no light has never been easier Video light Digitally compensates for picture jitter during playback resulting in a stable picture Time base corrector A small but powerful battery pack that can be charged at any time Lithium ion power supply An LCD screen makes ...

Страница 8: ...8 Audio Video Output terminal p 24 Video light p 51 C counter RESET button p 71 pause button p 22 FADE button p 37 Microphone stop button p 22 BLC button p 43 play button p 22 D ZOOM button p 17 rewind button p 22 REC SEARCH and record review button p 38 fast forward button p 22 REC SEARCH button p 38 EJECT button p 13 Lens p 63 Cassette compartment p 13 Zoom control p 17 Grip belt p 54 ...

Страница 9: ...p 46 DC IN terminal p 10 Viewfinder p 54 64 Video light switch p 51 S video terminal p 24 Strap attachment bar p 55 FlexiZone controller p 41 44 CHARGE indicator p 11 Tripod socket p 25 BATTERY RELEASE button p 11 Battery pack p 11 12 56 57 Backup battery holder p 58 Manual focus dial p 42 Speaker volume dial p 23 Selector dial p 28 ...

Страница 10: ...ur camera with instant power from an AC outlet 1 Connect the AC cable to the power adapter 2 Connect the power adapter to the camera s DC IN terminal 3 Connect the power adapter to an AC outlet 4 Remove the power adapter after use Always turn the camera off before connecting removing the power source For the power adapter use only Canon CA 550K or CA 550 Do not use other equipment CA 550K Compact ...

Страница 11: ...l it clicks into place 4 Plug the adapter into an AC outlet The charge indicator flashes to show that charging is in progress Single flashes mean that the battery pack is less than 50 charged Double flashes mean that it is between 50 and 75 charged Triple flashes mean that it is more than 75 charged The indicator glows steadily when the battery pack is fully charged 5 When charging is complete dis...

Страница 12: ...n 4 hrs 15 min BP 945 optional 4 hrs 55 min 6 hrs 25 min When the replacement of power supply is required please return it to the responsible nearest Canon Service Center and please replace it with the power adapter CA 550 Charging time BP 911K supplied 3 hrs BP 915 optional 4 hrs BP 930 optional 6 hrs BP 945 optional 8 hrs 30 min Charging and recording times The adapter can be used with a power s...

Страница 13: ...ove the cassette by pulling it straight out 4 Press the P mark on the compartment until it clicks and wait for it to close Never push down the top of the compartment Protecting tapes from accidental erasure REC SAVE ERASE OFF ON ERASE OFF ON REC SAVE To protect your recordings from accidental erasure slide the red switch on the cassette so that it covers the hole This switch position is usually la...

Страница 14: ... itself Do not use cassettes where the tape has been damaged or rejoined they may damage the camcorder Do not insert anything into the small holes on the cassette or cover them with cellophane tape Handle cassettes with care dropping them or exposing them to external shocks may cause internal damage Store cassettes in the provided case rewinding them to the start of the tape first and then storing...

Страница 15: ...r wrong or may cause tape damage To record 1 Turn the program selector to the a position This selects the camera s Automatic recording program It allows you to simply point and shoot without making any manual adjustments 2 Turn the STANDBY lever to STANDBY PAUSE appears in the display the camera is now in record pause mode 3 Press the start stop button to begin recording REC appears in the display...

Страница 16: ...ly For more details please refer to Using the LCD Screen p 19 Notes You cannot monitor the sound from the speaker during recording The LCD screen uses more power than the viewfinder so possible recording time will be less than if you were to use the viewfinder Be sure to close the LCD panel flush to the camera body when you have finished recording with the LCD screen To see a demonstration of the ...

Страница 17: ...ntrol the faster the zoom speed Turning the 800 digital zoom on off Turn the digital zoom on off by pressing the D ZOOM button to magnify the camera s zoom range by more than 22 In addition you can assign CUSTOM KEY 1 to turn the digital zoom on off see p 29 The zoom control continues to work as usual You can freely zoom in and out between 1 and 800 magnification the camera automatically switches ...

Страница 18: ...paringly or in order to reframe between shots When you want to get as close as possible to your subject keep the zoom at the wide angle position You can focus on a subject as close as 0 4 in 1 cm When you turn the digital zoom on 800 appears in the display Image resolution is lower when the magnification is greater than 22 Zoom displays T W T W T W T W T W 800 Zoom in Zoom out Stationary Optical z...

Страница 19: ...nclude yourself in the picture p 21 The viewfinder is also activated when the panel is in this position From this position you may also push the panel flat against the camera until it is flush with the side with the screen facing outwards Changing the angle of the LCD screen 90 90 180 Push the OPEN button and open the panel by pulling it away from the camera This automatically switches the LCD scr...

Страница 20: ...mera or the play menu 1 Open the menu and move the cursor to LCD PICTURE ADJUST 2 Press the SET button to adjust the brightness Press the FlexiZone controller right to make the display brighter Press the FlexiZone controller left to make the display darker 3 Press the MENU button to adjust the color Press the FlexiZone controller right to make the colors more vivid Press the FlexiZone controller l...

Страница 21: ...ed 1 Open the LCD panel p 19 2 Rotate the LCD panel 180 until the screen faces the same direction as the lens The viewfinder is also activated when the LCD is in this position When you turn the LCD panel so that it faces the opposite direction see diagram below you can watch yourself during recording or let your subject monitor recording ...

Страница 22: ...s using a Canon CC 8 Video Head Cleaning Cassette or a commercially available dry type head cleaning cassette Safe cassette operation When you turn the power off or remove the power source be sure to set the camcorder first to record pause stop or still pause mode Turning the power off or removing the power source while the tape is moving during recording play rewind for example will make the coun...

Страница 23: ...hite and the picture may not be visible during high speed search During still playback the picture flickers and fast action scenes may appear blurred The tape counter is reset when a cassette is loaded When you playback a cassette suffered considerable vibration or shaking during recording you may find that the playback picture is not stable depending on the TV you use The camera has a built in sp...

Страница 24: ...r VCR has an S video input terminal S 150 S video Cable C 250 AV Cable Note If you are going to use the TV as a monitor while you are shooting remember to keep the TV volume turned down as long as the camera s audio terminals are connected If the sound from the TV speakers is picked up by the microphone an unpleasant high pitched squeal called feedback may be produced AUDIO IN VIDEO IN Connect the...

Страница 25: ... careful not to leave the viewfinder exposed to bright sunlight or it may melt The light is concentrated by the viewfinder lens Avoid damage by returning the eyepiece to its retracted position Make sure that the fastening screw of the tripod is no longer than 0 24 inch 6 mm or it will damage the camera Composition The most important element in the scene does not have to be in the center For a more...

Страница 26: ...void unnecessary or half hearted movements Picture angle Long shot Medium shot Close up Use pans to record a landscape or following a moving subject Decide the area you want to cover and stand facing the end of your panning angle Without moving your feet turn from the waist to the starting position Start recording and after a few seconds begin to turn slowly from the waist Hold the final image for...

Страница 27: ...stration p 16 Screen 2 q Date set p 33 w Title select p 35 e Custom key set p 29 r LCD picture adjust p 20 MENU CUSTOM KEY INFO ON TV SCREEN ON IMAGE S OFF DATE SELECT DATE TIME DATE DISPLAY OFF TITLE OFF DATE TITLE CLR WHITE PHOTO MODE ON DEMONSTRATION ON i q w e r t y u o i MENU DATE SET TITLE SELECT CUSTOM KEY SET LCD PICTURE ADJUST q w e r Play menu With the program selector set to PLAY press ...

Страница 28: ...he bottom of the screen 1 screen 2 of the menu appears and when the cursor reaches the top of the screen 2 screen 1 appears 3 Press the SET button to turn the function on or off or to change its setting 4 Press the MENU button again to move to screen 2 of the menu camera menu only Make selections in the same way as for screen 1 5 Press the MENU button to close the menu 1 4 5 2 3 ...

Страница 29: ...you want at your fingertips To set the function of the Custom Keys 1 Turn the program selector to camera mode a w b c e or f 2 Open the camera menu to screen 2 and select CUSTOM KEY SET 3 Turn the SELECT dial to move the cursor down until you reach the combination of functions of your choice CUSTOM KEY 1 CUSTOM KEY 2 D ZOOM IMAGE S i D E SELECT D E ON OFF DATE TITLE FADE BLC 4 Press the SET or MEN...

Страница 30: ... Key information the camera may turn itself off automatically before you finish This can be avoided by removing the cassette before you begin You can only operate the digital effects when the CUSTOM KEYS are assigned to the digital effect option The camera remembers the Custom Key settings until you make a new selection Even when the CUSTOM KEY INFO information is turned off the settings are displ...

Страница 31: ...the display The image stabilizer is designed to deal with a normal degree of camera shake it cannot compensate for large movements of the camera Keep the image stabilizer turned off when the camera is mounted on a tripod The image stabilizer is not as effective as usual when the optional wide converter or tele converter is attached You cannot use the image stabilizer simultaneously with the 16 9 f...

Страница 32: ...e power adapter or remove connect the power adapter AUTO 10S Adds the date and time to your recordings for the first 10 seconds of each scene you record The date time display flashes in Record Pause mode OFF The date and time will not be added to your recordings at any time CONT The date and time are recorded continuously If you set the date display to AUTO 10S or CONT but have not yet set the dat...

Страница 33: ...r you set the minutes press the SET or MENU button to start the clock the camera displays the date and time for about 3 seconds and then automatically returns to the camera menu You can use the SET button to return to the camera menu at any stage of setting the clock 4 Press the MENU button to close the menu Notes The display can be set to any year between 2002 and 2050 In addition you can assign ...

Страница 34: ...cting TITLE on the Camera menu and choosing one of the 3 options AUTO 10S Adds the title to your recordings for the first 10 seconds of each scene your record The current title flashes in Record Pause mode OFF The title will not be added to your recordings at any time CONT The title is recorded continuously Notes In addition you can assign CUSTOM KEY 2 to choose whether to add titles to your recor...

Страница 35: ...al the preset titles will be displayed in order one by one 3 Press the SET button to select the preset title and enter the title in the memory The preset title is displayed for 3 seconds before the camera returns to the menu 4 Press the MENU button to close the menu Selecting a preset title HAPPY BIRTHDAY CONGRATULATIONS VACATION HAPPY EASTER MERRY CHRISTMAS HAPPY CHANUKAH THANKSGIVING PARTY TIME ...

Страница 36: ...move connect the power adapter Selecting a color 1 Open the Camera menu to Screen1 and choose the DATE TITLE CLR option The list of display colors appears and current color is shown in parentheses 2 Turn the SELECT dial to select the color you wish Each time you turn the SELECT dial and move the cursor to a color that color name will be displayed the color it represents 3 Press the SET button to r...

Страница 37: ... reappears in the display To make the scene gradually disappear 1 Press and hold the FADE button during recording 2 When the scene has completely disappeared press the start stop button to end recording 3 Release the FADE button Notes In addition you can assign CUSTOM KEY 1 to operate the fade see p 29 Once assigned press the CUSTOM KEY to fade in or out in the same way as detailed above The sound...

Страница 38: ...view When the camera is in record pause mode you can use record search to play the tape forwards or backwards to find the point where you want to start or restart recording This is useful when you want to add a new scene to a previously recorded cassette By using record search you can ensure a smooth join between the new scene and the old one 1 Make sure the camera is in record pause mode 2 Press ...

Страница 39: ......

Страница 40: ......

Страница 41: ...er you can select any object that appears in the display and the camera will bring it into focus Choose the FlexiZone Recording program when you want to use FlexiZone AF 1 Turn the program selector to w The FlexiZone Control frame appears in the display 2 Use the FlexiZone controller to move the frame over the subject The controller can be moved in any direction Press it repeatedly to move the fra...

Страница 42: ...t by the autofocus 3 Turn the SELECT dial downward to move the focus farther away and turn it upward to bring the focus nearer 4 To return to autofocus press the FOCUS button again Notes When you turn the camera off manual focus is canceled If you turn the program selector to w position while using manual focus the focus remains locked You may release it and activate the FlexiZone AF by pressing t...

Страница 43: ......

Страница 44: ......

Страница 45: ... can lock the exposure at the current level 1 Turn the program selector to a Auto Recording program 2 Press the center of the FlexiZone controller in straight The camera locks the exposure at the current level EXP LOCK appears in the display 3 Press the controller in straight again when you want to cancel the exposure lock Exposure lock ...

Страница 46: ... up to 6 seconds as the camcorder records the picture After the photo recording is finished the camera enters record pause mode When the title or date is displayed you can record them during PHOTO recording Notes While the camera records the still you cannot use the camera functions except turning the power off STANDBY lever and ON SCREEN button They do not respond until recording is complete If y...

Страница 47: ...ng The soundtrack is not affected The digital effects marked with asterisks can be used only during camera recording Using Digital Effects Black White Adds a paint like effect called solarization to the image Art Makes a monochrome image with a sepia tint Records a color negative of the image White appears as black yellow appears as blue green appears as red etc Also convert a negative image to an...

Страница 48: ...in the 16 9 format for playback on widescreen TVs If you select the 16 9 format after the image stabilizer has already been turned on the image stabilizer automatically turns off and i flashes and then disappears after 4 seconds Accordingly if the 16 9 format is turned on first the image stabilizer becomes inoperable If you play back a recording made for 16 9 on a normal TV screen the image will a...

Страница 49: ...nd then disappears after 4 seconds Accordingly if Strobe is turned on first the image stabilizer becomes inoperable Strobe Adds increasingly transparent blurs around moving subject giving a ghostly special effect If you select Ghost after the image stabilizer has already been turned on the image stabilizer automatically turns off and i flashes and then disappears after 4 seconds Accordingly if Gho...

Страница 50: ...E ON OFF button to activate the effect The display stops flashing and shines continuously 5 Press CUSTOM KEY 2 to cancel the effect The display starts flashing again You can now select a different effect Notes Choosing EFFECT deselects all digital effects In play mode you can select a digital effect in stop mode or without a cassette loaded however you cannot turn it on until you play the tape Usi...

Страница 51: ...ing time is reduced with continued use of the video light For longer recordings you may prefer to use a power adapter The light becomes hot during use keep it away from plastic or flammable materials and do not touch it Do not knock the light especially during use Do not use the wide converter lens or the tele converter lens with the video light When the bulb has reached the end of its life contac...

Страница 52: ...ra 5 Repeat steps 1 to 4 until your edited recording is complete 1 Connect the camera to the VCR See Connections for Playback on a TV Screen on p 24 2 Prepare the TV and VCR Turn on the TV and set it to the video channel or set the TV VIDEO selector to VIDEO Turn on the VCR and set its input selector to LINE Load a blank cassette and put the VCR in record pause mode See your TV and VCR instruction...

Страница 53: ...ctions for Playback on a TV Screen on p 24 2 Turn the TV on and set it to PAL60 mode See your TV instruction manual for details 3 Open the Playback menu and choose the PAL60 option 4 Turn the SELECT dial to select your setting 5 Press the SET button 6 Press the MENU button to close the menu PAL60 appears on the display during fast forward rewind and stop 7 Press the e play button Notes When a cass...

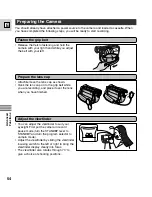
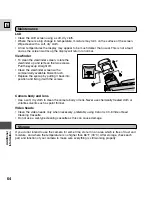
Страница 54: ...nder You can adjust the viewfinder to suit your eyesight First put the camera in record pause mode turn the STANDBY lever to STANDBY and turn the program selector to camera mode Adjust the viewfinder by sliding the viewfinder focusing switch to the left or right to bring the viewfinder display clearly into focus The viewfinder also rotates through 70 to give a choice of shooting positions Prepare ...

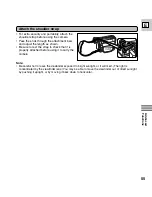
Страница 55: ...just the length as shown Be sure to test the strap to check that it is properly attached before using it to carry the camera Note Be careful not to leave the viewfinder exposed to bright sunlight or it will melt The light is concentrated by the viewfinder lens You may be able to move the viewfinder out of direct sunlight by pushing it upright or by moving it back down to horizontal ...

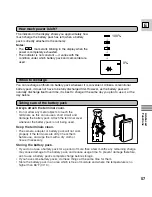
Страница 56: ...it in record pause mode Recording time will be shorter than usual at low temperatures You can use the battery pack between 32 and 104 F 0 to 40 C but it works best between 50 and 86 F 10 to 30 C At locations with extremely low temperatures such as ski resorts a warning display might sometimes appear for about five minutes after starting use If the battery pack starts to give you much less recordin...

Страница 57: ...left 100 0 Always attach the terminal cover Do not allow any metal objects to touch the terminals as this can cause a short circuit and damage the battery pack Attach the terminal cover whenever the battery pack is not being used Keep the terminals clean The camera adapter or battery pack will not work properly if the terminals are dirty Check them before use and wipe them with a dry cloth or tiss...

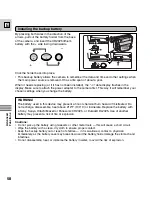
Страница 58: ...metal tools this will cause a short circuit Wipe the battery with a clean dry cloth to ensure proper contact Keep the backup battery out of reach of children if it is swallowed contact a physician immediately as the battery case may break down and the battery fluids damage the stomach and intestines Do not disassemble heat or immerse the battery in water to avoid the risk of explosion Click the ho...

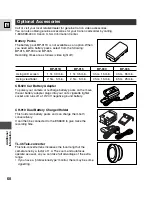
Страница 59: ...arrying Case WD 46 Wide converter FS 46 Filter Set FS 46U Filter Set TL 46 Tele converter SC A20 Soft Carrying Case CB 920 Car Battery Adapter CA 920 Compact Power Adapter CH 910 Dual Battery Charger Holder DC 905 DC Coupler BP 900 Series Battery Pack BP 900 Series Battery Pack CA 550 CA 550K Compact Power Adapter S 150 S video Cable Video System Availability differs from area to area ...

Страница 60: ...s You can also obtain genuine accessories for your Canon camcorder by calling 1 800 828 4040 Canon U S A Information Center CH 910 Dual Battery Charger Holder This holds two battery packs and can charge them both consecutively It can then be connected to the ES8600 to give twice the recording time TL 46 Tele converter This tele converter lens increases the focal length of the camera lens by a fact...

Страница 61: ... 930 BP 945 60 min 120 min 170 min SA 1 Adapter Bracket Attaches a video light or microphone securely to the camera FS 46 Filter Set Three special effects filters to add a creative touch to your recordings multiple image R cross and zoom spot Turn autofocus off when using special effects filters Vignetting occurs when using the multiple image filter at the extreme wide angle position WD 46 Wide co...

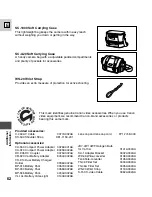
Страница 62: ...O A C C E S S O R Y Provided accessories C 250 AV Cable 3077A002AA SS 500 Shoulder Strap D81 1150 201 Lens cap and lens cap cord DY1 7748 000 Optional accessories CA 550 Compact Power Adapter 3026A001AA CA 920 Compact Power Adapter 8029A002AA DC 905 DC Coupler 3075A002AA CB 920 Car Battery Adapter 8034A002AA CH 910 Dual Battery Charger Holder 3036A002AA BP 915 Battery Pack 3057A002AA BP 930 Batter...

Страница 63: ...e camera close to TV transmitters portable communication devices or other sources of electric or magnetic radiation They may cause picture interference or permanently damage the camera Do not expose the camera to water Cover the camera when you are recording in light rain or mist There is a risk of electric shock if water gets inside the camera contact qualified service personnel as soon as possib...

Страница 64: ... C After storage check each part and function of your camera to make sure everything is still working properly Maintenance Viewfinder To clean the viewfinder screen rotate the viewfinder up and remove the two screws Pull the eyecup straight off Clean the viewfinder screen with a commercially available blower brush Replace the eyecup by putting it back into position and fixing it with the screws 2 ...

Страница 65: ... Wait for hours until the whole video camera dries What happens when condensation is detected If EJECT flashes in the display unload and load the cassette couple of times After this operation if EJECT still continues flashing in the display condensation may have formed What to do Remove the cassette leave the cassette compartment open and turn the power off Leave the camera and cassette in a dry p...

Страница 66: ...as use TV playback Although you can always play back your recordings in the viewfinder your camera can only be connected to TVs which use its NTSC system This TV system is used in the following countries areas American Samoa Bahama Barbados Bermuda Bolivia Canada Chile Colombia Costa Rica Cuba Ecuador El Salvador Guam Guatemala Greenland Haiti Honduras Jamaica Japan Korea Mexico Micronesia Myanmar...

Страница 67: ...The start stop button doesn t work There s no picture in the display You haven t turned the camera on p 15 You haven t loaded a cassette or it is set for erasure prevention p 13 The tape has reached the end The battery pack is exhausted or not properly attached p 11 57 You need to select a different recording program to use that function p 39 You left it in record pause mode for more than about 5 ...

Страница 68: ...ight scenes and low light conditions Subjects not in the center of the display The camera won t focus The camera is on manual focus p 42 The viewfinder lens needs adjusting p 54 The lens is dirty p 64 Some subjects are not suitable for autofocus Note Some subjects are not suitable for autofocus In these situations you will often get better results using manual focus see p 42 Focus on something whi...

Страница 69: ......

Страница 70: ...n and reload the cassette No cassette is loaded or the cassette is set for erasure prevention p 13 The tape is within 5 minutes of the end The tape has reached the end Shows how much battery power remains p 57 The battery pack is nearly exhausted p 11 57 The backup battery is nearly exhausted or not inserted properly p 58 PHOTO MODE is set to OFF in the camera menu when the PHOTO button is pressed...

Страница 71: ...the approximate running time of the tape 1 hour 23 minutes and 45 seconds in this example The tape counter is reset when a cassette is loaded or when you press the C RESET button p 8 Recording reminder When you start recording the camera counts from 0sec to 10sec for PHOTO recording from 0sec to 6sec Shots which are shorter than 10 seconds may be difficult to edit later On the other hand if you ar...

Страница 72: ...y rated 7 2 V DC Power Consumption while recording with the AF turned on 4 1 W LCD screen OFF 5 3 W LCD screen ON Television system EIA standard 525 lines 60 fields NTSC color signal Video recording system 2 rotary heads helical scanning system luminance signal FM azimuth recording chrominance signal converted subcarrier phase shift recording 8mm video standard Audio recording system Frequency mul...

Страница 73: ... Custom Keys 29 Î Date title color 36 Date and Time Display 32 33 Demonstration 16 Digital Effects 47 50 Digital Zoom 17 Editing to a VCR 52 Exposure Programs 39 40 Ï Fade 37 Fast forward Fast Forward Playback 22 Feed back 24 Finding Your Way Around the ES8600 8 9 FlexiZone AE 44 FlexiZone AF 41 FlexiZone Recording 39 Focusing 41 42 Ghost 49 Grip Belt 54 Ó Head Cleaning 64 High Speed Search 23 ˆ I...

Страница 74: ...ord Search 38 Recording 15 16 Recording Programs 39 40 Rewind Rewind Playback 23 Í Sand Snow 40 Screen Displays 70 71 Sepia 47 Shoulder Strap 55 16 9 48 Specifications 72 Sports 40 Spotlight 40 Storage 64 Strobe 49 ˇ Tape Counter 23 71 Telephoto 17 Temperature 56 Time Display 32 33 Titles 34 Tripod 25 Troubleshooting 67 69 Video Cassettes 13 14 Video Light 51 Video System 59 Viewfinder 54 64 Wide ...

Страница 75: ...ANON CANADA INC NATIONAL HEADQUARTERS 6390 Dixie Road Mississauga Ontario L5T 1P7 CANON CANADA INC CALGARY 2828 16th Street N E Calgary Alberta T2E 7K7 CANON CANADA INC MONTREAL 5990 Côte de Liesse Quebec H4T 1V7 If you have any questions call the Canon Canada Information Center toll free at 1 800 828 4040 Canada only Si vous avez des questions veuillez téléphoner sans frais au Canada 1 800 828 40...

Отзывы: