background image

Assignable Buttons and Customizable USER Screen

130

1

This function cannot be assigned to the optional SG-1 Shoulder Style Grip Unit.

2

This function can be used also in playback mode (assignable buttons only).

3

This function opens the monitoring menu or can only be operated from that menu.

4

This function is not available for the USER screen.

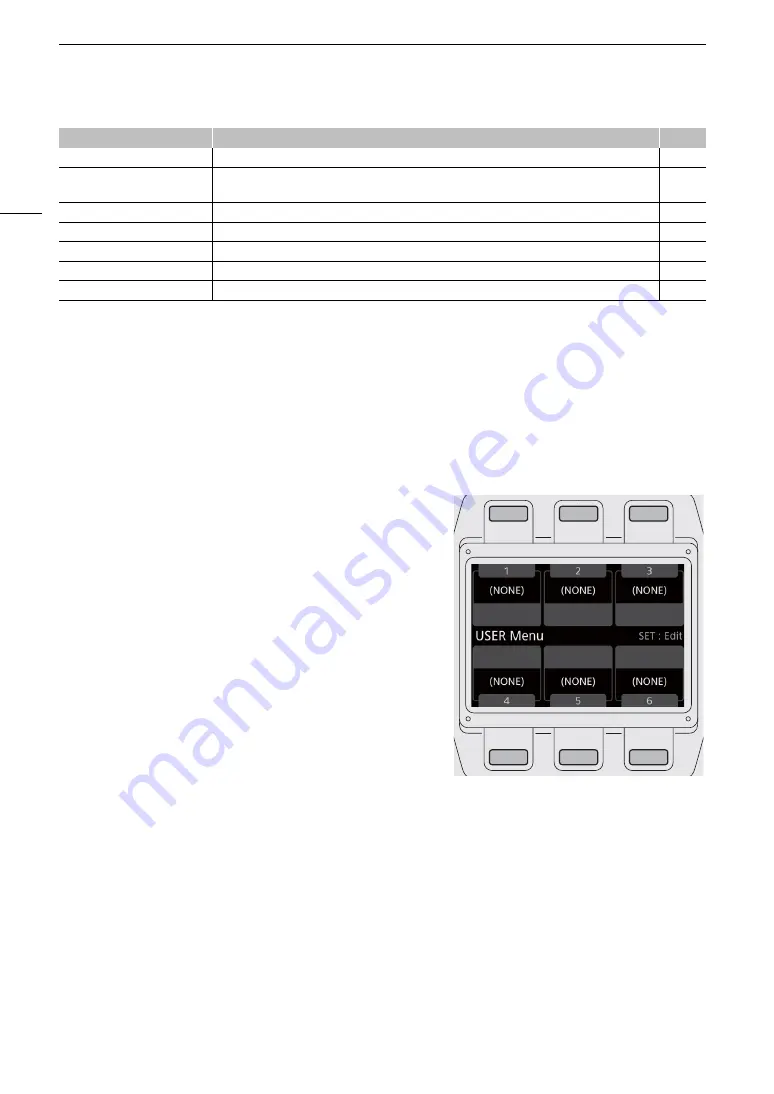
Customizing and Using the USER Screen

In addition to the USER screen that can be used with the camera’s control display, the optional OU-700 Remote 
Operation Unit offers an additional USER screen that can be customized and used separately from that of the 
camera.

1 Press the USER button and then press SET.

• Screen buttons not yet assigned will appear as [(NONE)]. The 

first available screen button position will be highlighted with 
an orange selection frame.

2 Turn the SELECT dial to select the screen button you wish 

to assign or edit and then press SET.

• A list of available functions appears with the current function 

assigned to the screen button highlighted.

• The functions that can be assigned are mostly the same as 

for assignable buttons (

A

128).

3 Select the desired function and then press SET.

• The selected function will be assigned to the selected screen 

button.

4 Whenever necessary, press the USER button to open the 

USER screen and press the desired screen button to use 
the functions you customized.

[Shutter]

3, 4

Enters the direct setting mode with the shutter speed underlined and ready to be adjusted.

75

[ISO/Gain]

3, 4

Enters the direct setting mode with the ISO speed or gain value underlined and ready to be 
adjusted.

77

[White Balance]

3, 4

Enters the direct setting mode with the white balance underlined and ready to be adjusted.

86

[Custom Picture]

3, 4

Opens the monitoring menu’s [Custom Picture] (

/

) submenu.

131

[My Menu]

3

Opens the monitoring menu’s [My Menu] customized submenu.

35

[Initialize Media]

2,


3

Opens the monitoring menu’s [Initialize Media] submenu.

51

[

¥

 User Setting]

3, 4

Customizable slot. Assign to the button any monitoring menu setting you would like to register.

Function name

Description

A

Содержание EOS C700

Страница 1: ...Digital Cinema Camera Instruction Manual PUB DIE 0494 000 ...

Страница 2: ...ld be required to stop operation of the equipment Only for European Union and EEA Norway Iceland and Liechtenstein These symbols indicate that this product is not to be disposed of with your household waste according to the WEEE Directive 2012 19 EU the Battery Directive 2006 66 EC and or national legislation implementing those Directives If a chemical symbol is printed beneath the symbol shown ab...

Страница 3: ...Wi Fi Alliance WPS as used on the camera s settings onscreen displays and in this manual signifies Wi Fi Protected Setup The Wi Fi Protected Setup Identifier Mark is a mark of the Wi Fi Alliance JavaScript is a trademark or registered trademark of Oracle Corporation its affiliates or subsidiaries in the United States and other countries HDMI the HDMI logo and High Definition Multimedia Interface a...

Страница 4: ...ecs H 264 Intra frame and H 264 Long GOP so you can select the video configuration from YCbCr 4 2 2 10 bit RGB 4 4 4 10 or 12 bit or YCbCr 4 2 0 8 bit to suit your creative needs Using Apple s ProRes format you have the choice between the 10 bit ProRes 422 HQ codec and the 12 bit ProRes 4444 codec 4K video RAW recording and output You can use a recorder docked with the camera5 or an external recor...

Страница 5: ... the clips and organize them Cinema RAW Development A 158 can develop the RAW data recorded with an external recorder and export it as a standard file type such as DPX or OpenEXR You can also import an EDL to recreate an edit created on NLE software This helps make a smooth transition to the color grading process Dual Pixel CMOS AF and autofocus functions Z only The camera features Dual Pixel CMOS...

Страница 6: ...lectronic Viewfinder 41 Attaching the Microphone Holder 43 Preparing the Lens 44 In Camera Lens Correction 47 Preparing Recording Media 48 Compatible Recording Media 48 Inserting a CFast Card 49 Removing a CFast card 49 Inserting and Removing an SD Card 50 Initializing Recording Media 51 Switching Between the CFast Card Slots 52 Relay Recording and Double Slot Recording 52 Checking the Remaining R...

Страница 7: ...it 104 Synchronizing with an External Device 105 Connecting an External Device 105 Reference Video Signal Input Genlock Synchronization 106 Time Code Signal Input 106 Reference Video Signal Output 107 Time Code Signal Output 107 Recording Audio 108 Audio Settings and Recorded Audio Channels 108 Connecting an External Microphone or External Audio Input Source to the Camera 109 Setting the Audio Inp...

Страница 8: ...d in a Clip 148 6 External Connections 149 Video Output Configuration 149 Main Recording Video Configuration and Video Output Configuration from the SDI OUT Terminals 149 Main Recording Video Configuration and Video Output Configuration from the MON Terminals and HDMI OUT Terminal 150 Playback Video Configuration and Video Output Configuration by Terminal 151 Connecting to an External Monitor or R...

Страница 9: ... 183 Setup screens 183 Camera Menu and Monitoring Menu 186 Displaying the INFO Screens 198 Troubleshooting 201 List of Messages 206 Handling Precautions and Safety Instructions 211 Maintenance Others 214 Optional Accessories 215 Specifications 217 Appendix Compatible Lenses and Functions 221 Appendix Camera Dimensions 223 Approximate Recording Times 228 Index 229 Software Used in This Product 233 ...

Страница 10: ...10 ...

Страница 11: ...on EOS C700 Photographs in the manual are simulated pictures taken with a still camera Some screenshots have been altered to make them easier to read Illustrations in the manual show the Canon EOS C700 camera with a Canon EF 50mm f 1 4 USM lens attached The following style is used to represent menu selections The first word in the thick bold typeface indicates the button you need to press on the c...

Страница 12: ...ra 3 Used to secure the CDX 36150 Codex Recorder for Canon EOS C700 when it is docked with the camera Battery Adapter for V Mount Batteries1 Handle Unit Microphone Holder Clamp Base Control Display Cover1 Body Cap1 Tape Measure Hooks1 x 2 Extension Unit Attachment Bracket2 Reinforcement Plate for the CDX 36150 Recorder3 including 0 64 cm 1 4 fixation screws x 2 Hex Wrenches x 2 for 0 64 cm 1 4 scr...

Страница 13: ... dial A 77 80 8 CUSTOM customize the control dial s function switch A 77 9 PUSH AUTO IRIS momentary automatic aperture button A 81 10 USER user defined setup screen button A 130 11 ALT alternative setup screen button A 184 12 Screen buttons A 30 13 Control display A 30 14 HOME home setup screen button A 30 183 15 Q button A 28 16 C key lock button A 56 17 MENU camera menu button A 32 18 REC start ...

Страница 14: ...on switches for INPUT 1 top for INPUT 2 bottom A 108 110 12 ANALOG analog audio source selection switches for INPUT 1 top for INPUT 2 bottom A 108 110 13 SD card slot cover switch A 50 14 SD CARD access indicator A 50 15 CFast CFast card slot A and CFast CFast card slot B access indicators A 49 16 CFast card slot cover switches for CFast top for CFast bottom A 49 17 SD card slot cover A 50 18 SD c...

Страница 15: ...mount with Cinema Lock A 44 PL lens mount A 46 1 MIC microphone terminal A 109 2 VIDEO terminal A 41 For connecting the optional EVF V70 OLED Electronic Viewfinder 3 DC OUT 24V 2A power output terminal A 28 4 DC OUT 12V 2A power output terminal A 28 5 CTRL controller terminal A 38 For connecting the optional OU 700 Remote Operation Unit 6 LENS terminal A 44 7 EF S lens mount index A 44 8 EF lens m...

Страница 16: ...lithium button battery A 24 8 Cable clamp 9 TIME CODE IN OUT terminal A 105 106 107 10 GENLOCK terminal A 105 106 SYNC OUT synchronizing signal output terminal A 105 107 11 MON terminals MON 1 top MON 2 bottom A 149 153 12 SDI OUT terminals from top to bottom SDI OUT 1 to SDI OUT 4 A 149 152 13 REMOTE B terminal 14 REMOTE A terminal For connecting the optional RC V100 Remote Controller A 123 or co...

Страница 17: ...top plate and 5 on the bottom plate 4 Screw holes for 1 4 20 mounting screws 10 mm 0 39 in deep Recommended mounting position for the optional OU 700 Remote Operation Unit 5 Socket for the extension unit attachment bracket A 120 160 6 Battery adapter release switch A 23 24 7 Battery adapter s fixation screws 2 on the top plate 2 on the bottom plate M4 A 23 24 8 Battery adapter for V mount batterie...

Страница 18: ...ocket head fixation bolts 0 64 cm 1 4 2 in total 5 Through holes for fixation bolts 1 1 2 3 2 1 2 One more in the same location on the opposite side 1 Screw holes for 1 4 20 mounting screws 10 mm 0 39 in deep 9 in total 2 Screw holes for 3 8 16 mounting screws 12 mm 0 47 in deep 8 in total 3 Hex socket head fixation bolts 0 64 cm 1 4 4 in total ...

Страница 19: ...19 Names of Parts Clamp Base A 41 1 2 3 1 Slider for an optional viewfinder s clamp rail 2 Clamp rail locking screw 3 Hex socket head fixation bolts 0 64 cm 1 4 4 in total ...

Страница 20: ... sensor A 42 6 Eyecup 7 Dioptric adjustment ring A 42 8 MAGN magnification button A 92 Assignable button EVF 3 A 127 9 FALSE COLOR button A 100 Assignable button EVF 4 A 127 10 Swing arm locking screw A 41 11 Swing arm 12 VIDEO terminal A 42 13 Screw hole for 1 4 20 mounting screws 25 mm 0 98 in deep 14 SELECT dial SET button A 32 15 Joystick A 32 SET button A 32 16 Swing arm slider A 41 17 18 19 ...

Страница 21: ... data Using the Canon RAW Plugin you can work with RAW recordings directly from supported NLE applications You can also generate proxy data with the software YCbCr 4 2 2 clips recorded on the CFast card can be treated as full quality data without any additional processing Transfer the 2K clips recorded in the camera or proxy data generated by the software to your NLE system and edit offline A 158 ...

Страница 22: ...r space Output Transform Refers to the table used for mapping ACES2065 1 color space information to the specific color information scheme used by the display device ASC CDL Refers to the list that contains color grading adjustment data This step requires equipment compatible with ASC CDL Extension module connector docking CDX 36150 Recorder Cinema RAW Development Color grading Post production On s...

Страница 23: ...teries attached Removing an Extension Module The following procedure is explained using the battery adapter for V mount batteries supplied with the camera as example 1 Use the supplied hex wrench to remove the four fixation screws from the top and bottom of the battery adapter 2 Slide the battery adapter release switch in the direction of the arrow The locking lever will pop out 3 Pull the locking...

Страница 24: ...onth Replacing the lithium button battery in such case will reset all the camera s settings to default values To avoid losing the settings you can save them on an SD card in advance A 140 To recharge the built in backup battery turn off the camera and connect a sufficiently charged power source battery or DC IN 12V terminal The built in backup battery will be fully charged in about 24 hours Instal...

Страница 25: ...Preparing the Backup Battery 4 Push down the locking lever until it clicks 5 Using the supplied hex wrench attach the four fixation screws to the top and bottom of the battery adapter to secure it in place ...

Страница 26: ...rding the use and maintenance of power sources Using a Battery The battery adapter for V mount batteries comes attached to the camera If it was removed attach the battery adapter in advance A 24 Attaching a Battery 1 Make sure the camera is turned off 2 Align the V shaped wedge on the battery to the V mount on the battery plate 3 Gently press the battery down until it clicks in place Removing a Ba...

Страница 27: ...ltage level of the power source used on the camera s HOME screen and on the shooting screen that appears on monitoring devices A 57 59 You can use the System Setup Low Power Warning settings to set a critical power level independently for the DC IN 12V terminal and battery When the power input to the camera reaches the predetermined level the onscreen power indicator will change to red and a messa...

Страница 28: ...mera On and Off After connecting an appropriate power source to the camera press the Q button to turn on the camera While the camera is starting up the tally lamp will illuminate in red When the camera is ready to start recording the tally lamp will change to green and the HOME screen will be displayed on the camera s control display To turn off the camera press and hold the Q button After the cou...

Страница 29: ... screen NOTES With the System Setup Set Clock settings you can change the time zone date and time also after the initial setup You can also change the date format If the lithium button battery and built in backup battery are both completely depleted all menu settings will be lost In such case replace the lithium button battery A 23 and perform the initial setup again Using the optional GP E1 GPS R...

Страница 30: ...uttons each opens a different setup screen where you can change settings or perform actions A 183 Options HOME screen This screen is displayed by default when you turn on the camera In this screen you can change the frame rate aperture and ND filter settings shutter speed ISO speed gain custom picture settings and white balance You can also check the status of the camera clip name recording format...

Страница 31: ...s brightness from the HOME screen by turning the SELECT dial while holding the BACK button pressed down NOTES If necessary you can remove the control display s protective cover inserting a fingernail or other thin object under the bottom center of the cover and pulling it After cleaning the control display place back the protective cover on the control display and push all four corners to secure i...

Страница 32: ...le the instruction below stands for the procedure following it System Setup Firmware 1 Press the MENU button 2 Turn the SELECT dial to select the desired submenu in the example System Setup and then press SET The orange selection frame will appear on a menu item in the submenu If a submenu contains many menu items a scroll bar will appear on the right side of the submenu indicating that you must s...

Страница 33: ...dial Turn to move the orange selection frame between menu settings options Joystick Push the joystick to move the orange selection frame between menu settings options On the RC V100 press the Up Down Left Right buttons instead Press the joystick itself to confirm the selected menu setting option SET button Confirm the selected menu setting option In the manual Press SET includes also pressing the ...

Страница 34: ...button to return to the previous submenu 6 Push the joystick up down or turn the SELECT dial to select the desired setting option and then press SET Depending on the menu item additional selections may be necessary 7 Press the EVF button twice optional viewfinder only or the MENU button once RC V100 only to close the menu Only once when the EVF V70 submenu is being displayed NOTES Unavailable item...

Страница 35: ...button to cancel the operation and return to the regular menu 2 Navigate the menus to find the menu setting you want to add and then press SET 3 Camera menu Press OK Monitoring menu Select OK and then press SET The menu setting you registered will now appear under the currently selected My Menu set 4 When the confirmation screen appears press OK camera menu or press SET monitoring menu Rearranging...

Страница 36: ...ect OK and then press SET 3 When the confirmation screen appears press OK camera menu or press SET monitoring menu Renaming the Selected My Menu Set You can give each of the My Menu sets a more descriptive name to make them easier to identify 1 Open the My Menu Rename screen My Menu Edit Rename In the monitoring menu the icon and submenu name will reflect the My Menu set currently selected By defa...

Страница 37: ...menu to confirm the text value entered Press the BACK button to return to the previous screen without changing the current text Short text numbers version For short text fields and numeric values a shorter version of the keyboard may appear 1 Turn the SELECT dial camera menu or push the joystick up down monitoring menu to select the first character or digit and press SET to move to the next 2 Chan...

Страница 38: ...peration You can attach the optional OU 700 Remote Operation Unit to the right side of the camera to allow one person to use the camera menu while another uses the optional EVF V70 OLED Electronic Viewfinder Supplied accessory Requires the removal of the supplied battery adapter for V mount batteries Clamp rail EVF V70 OLED Electronic Viewfinder Microphone holder Clamp base Handle unit WFT E6 or W...

Страница 39: ... and connect the 12 pin interface cable to the camera s LENS terminal to be able to start stop recording operate the zoom and aperture access the monitoring menu and more directly from the grip unit For details about docking the CDX 36150 Recorder with the camera and using it to record refer to Codex Recorder Guide for the EOS C700 models separate PDF file Clamp base Clamp rail Microphone holder H...

Страница 40: ...ORTANT Do not use tripods with mounting screws exceeding the depth of the screw holes on the camera as this may damage the camera Checking that the Camera is Horizontal You can use the camera s electronic level to make sure the shooting plane is truly horizontal On the control display you can check the camera s tilt the degree of rotation of the optical axis up and down and roll the degree of rota...

Страница 41: ...en the swing arm s locking screw clamp rail side 3 Remove the clamp rail s end cap 4 Insert the swing arm s slider into the clamp rail with the TOP label facing up 5 Attach the end cap to the clamp rail 6 Attach the supplied clamp base to the desired position on top of the camera and loosen the clamp rail locking screw Use the supplied hex wrench to secure it firmly with the 4 hex socket head bolt...

Страница 42: ... image is sharp 4 Press the EVF button on the optional viewfinder The monitoring menu will open with the EVF V70 submenu selected Alternatively you can press an assignable button set to EVF V70 Setup A 127 5 Select Brightness Contrast Color Sharpness or Luminance and then press SET 6 Select the desired level and then press SET Repeat steps 5 and 6 to adjust other settings as necessary NOTES The op...

Страница 43: ...e end of the rail Pull out the locking pin at the other side of the clamp rail to be able to take the slider completely out of the rail 5 Attach the end cap to the clamp rail 6 If you wish to remove the clamp rail from the optional viewfinder repeat steps 3 to 5 with the clamp rail s arm attached to the viewfinder In that case loosen the swing arm s locking screw clamp rail side Attaching the Micr...

Страница 44: ...Q button to turn off the camera 2 Turn the mount handle clockwise until it stops 3 Remove the body cap from the camera and any dust caps from the lens 4 Check that the mount handle is at the correct position for attaching a lens 5 Align the lens and mount making sure that the index marks are aligned EF lenses Align the red dot on the lens with the red EF lens mount index mark on the camera EF S le...

Страница 45: ...ith this camera you may notice peripheral illumination fall off or vignetting When using a compatible lens you can use the System Setup Retract Lens setting to retract the lens automatically when the camera s power is turned off Z Updating the Firmware of an EF Lens You can update the lens firmware of the EF lens attached to the camera For details about firmware updates for EF lenses visit your lo...

Страница 46: ...a 12 pin camera interface cable 5 Connect the lens s 12 pin cable to the camera s LENS terminal This allows the camera to power the lens s drive unit 6 Press the Q button to turn on the camera 7 If necessary change the lens s settings to allow control from the camera For details refer to the instruction manual of the lens used NOTES When a B4 lens is attached to the camera using the optional MO 4E...

Страница 47: ...t your local Canon Web site and check if there is correction data available for the lens you are using If so download the necessary update package and upgrade the camera s firmware following the instructions supplied therein 3 Select On and then press SET As long as Periph Illum Corr or Chrom Aberr Corr is set to On the camera will automatically apply the appropriate correction data NOTES About in...

Страница 48: ...a transfer rate of SD cards IMPORTANT CFast cards can become hot due to the high operating temperature inside the camera Removing a CFast card immediately after using it for recording may cause burns or cause you to drop the CFast card resulting in damage to the card After repeatedly recording deleting and editing clips if the memory is fragmented you may notice slower writing speeds to the record...

Страница 49: ...CFast card 1 To remove the CFast card currently selected wait until the CFast card access indicator is illuminated in green A CFast card not currently selected CFast card access indicator is off can be removed at any time 2 Slide the CFast card slot cover switch in the direction of the arrow The CFast card slot cover will open upward slot A or downward slot B The card access indicator will illumin...

Страница 50: ...ess indicator If you set System Setup LED Media Access to Off the card access indicators will not illuminate IMPORTANT Observe the following precautions while the SD card access indicator is illuminated in red Failure to do so may result in permanent data loss Do not remove the power source or turn off the camera Do not remove the SD card SD cards have front and back sides that are not interchange...

Страница 51: ... initialization and then press SET 4 Camera menu Press both FORMAT buttons simultaneously Monitoring menu Select OK and then press SET The SD card is initialized and all the data it contains is erased If you are using the Complete initialization option press CANCEL camera menu or press SET monitoring menu to cancel the operation while it is in progress You can use the SD card but all data will be ...

Страница 52: ...y Double slot recording This function records the same clip simultaneously to both CFast cards which is a convenient way to make a backup copy of your recording while you record Relay recording When the main recording format is set to XF AVC CFast this function allows you to continue recording on another CFast card without interruption if the CFast card you are using becomes full Relay recording i...

Страница 53: ...following procedure 1 Press the PLAY button and select the recording media that contains the clip that needs to be recovered A 142 Select CFast XF AVC CFast ProRes or SD Card XF AVC as the playback media format In the case of a CFast card select the correct CFast card slot 2 Press CLIP LIST to open the list of clips 3 Turn the SELECT dial to find the clip that needs to be recovered and then press ...

Страница 54: ...alance procedure will start It will take approximately 40 seconds During the procedure the monitoring screen will turn black 4 When the confirmation message appears press OK If the sensor is not completely shielded from light Error will appear on the control display Press OK and repeat the procedure from the beginning NOTES Adjusting the black balance is necessary in the following cases When using...

Страница 55: ...a card inserted will illuminate momentarily in red Then the access indicator of the CFast card slot selected for recording will change to green 2 Press the REC button to begin recording Recording starts The recording indicator on the HOME screen and at the bottom of the monitoring screen changes from STBY to Ü REC While recording on a CFast card the tally lamp will illuminate in red You can also p...

Страница 56: ... a sound when you start stop recording If you set an assignable button to Add Mark or Add Mark A 127 you can press the button to add an mark or mark to the last XF AVC clip recorded When you use a commercially available lens adapter and the image on the screen is inverted you can use the System Setup Scan Reverse Rec Setting setting to return the image to the correct orientation Key lock Locking t...

Страница 57: ...00 00Hz Shutter speed A 74 000000 00 0 dB ISO speed Gain A 76 Canon Log 3 Canon Log 2 Canon Log Wide DR Normal 1 to Normal 4 Gamma setting in the custom picture file A 134 C Gamut BT 2020 DCI P3 BT 709 Color Space setting in the custom picture file A 134 0000 0 White balance A 86 Icon Display Description TC 00 00 00 00 TC 00 00 00 00 Time code A 101 Depending on the operation a letter may appear a...

Страница 58: ...miter A 111 REEL A000 Camera index reel number A 62 CLIP C000 Clip number A 62 DC IN 00 0V BATT 00 0V 000 Power supply voltage DC IN and battery A 26 in red low power warning The power source currently in use is indicated with a Ð mark The percentage is displayed only when using a battery compatible with BMS battery management system C Key lock A 56 b Temperature warning A 63 in yellow The INFO ic...

Страница 59: ...t required The menu item that controls each display is given in the following table 1 indicates a menu item under Custom Display 1 and 2 indicates a menu item under Custom Display 2 Z AF frames Depending on the focus function used you may see some of the following AF frames Continuous AF frame always in white A 93 AF Boosted MF frame in yellow manual adjustment range in white automatic adjustment ...

Страница 60: ...etering mode A 82 1 Light Metering b Temperature warning A 63 2 Temperature Fan Fan operation A 63 i in red Lens error warning A 202 1 Lens in red Lithium button battery not inserted A 24 2 DC IN Battery A viewing LUT has been applied to at least one video output A 154 The icon will appear on all active display devices regardless of the video output to which the LUT was applied 1 LUT Icon Display ...

Страница 61: ...ter A 111 2 Audio Lvl Indicator Audio level meter and monitor channels A 111 157 Icon Display Description Custom Display 4 Double slot recording A 52 2 Recording Mode Camera level A 40 2 Level Headphone volume A 143 Recording media status and estimated remaining recording time 2 Remaining Rec Time 8 and 0000 min Recording media status in green can record in white reading the recording media in yel...

Страница 62: ... file name To set the camera index 1 Open the Camera Index screen Rec Media Setup 3 Metadata Camera Index 2 Turn the SELECT dial to select the desired camera index 3 Press OK camera menu or press SET twice monitoring menu A 0 0 1 C 0 0 1 _ y y m m d d X X _ C A N O N _ 0 1 P 1 2 3 4 6 7 5 1 Camera index One character A to Z that identifies the camera used 2 Reel number 3 characters 001 to 999 that...

Страница 63: ...mode you can select independently the fan speed used while recording and in record standby mode 1 Open the fan s Mode submenu System Setup B Fan Mode 2 Select the desired option and then press SET If you selected Automatic 3 To set the fan speed to be used while recording select Fan Speed REC and then press SET 4 Select the desired fan speed and then press SET Repeat steps 3 and 4 selecting Fan Sp...

Страница 64: ... Setup B Fan Speed 3 Select the desired fan speed and then press SET IMPORTANT While the fan is running the exhaust vent will emit warm air Be careful not to obstruct in any way the fan s air vents A 14 NOTES NOTES Depending on the ambient temperature and other shooting conditions the fan may not turn off even if you set its operating mode to Automatic ...

Страница 65: ... using an external recorder connected to one of the SDI OUT terminals refer to Video Output Configuration A 149 Selecting the Main Recording Format 1 Open the Main Rec Format submenu Rec Media Setup 3 Main Rec Format Alternatively using the HOME screen S F FPS OPTIONS Main Rec Format 2 Select XF AVC CFast or ProRes CFast and then press SET Selecting the System Frequency 1 Open the System Frequency...

Страница 66: ...mpling Bit rate and compression1 System frequency Frame rate 59 94 Hz 59 94P 59 94i2 29 97P 23 98P 4096x2160 3840x2160 YCbCr 4 2 2 10 bit 810 Mbps Intra frame Ü 410 Mbps Intra frame Ü Ü 2048x1080 1920x1080 RGB 4 4 4 12 bit 440 Mbps Intra frame Ü 225 Mbps Intra frame Ü Ü RGB 4 4 4 10 bit 410 Mbps Intra frame Ü 210 Mbps Intra frame Ü Ü YCbCr 4 2 2 10 bit 310 Mbps Intra frame Ü 160 Mbps Intra frame Ü...

Страница 67: ...used to record XF AVC clips using different system frequencies For details on the signal output from each terminal refer to Video Output Configuration A 149 While IP streaming is activated the video configuration main recording format system frequency frame rate resolution color sampling cannot be changed Resolution codec3 and color sampling System frequency Frame rate 59 94 Hz 50 00 Hz 24 00 Hz 5...

Страница 68: ... 1 00 2 00 3 00 5 99 14 99 29 97 31 97 35 96 39 96 43 96 47 95 51 95 55 94 59 94 89 91 119 88 1080 cropped 2 4 1 00 2 00 3 00 5 99 14 99 29 97 31 97 35 96 39 96 43 96 47 95 51 95 55 94 59 94 89 91 119 88 149 85 179 82 209 79 239 76 24 00P 21605 YCbCr 4 2 2 10 bit 1 00 2 00 3 00 6 00 12 00 24 00 26 00 28 00 30 00 32 00 36 00 40 00 44 00 48 00 52 00 56 00 60 00 1080 RGB 4 4 4 10 bit RGB 4 4 4 12 bit...

Страница 69: ...roRes 422 HQ 1 00 2 00 3 00 5 99 14 99 29 97 31 97 35 96 39 96 43 96 47 95 51 95 55 94 59 94 1080 cropped 7 ProRes 422 1 00 2 00 3 00 5 99 14 99 29 97 31 97 35 96 39 96 43 96 47 95 51 95 55 94 59 94 89 91 119 88 149 85 179 82 24 00P 2160 ProRes 422 HQ 1 00 2 00 3 00 6 00 12 00 24 00 26 00 28 00 30 00 1080 ProRes 4444 ProRes 422 HQ 1 00 2 00 3 00 6 00 12 00 24 00 26 00 28 00 30 00 32 00 36 00 40 00...

Страница 70: ... monitoring screen 4 Press the REC button to begin recording The tally lamp illuminates in red and S F STBY changes to Ü S F REC while recording The clip is recorded at the selected frame rate 5 Press the REC button again to stop recording The tally lamp will change back to green and the recording operation indication will change back to S F STBY 6 When you have finished recording turn off the slo...

Страница 71: ...c XF AVC Resolution Sampling setting for XF AVC clips on the CFast card 1 Open the sub recording Recording Media submenu Rec Media Setup 3 Sub Rec XF AVC Recording Media 2 Select CFast XF AVC clips or SD Card XF AVC Proxy clips and then press set CFast is only available when the main recording format is set to one of the RAW options For XF AVC sub recordings CFast only 3 To change the resolution o...

Страница 72: ...ecording on one CFast card to the other main recording the recording of the XF AVC Proxy clip on the SD card sub recording will be interrupted as well and continue as a separate XF AVC Proxy clip When an SDHC card is used to record XF AVC Proxy clips the video stream file in an XF AVC Proxy clip will be split approximately every 4 GB for clips with long recording times Still playback on the camera...

Страница 73: ... is activated Using the Direct Setting Mode 1 Press the FUNC button on the optional viewfinder or an assignable button set to FUNC A 127 On the monitoring screen the icon or onscreen display of the function selected to be adjusted will be highlighted with an orange underline Press the FUNC button assignable button repeatedly or push the joystick left right to select the function you wish to adjust...

Страница 74: ...e during slow fast motion recording Off The camera uses a standard shutter speed based on the frame rate Available shutter speeds The available shutter speeds vary depending on the system frequency and frame rate used 1 When slow fast motion recording is activated available values will vary depending on the selected shooting frame rate 2 Not available when slow fast motion recording is activated S...

Страница 75: ... soft or out of focus To avoid the loss of sharpness due to diffraction use a faster shutter speed a denser ND filter A 78 or open up the aperture Z When the frame rate is set to 59 94i 59 94P 50 00i or 50 00P if the shutter speed mode is set to Off and slow fast motion is not activated you can use the Camera Setup Flash Band Corr setting to have the camera detect partial flash banding on consecut...

Страница 76: ...60 200 400 800 1600 3200 6400 12800 25600 100 51200 102400 1 3 stop 1 3 stop increments 160 200 250 320 400 500 640 800 1000 1250 1600 2000 2500 3200 4000 5000 6400 8000 10000 12800 16000 20000 25600 100 125 32000 40000 51200 64000 80000 102400 Gain Normal 3 dB increments 2 dB 0 dB to 42 dB 6 dB 3 dB 45 dB to 54 dB Fine 0 5 dB increments 2 dB to 42 dB 42 5 dB to 54 dB ISO Gain increment Normal ran...

Страница 77: ...to it You can set in advance the functions that are assigned to each position of the CUSTOM switch 1 Open the CUSTOM Switch submenu System Setup B CUSTOM Switch 2 Select 1 or 2 depending on the switch position to which you want to assign the ISO speed gain function and then press SET 1 is the top position initially assigned to the aperture function 2 is the bottom position initially unassigned 3 S...

Страница 78: ...h the settings in reverse order The selected ND filter setting appears on the HOME screen and at the top of the monitoring screen Only when IRIS OPTIONS Extended ND Range is set to On NOTES NOTES Depending on the scene the color may change when turning the ND filter on off Setting a custom white balance A 87 may be effective in such case About the extended ND range When you switch to or from a den...

Страница 79: ... menu or remotely using Browser Remote on a connected network device A 166 172 Push auto iris Momentary automatic aperture During manual aperture press an assignable button or use Browser Remote A 166 172 to temporarily adjust the aperture automatically Automatic aperture The camera adjusts the aperture automatically Required settings on EF Cinema lenses and broadcast lenses To adjust the aperture...

Страница 80: ...rture value appears on the control display marked with an orange selection frame 6 Turn the SELECT dial to select the desired value and then press SET Alternatively you can press an assignable button set to Iris or Iris A 127 The selected aperture value appears on the HOME screen and at the top of the monitoring screen To use the control dial 5 Close the menu and set the CUSTOM switch to the top p...

Страница 81: ...enable automatic adjustment on the lens A 79 2 Press and hold the PUSH AUTO IRIS button Alternatively using the HOME screen IRIS AUTO IRIS The camera will automatically adjust the aperture to obtain optimal exposure As long as you hold the button pressed down E will appear on the monitoring screen next to the aperture value When you release the button automatic aperture mode will end and the E ico...

Страница 82: ...el and then press SET Alternatively you can press an assignable button set to AE Shift or AE Shift A 127 You can select one of 17 AE shift levels from 2 0 to 2 0 The selected AE shift level will be displayed on the monitoring screen next to the exposure bar and the camera will attempt to adjust the exposure accordingly Light Metering Mode Select the light metering mode to match the recording condi...

Страница 83: ...acklit scenes Standard Averages the light metered from the entire screen giving more weight to the subject in the center Spotlight Use this option when recording a scene in which only a certain part of the picture is lit for example when the subject is lit by a spotlight ...

Страница 84: ... an external monitor screen There are also other LUTs available that can be applied for processing in post production For the latest information on available LUTs please visit your local Canon Web site Preset Gamma Color Space Color Matrix Characteristics Canon Log 3 C Gamut Canon Log 3 Cinema Gamut Neutral These settings use Canon Log 3 gamma and presume a workflow that includes post production p...

Страница 85: ...CP MAIN Preset Monitoring menu Press the BACK button to return to the Custom Picture submenu and then select Preset 4 Select the desired setting and then press SET To select the gamma curve color space or color matrix individually select Off and continue the procedure with step 5 To use one of the preset settings as is the rest of the procedure is not necessary 5 Open the Gamma submenu HOME screen...

Страница 86: ...ong the green magenta gradation NOTES NOTES The Color Matrix Tuning and White Balance settings in the custom picture file A 137 take precedence over the white balance set with these procedures You can use the WB OPTIONS Shockless WB setting to make the transition look smoother when you change the white balance settings When an optional RC V100 Remote Controller is connected to the camera you can a...

Страница 87: ...ss WB SET 3 Point the camera at a gray card or white object so that it fills the center of the monitoring screen Use the same lighting conditions you plan to use when recording 4 Press OK HOME screen or press an assignable button set to Set White Balance A 127 monitoring screen direct setting mode The Å icon will flash on the control display The ÅA or ÅB icon will flash quickly at the top of the m...

Страница 88: ...olor temperature and CC value to their default settings 4 After adjusting the white balance settings as necessary press OK The selected color temperature and CC value will appear on the HOME screen and at the top of the monitoring screen next to the white balance icon Adjustment ranges NOTES NOTES If after registering a custom white balance the color temperature and CC value appear in gray you wil...

Страница 89: ...using it and tracks the subject if it moves Z only Not available when a manual focus lens is attached to the camera Focusing methods and required settings 1 For the necessary settings on compatible EF Cinema lenses and broadcast lenses see the table below 2 AF OPTIONS AF Mode setting 3 Depending on the lens the focus ring may be disabled when the focus mode switch is set to AF 4 You can activate t...

Страница 90: ...ra you can adjust the focus with the remote controller s FOCUS dial At default settings turn the dial right to focus farther and left to focus nearer To be able to adjust the focus using an accessory connected to a lens itself connected to the camera using the 12 pin interface cable you will need to change the Camera Setup Focus Control setting to give priority to the lens Using the Focus Assistan...

Страница 91: ...ible EF Cinema lenses A 221 When Camera Setup Mount Adapter is set to MO 4E When the focus guide and face detection functions are used together the focus guide may not focus the main subject s eyes correctly depending on the direction in which the face is turned Peaking The camera offers two peaking levels 1 Press the PEAKING button Alternatively you can press F ASSIST PEAKING to turn peaking on a...

Страница 92: ...ls independently of each other You can select individually through which terminals to output on which monitoring devices to display the assistance functions with the output settings under F ASSIST OPTIONS Peaking and Magnification When the HDMI OUT terminal s resolution is set to 4096x2160 or 3840x2160 the assistance functions will not be displayed on the monitor connected to the HDMI OUT terminal...

Страница 93: ...e camera cannot evaluate how to adjust the focus it will not perform unreliable focus adjustments This results in an overall smoother focusing operation than with continuous AF 1 Set the focus mode switch on the lens to AF On a compatible EF Cinema broadcast lens enable automatic adjustment on the lens A 89 will appear on the left of the monitoring screen 2 Open the focus AF Mode submenu Setup scr...

Страница 94: ... to set the AF speed the speed at which the focus is adjusted to one of 10 levels AF OPTIONS AF Speed Limit to select whether the selected AF speed is applied at all times or only while recording AF OPTIONS AF Response to set the responsiveness of the autofocus function to one of 7 levels While using continuous AF you can hold the ONE SHOT AF button pressed down to temporarily adjust the focus usi...

Страница 95: ... size and position of the AF frame that appears on the monitoring screen while using one of the autofocus functions The size and position of face detection frames and tracking frames will change automatically as the subject moves and its relative size changes within the frame 1 Open the AF Frame Position submenu Setup screen AF OPTIONS AF Frame Position Monitoring menu Camera Setup v Focus AF Fram...

Страница 96: ... have a face detection frame with small arrows Þ on the sides will appear in white when a face is detected and in gray when a face is not detected During continuous AF the camera will keep focusing on the main subject s face During one shot AF the camera will focus on the main subject s face while you hold the ONE SHOT AF button pressed down If you use face detection together with the tracking fun...

Страница 97: ...button to end the tracking function s standby mode 2 Place the center of the I mark on the subject you wish to track Setup screen Press Í Î Ï Ð Monitoring menu Use the joystick on the optional viewfinder Press CENTER setup screen or press the BACK button on the optional viewfinder to return the I mark to the center position 3 Press START setup screen or press SET on the optional viewfinder to star...

Страница 98: ...stead to not display the onscreen markers on the respective video outputs 3 Select a marker you wish to display select the desired marker color and then press SET Select Off to turn off the selected marker You can display multiple markers simultaneously Repeat this step as necessary If you selected Safe Area or Aspect Marker select the desired safe area or aspect ratio with the following procedure...

Страница 99: ...ect Ratio is set to Custom and Custom Ratio is set to 1 90 1 Displaying Zebra Patterns The camera has a zebra pattern function that shows black and white diagonal stripes over areas that are overexposed There are two types of zebra patterns and you can display both simultaneously Zebra 1 lets you identify areas within a certain range 5 of a specified level from 5 to 95 while zebra 2 lets you ident...

Страница 100: ...ve monitoring devices Alternatively you can press an assignable button set to False Color VIDEO optional viewfinder only False Color MON HDMI external monitors only False Color MON 1 False Color MON 2 False Color HDMI individual monitors or False Color all monitoring devices at once A 127 NOTES NOTES You can use the Assist Functions False Color Color Index setting to display an index of the colors...

Страница 101: ...t initial time code is 00 00 00 00 See the following procedures to select the time code running mode and set the initial time code Regen The camera will read the selected recording media and the time code will continue from the last time code recorded on the recording media The time code runs only while recording so clips recorded consecutively on the same recording media will have continuous time...

Страница 102: ... time code display will differ depending on the setting When you select DF the time code will appear as 00 00 00 00 when you select NDF it will appear as 00 00 00 00 Putting the Time Code Display on Hold If you set an assignable button to Time Code Hold A 127 you can press the button to freeze the display of the time code While the time code display is put on hold H will appear next to the time co...

Страница 103: ...rame and non drop frame time codes there might be a discontinuity in the time code at the point where the recording starts When you are using the Free Run running mode the time code will continue running as long as the lithium button battery has some charge left even if you disconnect all other power sources If you set an assignable button to Time Code A 127 you can press the button to open the Ti...

Страница 104: ... with XF AVC clips A 106 1 Open the user bit setting screen Setup screen UB SET UB Monitoring menu System Setup B User Bit Type Setting Set To reset the user bit to 00 00 00 00 select Reset instead The user bit setting screen appears with an orange selection frame on the leftmost character 2 Set the desired user bit using the keyboard screen A 37 Setup screen only Press RESET to reset the user bit...

Страница 105: ...he SDI OUT terminals or MON terminals to an editing device the editor can create video with the same time code Connecting an External Device When synchronizing the camera using a reference video signal use the GENLOCK SYNC OUT terminal When synchronizing a time code signal use the TIME CODE terminal Be sure to set either terminal to input or output in advance Connect the external device to the cam...

Страница 106: ...se the recorded time code may be incorrect Time Code Signal Input An external SMPTE standard LTC timing signal received from the TIME CODE IN OUT terminal can be recorded as the time code The user bit of the external timing signal can also be recorded with clips Before connecting the device set the TIME CODE IN OUT terminal to input with the procedure below and make sure the time code running mode...

Страница 107: ...K SYNC OUT Terminal Function 2 Select HD Sync Output and then press SET If necessary change the scan mode P or PsF with the SYNC Scan Mode setting in the same submenu Synchronization signals When slow fast motion recording is activated the signal output will change depending on the system frequency used 1080 59 94i 59 94 Hz 1080 50 00i 50 00 Hz or 1080 60 00i 24 00 Hz When slow fast motion recordi...

Страница 108: ...l AES EBU INPUT 1 terminal digital audio MIC terminal L MIC terminal R INPUT Terminals INPUT Terminals AES EBU AES EBU INPUT 1 terminal digital audio INPUT 2 terminal digital audio INPUT Terminals INPUT Terminals AES EBU ANALOG INPUT 1 terminal digital audio INPUT 2 terminal INPUT Terminals Monaural Mic AES EBU INPUT 1 terminal digital audio Built in microphone mono Built in microphone mono INPUT ...

Страница 109: ... through the cable clamp under the microphone holder 햴 3 Plug the microphone cable into the desired INPUT terminal 햵 or the MIC terminal 햶 INPUT Terminals Monaural Mic ANALOG INPUT 2 INPUT 1 terminal INPUT 2 terminal Built in microphone mono Built in microphone mono INPUT Terminals Monaural Mic ANALOG INPUT 1 INPUT 1 terminal INPUT 1 terminal Built in microphone mono Built in microphone mono MIC T...

Страница 110: ...G analog source selection switch to MIC microphone or LINE audio device To supply a microphone with phantom power set the switch to MIC 48V instead Make sure to connect the microphone first before turning the phantom power on Keep the microphone connected when turning off the phantom power When using the INPUT terminals to record to only one channel use the INPUT 1 terminal 햴 햵 햶 MIC terminal Cabl...

Страница 111: ... as an audio backup recording you can record the same analog audio source connected to the INPUT 1 terminal to both audio channels CH1 and CH2 In that case you can adjust the audio recording levels of each channel independently of each other 1 Open the CH2 Input submenu Setup screen AUDIO OPTIONS Audio Input CH2 Input Monitoring menu Audio Setup Audio Input CH2 Input 2 Select the desired option an...

Страница 112: ...t CH1 CH2 ALC Link and CH3 CH4 ALC Link settings to link the audio level adjustment of both channels If at least one of the channels is set to the INPUT terminals an analog audio source and manual audio level adjustment you can activate the audio limiter to prevent audio distortions When activated the audio limiter will limit the amplitude of audio input signals when they start to distort Use the ...

Страница 113: ... Audio Input MIC Low Cut Monitoring menu Audio Setup Audio Input MIC Low Cut 2 Select On and then press SET When you select On some low frequency sounds may be suppressed along with the sound of wind Microphone Attenuator MIC Terminal When an audio channel is set to the MIC terminal if the audio level is too high and the sound sounds distorted you can activate the microphone attenuator 20 dB 1 Ope...

Страница 114: ...ivate Alternatively you can press an assignable button set to Color Bars A 127 2 Select On and then press SET The selected color bars appear on the monitoring screen 3 From the same submenu select Type and then press SET 4 Select the type of color bars and then press SET Turning off the camera or pressing the PLAY button switching to playback mode will deactivate the color bars NOTES NOTES When th...

Страница 115: ... skip to step 5 to change the gain 3 From the same submenu select Select Line and then press SET 4 Enter the Y coordinate of the desired line using the keyboard screen A 37 When the vertical resolution number of horizontal lines is 1080 you can select a value between 0 and 1079 1 line increments when the vertical resolution is 2160 you can select a value between 0 and 2158 2 line increments 5 From...

Страница 116: ...is applied to the video output The waveform monitor cannot be displayed while magnification is activated If the Knee settings in the custom picture file A 135 were changed a horizontal line will appear on the waveform monitor indicating the luminance Y level corresponding to the knee point ...

Страница 117: ...k to a clip you must first set in advance an assignable button to Add Mark or Add Mark 1 Set an assignable button to Add Mark or Add Mark A 127 To add both types of clip marks to different clips set one assignable button to Add Mark and another assignable button to Add Mark 2 When you finish recording a clip you wish to mark press the assignable button A message indicating the clip mark will appea...

Страница 118: ...D card into the camera s SD card slot 3 Open the metadata Setting submenu Rec Media Setup 3 Metadata Setting 4 Select SD Card and then press SET 5 From the same submenu select User Memo and select the file name of the desired user memo file Select Off to record clips without a user memo 6 Press OK camera menu or press SET monitoring menu NOTES NOTES After you set a user memo do not remove the SD c...

Страница 119: ...on to help identify the recording later on 1 Open the Scene or Take submenu Camera menu Rec Media Setup Metadata Scene or Take Monitoring menu Rec Media Setup 3 Metadata Scene or Take Set To clear the scene take information select Reset instead 2 Enter the desired text using the keyboard screen A 37 ...

Страница 120: ...h as the receiver tries to acquire satellite signals When satellite signals are correctly acquired the icon will stay continuously on GPS functions will be activated and clips recorded thereafter will be geotagged IMPORTANT In certain countries regions the use of GPS may be restricted Be sure to use the GPS receiver in accordance with local laws and regulations of the country region where the rece...

Страница 121: ... You can use the System Setup GPS Display Info setting to display the information received from the GPS signal After replacing the power source or when first turning on the camera it may take longer for the GPS receiver to start receiving the GPS signal ...

Страница 122: ...amorphic all monitoring devices at once A 127 3 From the same submenu select Desqueeze Ratio 4 Select the desired option and then press SET You can select a fixed desqueeze factor x1 3 or x2 0 or use the lens s squeeze factor as defined in the metadata Lens Squeeze Factor NOTES NOTES You can record the lens s squeeze factor in the clip s metadata with the Rec Media Setup Metadata Lens Squeeze sett...

Страница 123: ...menu System Setup B REMOTE Term 3 Select RC V100 REMOTE A or RC V100 REMOTE B depending on the terminal used and then press SET Options RC V100 REMOTE A or RC V100 REMOTE B depending on the terminal used Select this option to use the optional RC V100 Remote Controller connected to the corresponding REMOTE terminal Standard Select this option to use commercially available remote controls NOTES NOTE...

Страница 124: ...erial number of the RC V100 If the serial number starts with 01 xxxx where xxxx represents other digits you will need to update the remote controller s firmware Canon will perform this feature upgrade and requires that the remote controller be sent to an accredited Canon Service Center Shipping and handling charges may apply Contact a Canon Customer Support Center for details ...

Страница 125: ...off the camera Do not remove the SD card NOTES NOTES If the LOCK switch on the SD card is set to prevent writing you will not be able to record photos Change the position of the LOCK switch in advance Photo Numbering Photos are automatically assigned consecutive numbers and stored on the SD card in folders You can select the photo numbering method to be used 1 Open the Photo Numbering submenu Rec ...

Страница 126: ...er was created In the example the folder numbered 101 was created on November 3 Understanding photo numbers An example photo number is 101 0107 The first 3 digits indicate the folder number where the photo is stored and the last 4 digits indicate the consecutive number assigned to the photo from 0001 to 9999 The photo number also indicates the name and location of the file on the SD card For examp...

Страница 127: ... can be used when the accessory is attached to the camera EVF V70 OLED Electronic Viewfinder 4 assignable buttons SG 1 Shoulder Style Grip Unit 1 assignable button RC V100 Remote Controller 4 assignable buttons In most cases the names of the buttons printed on the camera and optional accessories also indicate their default settings Changing the Assigned Function and Using an Assignable Button 1 Pr...

Страница 128: ...scription A NONE No function assigned the button is disabled Z One Shot AF The camera focuses automatically one time only one shot AF function 92 Z AF Lock Locks the focus during continuous AF or AF boosted MF mode 95 Z Face AF Toggles the Face AF setting between Face Priority and Face Only 96 Z Face Detection Turns the face detection function on off Z Tracking Turns the tracking function on off 9...

Страница 129: ...menu s Control Display submenu setup of the camera s control display or the control display on an optional OU 700 Remote Operation Unit connected to the camera 31 Control Display 2 Turn the camera s control display on off EVF V70 Setup 2 3 4 Opens the monitoring menu s EVF V70 submenu setup of the optional viewfinder 42 OSD Output 2 Turns on off the camera s onscreen displays on off 155 OSD Output...

Страница 130: ...tions appears with the current function assigned to the screen button highlighted The functions that can be assigned are mostly the same as for assignable buttons A 128 3 Select the desired function and then press SET The selected function will be assigned to the selected screen button 4 Whenever necessary press the USER button to open the USER screen and press the desired screen button to use the...

Страница 131: ...ll be applied The Gamma and Color Space settings currently in use are displayed under COLOR in the HOME screen and their icons will appear at the left of the monitoring screen If editing of the custom picture file s detailed settings Other Settings Activate was enabled A 131 will appear at the left of the monitoring screen NOTES About changing custom picture related settings using the optional RC ...

Страница 132: ...et submenu HOME screen COLOR CP OTHERS File Reset Monitoring menu Custom Picture File Reset 3 Press both RESET buttons simultaneously HOME screen or select OK and then press SET monitoring menu Renaming Custom Picture Files 1 Select a custom picture file A 131 2 Open the Rename submenu HOME screen COLOR CP OTHERS File Rename Monitoring menu Custom Picture File Rename Input 3 Enter the desired file...

Страница 133: ...ct the custom picture file that you wish to replace A 131 2 Open the Load from 8 submenu HOME screen COLOR CP OTHERS File Transfer Load from 8 Monitoring menu Custom Picture File Transfer Load from 8 3 Select the file with the settings that you want to replicate and then press OK HOME screen or press SET monitoring menu 4 Press both LOAD buttons simultaneously HOME screen or select OK and then pre...

Страница 134: ...a very wide dynamic range Optimized for playback on TV monitors Normal 1 Standard Standard picture for playback on TV monitors Normal 2 x4 0 Setting suitable for playback on TV monitors Produces brighter highlights bright areas of the image than with the Normal 1 Standard setting Normal 3 BT 709 Setting suitable for playback on TV monitors Produces a more faithful black gradation in the shadows da...

Страница 135: ...set to one of the Canon Log settings this setting has no effect on the picture Master Black Red Master Black Green Master Black Blue 50 to 50 0 These settings correct the color cast in blacks When Gamma is set to one of the Canon Log settings these settings have no effect on the picture Black Gamma Level 50 to 50 0 Range Point 20 to 50 0 These settings control the lower part of the gamma curve dar...

Страница 136: ...ependent offset Coring D Curve 0 to 8 0 Sets the curve of coring adjustment in other words how the coring level changes from the value set for Coring Level to that set for Coring D Ofst level dependent curve HV Detail Bal 8 to 8 0 Adjusts the ratio between horizontal and vertical detail Higher values emphasize vertical detail while lower values emphasize horizontal detail Limit 50 to 50 0 Restrict...

Страница 137: ...Low Off Hue 0 to 31 0 Chroma Area Y Level 0 to 31 16 The camera detects the characteristics of a certain color or tone and applies a noise reduction filter to the targeted areas A zebra pattern will appear on the monitoring screen over areas targeted for noise reduction Effect Level Adjusts the level of the noise reduction filter Hue Adjusts the hue for the color to be detected Chroma Adjusts the ...

Страница 138: ...se 0 to 31 0 These settings determine the color phase of the area to be corrected A or B respectively Area A Setting Chroma Area A Setting Area Area A Setting Y Level Area B Setting Chroma Area B Setting Area Area B Setting Y Level 0 to 31 16 These settings determine the following color characteristics of the area to be corrected A or B respectively Area A Setting Chroma Area B Setting Chroma Colo...

Страница 139: ...For details on which onscreen displays can be customized refer to Onscreen Displays on the Shooting Screen A 59 and Onscreen Displays During Playback A 144 1 Open the desired customized displays submenu Camera menu Monitoring Setup Custom Display 1 or Custom Display 2 or Monitoring Setup Custom Display Monitoring menu Monitoring Setup Custom Display 1 or Custom Display 2 shooting mode or Custom Di...

Страница 140: ...lect From Camera or From 8 and then press SET 3 Press both LOAD buttons simultaneously camera menu or select OK and press SET monitoring menu The camera s settings will be replaced by the settings saved on the selected source Then the screen will turn black momentarily and the camera will restart NOTES The following settings are not saved with this operation The following settings in the HOME scre...

Страница 141: ...e mode Ý will appear on the PLAY screen and Ý PAUSE will appear on top of the monitoring screen Pressing the HOME USER ALT or TC buttons will switch the camera back to shooting mode and open the respective setup screen on the control display To change the camera s system frequency The camera cannot play back recording media that were recorded using a system frequency different from that of the cam...

Страница 142: ...ring playback to pause Press SET again during playback pause to resume the playback During playback pause you can turn the SELECT dial to change the playback position Press STEP SIZE to change the interval used when you turn the SELECT dial 1 PB MEDIA playback media Press the screen button to select the media and format selected for playback A 142 2 Media format selected for playback 3 Playback op...

Страница 143: ... terminal NOTES For details on changing the audio channel refer to Audio Output A 157 Viewing Photos After selecting photos as the format to play back use the SELECT dial to browse through your photos From the PLAY screen 1 Select SD Card Photos as the media format to play back A 142 The last recorded photo on the SD card will appear on the monitoring screen and the details of the image file will ...

Страница 144: ...ast card 8 SD card 3 Playback operation Ý pause Ð play Ô Ó frame reverse advance 4 Frame rate1 A 65 5 Embedded custom picture file2 A 133 6 Relay recording2 A 52 5 indicates the first part of the recording 6 indicates the middle part s and 7 indicates the last part 7 mark2 mark2 A 117 146 8 Time code A 101 9 Camera index A 62 Custom display3 Camera Index 10 Clip number Total number of clips 11 Ons...

Страница 145: ...isplaying Clip Information You can display detailed information about the selected clip and the custom picture settings and metadata recorded with the clip 1 Select the desired clip A 142 2 Open the clip information screen OPTIONS Display Clip Info The Clip Info screen will appear on the control display Turn the SELECT dial to scroll through all the information 3 Press the PLAY button or the BACK ...

Страница 146: ...y for XF AVC clips Adding and Deleting Marks or Marks You can add an OK mark or check mark to XF AVC clips recorded on the CFast card in order to tag them as special clips Since clips with an mark cannot be deleted with the camera you can use this mark also to protect important clips 1 Select the desired clip A 142 Select CFast XF AVC as the playback media format 2 Add the clip mark or mark OPTION...

Страница 147: ...xcept for XF AVC clips with an mark To delete such clips delete the mark beforehand A 147 1 Select the desired clip or photo A 142 2 Delete the clip or photo OPTIONS Delete 3 Press both DELETE buttons simultaneously The clip or photo will be deleted 4 When the confirmation screen appears press OK IMPORTANT Be careful when deleting clips and photos Deleted recordings cannot be recovered with the ca...

Страница 148: ... SELECT dial to scroll through all the information 3 Press FILE and turn the SELECT dial to select the custom picture file where you want to copy the settings from the clip 4 Press both COPY buttons simultaneously The clip s custom picture settings will be copied to the selected custom picture file overwriting any previous settings 5 When the confirmation screen appears press OK NOTES You cannot c...

Страница 149: ...his is indicated by the gray cells in the table 5 RGB 4 4 4 10 bit is only available when the main recording format is set to XF AVC CFast 6 Only when the resolution is 1920x1080 Main recording video configuration Output from each terminal3 4 Number of terminals required Output signal Main Rec Format 1 Resolution Color sampling Frame rate2 SDI OUT 1 SDI OUT 2 SDI OUT 3 SDI OUT 4 RAW SDI OUT 4096x2...

Страница 150: ...esolution of the recording video configuration is 2048 the sides of the image will be cropped The color sampling will be set automatically to YCbCr 4 2 2 10 bit YCbCr 4 4 4 8 bit or RGB 4 4 4 8 bit depending on the capabilities of the external monitor When the output resolution is 4096x2160 or 3840x2160 and the frame rate is 59 94P or 50 00P the color sampling will be set automatically to YCbCr 4 ...

Страница 151: ...ly to YCbCr 4 2 2 10 bit YCbCr 4 4 4 8 bit or RGB 4 4 4 8 bit depending on the capabilities of the external monitor 4 System Setup Term Output Setup HDMI Max Res setting 5 Only available when System Setup Term Output Setup SDI OUT Output is set to Off 6 RGB 4 4 4 10 bit is only available when the main recording format is set to XF AVC CFast Video configuration of the clip Video output configuratio...

Страница 152: ...n manual of the external device used During RAW output 2 channel 16 bit audio will be output instead transmitted as 20 bits You can select which audio channels to output A 157 If the main recording format is set to ProRes CFast but no CFast card is inserted in the camera clip file name information will not be output 1 To output RAW video set the main recording format to RAW SDI OUT A 65 2 Activate...

Страница 153: ...d is inserted in the camera clip file name information will not be output 1 Activate the MON terminals and select the desired output mode System Setup B Term Output Setup MON Output 1920x1080 or 2048x1080 1920x1080 If you have no intention to use the MON terminals select Off instead 2 If you selected 2K output you can select the 3G SDI mapping level for the output signal From the same submenu 3G S...

Страница 154: ...external monitor you will need a monitor that is compatible with the selected color space Available LUT options by gamma curve and color space Available LUTs depend on the combination of gamma curve and color space used whether it was set through one of the preset color settings or through the individual main settings in the custom picture file A 134 Only when COLOR CP MAIN Preset is set to Canon ...

Страница 155: ...itors Output 2 Select On and then press SET Alternatively you can press an assignable button set to OSD Output VIDEO optional viewfinder only OSD Output MON HDMI external monitors only or OSD Output all monitoring devices at once A 127 T appears at the right of the monitoring screen in shooting mode only if Monitoring Setup Custom Display 2 OSD Output is set to On Applied LUT Output Settings with ...

Страница 156: ...n External Monitor or Recorder 156 NOTES When the HDMI OUT terminal s resolution is set to 4096x2160 or 3840x2160 the camera s onscreen displays will not be displayed on the monitor connected to the HDMI OUT terminal ...

Страница 157: ... Monitoring menu Audio Setup Audio Output Monitor Channels HDMI Channels or RAW SDI Channels In playback mode Audio Setup Monitor Channels or HDMI Channels MONITOR Monitor Channels audio from the headphone terminal HDMI Channels audio output from the HDMI OUT terminal RAW SDI Channels audio output from the SDI OUT terminals during RAW video output Alternatively you can press an assignable button s...

Страница 158: ...nal Cut Pro X Plugin that allows you to easily transfer clips from a recording media or a local folder in the computer to the compatible version of Apple s Final Cut Pro X directly from within the NLE application Developing RAW Clips Use the Cinema RAW Development software to develop RAW clips recorded on an external recorder connected to the camera s SDI OUT terminals After you develop the clips ...

Страница 159: ...provide support regarding network configurations IMPORTANT Data transmitted over networks is not encrypted Canon shall not be liable for any loss of data or damage resulting from incorrect network configuration or settings Additionally Canon shall not be liable for any loss or damage caused by the use of network functions Using an unprotected Wi Fi network can expose your data to monitoring by una...

Страница 160: ... wireless access point Wi Fi enabled devices will be able to connect to the camera directly Limited only to the connection between the camera and supported Wi Fi enabled devices The functionality is not the same as that of commercially available access points Infrastructure connection WPS button If your wireless router supports Wi Fi Protected Setup WPS setup will be easy and require minimal confi...

Страница 161: ...z or 2 4 GHz press SET 6 Select the Wi Fi channel Channel desired channel press SET Available channels will be different depending on the wireless connection mode selected in the previous step and the model of wireless file transmitter used For details refer to the Areas of Use and Restrictions leaflet supplied with the optional WFT E6 or WFT E8 Wireless File Transmitter 7 Select the encryption me...

Страница 162: ... OK setup screen or press SET monitoring menu While Connecting appears on the screen you can press CANCEL setup screen or press SET monitoring menu to cancel the operation NOTES NOTES The WPS Button method may not work correctly if there are several active access points in the area In such case try using WPS PIN Code or Search for Access Points A 163 instead WPS using a PIN code 1 After you select...

Страница 163: ...up screen or press SET monitoring menu 3 Enter the password of the access point Setup screen Select Password and press SET Monitoring menu Password Input Press SET Enter the desired text using the keyboard screen A 37 If the access point is not encrypted C this step is not required NOTES NOTES Valid passwords vary depending on the encryption method 64 bit WEP encryption 5 ASCII characters or 10 he...

Страница 164: ...ailable Ethernet cable to the Ethernet terminal on the camera and an Ethernet port on a network device 2 Open the Connection Method submenu of the desired network function Setup screen NETWORK Desired function OPTIONS Connection Method Monitoring menu System Setup B Network Settings Desired function Connection Method The camera will switch automatically to playback mode when you select FTP Transfe...

Страница 165: ...ing A 178 You can also set System Setup LED LAN Ethernet to Off to disable the indicator Checking and Changing Network Settings The camera s network functions are optimized to work automatically with minimal setup by the user Still you have the option to change manually more advanced network settings to suit specific needs Changing settings manually requires more advanced knowledge of Wi Fi and ne...

Страница 166: ...essing the camera through a network The port number HTTP protocol used by Browser Remote is usually set to port 80 but you can change it if necessary The camera ID will appear on the Browser Remote screen making it easy to identify which camera the application is controlling in case of a multi camera shooting setup 1 Open the Browser Remote s settings submenu Setup screen NETWORK Browser Remote OP...

Страница 167: ...ser Remote on the camera Setup screen NETWORK Browser Remote ACTIVATE set it to On Monitoring menu System Setup w Network Settings Browser Remote Activate On With Camera Access Point connections the camera will start functioning as a wireless access point With Ethernet connections connect the camera to the desired network and the connection type icon will appear on the HOME screen and at the top l...

Страница 168: ...Remote Click touch H and select the desired language from the list Most buttons and controls emulate physical controls on the camera and are labeled in English only regardless of the language selected 6 Use the Browser Remote controls to operate the camera Descriptions of the controls are given in the following pages Detailed operation is given in each function s reference page 7 When you have fin...

Страница 169: ...en that allows users only to start stop recording using a smartphone or other device with a small screen The screen displayed will differ depending on the user information used to log in The following sections explain how to use the Browser Remote controls For detailed information and applicable restrictions about the functions themselves please refer to each function s explanation NOTES NOTES Bro...

Страница 170: ...ection Changes the language used for controls in the metadata input screen and for error messages Still most of the application s controls emulate physical buttons on the camera and appear in English only regardless of the language selected 8 Key lock button Touch the icon to lock the Browser Remote screens in order to prevent settings from being changed inadvertently 9 REC button Touch the button...

Страница 171: ...e view screen and touch Å Use the same lighting conditions you plan to use when recording During the procedure the icon in the button will flash quickly When it stops flashing the procedure is completed and the custom white balance will be applied 3 Preset and user set white balance settings Touch a button to apply the corresponding white balance settings as shown in the button 4 AWB Lock button W...

Страница 172: ... to F values NOTES During manual aperture adjustment you can also touch PUSH AUTO IRIS to have the camera adjust the aperture automatically once The manual aperture buttons will not be available at this time When using an EF Cinema lens with the built in extender function activated or a broadcast lens you cannot change the aperture by selecting an aperture value 3 ISO speed Gain related buttons IS...

Страница 173: ... Guide function button 7 ONE SHOT AF button A 173 AF Lock button A 174 8 Tracking buttons 9 Manual focus buttons Manual focus 1 Touch the AF mode button and select One Shot 2 Touch one of the manual focus buttons on the Near side to focus closer or one of the controls on the Far side to focus farther away There are three levels of adjustment is the smallest and the largest Z Focus Guide 1 Touch th...

Страница 174: ...rowser Remote s live view screen in order to select it for focusing 1 Touch the AF frame position button and select Selectable 2 Make sure the touch focus function has been unlocked and the D icon appears in the button A 170 3 Touch the desired subject in the live view screen Depending on the focus mode used a frame may appear on the selected subject and the camera may also focus on the subject au...

Страница 175: ...in to end the tracking function To adjust the zoom The zoom can be adjusted only when a compatible EF Cinema lens A 221 is attached to the camera Touch the Zoom tab in the detailed camera settings panel 1 Zoom slider Drag the zoom slider up down to zoom in T or out W respectively NOTES NOTES If you operate the zoom slider slowly it may take some time until the lens starts moving The Basic Screen F...

Страница 176: ...To enter the latitude Touch inside one of the text boxes under Latitude and enter from left to right the degrees minutes and seconds values To select a southern latitude touch North and select South instead To enter the longitude Touch inside one of the text boxes under Longitude and enter from left to right the degrees minutes and seconds values To select a western longitude touch East and select...

Страница 177: ...ed When the confirmation message appears touch 11 Apply from Next button Touch the button to send the metadata entered in this screen to the camera so it is embedded only with XFHAVC clips that are recorded after the transfer When the confimation message appears touch This option does not overwrite the metadata of clips already recorded or being recorded NOTES NOTES The metadata sent to the camera...

Страница 178: ...twork A 164 or a Wi Fi network in Infrastructure mode A 161 2 Open the IP streaming settings submenu Setup screen NETWORK IP Streaming OPTIONS Monitoring menu System Setup B Network Settings IP Streaming 3 Select the video configuration for the video streamed over IP Video Output Conf Desired option Press SET 4 Select the audio channels for the IP stream Audio Out Channels CH1 CH2 or CH3 CH4 Press...

Страница 179: ...s submenu setup screen or IP Streaming submenu monitoring menu as the main procedure A 178 1 Select FEC Port No and then press SET Enter the port number using the keyboard screen A 37 Setup screen only Press RESET to reset the port number to 5002 2 Select the FEC interval to be used FEC Interval Desired value Press SET RTSP Settings From the same IP streaming Options submenu setup screen or IP Str...

Страница 180: ...eaming Display Info Turn the SELECT dial to check all the settings You will need the IP stream s URL and the RTSP user name and password Only the default password is displayed Passwords set by the user will not be displayed the information screen will show only whether a password is set or not 5 When you have finished streaming the desired video turn off the IP streaming on the camera Setup screen...

Страница 181: ...A 37 4 Enter the FTP User Name FTP Password and Destination Folder in the same way 5 Select Port No and press SET to change the port number Enter the port number using the keyboard screen A 37 Setup screen only Press RESET to reset the port number to 21 6 Select whether to activate the passive mode Passive Mode On or Off Press SET Off is the standard setting for most cases On passive mode is more ...

Страница 182: ...ected all the desired clips press OK All the applicable clips will be transferred to the FTP server When using an Ethernet connection the Ethernet access indicator will flash quickly while the files are being transferred Press CANCEL to cancel the transfer while it is in progress 5 When the confirmation message appears press OK IMPORTANT Observe the following precautions when transferring files Fa...

Страница 183: ...table for the Rec Media Setup 3 menu A 188 IRIS aperture Select the aperture value A 79 AUTO IRIS Press and hold to adjust the aperture automatically A 81 ND ND Select the ND filter setting A 78 OPTIONS AE Shift AE Response Mode Iris Increment Fine Increment Iris Indicator Zoom Iris Correct Extended ND Range See the corresponding settings under AE and Iris in the table for the Camera Setup v menu ...

Страница 184: ...ure 2 000 K to 15 000 K Color compensation CC 20 to 20 RESET OK confirm changes Adjust the color temperature and or color compensation CC value WB SET OK start the white balance calibration A 87 Register a custom white balance setting RENAME Text string up to 8 characters USER_01 to USER_05 A 88 Rename a user set white balance setting OPTIONS Shockless WB AWB Response See the corresponding setting...

Страница 185: ...CH1 CH2 CH2 CH1 2 CH1 2 CH3 CH4 CH3 CH3 CH4 CH4 CH3 4 CH3 4 CH1 3 CH2 4 A 157 headphone volume 0 to 15 8 A 113 OPTIONS Audio Input Audio Output See the corresponding settings in the table for the Audio Setup menu A 188 CAM LVL camera s electronic level Tilt degree of rotation degree of rotation of the optical axis up and down Roll degree of rotation sideways along the optical axis SET set the came...

Страница 186: ...nse High Normal Low Determines how quickly the aperture is adjusted during automatic exposure This setting has no effect when one of the following lenses is attached ISO Gain A 76 Select ISO Gain Extended Range On Off ISO Increment 1 stop 1 3 stop Gain Increment Normal Fine Iris A 79 Mode Automatic Manual This setting is available only when a compatible lens A 221 is attached to the camera Iris In...

Страница 187: ...pter When this setting is set to an option other than Off the video configuration will change automatically to 1920x1080 YCbCr 10 bit 50 Mbps Long GOP at 59 94i or 50 00i depending on the system frequency Focus Control Camera Lens Determines the signal path used to adjust the focus Camera Use the default setting for most cases Lens You can adjust the focus using an accessory connected to the lens ...

Страница 188: ...H3 CH3 CH4 CH4 CH3 4 CH3 4 CH1 3 CH2 4 A 157 HDMI Channels RAW SDI Channels CH1 CH2 CH3 CH4 A 157 Submenu levels Menu items Setting options and additional information Initialize Media CFast A CFast B SD Card Capture Drive A 51 Main Rec Format XF AVC CFast ProRes CFast RAW Capture Drive RAW SDI OUT A 65 Slow Fast Motion On crop On Off A 68 System Frequency 59 94 Hz 50 00 Hz 24 00 Hz A 65 Frame Rate...

Страница 189: ...f Rec Command On Off When you connect the camera to an external recorder if you start or stop recording with the camera the other device will also start or stop recording Metadata Camera Index A to Z A 62 Reel Number Clip Number 001 to 999 A 62 User Defined User defined string up to 5 characters CANON A 62 Scene Take Scene description up to 16 characters Take description up to 8 characters A 119 L...

Страница 190: ...ct Line Mask 25 Mask 50 Mask 75 You can use a color line or apply masking to the non recorded areas to distinguish the area covered by the recorded frame from the surroundings If you selected Line you can select the color of the border line with the Line Color setting Line Color Yellow Blue Green Red Black Gray White Anamorphic A 122 Desqueeze Ratio Lens Squeeze Factor x2 0 x1 3 VIDEO Output MON H...

Страница 191: ... icon onscreen display always or whenever the necessary conditions are triggered Only Warnings Show the icon onscreen display only when a critical level is reached Custom Display A 139 Camera Index Audio Lvl Indicator On Off Date Time Camera Data On Off These settings are available only when the menu is opened from the PLAY screen A 144 and determine whether the following onscreen displays will ap...

Страница 192: ...intervals 100 Waveform Monitor A 115 VIDEO Output MON HDMI Output On Off Type Line Line Spot Select Line Field RGB YPbPr Gain 1x 2x Y Position 0 15 30 45 50 Select Line When the vertical resolution is 1080 0 to 1079 in 1 line increments 540 Set When the vertical resolution is 2160 0 to 2158 in 2 line increments 1080 Set Markers A 98 VIDEO Output MON HDMI Output On Off Center Horizontal Grid Aspect...

Страница 193: ...OUT Terminal Function HD Sync Output Genlock Input A 105 Genlock Adjustment 1023 to 1023 000 A 106 The phase difference between the external Genlock signal and the camera is initially set to 0 This setting allows you to adjust it within the range of approx 0 4 H 1023 to 1023 To set a 4 digit adjustment value set the first field to 10 or 10 SYNC Scan Mode P PsF A 107 Time Code A 101 Mode Preset Reg...

Страница 194: ...C buttons on the camera on the left side next to the control display on the front or on the right side next to the card slots or on an optional SG 1 Shoulder Style Grip Unit or optional OU 700 Remote Operation Unit attached to the camera LED Button Illumination Camera EVF V70 Remote OU 700 High Low Off Tally Lamp Camera Remote OU 700 On Off Media Access LAN Ethernet On Off These settings determine...

Страница 195: ...s refer to the Areas of Use and Restrictions leaflet supplied with the optional WFT E6 or WFT E8 Wireless File Transmitter Default channel is 1 Authn Encr Method WPA2 PSK AES Open No encryption Password 12345678 IP Address Assign Automatic Manual IP Address 0 0 0 0 to 255 255 255 255 192 168 0 80 Subnet Mask 0 0 0 0 to 255 255 255 255 192 168 0 80 Default Gateway 0 0 0 0 to 255 255 255 255 0 0 0 0...

Страница 196: ...C Address FTP Transfer These settings are available only when the menu is opened from the PLAY screen A 143 A 181 Activate On Off Connection Method Ethernet Infrastructure Wi Fi Setup Method WPS Button WPS PIN Code Search for Access Points SSID Network name up to 32 characters Authn Encr Method WPA WPA2 PSK TKIP AES Open No encryption Open WEP 1 to Open WEP 4 Shared Key WEP 1 to Shared Key WEP 4 P...

Страница 197: ... to AF if this setting is set to On the lens will retract fully when the camera is turned off EF 40mm f 2 8 STM EF S 24mm f 2 8 STM EF 50mm f 1 8 STM Reset Hour Meter The camera has two hour meters the first keeps track of total operation time and the second keeps track of operation time since the last time the second hour meter was reset with this function Certification Logos Displays certificati...

Страница 198: ...about the system A 199 VIDEO screen Information about the video output signals A 200 MEDIA screen Information about recording media A 200 LIVE current status screen When the INFO icon appears on the control display open the LIVE screen to check important information regarding the status of the camera If there are no problems with the camera System Status Good will be displayed If an error message ...

Страница 199: ...or settings A 84 3 Custom picture main settings A 134 4 Custom picture other settings A 135 1 Date and time A 29 2 Total operation time 3 Operation time since Reset Hour Meter was used last A 197 4 System frequency A 65 5 Main recording format A 65 6 Resolution A 65 7 Temperature warning and fan operation A 63 1 2 3 4 1 2 3 4 5 6 7 ...

Страница 200: ... HDMI OUT terminal A 153 2 Output from the MON terminals activated or not A 153 3 Output from the SDI OUT terminals activated or not A 152 1 CFast card A and recording format 2 CFast card B and recording format 3 Capture Drive 2 0 in a CDX 36150 Recorder docked with the camera 4 SD card 5 User memo A 118 176 User memo file name title creator shooting location and description For each 6 Visual bar ...

Страница 201: ...ocus The camera may not be able to focus on certain subjects using autofocus Focus manually A 90 When the AF mode is set to AF boosted MF start focusing manually until the AF frame changes to white automatic adjustment range The optional viewfinder is not adjusted Use the dioptric adjustment ring to make the proper adjustment A 42 The lens is dirty Clean the lens with a soft lens cleaning cloth Z ...

Страница 202: ...he SD card is full Replace the SD card or delete some recordings A 147 to free some space on the SD card Even after stopping recording the access indicator stays illuminated in red The clip is being recorded on the card This is not a malfunction b appears in yellow on the control display and monitoring screen The camera s internal temperature has reached a predetermined level You can continue usin...

Страница 203: ... A 155 Screen displays turn on and off repeatedly The input voltage of the battery or power source connected to the DC IN 12V terminal is too low Check the power source Excess current to the lens has been detected Remove the lens Clean the contacts on the lens mount and lens and reattach the lens Abnormal characters appear on the monitoring screen and the camera does not operate properly Disconnec...

Страница 204: ...ed deleted over time Save your clips A 158 and initialize the CFast card A 51 Recording to and playing back from an SD card is slow This may occur as clips and photos are recorded deleted over time Save your recordings A 158 and initialize the SD card using the Complete option A 51 The optional RC V100 Remote Controller or commercially available remote control does not work Make sure that System S...

Страница 205: ...Web browser Make sure NETWORK Browser Remote ACTIVATE is set to On The URL entered into the Web browser s address bar is incorrect Be sure to use the URL exactly as it appears in the Browser Remote screen on the control display A 167 You may need to scroll down with the SELECT dial to find the URL line The Browser Remote screen is not displayed correctly on the Web browser The device operating sys...

Страница 206: ...lens contacts with a soft cloth and reattach the lens Cannot play back The file control information of an XF AVC clip is corrupted or there was a decoder error Turn the camera off and then on again If this does not solve the problem consult a Canon Service Center Corrupted file control information cannot be recovered Recording media or XF AVC clips with corrupt file control information cannot be r...

Страница 207: ...ent the frame rate A 65 Lens error Turn the camera off then on again There was a communication error between the camera and the lens Turn the camera off and then on again Low Power Warning Check the power supply The input power supplied to the camera has reached the level set for the power level warning A 195 Check the power source The message appears every time you press the REC button when the p...

Страница 208: ...nsert it Alternatively replace the CFast card If this does not solve the problem consult a Canon Service Center Corrupted file control information cannot be recovered Recording media or XF AVC clips with corrupt file control information cannot be read by Canon XF Utility Remote OU 700 Firmware update error Press the HOME button on the Remote OU 700 and wait a few moments There was a problem while ...

Страница 209: ... Fi password The authentication encryption method is set to an option other than Open No encryption and the password entered is incorrect Check the access point s password and try entering the password again A 163 IP address conflict Another device on the same network has the same IP address assigned to the camera Change the IP address of the conflicting device or the camera LAN cable not connecte...

Страница 210: ...le to obtain an IP address If you are not using a DHCP server enter the IP address manually A 165 Turn on the DHCP server If it is already on make sure it is functioning properly Make sure the address range for the DHCP server is sufficient WFT s temperature too high Cannot use Wi Fi Wi Fi functions have been turned off because the transmitter s temperature is too high Remove the transmitter from ...

Страница 211: ...ontact flush thoroughly with copious amounts of clean running water and seek immediate medical assistance Do not heat batteries or expose them to fire Do not expose the terminals to dirt or let them come into contact with metallic pins or other metal objects Do not look through the viewfinder at strong light sources such as the sun on a bright day or lasers and other strong artificial light source...

Страница 212: ...on of the camera After removing the lens make sure to attach the body cap to the lens mount and the lens cap and dust cap to the lens Long term storage If you do not intend to use the camera for a long time store it in a place free of dust in low humidity and at temperatures not higher than 30 C 86 F Power Sources Dirty terminals may cause a poor contact between a battery and the camera Wipe the t...

Страница 213: ...m to water Check the direction before inserting the recording media Forcing recording media into the slot if it is not correctly oriented may damage the recording media or the camera Do not attach any labels or stickers on the recording media Disposal When you delete data on the recording media only the file allocation table is altered and stored data is not physically erased Take the necessary pr...

Страница 214: ...ween hot and cold temperatures may cause condensation water droplets to form on its internal surfaces Stop using the camera if condensation is detected Continued use may damage the camera Condensation may form in the following cases When the camera is moved quickly from cold to warm places When the camera is left in a humid room When a cold room is heated rapidly To avoid condensation Do not expos...

Страница 215: ...for your Canon camera by calling 1 800 828 4040 Canon U S A Information Center EVF V70 OLED Electronic Viewfinder UN 5 50 cm 1 6 ft or UN 10 1 m 3 3 ft Unit Cable WFT E6 or WFT E8 Wireless File Transmitter OU 700 Remote Operation Unit UC V75 75 cm 2 5 ft or UC V1000 10 m 32 8 ft Remote Operation Unit Cable GP E1 GPS Receiver SG 1 Shoulder Style Grip Unit SU 15 Shoulder Support Unit RR 10 10 m 32 8...

Страница 216: ...he camera or contact a Canon Service Center You can have the C700 model changed into a C700 PL or C700 GS PL model For details consult the retail dealer from whom you purchased the camera or contact a Canon Service Center This mark identifies genuine Canon video accessories When you use Canon video equipment we recommend Canon brand accessories or products bearing the same mark ...

Страница 217: ... 97P 23 98P 25 00P 24 00P Recording Media not included For approximate recording times refer to Approximate Recording Times A 228 Main recording sub recording CFast 2 0 card 2 slots Sub recording and photos1 SD SDHC SD High Capacity or SDXC SD eXtended Capacity memory card 1 Custom picture files camera settings and user memo files can be saved on and read from the SD card as well Image Sensor Z Su...

Страница 218: ...ent available for all settings except AWB 4 Color temperatures are approximate and given for reference purposes only Focus Manual focus Z only Also autofocus one shot AF AF boosted MF continuous AF face AF and subject tracking available Z AF type Dual Pixel CMOS AF contrast detection AF Sensor Sensitivity ISO 800 2000 lux 89 9 reflection 59 94 Hz Z F10 F14 2048x1080 at 59 94P 50 00 Hz Z F11 F16 20...

Страница 219: ...l 3 5 mm stereo mini jack 72 dBV volume center full scale 18 dB 1 2 kΩ Microphone attenuator 20 dB Headphone Terminal 3 5 mm stereo mini jack G to 8 dBV 16 Ω load volume range Min to Max 50 Ω or less GENLOCK SYNC OUT Terminal BNC jack 1 0 Vp p 75 Ω GENLOCK setting input only SYNC OUT setting output only tri level HD signal TIME CODE IN OUT Terminal BNC jack input output Input setting 0 5 Vp p to 1...

Страница 220: ...P When the camera is powering external accessories power consumption will increase by the amount consumed by the connected accessories Operating Temperature 0 40 C 32 104 F Dimensions W x H x D Camera body only Z 167 x 154 x 327 mm 6 6 x 6 1 x 1 1 in 167 x 154 x 336 mm 6 6 x 6 1 x 1 1 in For detailed technical drawings see the appendix Camera Dimensions A 223 All dimensions are approximate Weight ...

Страница 221: ...o iris Automatic EF lenses Ü Ü EF lenses compatible with auto iris Ü Ü Ü EF Cinema lenses CN7x17 KAS S E1 Required2 Ü Ü Ü Ü CN7x17 KAS S P1 Required Ü Ü Ü Ü CN20x50 IAS H E1 Required2 Ü Ü Ü Ü CN20x50 IAS H P1 Required Ü Ü Ü Ü CN E18 80mm T4 4 L IS KAS S available soon Ü Ü Ü Ü Prime lenses compatible with Dual Pixel Focus Guide Broadcast lenses Required Required Ü Ü Ü Ü Lens Focus control from the ...

Страница 222: ...al Pixel Focus Guide function EF S 10 18mm f 4 5 5 6 IS STM EF S 18 135mm f 3 5 5 6 IS STM EF S 18 55mm f 3 5 5 6 IS STM EF S 55 250mm f 4 5 6 IS STM EF 24 105mm f 3 5 5 6 IS STM EF S 18 135mm f 3 5 5 6 IS USM CN E14mm T3 1 L F CN E50mm T1 3 L F CN E24mm T1 5 L F CN E85mm T1 3 L F CN E35mm T1 5 L F CN E135mm T2 2 L F ...

Страница 223: ...00 8 4 0 in Left side view Z Front view Z 66 5 2 6 in 89 8 3 5 in 53 8 2 1 in 64 0 2 5 in 84 0 3 3 in 314 8 1 0 ft 11 7 0 46 in Lens mount surface 100 8 4 0 in Left side view Front view 66 5 2 6 in 89 8 3 5 in 64 0 2 5 in 84 0 3 3 in 322 8 1 1 ft 13 0 0 51 in Right side view Back view 314 8 1 0 ft 11 7 0 46 in Lens mount surface ...

Страница 224: ...25 4 1 0 in 25 4 1 0 in 25 4 1 0 in 25 4 1 0 in 25 4 1 0 in 12 7 0 5 in 25 4 1 0 in 25 4 1 0 in 25 4 1 0 in 25 4 1 0 in 25 4 1 0 in 25 4 1 0 in Bottom view 12 7 0 5 in 221 8 8 7 in 12 7 0 5 in 44 0 1 7 in 12 7 0 5 in 25 4 1 0 in 211 2 8 3 in 107 5 4 2 in 25 4 1 0 in 12 7 0 5 in 50 4 2 0 in 12 7 0 5 in 25 4 1 0 in 25 4 1 0 in 12 7 0 5 in 12 7 0 5 in 12 7 0 5 in ...

Страница 225: ...225 Appendix Camera Dimensions Front view with accessories 166 5 6 6 in 203 8 8 0 in 169 7 6 7 in ...

Страница 226: ...Dimensions 226 Right side view with accessories Microphone holder 275 9 10 9 in max 231 0 9 1 in 111 0 4 4 in 38 1 1 5 in 9 4 0 37 in 122 5 4 8 in 73 5 2 9 in 64 2 2 5 in 9 5 0 37 in 25 3 1 0 in 28 4 1 1 in 53 8 2 1 in ...

Страница 227: ...1 3 3 in 70 6 2 8 in 44 1 1 7 in 11 2 0 44 in 143 2 5 6 in 73 5 2 9 in 59 8 2 4 in 30 5 1 2 in 4 4 0 17 in 18 2 0 72 in 49 0 1 9 in 4 4 0 17 in 59 8 2 4 in 30 5 1 2 in 25 4 1 0 in 25 4 1 0 in 35 1 1 4 in 12 7 0 5 in 25 4 1 0 in 25 4 1 0 in 25 4 1 0 in 25 4 1 0 in 25 4 1 0 in 25 4 1 0 in 25 4 1 0 in 25 4 1 0 in 35 1 1 4 in 25 4 1 0 in ...

Страница 228: ... Intra frame 35 min 75 min 150 min 160 Mbps Intra frame 50 min 105 min 210 min 50 Mbps Long GOP 165 min 335 min 680 min Resolution Frame rate Codec 64 GB 128 GB 256 GB 4096x2160 29 97P ProRes 422 HQ 5 min 15 min 35 min 24 00P 23 98P 10 min 20 min 40 min 25 00P 10 min 20 min 40 min 2048x1080 59 94P ProRes 4444 10 min 20 min 40 min 29 97P 20 min 40 min 85 min 24 00P 23 98P 25 min 55 min 110 min 50 0...

Страница 229: ...a Canon Log 3 gamma curves 84 134 Canon XF Utility download 158 CFast card Compatible CFast cards 48 Initializing 51 Inserting Removing 49 Recording method 52 Switching CFast card slots 52 Check marks 117 146 Cinema RAW Development download 158 Clamp base 41 Clips Adding an mark mark 117 146 Clip information 145 Clip name format 62 Deleting 147 Playback 142 Recording 55 Recovering 53 XF AVC Proxy ...

Страница 230: ... Fi specifications 160 INFO information screens 198 Infrastructure 161 Initializing recording media 51 INPUT terminals 108 110 Intra frame XF AVC compression 66 IP streaming 178 Iris 79 ISO speed 76 J Joystick 32 K Key lock 56 L Language 29 Lens 44 Lens correction chromatic aberration peripheral illumination 47 Lens firmware 45 LENS terminal 44 46 Light metering mode 82 Lithium button battery 24 L...

Страница 231: ...3 Relay recording 52 REMOTE A REMOTE B terminals 123 Remote controller 123 Remote operation 123 166 Resetting all camera settings 193 Resolution frame size 65 Router 160 Running mode time code 101 S Safe area 98 Saving clips to a computer 158 Screen buttons 30 SD card Compatible SD cards 48 Initializing 51 Inserting Removing 50 SDI OUT terminals 149 152 Search for access points 163 Setup screens 3...

Страница 232: ...VF V70 41 V mount batteries 26 W Waveform monitor 115 White balance 86 Wide DR 134 Wi Fi channel Areas of Use and Restrictions Wireless file transmitter 160 WPS Wi Fi Protected Setup 162 Z Zebra pattern 99 Zoom 175 Separate leaflet supplied with the optional WFT E6 or WFT E8 Wireless File Transmitter ...

Страница 233: ...re designed to take away your freedom to share and change it By contrast the GNU General Public License is intended to guarantee your freedom to share and change free software to make sure the software is free for all its users This General Public License applies to most of the Free Software Foundation s software and to any other program whose authors commit to using it Some other Free Software Fo...

Страница 234: ...his License whose permissions for other licensees extend to the entire whole and thus to each and every part regardless of who wrote it Thus it is not the intent of this section to claim rights or contest your rights to work written entirely by you rather the intent is to exercise the right to control the distribution of derivative or collective works based on the Program In addition mere aggregat...

Страница 235: ...mber of this License which applies to it and any later version you have the option of following the terms and conditions either of that version or of any later version published by the Free Software Foundation If the Program does not specify a version number of this License you may choose any version ever published by the Free Software Foundation 10 If you wish to incorporate parts of the Program ...

Страница 236: ...and other authors who decide to use it You can use it too but we suggest you first think carefully about whether this license or the ordinary General Public License is the better strategy to use in any particular case based on the explanations below When we speak of free software we are referring to freedom of use not price Our General Public Licenses are designed to make sure that you have the fr...

Страница 237: ...ly into another language Hereinafter translation is included without limitation in the term modification Source code for a work means the preferred form of the work for making modifications to it For a library complete source code means all the source code for all modules it contains plus any associated interface definition files plus the scripts used to control compilation and installation of the...

Страница 238: ...ntaining this object code plus portions of the Library will still fall under Section 6 Otherwise if the work is a derivative of the Library you may distribute the object code for the work under the terms of Section 6 Any executables containing that work also fall under Section 6 whether or not they are linked directly with the Library itself 6 As an exception to the Sections above you may also com...

Страница 239: ...est validity of any such claims this section has the sole purpose of protecting the integrity of the free software distribution system which is implemented by public license practices Many people have made generous contributions to the wide range of software distributed through that system in reliance on consistent application of that system it is up to the author donor to decide if he or she is w...

Страница 240: ...es of this license document but changing it is not allowed This is the first released version of the library GPL It is numbered 2 because it goes with version 2 of the ordinary GPL Preamble The licenses for most software are designed to take away your freedom to share and change it By contrast the GNU General Public Licenses are intended to guarantee your freedom to share and change free software ...

Страница 241: ...has been distributed under these terms A work based on the Library means either the Library or any derivative work under copyright law that is to say a work containing the Library or a portion of it either verbatim or with modifications and or translated straightforwardly into another language Hereinafter translation is included without limitation in the term modification Source code for a work me...

Страница 242: ... length then the use of the object file is unrestricted regardless of whether it is legally a derivative work Executables containing this object code plus portions of the Library will still fall under Section 6 Otherwise if the work is a derivative of the Library you may distribute the object code for the work under the terms of Section 6 Any executables containing that work also fall under Sectio...

Страница 243: ... the wide range of software distributed through that system in reliance on consistent application of that system it is up to the author donor to decide if he or she is willing to distribute software through any other system and a licensee cannot impose that choice This section is intended to make thoroughly clear what is believed to be a consequence of the rest of this License 12 If the distributi...

Страница 244: ...s Random Hacker signature of Ty Coon 1 April 1990 Ty Coon President of Vice That s all there is to it avr libc Portions of avr libc are Copyright c 1999 2010 Redistribution and use in source and binary forms with or without modification are permitted provided that the following conditions are met Redistributions of source code must retain the above copyright notice this list of conditions and the ...

Страница 245: ... list of conditions and the following disclaimer 2 Redistributions in binary form must reproduce the above copyright notice this list of conditions and the following disclaimer in the documentation and or other materials provided with the distribution 3 All advertising materials mentioning features or use of this software must display the following acknowledgement This product includes software de...

Страница 246: ... OUT OF OR IN CONNECTION WITH THE SOFTWARE OR THE USE OR OTHER DEALINGS IN THE SOFTWARE util linux Redistribution and use in source and binary forms with or without modification are permitted provided that the following conditions are met 1 Redistributions of source code must retain the above copyright notice and the entire permission notice in its entirety including the disclaimer of warranties 2...

Страница 247: ...ED OF THE POSSIBILITY OF SUCH DAMAGE zlib Copyright C 1995 2012 Jean loup Gailly and Mark Adler This software is provided as is without any express or implied warranty In no event will the authors be held liable for any damages arising from the use of this software Permission is granted to anyone to use this software for any purpose including commercial applications and to alter it and redistribut...

Страница 248: ...mited Warranty covers all defects encountered in normal use of the Products and does not apply in the following cases A Loss or damage to the Products due to abuse mishandling accident improper maintenance use of non Canon accessories or failure to follow operating maintenance or environmental instructions prescribed in Canon USA s user s manual B If the Products are defective as a result of leaki...

Страница 249: ...ed in normal use of the Products and does not apply in the following cases A Loss or damage to the Products due to abuse mishandling accident improper maintenance use of non Canon accessories or failure to follow operating maintenance or environmental instructions prescribed in Canon Canada s user s manual B If the Products are defective as a result of leaking batteries sand dirt or water damage C...

Страница 250: ...ON U S A INC http pro usa canon com support 855 CINE EOS 855 246 3367 USA only UNITED KINGDOM Canon UK Ltd Unit 160 Centennial Park Centennial Avenue Elstree Hertfordshire WD6 3SG 020 7660 0186 Canon Inc 30 2 Shimomaruko 3 chome Ohta ku Tokyo 146 8501 Japan Canon Europa N V Bovenkerkerweg 59 1185 XB Amstelveen The Netherlands http www canon europe com ...

Отзывы: