42
43
A
Horizontal
position
42
43
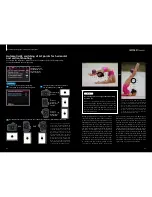
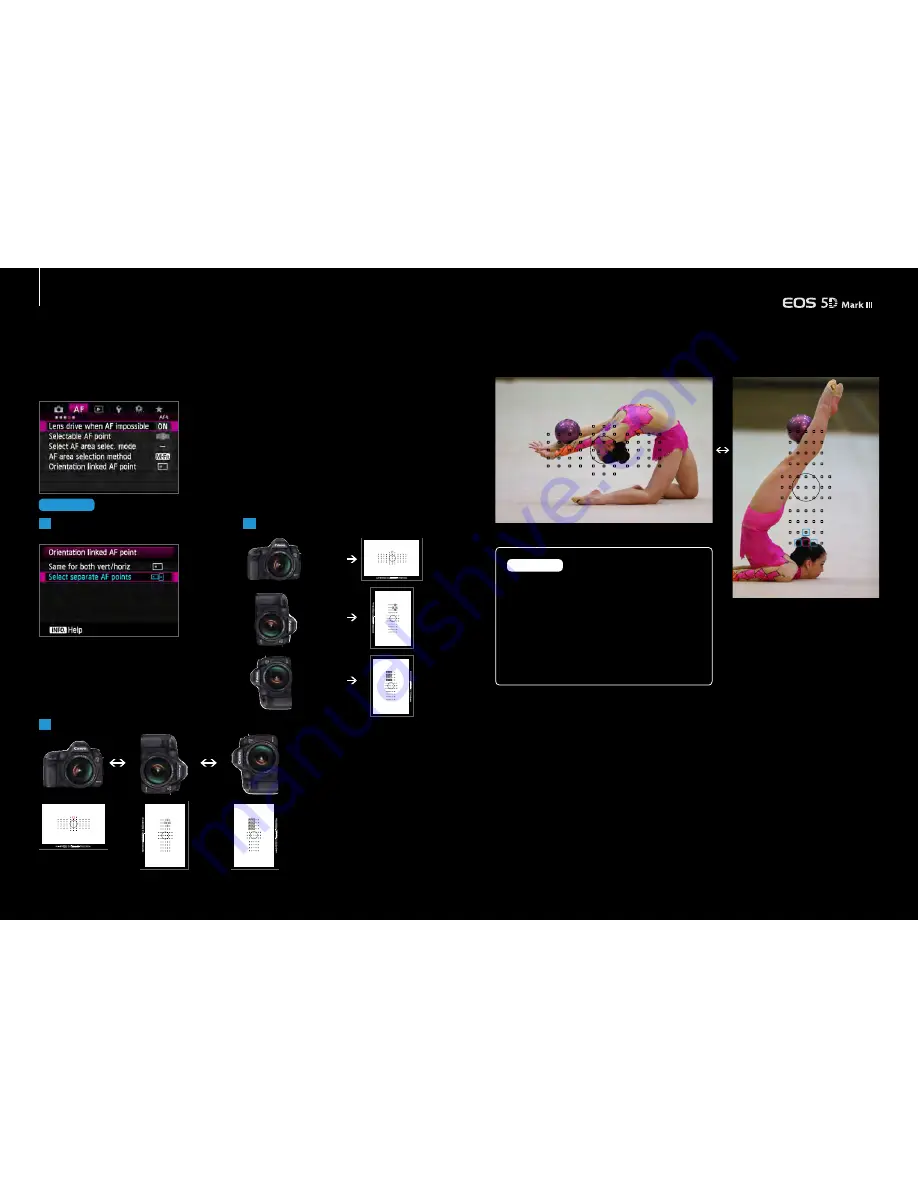
Select the [Select separate AF points]
option from [Orientation linked AF point]
By changing the camera's orientation, the set AF points and modes will switch automatically
Change the camera position and select
the desired AF point or AF mode
Set up steps
Note:
1
3
2
Utilizing the AF point setting and registration
Automatically switching of AF points for horizontal
and vertical shooting
Presetting the AF points, makes it easier to capture the desired composition
for horizontal and vertical shooting
Use [Orientation
linked AF point] in
the [AF4] tab to set
the AF points for
each orientation
B
Vertical
position
with grip at
the top
C
Vertical
position
with grip at
the bottom
First, select [Select separate AF
points] from [Orientation linked AF
point]. Next, select the AF area
selection mode and the manually
selected AF point for each of the
p o s i t i o n s (o r i e n t a t i o n) o f A )
Horizontal position, B) Vertical
position with grip at the top, and if
required C) Vertical position with
grip at the bottom. The settings
will automatically be remembered.
Now, for each of these orientations
the camera will automatically switch
to the select mode and AF points.
When shooting with different orientations the
camera will change between the AF area selection
mode, and manually selected AF point settings, and
the last setting will be remembered. Therefore, you
should check the mode and AF point position
before beginning a n
Be careful you do not forget that this setting
has been set
This shot was taken with the orientation
option set so that when in the horizontal
position the central AF point was set, but
when the grip is at the top in a vertical
position, the AF point is at the bottom
center. In rhythmic gymnastics the head
may b e cl o s e to the fl o o r during the
per formance, so the AF point was set
beforehand with this in mind.
During sporting events, or concerts, it is common
shoot while changing camera the orientation
between horizontal and vertical positions. The
EOS 5D Mark III has 61 AF points to manually
choose from which is a lot. This means it has a
high degree of composition freedom, however, if
you select the top left AF point in the horizontal
position for example, if you change the
orientation so the grip is at the top in the vertical
position, the AF point will end up at the bottom
left. If you want to capture the athlete’s entire
body and focus on their face when shooting,
you will have to quickly select another AF point.
In situations like this, AF point settings for each
orientation is extremely useful. By selecting
[Select separate AF points] from [Orientation
linked AF point], individual settings for each of
the AF area selection modes and the manually
selected AF points can be memorized. In the
previous case for example, if you set the center
upper edge AF point beforehand when in the
vertical position with the grip at the top, when
switching from the horizontal to vertical position,
it is possible to have the AF point line up with
the position of the face instantly. By envisioning
the composition you want to capture and setting
t h e a p p r o p r i a t e A F p o i n t o r A F m o d e
beforehand, will result in you being able to carry
on shooting as you change orientations.


