Canon EOS 50D Скачать руководство пользователя страница 13

Chapter 1 


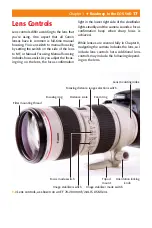
Roadmap to the EOS 50D


15

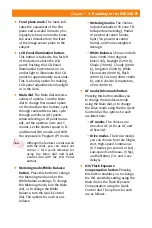
Picture Style along with the sharp-
ness, contrast, saturation, and color 
tone settings that are in eff ect. You 
can press the Info button to access 
the Detail Set. (settings) screen to 
adjust the settings. 


Picture Styles and customizing 
them are covered in Chapter 5.

✦ 

FUNC. (Function) button.

 Pressing 

the Function button displays a 
screen where the LCD monitor 
brightness can be adjusted. This 
screen includes a thumbnail image 
stored on the CF card, as well as a 
gray scale chart on the right. To 
change the brightness, turn the 
Quick Control dial to the left to 
darken or to the right to brighten 
the screen, and then press the Set 
button to confi rm the change. As 
you adjust the brightness, you 
should be able to clearly distin-
guish diff erences between each of 
the grayscale bars on the right. 
Custom Function IV-7: Assign 
FUNC. button, enables you to reset 
the Function button so that it dis-
plays the Image Quality, Exposure 
Compensation/Bracketing, Image 
Jump, or Live View Function set-
tings screen instead. 
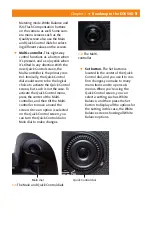
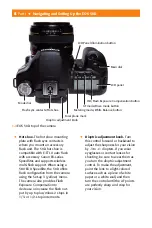
✦ 

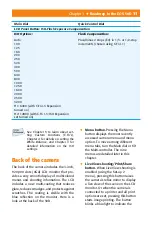
Power/Quick Control dial switch.


The power switch off ers three set-
tings. Off  does just what you expect 
it to do. The On setting turns on the 
power but limits the use of the 
Quick Control dial to make direct 
adjustments to some LCD panel 
functions. The topmost setting 

denoted by a hockey stick-type sym-
bol enables direct use of the Quick 
Control dial for setting the Flash 
Exposure Compensation amount, 
drive mode, and so on, on the LCD 
panel and in the viewfi nder. 
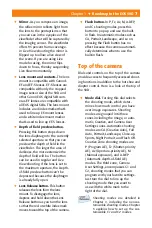
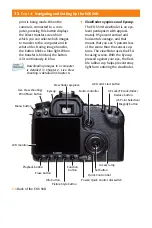
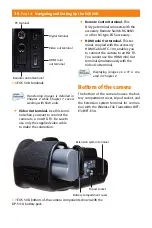
Side of the camera

On one side of the EOS 50D is the 
CompactFlash (CF) card slot door. Opening 
the door reveals the slot for the CF card and 
the card eject button. The opposite side of 
the camera houses two sets of camera termi-
nals under individual rubber covers. The rub-
ber covers are embossed with descriptive 
icons and text to identify the terminals. 

Here is an overview of each camera terminal.

✦ 

Digital terminal.

 This terminal 

enables you to connect the camera 
directly to a computer to download 
images from the camera to the 
computer, or to a PictBridge-
compatible printer to print images 
from the CF card.

✦ 

PC terminal.

 This threaded, no-

polarity terminal enables connec-
tion between the camera and 
studio fl ash units that have a sync 
cord. While Canon recommends 
using a sync speed of 1/30 to 1/60 
sec., I’ve found that the camera 
syncs with my studio strobes at 
1/125 sec. with no problem, 
although you should test your sys-
tem fi rst. With corded non-Canon 
fl ash units, the synch speed is 
1/250 sec. 

Содержание EOS 50D

Страница 1: ...o everyday perspective and o ers a road map to navigating the camera controls and menus Where possible I o er paradigms for using the camera that help you spend less time remembering what control to u...

Страница 2: ...Quick Control dial to change the Drive mode This holds true for the respectively the new sensor is engineered to increase each pixel s light sensitive area and to use a larger microlens over each pixe...

Страница 3: ...use the Main and Quick Control dials for select ing di erent values on the screen Multi controller This eight way control functions as a button when it s pressed and as a joystick when it s tilted in...

Страница 4: ...e Front of the camera While you as the photographer don t often see the front of the camera it includes the nicely sculpted grip that increases control and balance when handling the camera and it incl...

Страница 5: ...5 explains how to set up the cus tomizable C1 and C2 modes Mirror As you compose an image the re ex mirror re ects light from the lens to the pentaprism so that you can see in the eyepiece of the view...

Страница 6: ...te with ash sync contacts is where you mount an accessory ash unit The 50D hot shoe is compatible with E TTL II auto ash with accessory Canon EX series Speedlites and supports wireless multi ash suppo...

Страница 7: ...llows Focal plane mark The mark indi cates the equivalent of the lm plane and is useful in macro pho tography when you need to know the exact distance from the front of the image sensor plane to the s...

Страница 8: ...uative 35 zone TTL full aperture metering Partial 9 percent at center frame Spot 3 8 percent at center frame Center weighted Average White Balance Options Auto 3000 7000 K Daylight 5200 K Shade 7000 K...

Страница 9: ...t ting Custom Functions C Fn s Chapter 4 for details on setting the White Balance and Chapter 3 for detailed information on the ISO settings Back of the camera The back of the camera includes the 3 in...

Страница 10: ...n displays the Direct transfer screen from which you can select which images to transfer to the computer and in what order During image transfer the button blinks a blue light When the transfer is nis...

Страница 11: ...etting screen When working with camera menus the Multi controller is used to set White Balance shift settings and to select menu options AF On AF start button Canon also labels this button as the AF s...

Страница 12: ...an image is ren dered in terms of color saturation and contrast The Picture Style screen shows the currently selected If you set C Fn III 3 AF point selec tion method to use the Multi controller then...

Страница 13: ...he On setting turns on the power but limits the use of the Quick Control dial to make direct adjustments to some LCD panel functions The topmost setting denoted by a hockey stick type sym bol enables...

Страница 14: ...the camera houses the bat tery compartment cover tripod socket and the Extension system terminal for connec tion with the Wireless File Transmitter WFT E3 WFT E3A Transferring images is detailed in C...

Страница 15: ...the lens that you re using One aspect that all Canon lenses have in common is full time manual focusing You can switch to manual focusing by setting the switch on the side of the lens to MF or Manual...

Страница 16: ...he compensation The following diagram shows the view nder information and what each element represents Focusing distance range selection switch This switch limits the range that the lens uses when see...

Страница 17: ...ng the Menu button on the back of the camera Focusing screen AE lock AEB in progress Spot metering circle AF points Superimposed display H 2 1 2 ISO WB B W D 1 Flash ready Improper FE lock warning Hig...

Страница 18: ...W and any of the JPEG image quality settings Red eye On O O On Beep On O Shoot without a card On O Review time O 2 sec 4 sec 8 sec Hold Peripheral illumin Correct Enable Disable Shooting 2 menu Expo c...

Страница 19: ...blink in all image playback displays AF point disp Disabled Enable Superimposes the AF point that achieved focus on the image during playback Histogram Brightness RGB Brightness displays a tonal distr...

Страница 20: ...enu Info button Normal disp Camera set Camera Settings Shoot func Shooting function Normal display displays the Camera Settings screen when you press the INFO button once and the Shooting function scr...

Страница 21: ...stom Functions related to autofocus and drive operation including lens drive when AF is impossible lens AF stop button function AF point selection method superim posed display AF assist beam ring mirr...

Страница 22: ......

Отзывы: