background image

3

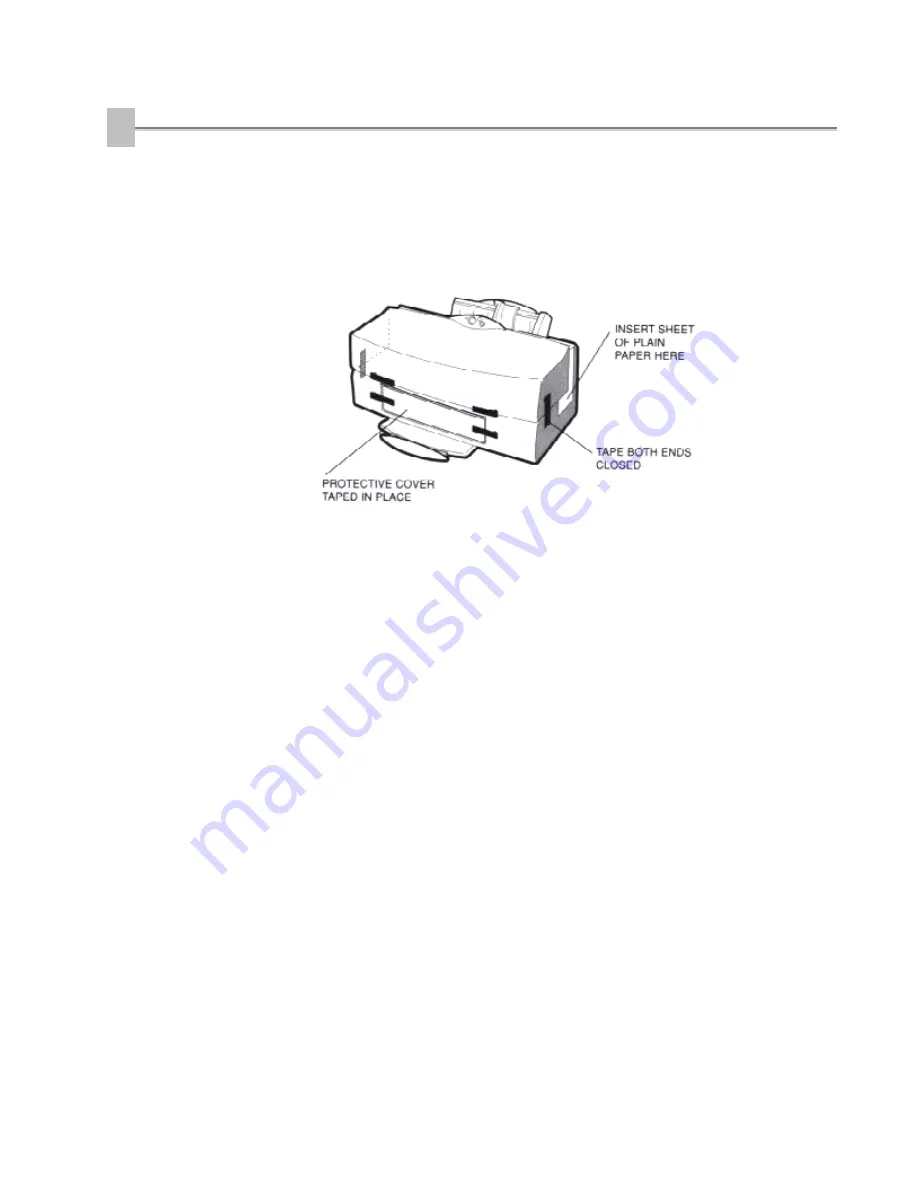
Tape the

printer.

o


Tape both ends so the printer cover will remain closed.

o


On the front of the printer, tape the original protective cover over
the paper output slot.

o


If the protective cover is not available, you can use a piece of
heavier-weight paper (such as card stock).  Cut the paper so that it
covers the paper output slot.

Содержание BJC7000 Series

Страница 1: ...BJC 7000 USER S MANUAL Canon ...

Страница 2: ...ows 95 Printer Setup Within Windows 3 1 Accessing the Printing Options The Windows Tabs Specifying Your Printing Options Recommended Print Mode Settings Changing the Print Mode Using Cartridge Detection and Pause Page Printing Speed Versus Color Ways to Improve Print Speed in Windows 3 Paper Handling Selecting Paper Types Paper Gu1idelines Printer Settings for Various Print Media Loading Paper Aut...

Страница 3: ...ows Cleaning the Print Heads Using the Operator Panel Deep Cleaning the Print Heads Deep Cleaning Using the Printer Driver Deep Cleaning Using the RESUME Button BJ Cartridge Guidelines Replacing BJ Tanks and BJ Cartridges BJ Cartridge and BJ Tank Maintenance Replacing the BJ Cartridges Replacing a BJ Tank in the BC 61 Color or BC 62 Photo BJ Cartridge Storing a BJ Cartridge Transporting the Printe...

Страница 4: ...er to meet your printing needs The BJC 7000 Series printers offer excellent print quality and fast print speed using both color and black inks We are certain you will be satisfied with this advanced Bubble Jet technology This chapter Lists the supplies and accessories you can purchase for the printer Describes Canon s customer support services ...

Страница 5: ... dealer near you call the Canon Referral Service at 1 800 848 4123 If supplies are not available from your local dealer you can order directly from Canon by calling 1 800 385 2155 BJ Cartridges and BJ Tanks You can use the following BJ cartridges with the BJC 7000 Series printers BC 61 Color BJ Cartridge BC 60 Black BJ Cartridge BC 62 Photo BJ Cartridge You can purchase the following BJ tanks for ...

Страница 6: ...o Canon s Bubble Jet products that is attributable to the use of third party parts or supplies including inks The limited warranty remains in effect for its life once that particular damage has been properly repaired For optimum printing results Canon recommends that you use only Canon BJ cartridges Canon Specialty Papers Canon manufactures numerous specialty papers including o High Gloss Photo Fi...

Страница 7: ...48 o Speak to a technician currently 24 99 during holidays and days hours not listed above regarding urgent product questions or for products no longer under warranty 1 800 423 2366 o E mail support via the Canon Computer Systems Inc Web site www ccsi canon com o 24 hour toll free Fax Retrieval System 1 800 526 4345 o 24 hour Bulletin Board Service 1 757 420 2000 Support program specifies subject ...

Страница 8: ... warranty information to find out about the different service options available to you Save your sales receipt for proof of purchase In the event that your printer needs service you will need your proof of purchase to obtain warranty service If you feel your BJC 7000 Series Color Bubble Jet Printer needs servicing contact Canon on the World Wide Web to locate the Canon Authorized Service Facility ...

Страница 9: ... your Quick Start Guide for details Installing a Printer Driver Before you can use any type of printer with your computer you must install a printer driver The printer driver tells the computer what kind of a printer you are using The printer driver also controls the various settings such as print quality an paper type You define these settings within the printer driver and the printer driver then...

Страница 10: ...exact printing procedure 1 Start your application Start the program you are using to create the document and open the document you want to print 2 Make sure the Canon BJC 7000 is selected as your default printer Choose Print Setup from the File menu Click on Setup button if you want to make any adjustments as appropriate for printing your document See Printer Setup Within Windows 95 or Printer Set...

Страница 11: ... printer and then select the Properties command from the File menu From the Printers folder you can select the printer click the right mouse button and then select Properties from the drop down list Using the Printer Driver in Windows 95 The printing options are displayed on the following Windows 95 tabs General Details Paper Graphics Setting and Control See The Windows Tabs section page 2 5 for d...

Страница 12: ...Setup option available from the File menu of most applications that run in Windows If the Print Setup option does not appear in the File menu for your application refer to the user s manual supplied with the application It should provide information about changing the printer setup parameters In Windows 3 1 the printing options are displayed on these tabs Paper Graphics Setting and Control See the...

Страница 13: ...add comments regarding the printer driver and print a test page or a separator page You see this tab when you open the Properties dialog box from the Printers folder not from within a Windows application o Details Windows 95 only This tab allows you to specify printer port settings spool settings and time out settings You see this tab when you open the Properties dialog box from the Printers folde...

Страница 14: ...o Main This tab allows you to select your Print Mode The printing options on this tab are the same for both Windows 95 and Windows 3 1 ...

Страница 15: ...o Paper This tab allows you to specify paper size and page orientation the Printin options on this tab are the same for both Windows 95 and Windows 3 1 ...

Страница 16: ...o Print This tab allows you to specify background printing and color mode The printing options on this tab are the same for both Windows 95 and Windows 3 1 ...

Страница 17: ...u to initiate print head cleaning print test pages move the BJ cartridge so you can change a BJ tank or the cartridge itself or turn the printer off The printing options on this tab are the same for both Windows 95 and Windows 3 1 ...

Страница 18: ...o To save your settings without exiting click the Apply button o To access the Help file click on Help button o When you move the mouse cursor over one of the printing options a help message appears at the bottom of the tab o To find out about a setting click the question mark in the upper right corner Move the larger question mark to the setting you are interested in and click again Recommended P...

Страница 19: ...or printing draft texts o For high quality printing of photos and graphics you can use special high resolution paper and select one of the following Print Modes Graphics For graphics with clearly defined graph and color boundaries Photo For photos and graphics with many gradation levels SuperPhoto Highest quality for photos this setting requires the use of a BC 62 Photo BJ Cartridge o For printing...

Страница 20: ...Changing the Print Mode On the Main tab you can click the Change button to customize the selected Print Mode You see three tabs o Quality o Color ...

Страница 21: ...o Save Using Cartridge Detection and Pause Page On the Control tab click on Custom Setting to enable or disable Photo Cartridge Detection and or Pause Page ...

Страница 22: ... only This avoids the extra step of sending the print file to the Print Manager and may increase your printing speed by as much as 25 depending on the computer you are using o Add a permanent swap file in Windows 3 1 Under the 386 Enhanced icon in the Windows Control Panel add or create a permanent swap file that is from 4 MB to 9 MB The computer will be able to prepare the print file faster See y...

Страница 23: ...ive as well as cause the print speed to slow down o Use primary colors when printing presentation graphics Use black cyan yellow magenta blue green and red when possible The computer will need to calculate and transfer less dot information o User the Draft setting for Print Mode The printer will need to image fewer dots o Use Plain Paper as the Media Type The print head will make one or two passes...

Страница 24: ... settings for various print media o Loading paper o Manually feeding paper o Printing on envelopes o Using Canon Specialty Papers To ensure the best performance of your printer you ll want to select the best paper and load it correctly You can stack paper in the sheet feeder to load it automatically or you can manually feed one sheet at a time ...

Страница 25: ...ckage to see which side to print on first High Gloss Photo Film The Canon High Gloss Photo Film HG 201 features a bright white finish that lends striking visual power to charts graphs and photographic images Use this film to make your presentation materials and graphics look professional When printing on this film use the BC 62 Photo BJ Cartridge and select High Gloss Film in the printer driver Gl...

Страница 26: ...aft and sewing projects Fabric sheets are 9 5 x 14 inches Back Print Film Canon Back Print Film BF 102 has been specially developed for Canon Color Bubble Jet printers The film is designed to deliver brilliant high intensity color images suitable for business presentations design work or professional reports Back print film is printed on the back matte nonglossy side of the film in mirror image an...

Страница 27: ...may not match because the 1 6 inch line spacing of the printer is slightly less than that of graph paper o If the print density of your page is very high light paper stock may curl slightly due to the large amount of ink If you need to print dense graphics try printing on heavier stock o Do not use thicker paper that meets the specifications for this printer Printing with a paper that is thick eno...

Страница 28: ...ilm HG 201 Auto 1 Glossy Photo Paper GP 201 Auto 1 High Resolution Paper HR 101 Auto Approx 100 T Shirt Transfers TR 101 Auto 1 Greeting Cards GC 101 Manual 1 Fabric Sheet FS 101 Auto 1 Back Print Film BF 102 Auto 10 CF 102 Transparencies Auto 30 Other heavier weight print media Manual 1 Envelopes Single Stack Auto Auto 1 15 ...

Страница 29: ...ts of transparency film or 10 sheets of back print film in the sheet feeder However these special media may not advance correctly under unusual environmental conditions such as extreme temperatures or humidity If you have trouble with special papers becoming skewed or feeding multiple sheets do not stack them in the sheet feeder Manually feed them one sheet at a time Automatically Feeding Paper 1 ...

Страница 30: ...er along the edge that will feed into the printer first 3 Slide the stack of paper into the sheet feeder until it stops o Align the edge of the paper with the right edge of the sheet feeder o Secure the stack with the paper guide 4 Start your print operation o Make sure the printer is turned on ...

Страница 31: ...ht away and allow the ink to dry o The capacity of the paper output tray is 20 sheets of paper To reduce paper jams remove paper from the output tray before the count reaches 20 o If paper curls after printing remove it immediately otherwise paper jams may occur o The platen a roller on the inside of the printer may become inked if your print data beyond the width of the page If this happens clean...

Страница 32: ...eeder Manually Feeding Paper You use the manual feed function when printing on heavier weight print media 17 lb to 146 lb 64 g m2 to 550 g m2 or paper thickness up to 0 8mm 1 Move the manual feed guide to match your paper size 2 Set up your print operation o If you are using Windows you must select Manual Feed in the BJC 7000 Series Printer Driver for the printer to accept manually fed paper o On ...

Страница 33: ...o 15 envelopes in the sheet feeder or you can manually feed envelopes one at time U S Commercial number 10 COM10 envelopes and European DL envelopes are recommended You may be able to stack envelopes of other sizes in the sheet feeder however Canon cannot guarantee consistent performance on envelope sizes other than COM10 and DL The following envelopes are not recommended because they may cause ja...

Страница 34: ...eder You can also manually feed envelopes one at a time 1 Prepare the envelopes o Arrange the stack of envelopes on a firm surface and press down firmly on the edges to make the folds crisp o Press all the way around the envelopes to remove any curls and to expel air from inside the envelopes o To remove curling from envelopes hold the edges of the envelopes diagonally and bend gently o Make sure ...

Страница 35: ...envelopes o Slide a stack of envelopes into the sheet feeder until it stops o Align the edge of the paper guide with the left edge of the stack of envelopes 3 Start your print operation o Make sure the printer is on ...

Страница 36: ... paper follow these guidelines o When automatically feeding transparencies or back print film remove each sheet after it is delivered Do not allow film sheets to stack up o Let the printed sheets of film or paper dry completely before storing them Paper type Drying time approx Canon High Gloss Photo Film Canon Glossy Photo Paper GP 201 Canon Fabric Sheet FS 101 Canon Back Print Film BF 102 Canon C...
Страница 37: ...ady to use them o Store unused film at temperatures between 59 F to 86 F 15 C to 30 C The relative humidity should be between 10 and 70 Canon s High Resolution Paper HR 101 Canon s High Resolution Paper HR 101 is designed for high quality printing This paper is specially coated to produce delicate color output After using a package of High Resolution Paper 200 sheets you need to use the cleaning s...

Страница 38: ...et feeder o Adjust the paper guide to the edge of the cleaning sheet 3 Feed the sheet o Make sure the printer is on o Press and hold the RESUME button o The printer beeps once slowly Continue to hold down the RESUME button until you hear two more beeps Then release the button o The printer feeds the sheet and then ejects it o Use a cleaning sheet once only ...

Страница 39: ...ps for using Fabric Sheets with the printer Be sure to follow these guidelines o To avoid paper jams smearing and other problems do not open the printer s cover during printing o Use the fixing agent that comes with the Fabric Sheet FS 101 o Do not touch newly printed fabric sheets until the ink is completely dry This takes about one hour Printing On a Fabric Sheet 1 Set up the printer o Make sure...

Страница 40: ...o the edge of the fabric sheet 3 Set up the BJC 7000 Series Printer Driver for Windows o In the Paper tab select A4 for the Paper Size o In the Main tab click on the Change button Then in the Quality tab select Fine for Halftoning and Fabric Sheet for Media Type To save your settings use the save tab o Start the print operation from your Windows application ...

Страница 41: ... o Wash the printed fabric sheet for about three minutes under lukewarm running water to remove extra ink o Hang the fabric sheet up to dry it again o Iron the dried fabric sheet with a clothes iron o See the booklet that comes with the Fabric Sheet FS 101 for details on drying and washing o Clear enough space in front of the printer for at least one sheet of paper to rest after printing ...

Страница 42: ...udes o Printer guidelines o Cleaning the printer o Printing the Nozzle Check Pattern o Cleaning the print heads o Deep cleaning the print heads o BJ cartridge guidelines o Replacing the BJ cartridges o Replacing a BJ tank in the BC 61 Color or BC 62 Photo BJ cartridge o Storing a BJ cartridge o Transporting the printer ...

Страница 43: ...rily o Do not unplug the printer or turn off a power strip to which the printer is attached when the printer s power is turned on This may prevent the print head unit from returning to the home position on the right and being capped which may cause the print head to dry out This is critical If left uncapped the print head may clog and may need to be replaced o Do not move the mechanism that holds ...

Страница 44: ...surface of the printer o When cleaning the printer avoid the area near the print head on the BJ cartridge Do not touch the print head Ink may leak out and cause stains Clean the printer regularly to avoid printing problems Remove any ink mist or paper debris from the interior of the printer using a soft cloth moistened with water Clean especially well around the platen area If the rollers become d...

Страница 45: ...and your print quality Before selecting the Test Prints option make sure paper is properly loaded in the sheet feeder see Automatically Feeding Paper starting on page 3 6 Printing the Nozzle Check Pattern From Windows 1 Start the printer driver o Click the Start button select Settings and then click Printers o Right click BJC 7000 and then select Properties 2 Click on the Control tab o Then click ...

Страница 46: ...in paper in the auto sheet feeder o Do not use a paper size other than letter or A4 2 Turn the printer off and back on o Turn off the printer and wait a few seconds o Press down and hold the POWER button The printer will beep once Continue to hold down the POWER button until you hear one further beep then release the POWER button The test print begins o Check the results of the Nozzle Check Patter...

Страница 47: ...zzle Check Pattern The Nozzle Check Pattern looks like this when the BC 61 Color BJ Cartridge is installed If any portion of the Nozzle Check Pattern is incorrect clean the print head See the next section for details ...

Страница 48: ...he printer automatically performs print head cleaning each time you turn it on Cleaning the Print Heads From Windows If you are using Windows you can execute print head cleaning from the Control tab in the BJC 7000 Printer Driver 1 Start the printer driver and click the Control tab o Now click the first Print Head Cleaning icon ...

Страница 49: ...artridge select Color 3 Click Execute and follow the instructions on the screen o To check the print head performance prin the Nozzle Check Patter see page 4 4 o If the results of the Nozzle Check Pattern are not satisfactory perform print head deep cleaning see page 4 10 Cleaning the Print Heads Using the Operator Panel 1 Make sure the printer is turned on o Make sure the green POWER light is on ...

Страница 50: ... turned on Both print heads are cleaned o Perform the print head cleaning only when you encounter a print quality problem Unnecessary and repetitious cleaning will waste ink o If you execute the print head cleaning while paper is manually loaded the printer will eject the paper and then perform the cleaning o If you press and hold the RESUME button until the printer beeps twice the printer will pe...

Страница 51: ...so deep clean the print heads only after print head cleaning has failed to correct a problem o Before you begin make sure both the printer and the computer are turned on Always perform print head cleaning with the BJ cartridges installed in the printer Never remove the BJ cartridges from the cartridge holder or touch the print heads Deep Cleaning Using the Printer Driver Make sure paper is loaded ...

Страница 52: ...see page 4 4 If the results of the Nozzle Check Pattern are not satisfactory repeat these four steps in the following order until the pattern is satisfactory 1 Clean the print head 2 Print the Nozzle Check Pattern 3 Deep clean the print head 4 Print the Nozzle Check Pattern Deep Cleaning Using the RESUME Button Make sure the printer is on o Press and hold down the RESUME button until the printer b...

Страница 53: ...e problem has not been corrected after deep cleaning the print head four or five times replace the print head BJ Cartridge Guidelines The printer s cartridge holder holds two BJ cartridges one BC 60 Black BJ Cartridge and either one BC 61 Color BJ Cartridge or one BC 62 Photo BJ Cartridge o BC 60 Black BJ Cartridge Contains the print head unit and black ink only When you run out of black ink you r...

Страница 54: ...rinting When used with Canon s High Gloss Photo Film HG 201 Glossy Photo Paper GP 201 or High Resolution Paper HR 101 this ink produces images comparable to your favorite photographs When you run out of ink you replace the BJ tank Use only the BCI 62 Photo BJ Tank with the BC 62 Photo BJ Cartridge Replacing BJ Tanks and BJ Cartridges The actual amount of ink that you use will vary depending on the...

Страница 55: ...ck BJ Cartridge if it has been in use for more than one year Canon has more engineers dedicated to creating quality ink for providing the best results for output on Bubble Jet printer than any other organization Canon does not prohibit the use of third party inks and the use of third party inks does not invalidate the product s limited warranty However Canon cannot guarantee the quality or perform...

Страница 56: ... Cartridge make sure you store the cartridge not being used in the Ink Cartridge Storage Box o Keep BJ cartridges and BJ tanks in their sealed containers until you are ready to use them o Do not remove the BJ tank from the BC 61 Color BJ Cartridge or the BC 62 Photo BJ Cartridge unnecessarily This may cause the ink to clog o If spilled the ink is difficult to remove Therefore it s a good idea to k...

Страница 57: ... how to replace the BC 60 Black Cartridge when it has run out of ink or how to switch the BC 61 Color BJ Cartridge with the BC 62 Photo BJ Cartridge When switching from the BC 61 Color BJ Cartridge to the BC 62 Photo BJ Cartridge or vice versa be sure to replace the entire unit Do not insert a BCI 61 Color BJ Tank into a BC 62 Photo BJ Cartridge nor a BCI 62 Photo BJ Tank into a BC 61 Color BJ Car...

Страница 58: ...nutes for the print head to cool down then press the CARTRIDGE button again 2 Remove the BJ cartridge o If you are removing the BC 60 Black BJ Cartridge pull up on the left cartridge to remove it o If you are removing the color cartridge either the BC 61 Color BJ Cartridge or BC 62 Photo BJ Cartridge pull up on the right cartridge to remove it ...

Страница 59: ... If you are switching the color cartridges store the cartridge you removed in the SB 60 Ink Cartridge Storage Box The storage box is for the BC 61 or BC 62 only The BC 60 stays in the printer at all times o If necessary open a new BJ cartridge box Then remove the cap and tape 4 Insert the new BJ cartridge o If you are inserting a BC 60 Black BJ Cartridge insert it into the left side of the cartrid...

Страница 60: ...ck it in place 5 Press the CARTRIDGE button once Then close the printer cover The printer automatically starts cleaning the print heads and the POWER light blinks This will take about two minutes After print head cleaning is finished the POWER light stays on and the printer is ready for operation Now perform the print head alignment procedure see the Quick Start Guide for details Every time you re...

Страница 61: ...e sure the printer s power is on 1 Open the front cover and press the blue CARTRIDGE button once o The printer beeps and moves the cartridge holder to the left side of the printer o The POWER light blinks while the cartridge holder is positioned to the left of the printer 2 Remove the empty BJ tank o The color cartridge is on the right o Press in on the release tab and then lift the BJ tank up and...

Страница 62: ...lor BJ tanks cannot be refilled Always discard them immediately o If a BC 61 Color BJ Cartridge is installed you must replace the old BJ tank with a new BJ tank for the BC 61 Color BJ Cartridge o If a BC 62 Photo BJ Cartridge is installed you must replace the old BJ tank with a new BJ tank for the BC 62 Photo BJ Cartridge o If you replace the BJ tank for the BC 61 Color BJ Cartridge or BC 62 Photo...

Страница 63: ...tank 7 Press the CARTRIDGE button once then close the printer cover o The printer automatically starts cleaning the print heads and the POWER light blinks This will take about two minutes After print head cleaning is finished the POWER light stays on and the printer is ready for operation o Perform another test print to make sure the new color BJ tanks are functioning normally ...

Страница 64: ...hoto BJ Cartridge only The BC 60 Black BJ Cartridge is always in the printer 1 Open the Ink Cartridge Storage Box o When opening the Ink Cartridge Storage Box press in on the release tab that locks the cover in place wpe63132 gif 9144 bytes 2 Carefully set the cartridge in the storage box o You must insert the cartridge correctly or the storage box will not close o The protective cap must be remov...

Страница 65: ...another or if you want to store it follow these steps 1 Turn off the printer s power o Make sure the print head is in the home position on the right side of the printer o Remove any paper from the sheet feeder o Detach the interface cable o Do not remove the AC adapter 2 Open the front cover o Lay two small sheets of plain paper on either end of the printer and close the cover This ensures a tight...

Страница 66: ...emain closed o On the front of the printer tape the original protective cover over the paper output slot o If the protective cover is not available you can use a piece of heavier weight paper such as card stock Cut the paper so that it covers the paper output slot ...

Страница 67: ...ked FRAGILE or HANDLE WITH CARE o Do not remove the BJ cartridge from the printer or ship a BJ cartridge or a BJ tank from which you have removed the protective cap An opened BJ cartridge or BJ tank that is not installed in the printer or in the Ink Cartridge Storage Box may leak and the print head may dry out ...

Страница 68: ...gh our on line support services and through our Fax Retrieval System On line services include the World Wide Web and our BBS This chapter also contains information to help you solve printer problems It covers a few basic problems and describes how to clear a paper jam For complete problem solving information be sure to use our support services See Getting Help From Canon in Chapter 1 page 1 4 for ...

Страница 69: ... o Serial number o Place of purchase o Nature of problem o Steps you have taken to solve the problem and the results The serial number is located on the label on the back of the printer Attempting to repair the printer yourself may void the limited warranty as to that repair See the limited warranty information that came with your printer for details ...

Страница 70: ... all your cable connections Check your printer driver setup Check your computer configuration o If your print quality is not satisfactory Clean the print head Clean the print head five times Replace the BJ cartridge o If colors are missing Perform a Nozzle Check Pattern see page 4 4 Clean the print head see page 4 7 If necessary replace the BJ cartridge see page 4 16 ...

Страница 71: ...he POWER button o Turn off the printer 2 Gently pull the paper out with one hand while holding down the printer with the other hand o If the paper tears off inside the printer open the printer s cover and remove the paper left inside the printer 3 Press the POWER button to turn the printer back on o The POWER light comes on and the print head moves to the home position o The printer is now ready f...

Страница 72: ... inches 13mm Plain Paper 20 lb or 75 g m Approx 130 sheets 0 5 stack High gloss photo film 1 sheet Glossy photo paper 1 sheet High resolution paper Approx 100 sheets 0 5 stack Transparencies 30 sheets Back print film 10 sheets Fabric sheets 1 sheet T shirt transfers 1 sheet Envelopes 15 Envelopes U S Commercial number 10 or European DL Paper Size Letter 8 5 x 11 Legal 8 5 x 14 A4 210 mm x 297 mm ...

Страница 73: ...bric Sheets Fabric Sheets FS 101 for Canon Bubble Jet Printers Back Print Film Canon Back Print Film BF 102 Transparencies Canon Transparency Film CF 102 Envelopes Commercial Number 10 or European DL Paper Weight Automatic Feed 17 to 30 lb 64 to 105 g m Manual Feed 17 to 157 lb 64 to 550 g m Print Speed Monochrome Up to 5 ppm Color Up to 3 5 ppm Print speed may vary with content of the document an...

Страница 74: ... 3 mm L 0 20 in 5 mm R 0 25 in 3 mm R 0 20 in 5 mm T 0 12 in 3 mm T 1 10 in 27 mm B 0 28 in 7 mm B 1 10 in 27 mm Printable area for envelopes To ensure the best print quality make sure printing on envelopes is well within the printable area described below ...

Страница 75: ...ox 4000 pages cartridge at 15 coverage BCI 61 Color Ink Tank Colors Cyan magenta yellow Capacity Approx 320 pages tank at 15 coverage BC 62 Photo BJ Cartridge Print head 480 nozzles 80 Nozzles for each color cyan magenta yellow photo cyan photo magenta photo yellow Capacity Approx 4000 pages cartridge at 15 coverage BCI 62 Photo Ink Tank Colors Cyan magenta yellow photo cyan photo magenta photo ye...

Страница 76: ...o 35 C Humidity 10 to 90 RH no condensation Storing Environment Temperature 32 F to 95 F 0 C to 35 C Humidity 5 to 90 RH no condensation Power Source USA Canada AC 120 V 60Hz 0 65 A Power Consumption 8 watts maximum nonprinting 40 watts maximum printing Dimensions 18 4 467mm W x 12 3 313mm D x 8 6 218mm H Weight Approx 14 1 lb 6 4 kg with AC adapter attached ...

Отзывы: