background image

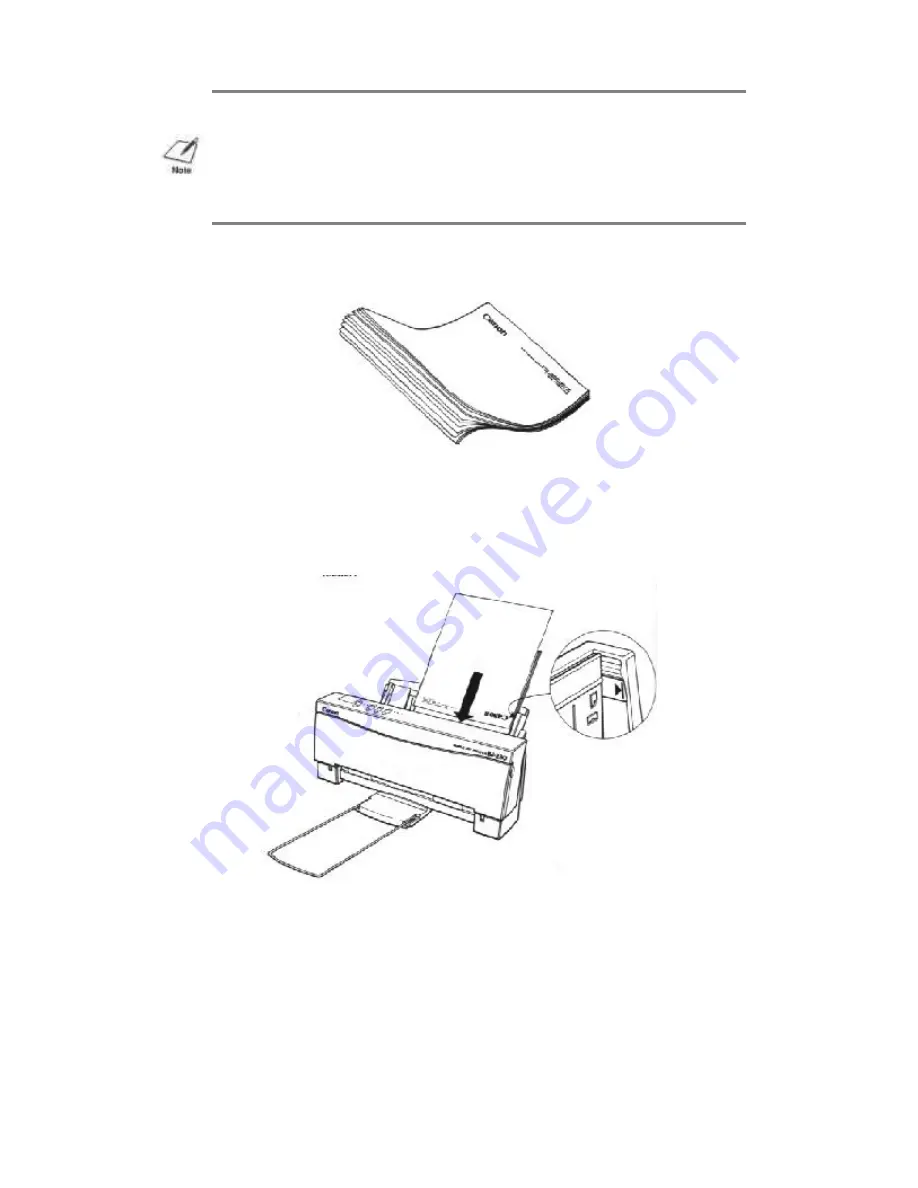
2. Fan the paper before stacking it in the sheet feeder. 

3. Align the stack of paper with the right edge of the sheet feeder 

and slide in the stack until it stops. Do not force the paper into the 
printer. Make sure the stack of paper does not exceed the paper 
limit mark or the tab on the right side of the sheet feeder. 

4. Insert the paper so that the side you want to print on is facing you. 

If you are using a preprinted stock, such as letterhead, insert the 
top of the paper into the sheet feeder first.

5. Adjust the paper guide to the stack of paper , and adjust the paper 

exit support to match the width of your paper so that the paper 
will be centered on the support. 

NOTE: You set the paper selection lever to the front position only when 
loading envelopes or manually feeding paper. If it is set to the front 
position when you are automatically feeding stacks of normal paper, the 
printer may feed multiple sheets or jam.

Содержание BJ-230

Страница 1: ...BJ 230 USER S MANUAL Canon ...

Страница 2: ...ration Feeding Paper Selecting a Print Mode Selecting Reduction Mode Printing the Test Prints Performing Automatic Line Feeds Chapter 5 Using the Printer With Your Software Setting Up Windows for Your Printer Setting Up Other Software Applications Software and Printer Compatibility Chapter 6 Maintaining the Printer Cautions Cleaning the Printer Replacing the Ink Cartridge Transporting the Printer ...

Страница 3: ...Plank and Cindy Cassat Appendix B Interface Specifications Appendix C Printer Command Summaries and Character Set BJ 10 Command Summary BJ 10 Character Sets Epson LQ Command Summary Epson LQ Character Sets Glossary Index ...

Страница 4: ...Printer BJ 230 produces high quality printing by incorporating many useful features Excellent print quality High performance print head offers 360X360 dots per inch dpi for high resolution graphics Convenient paper handling An automatic sheet feeder holds up to 100 sheets of letter or legal size paper 50 sheets of ledger size paper 10 envelopes or 10 transparencies Software Compatibility Two resid...

Страница 5: ...all the information you need to set up and operate your printer in several easy to read chapters Chapter 1 Introduction Introduces you to the features of the printer and describes how this manual is organized Chapter 2 Setting Up the Printer Describes how to select a location for your printer and how to unpack and assemble it Chapter 3 Loading Paper Describes how to select paper and how to load it...

Страница 6: ...anual call the Canon Special Offers Group at 1 800 385 2155 Conventions This User s Manual uses the following conventions to help you operate the printer correctly and safely Distinctive typefaces identify the printer buttons you press the lights on the operator panel and any commands you enter at your computer For example the buttons you press appear in this typeface POWER The lights you see appe...

Страница 7: ...idays In other countries please contact your Canon dealer Servicing the Printer The Canon Bubble Jet Printer BJ 230 is designed with the latest technology to help you realize years of trouble free operation The blue warranty card that came with your printer describes CCSI s limited two year warranty for its Bubble Jet Printers Be sure to read the warranty information and save the blue card Also sa...

Страница 8: ...scribes how to connect the power and interface cable If you have already set up your printer using the Quick Start Guide you may want to scan this chapter for the additional information it supplies Unpacking the Printer Carefully remove all items from the box Ask someone to hold the box while you pull the printer and its protective packaging from the carton In addition to this User s Manual you wi...

Страница 9: ...ng on normal paper Choosing a Location for Your Printer Whether at home or in the office you need to find a comfortable and convenient location for the printer Follow the guidelines in this section to make sure the location is right for your printer Canon Bubble Jet Printer BJ 230 Quick Start Guide BC 02 ink cartridge Windows driver diskette in envelope Paper exit support Product Warranty card AC ...

Страница 10: ...our computer away from potential sources of electromagnetic interference such as loudspeakers or the base units of cordless telephones Make sure there is enough room around the printer for storing and feeding paper Keep the paper exit area clear from objects that may block paper from exiting the printer Make sure there is enough room to fully extend the paper rest and use the paper exit support Th...

Страница 11: ...Examining the Printer Before setting up your printer you should become familiar with its components and understand their functions From the Front ...

Страница 12: ...For loading multiple sheets of normal weight paper set this lever to the back position For envelopes or thick paper set this lever to the front position Leave this lever in the back position when loading stacks of normal paper Operator Panel Controls the printer and defines basic printer operations The various lights on the operator panel indicate statusof the prienter and identify the print mode ...

Страница 13: ...this chapter Dip switch cover Protects the DIP switches You use these switches to change the printer s factory default settings For information about changing the default settings see Chapter 8 Customizing the Printer From the Back Parallel interface port Allows you to attach the printer s interface cable AC power receptacle Allows you to attach the printer s power cord Inside the Printer ...

Страница 14: ...e components of your printer you are ready to install the printer and connect it to your computer The first step is to install the ink cartridge Installing the Ink Cartridge You use the BC 02 ink cartridge with this printer Each ink cartridge can print about 400 to 500 letter size pages 700 000 characters in HQ mode and 800 to 1000 pages 1 400 000 characters in HS mode The actual amount varies acc...

Страница 15: ...ot attempt to disassemble the cartridge Do not vigorously shake the ink cartridge while handling it To install the ink cartridge follow these steps 1 Grasp the sides of the front cover and open it so you can access the cartridge holder 2 Take the ink cartridge out of its protective packaging 3 Slide off the orange protective cap from the print head and CAUTION Keep the ink cartridge out of childre...

Страница 16: ...de of the printer 5 Lift the green lock lever on the cartridge holder CAUTION Avoid touching the yellow mounting base on which you place the cartridge especially the circuit board on the side of the mounting base and the film cable that extends from the cartridge holder ...

Страница 17: ...the ink cartridge over the yellow mounting base with the print head facing down When installed correctly the label on the cartridge will appear upside down 7 Push the lock lever down until it snaps into place ...

Страница 18: ...right and caps itself to keep from drying out If you unplug the printer while it is printing or if you move the ink cartridge from the home position the cartridge is not capped and may dry out CAUTION Do not move the ink cartridge after installing it Moving the ink cartridge to the left and leaving it there may uncap the print head and cause it to dry out NOTE If after installing a new ink cartrid...

Страница 19: ...n the sheet feeder to load it automatically or you can manually feed one sheet at a time The path that the paper travels through the printer is the same for automatic and manual feeding Automatically Feeding Paper Your printer produces letter quality print on most plain bond papers including cotton bond papers and photocopying papers This printer does not require special ink jet papers CAUTION Mak...

Страница 20: ...osition NOTE Attempting to print on damp curled wrinkled or torn paper can cause paper jams and poor print quality Size Letter 8 5 x 11 inches 210 x 279 mm Legal 8 5 x 14 0 inches 216 x 356 mm portrait orientation only Ledger 11 x 17 inches 279 x 420 mm portrait orientation only Thickness Less than 0 008 inches 0 2 mm Weight 17 to 24 lbs 64 to 90 g m NOTE Make sure the paper size you select within...

Страница 21: ...want to print on is facing you If you are using a preprinted stock such as letterhead insert the top of the paper into the sheet feeder first 5 Adjust the paper guide to the stack of paper and adjust the paper exit support to match the width of your paper so that the paper will be centered on the support NOTE You set the paper selection lever to the front position only when loading envelopes or ma...

Страница 22: ...1 x 104 mm Other envelope sizes are not supported by this printer NOTE Do not leave paper stacked in the printer for long periods os time longer sheets of paper may become bent or curled over time This may cause multiple sheets to feed or the paper may jam CAUTION Some envelopes are not recommended because they may cause jams or smears or may damage your printer Envelopes with windows metal clasps...

Страница 23: ...d then pressing the ON LINE button The beeper sounds once and the indicator light for the current print mode blinks quickly Press ON LINE to set the printer back on line 3 Set the green paper thickness lever on the inside of the printer to the right 4 Set the paper selection lever to the forward position and move the paper guide to the left to match the width of the envelopes ...

Страница 24: ...d the envelopes to remove any curls and expel air from inside the envelopes 6 Align the stack of envelopes with the right edge of the sheet feeder and slide in the stack until it stops 7 Adjust the paper guide to the stack of envelopes and adjust the paper exit support to match the width of the envelopes 8 Start your print operation ...

Страница 25: ...up to 28lb or 105 g m or a transparency stock Use transparencies that are intended for use with ink jet printers For best results use Canon s BJ transparency film Q07 0001 M1 You can also use 3M s CG3480 transparency film To manually feed a single sheet follow these steps 1 Make sure the printer is turned on and on line 2 Set the paper selection lever on the right side of the sheet feeder to the f...

Страница 26: ... size paper in landscape orientation in the sheet feeder NOTE When printing on a transparency insert the sheet so the transparency side is facing you and the backing is toward the sheet feeder Insert the top of the transparency where it is attached to its backing into the sheet feeder first NOTE After printing on thick paper or envelopes set the paper thickness lever inside the printer back to the...

Страница 27: ... landscape orientation than it does when actually printing in landscape mode When you load paper in landscape orientation you can use reduction mode to fit even more text on next page See Chapter 4 Using the Operator Panel for details on using reduction mode ...

Страница 28: ...g the operator panel You can also select printer specific functions such as the print mode and you can start the self tests The following sections of this chapter describe how you use the operator panel to select printer functions Turning On the Printer Press the POWER button to turn on the printer The POWER light will come on When the printer is ready to print the ON LINE light will come on Pausi...

Страница 29: ...the printer when to load paper Ejecting paper When you want to eject a sheet of paper make sure the printer is off line and press the LF FF button for one second The printer ejects the current sheet of paper Selecting a Print Mode Your printer incorporates two print modes that allow you to choose between print speed and print quality You use the PRINT MODE button to select the current print mode w...

Страница 30: ...n mode for printing spreadsheets and other wide documents on regular paper In reduction mode the printer reduces the output to two thirds of its full size Therefore a spreadsheet that is 13 6 inches wide will be 9 07 inches wide when printed in reduction mode Using reduction mode you can print spreadsheet data that you normally print on 15 x 11 inch continuous form paper on 8 5 x 11 inch paper in ...

Страница 31: ... the end of each page To select the reduction mode follow these steps 1 Make sure the printer is on line 2 Press and hold the LF FF button 3 Press the PRINT MODE button The printer beeps twice and the indicator lights for the current print mode blink slowly 4 Load paper and begin your print operation To disable reduction mode press and hold the LF FF button and press the PRINT MODE button You can ...

Страница 32: ...ters per inch cpi the print mode is HQ In Epson LQ mode the pattern is printed in Roman typeface at 10 cpi the print mode is HQ Starting To start the self test follow these steps 1 Press the POWER button to turn off the printer 2 Make sure paper is loaded correctly in teh sheet feeder 3 Press and hold the ON LINE and PRINT MODE buttons and press the POWER button until the beeper sounds The printer...

Страница 33: ... the self test looks like this Font List You can print this sample in both printer control modes BJ 10 mode or Epson LQ mode The printer prints all characters in the available print styles and pitches Starting the test ...

Страница 34: ...3 Press and hold the ON LINE button and press the POWER button until the beeper sounds Stopping the test To stop printing the font list press and hold the ON LINE button for one second The printer stops printing ejects the current sheet of paper and goes on line In BJ 10 mode the font list looks like this In Epson LQ mode the pattern looks like this ...

Страница 35: ...ine You only need to set this function if you are using an application program that does not include a carriage return with a line feed To set the automatic line feed function follow these steps 1 Make sure the printer is turned off 2 Press and hold the ON LINE LF FF and PRINT MODE buttons and then press the POWER button until the beeper sounds If you notice an extra blank line between each line p...

Страница 36: ...se procedures make sure you are familiar with the basic operation of Windows including its terms and use of the mouse If necessary refer to your Microsoft Windows 3 1 or 3 0 User s Guide for help Installing the Printer Driver 1 Make sure your computer is turned on 2 Make a backup copy of the diskette containing the Canon BJ 230 printer driver for Windows 3 Start Windows and follow the steps that a...

Страница 37: ... into disk drive A and select OK If you are not using drive A you can enter the pathname that identifies the drive you are using or use Browse to locate the drive 6 Choose Canon BJ 230 from the LIst of Printers and select OK The Control Panel installs the BJ 230 DRV file on your hard disk The printers dialog box appears with the Canon BJ 230 listed in the Installed Printers box NOTE Your screen ma...

Страница 38: ...et As Default Printer button from the Printers dialog box 10 Select the Close button to complete the installation of the Canon BJ 230 Windows driver Windows 3 0 If you are using Windows 3 0 follow these steps to install the printer driver 1 Choose Control Panel from the Main Group window in the Program Manager 2 Open the Printers icon The Printers dialog box appears 3 Select the Add Printer button...

Страница 39: ... designation make sure the BJ 230 is selected in the Installed Printers box Then select the Configure button to display the Configure dialog box 9 Choose your port and select OK 10 Select Active for the status of the BJ 230 If you intended to use it for all of your work double click on its name in the Installed Printers box to select it as the default printer 11 Choose the OK button to complete th...

Страница 40: ... to the Resolution setting to select one of the following resoulutions 360 x 360 dots per inch dpi which is the default resolution 180 x 180 dpi 90 x 90 dpi A resolution of 360 x 360 dpi offers the best print quality Click on the arrow next ot the Paper Size setting to select one of the following paper sizes Letter 8 1 2 x 11 in which is the default A4 210 x 297 mm A4 Wide 297 x 210 mm Legal 8 1 2...

Страница 41: ... arrow next to the Paper Source setting to select one of the followin paper sources Auto Sheet Feeder which is the default Manual Feed NOTE When you load letter wide paper in landscape orientation the printer actually prints in portrait mode So make sure you select portrait for your printing orientation in the printer driver NOTE When using manual feed make sure the Print Manager is turned off in ...

Страница 42: ...ourse Fine or Line Art The dithering option you select changes the quality of a gray scale or color image None causes all color values to appear either black or white no in between colors are represented The default dithering option is Fine You can control the intensity with which text is printed using the Intensity Control box This controls the threshold at which a pixel value is turned on or off...

Страница 43: ...to work with specific hardware setups Most application programs include an installation program or routine that you run to identify the type of hardware you are using such as your computer and printer Application programs include a group of programs called printer drivers that support different printers Before using the printer with your application program you need to tell the application what ty...

Страница 44: ...on LQ printer After selecting a printer you can use software commands for all standard printer functions through the application program This includes bold or double strike printing underlining subscripts margin control line spacing control and graphics Selecting a Printer Control Mode NOTE Software developers continuously create printer drivers If your application software does not list a Canon B...

Страница 45: ... to print both text and graphics select BJ 10 mode The following table lists the fonts and pitches that are available in each printer control mode In BJ 10 mode Courier 12 cpi is available in HS mode only In BJ 10 mode proportional spacing is not available in HS mode Printer Control Mode Font design typeface BJ 10 Epson LQ Prestige 12 characters per inch cpi in HQ mode only 10 cpi 12 cpi 15 cpi 17...

Страница 46: ...oughout the microcomputer industry and are recognized by all printers Two examples of these are form feed FF and line feed LF ESCape sequesnces are unique to each printer emulation ESCape sequences begin with the ESCape character ESC followed by one or more other characters The ESCape character tells the printer not to print the next character s but to use the information to perform a printing con...

Страница 47: ...move the ground pin Make sure the power is off any time you connect or disconnect the power cord or interface cable Do not move the mechanism that holds the ink cartridge You may damage delicate mechanical parts Do not touch the print head area on the ink cartridge Ink may leak out and cause stains Cleaning the Printer To achieve the maximum performance from your printer clean it regularly Be very...

Страница 48: ...ou have been using the cartridge for using the cartridge for over one year Your printed output is not crisp and clear or there are gaps in the characters missing dots CAUTION Make sure the printer is turned off before cleaning it and unplug the power cord When cleaning inside the printer avoid the area near the print head on the ink cartridge Do not touch the print head Ink may leak out and cause ...

Страница 49: ...avoid spilling ink follow these precautions Do not touch the print head on the ink cartridge or the sharp edges around it Do not hold the ink cartridge or place it on a table with the print head facing down except when you are installing it Do not attempt to disassemble the cartridge Do not vigorously shake the cartridge while handling it Remove the ink cartridge from the printer only when necessa...

Страница 50: ...n the cartridge holder Slide the old ink cartridge out of the holder and dispose of it properly 4 Take the new ink cartridge out of its protective packaging Slide off the orange protective cap from the print head and then remove the orange tape CAUTION Keep the ink cartridge out of children s reach the ink contains isopropyl alcohol 67 63 0 ...

Страница 51: ...ectly the label on the cartridge will be upside down 6 Push the lock lever down until it snaps into place CAUTION Avoid touching the yellow mounting base on which you place the cartridge especially the circuit board on the side of the mounting base and the film cable that extends from the cartridge holder ...

Страница 52: ...d When complete the ON LINE indicator stops blinking and goes off Press ON LINE to resume printing Storing Ink Cartridges Follow these guidelines when storing your ink cartridges Keep a new ink cartridge in its sealed container until you are ready to use it Store the ink cartridge at room temperature Install the ink cartridge in the printer immediately after you open the sealed container After ins...

Страница 53: ...om the sheet feeder 3 Detach the interface cable and the power cord 4 Close the front cover if necessary 5 Return the paper rest and paper exit support to their original positions 6 Repack the printer in its original packing materials NOTE Do not remove the ink cartridge from the printer or ship an ink cartridge from which you have removed the protective cap An opened ink cartridge that is not ins...

Страница 54: ...g ERROR Light Is On Paper Loading Problems Paper Does Not Load Into the Printer Multiple Sheets Load Into the Printer Paper Is Loaded Skewed Printing Is Skewed Envelopes Do Not Load Paper Does Not Eject After Printing Paper Jams Occur Print Quality Problems Print Density is Low Print Is Not Clear Characters Are Blurred or Smudged Smudges On Back of Printed Page Characters Appear Jagged Irregular P...

Страница 55: ...er but still does not print there may be a problem with the printer or its communication with your computer Follow these steps to determine the problem 1 Make sure the printer is on line If the ON LINE indicator is not green press the ON LINE button Then try printing 2 Check the interface cable connection Make sure you have connected the correct interface cable to your computer and that the connec...

Страница 56: ... and the holder 3 Perform the print head cleaning procedure described later in this chapter See the Print Head Needs Cleaning section ON LINE HS and HQ Indicators Are Blinking If you turn on the printer and the ON LINE HS and HQ indicators are blinking a RAM ROM error has probably occurred Try these steps to clear the problem 1 Press the POWER button to turn off the printer 2 Wait 15 seconds and p...

Страница 57: ... For manually feeding paper set it to the front position 2 When manually feeding paper make sure the printer is on line Then insert the single sheet of paper all the way into the sheet feeder and hold it for one second If the paper is not inserted far enough the printer cannot load it 3 Make sure the paper rest is extended and the paper is not curled Multiple Sheets Load Into Printer 1 Make sure t...

Страница 58: ...eder The right side of the envelope is aligned against the right side of the sheet feeder The left side is aligned against the paper guide 3 For manual loading insert the envelope all the way into the sheet feeder Paper Does Not Eject After Printing Most software applications tell the printer to eject the paper after printing however some do not If the printer does not automatically eject a sheet ...

Страница 59: ... cover and remove the paper from inside the printer 4 Press the POWER button to turn on the printer the POWER ON LINE and HQ or HS indicators light and the print head moves to the home position The printer is now ready for printing If you are having repeated paper jams it may be due to the paper you are using Fan the paper before stacking it in the sheet feeder This keeps the sheet of paper from s...

Страница 60: ...ype 3 Make sure you are using a BC 02 ink cartridge If not replace the ink cartridge with a BC 02 Characters Are Blurred or Smudged 1 If the printed characters are blurred or smudged make sure you are using the recommended paper 2 Make sure the paper thickness lever inside the printer is set for your paper type 3 Make sure you are using a BC 02 ink cartridge If not replace the ink cartridge with a...

Страница 61: ...mode set the paper thickness lever to the right for thick paper and print it again Print Head Needs Cleaning Paper dust or ink may get clogged in an ink nozzle in the ink cartridge Performing the print head cleaning procedure should clear up this problem The printer will automatically clean the print head when you follow these steps 1 Make sure the printer is turned on and on line 2 Press the ON L...

Страница 62: ... computer If your printed output does not appear as you expect follow these steps 1 Make sure your cable connections are secure 2 Check that the printer control mode BJ 10 or Epson LQ matches the printer driver you selected See Chapter 5 Using the Printer With Software for details on selecting a printer driver and a printer control mode Characters on Screen Do Not Match Printed Characters Many gra...

Страница 63: ... platen Printing Incorrect Number of Lines on Page If the printer is not printing the number of lines you expect on a page follow these steps 1 Check the setting of DIP switch 4 This DIP switch determines the page length For letter size paper set it to OFF For envelopes set it to OFF For A4 size paper set it to ON 2 Check the top and bottom margin settings of your software 3 Make sure your paper i...

Страница 64: ...in the Program Manager and open the Printers icon From the Printers dialog box select Connect and disable the Fast Printing Direct to Port option Turn off the Print Manager in the Printers dialog box Large Gaps Appear Between Text of Graphics 1 Choose Control Panel from the Main Group window in the Program Manager and open the Windows Setup icon 2 Check that the video driver is VGA If the display ...

Страница 65: ... described in this chapter Your printer is designed to be used in BJ 10 mode and provides numerous printing features in this mode If your software application id designed to print only on an Epson LQ printer you can use the DIP switches to change the printer control mode to Epson LQ Factory Default Settings The following table shows the factory default settings of the printer Function Setting Char...

Страница 66: ...the printer control mode DIP switch 12 selects the printer control mode When DIP switch 12 is OFF the printer is in BJ 10 mode when DIP switch 12 is ON the printer is in Epson LQ mode Changing a DIP Switch Setting To change a DIP switch setting follow these steps 1 Make sure the printer is turned off 2 Open the DIP switch cover on the top of the printer Pull the cover toward you lifting from the n...

Страница 67: ...nter or if the printer receives the Set Initial Conditions command from a software program the printer resets its functions to the settings defined by the DIP switches BJ 10 Mode When the printer is in BJ 10 mode DIP switch 12 is OFF you can set the DIP switches to control the following functions DIP switch Function OFF ON 1 Horizontal print position Letter size or COM 10 envelope A4 size or DL si...

Страница 68: ...aracters and graphics to two thirds of their normal size When the printer is in envelope mode reduction mode is disabled DIP switch 4 If you are using letter size paper set this switch OFF this sets the page length to 11 inches If you are using A4 size paper set this switch On this sets the page length to 12 inches DIP switch 5 When this switch is OFF the printer uses Character Set 1 When this swi...

Страница 69: ...is OFF the printer allocates the entire buffer space approximately 41 2 KB to the input buffer When you are using downloaded fonts change this switch to ON the printer will allocate 40 KB to buffer space for downloaded fonts DIP switch 12 When this switch is Off the printer is in the BJ 10 mode When this switch is On the printer is in Epson LQ mode Example The following DIP switch settings select ...

Страница 70: ...s to two thirds of their normal size When the printer is in envelope mode reduction mode is disabled DIP switch 4 If you are using letter size paper set this switch Off this sets the page length to 11 inches If you are using A4 size paper set this switch ON this sets the page length to 12 inches DIP switch 5 When this switch is OFF the printer uses the Epson Italics character set which includes it...

Страница 71: ...witch is OFF the printer is in BJ 10 mode When this switch is ON the printer is in Epson LQ mode Example The following DIP switch settings select the specified printer functions as the defaults DIP switches Character set 6 7 8 USA OFF OFF OFF United Kingdom OFF OFF ON Germany OFF ON OFF France OFF ON ON Denmark ON OFF OFF Sweden ON OFF ON Italy ON ON OFF Spain ON ON ON DIP switches Typeface 6 7 8 ...

Страница 72: ...racter set 8 ON United Kingdom character set 11 ON Sans serif typeface NOTE Unlike some previous Canon printers internal fonts are available only through software commands They cannot be selected through the operator panel nor the DIP switches This is only an issue for some MS DOS applications and some custom software ...

Страница 73: ... with automatic feed 17 to 28 lb 64 to 105 g m2 with manual feed Printing Area Paper Sheet Feeder Capacity Plain Paper Maximum 100 sheets of letter legal A4 or B5 20 lb or 75 g m2 maximum thickness of stacked paper 0 39 inch 10 mm Maximum 50 sheets of ledger A3 20 lb or 75 g m2 maximum thickness of stacked paper 0 19 inch 5 mm Envelope 10 envelopes commercial number 10 Paper Size Letter 8 5 x 11 i...

Страница 74: ... Horizontal a 8 3 to 11 7 inches 210 to 297 mm b 0 13 inch 3 4 mm A4 and A3 size paper 0 25 inch 6 4 mm Letter legal ledger size paper Vertical c 8 3 to 17 inches 210 to 431 mm d 0 5 inch 12 7 mm e 0 3 inch 8 mm ...

Страница 75: ...inch 17mm f 1 0 inch 25 4mm Printing Speed HS mode 248 cps in 10 cpi 496 cps in 20 cpi HQ mode 173 cps in 10 cpi 346 cps in 20 cpi SHQ mode 124 cps in 10 cpi 248 cps in 20 cpi Resident Printer Control Modes BJ 10 mode IBM Proprinter X24E emulation Epson LQ mode Epson LQ 510 emulation Line Feed Pitch BJ 10 mode 1 6 1 8 n 60 n 72 n 180 n 216 and n 360 inches n programmable Epson LQ mode 1 6 1 8 n 18...

Страница 76: ...105 cpl 114 cpl 10 cpi double wide 5 cpi 52 cpl 57 cpl 10 cpi condensed 17 cpi 180 cpl 193 cpl 10 cpi condensed double wide 8 5 cpi 90 cpl 97 cpl 12 cpi 12 cpi 126 cpl 136 cpl 12 cpi double wide 6 cpi 63 cpl 68 cpl Proportional spacing PS Varies Varies Mode Pitch Characters per line DIP Switch 1 OFF ON 10 cpi 10 cpi 105 cpl 114 cpl 10 cpi double wide 5 cpi 52 cpl 57 cpl 10 cpi condensed 17 cpi 180...

Страница 77: ... Download buffer 0 KB or 40 KB Epson LQ mode Input buffer Approx 3 KB Download buffer 39 KB Interface 8 bit parallel Ink Cartridge Type BC 02 single cartridge ink supply Print head 64 bubble jet nozzles Ink color Black Number of characters printed Approx 700 000 characters cartridge in HQ mode Approx 1 400 000 characters cartridge in HS mode Ink amount Approx 0 9 oz 28g Operating Environment Tempe...

Страница 78: ...Weight Approx 7 7 lbs 3 5 kg Dimensions 16 9 inches 428 mm W x 8 2 inches 209 mm D x 7 9 inches 201 2 mm H ...

Страница 79: ...s such as bold underline or indent within a document When the document prints the embedded commands control the way the printer produces the printed page Refer to your application software manual for instructions on sending commands You can send specific commands directly to the printer using either a BASIC programming statement or a printer command option in your software BJ 10 Command Summary Yo...

Страница 80: ...wide mode DC4 20 14 Cancel data CAN 24 18 Insert space SP 32 20 Function ASCII Decimal Hexadecimal Set cancel underscore mode n Setting 0 End underscore 1 Start under score ESC n 27 45 n 1B 2D n Set 1 8 inch line spacing 8 lpi ESC0 2748 1B30 Set 7 72 inch line spacing 7 72 inch per line ESC 1 27 49 1B 31 Enable line spacing set by ESC A ESC 2 27 50 1B 32 Set graphics line spacing in n 180 inch inc...

Страница 81: ...sized mode to start printing in twice the normal dot density ESC E 27 69 1B 45 Cancel emphasized mode set by ESC E ESC F 27 70 1B 46 Set double strike mode ESC G 27 71 1B 47 Cancel double strike mode set by ESC G ESC H 27 72 1B 48 Select font style ESC I n 27 73 n 1B 49 n Perform graphics line spacing n 0 to 255 ESC J n 27 74 n 1B 4A n Set single density image graphics ESC K n1 n2 27 75 n1 n2 1B 4...

Страница 82: ...t cancel presentation highlight double high mode ESC n1 n2 m1 m2 m3 m4 27 91 64 n1 n2 m1 m2 m3 m4 1B 5B 40 n1 n2 m1 m2 m3 m4 Select global font ESC I 27 91 73 1B 5B 49 Set initial condition ESC K n1 n2 27 91 75 n1 n2 1B 5B 4B n1 n2 Set code page ESC T n1 n2 27 91 84 n1 n2 1B 5B 54 n1 n2 Change graphics line spacing ESC n1 n2 27 91 92 n1 n2 1B 5B 5C n1 n2 Select high resolution graphics mode ESC g ...

Страница 83: ...racter Set 1 has control codes in two places one between ASCII 0 and ASCII 32 and the other between ASCII 128 adn ASCII 159 Character Set 2 has control codes only between ASCII 0 and 32 All other ASCII characters are printable The three character sets for each code page are shown on following pages Function ASCII Decimal Hexadecimal Select graphics mode AGM ESC m n1 n2 27 42 m n1 n2 1B 2A m n1 n2 ...

Страница 84: ...USA Code Page 437 Character Set 1 USA Code Page 437 Character Set 2 ...

Страница 85: ...USA Code Page 437 All Characters Chart Multilingual Code Page 850 Character Set 1 ...

Страница 86: ...Multilingual Code Page 850 Character Set 2 ...

Страница 87: ...tch 12 is set to ON Basic Control Codes Multilingual Code Page 850 All Characters Chart NOTE Because of hardware differences the justification code ESC a and the perforation skip codes ESC M and ESC N are not supported by your printer Also they styles of block graphics characters at 12 cpi are different from normal Epson LQ 510 printing ...

Страница 88: ... set by SI DC2 18 12 Set printer off line DC3 19 13 Cancel double wide mode DC4 20 14 Cancel data CAN 24 18 Start escape sequence ESC 27 1B Insert space SP 32 20 Delete character DEL 127 74 Function ASCII Decimal Hexadecimal Set double wide mode by line ESC SO 27 14 1B 0E Set condensed mode ESC SI 27 15 1B 0F Control sheet feeder n Setting R Eject paper ESC EM n 27 25 n 1B 19 n Set intercharacter ...

Страница 89: ...ch line spacing 6 lpi ESC 2 27 50 1B 32 Set line spacing in n 180 inch increments n 1 to 255 ESC 3 n 27 51 n 1B 33 n Set italic mode ESC 4 27 52 1B 34 Cancel italic mode ESC 5 27 53 1B 35 Enable printable range ESC 6 27 54 1B 36 Cancel printable range expansion ESC 7 27 55 1B 37 Copy ROM font to RAM ESC 27 58 1B 3A Set unidirectional print by line ESC 27 60 1B 3C Set most significant bit MSB to 0 ...

Отзывы: