Canon BJ-200EX Скачать руководство пользователя страница 18

§


When unplugging the power cord, always remove it by holding the
plug and not the cord.

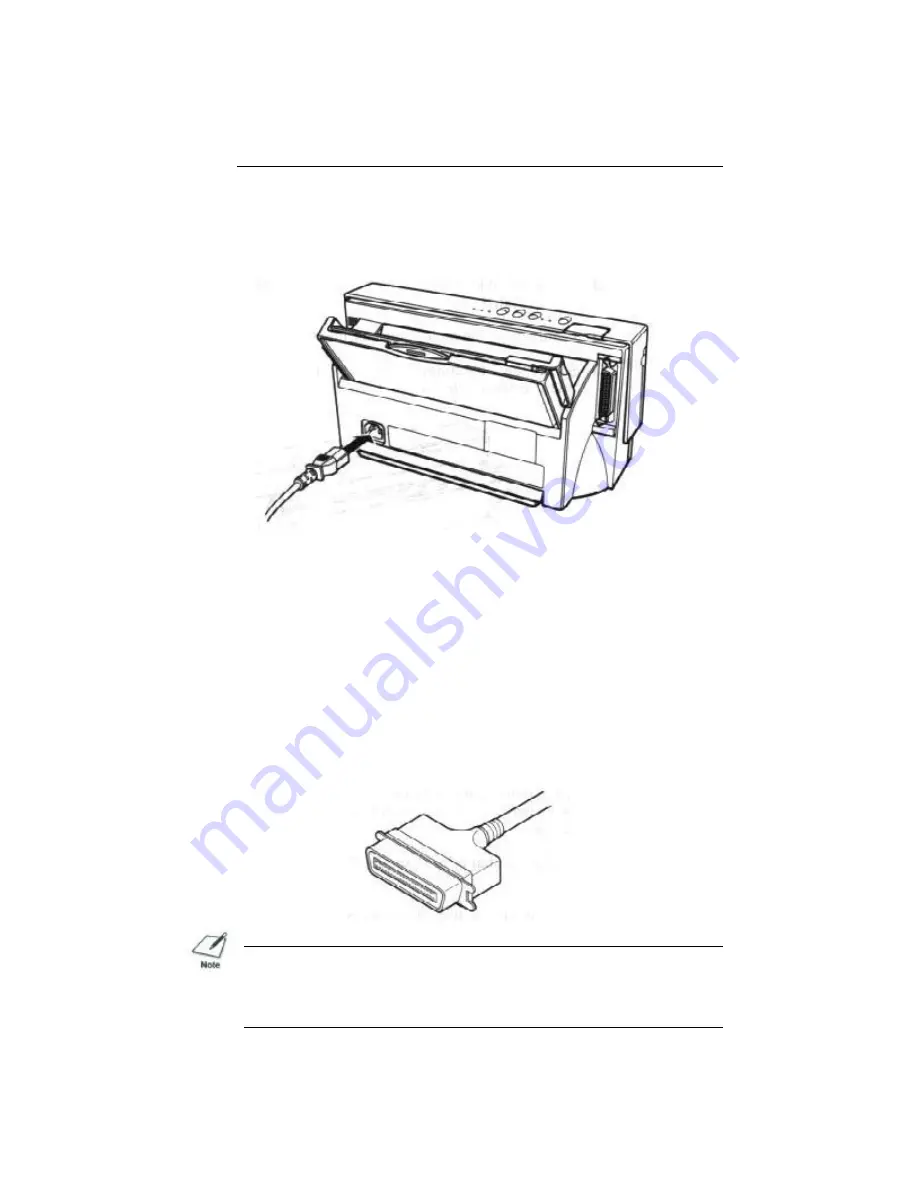
To attach the power cord, follow the steps below.

1. Attach the power cord to the AC power receptacle on
the back of the printer.

2. Plug the power cord into a properly grounded AC
outlet.


Connecting Your Printer to the Computer

Your printer has an 8-bit parallel interface port, which
allows you to use it with IBM PCs and compatible
computers. You need to purchase a Centronics-compatible
parallel interface cable from your dealer. Ask your dealer
for assistance if you need help selecting the right cable.

NOTE: 

For reliable data communications between your computer

and the printer, use a short cable, six feet or less in length.

To connect the computer to the host computer, follow the
steps below:

Содержание BJ-200EX

Страница 1: ...BJ 200ex USER S MANUAL Canon ...

Страница 2: ...ern Installing a Printer Driver Installing the Windows Printer Driver and Visual Guide Using the Visual Guide Using the BJ 200ex Windows Driver Installing the Canon TrueType Fonts for Microsoft Windows 3 1 Managing Your Printer s Features Software Applications Operator Panel Buttons DIP Switches Line Printer Versus Page Printers Line Printers and Processing Page Printers and Processing Chapter 3 U...

Страница 3: ...ting Up WordPerfect for Your Printer Software and Printer Compatibility Chapter 5 Using the Operator Panel Feeding Paper Selecting a Print Mode Using the Reduction Modes Two thirds Reduction Mode One half Reduction Mode Selecting the Reduction Mode Performing Automatic Line Feeds Chapter 6 Maintaining the Printer Printer Guidelines Cleaning the Printer Replacing the Ink Cartridge Ink Cartridge Gui...

Страница 4: ...P Switch Setting Appendix A Specifications Appendix B Application Notes Printing Envelopes in Microsoft Windows AmiPro 3 0 Microsoft Publisher Microsoft Word for Windows WordPerfect Works 3 0 for Windows Glossary Index editiing by Jason Plank and Cindy Cassat ...

Страница 5: ...introduces you to the features of your new printer lists the options and supplies you can purchase for the printer and describes Canon s customer support procedures Features and Benefits The BJ 200ex Bubble Jet Printer produces high quality printing by incorporating many useful features Excellent Print Quality The printer s high performance print head offers 720 horizontal by 300 vertical dots per...

Страница 6: ...eadsheets and other wide documents on regular paper In reduction mode the printer reduces the output to two thirds or one half of its full size High Quality Ink The ink in the BC 02 ink cartridge is not easily affected by light dries quickly and is smudge resistant Automatic Capping System To ensure trouble free operation the printer automatically moves the print head to the home position and caps...

Страница 7: ...nt Media Canon manufactures the following print medium for this bubble jet printer Canon Transparencies Q07 001 M1 These overhead clear transparencies also called Over Head Projection or OHP film are specially designed for Canon Bubble Jet printers Other overhead clear transparencies may cause problems in your Canon printer by not feeding correctly into the printer or by not allowing the ink to dr...

Страница 8: ...tions and technical questions to Canon via facsimile The number for this service is 1 714 438 3317 which accesses a G3 fax machine Be sure to state your question and provide a phone number or fax number for a response Fax Retrieval System Canon also provides a 24 hour toll free fax retrieval system You can use this service to get helpful documents faxed directly to your fax machine These documents...

Страница 9: ... the card If you seem to have a problem try to solve it by referring to the information in Chapter 7 Troubleshooting If you cannot solve the problem contact Canon s support personnel at the help desk If you fell that your BJ 200ex Bubble Jet Printer needs servicing call the Canon help desk to locate the Canon Authorized Service Facility ASF nearest you or how to find out about the exclusive Canon ...

Страница 10: ...s If you already set up your printer using the Quick Start Guide you may want to look through this chapter to find any additional information it supplies Unpacking the Printer Follow these steps to unpack your printer 1 Carefully remove all items from the box If you have lifted the printer s box using the built in handles press the cardboard handles toward the outside of the box before trying to l...

Страница 11: ... damaged in shipping or if any items are missing notify your dealer immediately In addition to the items shipped with your printer you need a Centronic compatible parallel interface cable which you can purchase from your dealer Be sure to fill out your Registration card and send it to Canon Computer Systems Inc Save your sales receipt for proof of purchase Removing the Shipping Materials As you un...

Страница 12: ...om the outside of the printer Remove the protector plastic or Styrofoam inside the sheet feeder Move the paper guide to the left 2 Remove the shipping tape inside the printer Open the front cover by grasping the sides of the cover and pulling it down Remove the tape that secures the ink cartridge holder Make sure the paper thickness lever is set to the left for printing on normal paper ...

Страница 13: ...delines Choose a flat sturdy surface with enough space for the paper to flow freely into and out of the printer Angled print stands may cause quality and reliability problems Fully extend the paper rest and paper output tray to ensure enough space is available for proper operation The printer requires this much space ...

Страница 14: ...rmation on the printer s intelligent circuits Do not subject the printer to strong physical shock or vibrations Keep the printer clean Dust accumulation may prevent the printer from functioning properly To protect the printer from damage hold both sides when you move it While the BJ 200ex Bubble Jet Printer is small and compact it is not designed for mobile printing Examining the Printer Before se...

Страница 15: ...Operator Panel ...

Страница 16: ...From the Back ...

Страница 17: ...utlet in the United States or Canada Use only the power cord that came with the printer Using a longer cord or an extension cord may result in reduced voltage or malfunctions If you smell a peculiar odor or see smoke unplug the power cord immediately Do not place anything in front of your wall outlet that may obstruct your access to it or put pressure on the power cord ...

Страница 18: ...rinter to the Computer Your printer has an 8 bit parallel interface port which allows you to use it with IBM PCs and compatible computers You need to purchase a Centronics compatible parallel interface cable from your dealer Ask your dealer for assistance if you need help selecting the right cable NOTE For reliable data communications between your computer and the printer use a short cable six fee...

Страница 19: ...erface port on your computer Installing the Ink Cartridge You use the BC 02 ink cartridge with this printer Each ink cartridge can print about 400 to 500 letter size pages 700 000 characters in HQ mode and 800 to 1000 pages 1 400 000 characters in HS mode The actual amount varies according to the print density of a page If you print a lot of graphics you may need to change cartridges more often NO...

Страница 20: ...the cartridge holder 2 Take the ink cartridge out of its protective packaging NOTE Install the ink cartridge immediately after removing it from its protective packaging 3 Slide off the orange protective cap from the print head and remove the orange tape 4 Locate the cartridge holder on the right side of the printer ...

Страница 21: ... the green lock lever on the cartridge holder 6 Fit the ink cartridge over the yellow mounting base with the print head facing down When installed correctly the label on the cartridge will appear upside down ...

Страница 22: ...e lever remove the cartridge and try again 8 Be sure no gap exists between the ink cartridge and cartridge holder When secure the ink cartridge makes contact with the circuit card inside the cartridge holder Do not move the ink cartridge after installing it Moving the ink cartridge to the left and leaving it there may uncap the print head and cause it to dry out 9 Close the front cover When you tu...

Страница 23: ...he power cord is attached to the printer and a wall outlet 3 Press the POWER button on the operator panel The POWER light flashes and the printer makes several sounds as it warms up and gets ready to print When the printer is ready to print the POWER ON LINE and HQ lights are on To turn off the printer press the POWER button again After turning off the printer always wait at least five seconds bef...

Страница 24: ...2 seconds while the printer cleans the print head When complete the ON LINE indicator will stop blinking and go off The printer will stay off line until you press the ON LINE button Cleaning the print head consumes a small amount of ink Repeating this procedure unnecessarily reduces the life of the cartridge Loading a Stack of Paper These steps show how to load a stack of plain paper and test your...

Страница 25: ...paper support up until it stops and pull out the paper output tray 3 Fan the paper For best results fan the paper before loading it Always fan a stack of paper along the edge that will feed into the printer first ...

Страница 26: ...k of paper into the sheet feeder until it stops Align the edge of the paper with the right edge of the sheet feeder Secure the stack with the paper guide Do not force the paper into the printer Printing a Test Pattern ...

Страница 27: ...per is loaded 3 Press and hold the ON LINE button and press the POWER button until the printer beeps twice The two beeps are approximately three seconds apart The printer starts to print Demo Print 1 4 To stop printing the Demo Print press the ON LINE button for one second The printer stops printing ejects the page and goes back on line Installing a Printer Driver Before you can print documents fr...

Страница 28: ...o install either the driver the guide or both Follow these steps 1 Turn on your computer 2 Make backup copies of the diskettes 3 If you are not already in the Windows environment type WIN and press ENTER Make sure the Windows Control Panel is closed 4 Insert the first diskette Disk 1of 2 into the disk drive A or your desired drive 5 From the Program Manager select the File menu and then choose the...

Страница 29: ...l as illustration of all the topics it covers It includes demonstrations and simulations of procedures you actually perform It includes technical information regarding printer command codes and ESCape sequences Using the Visual Guide you can easily search for the topic you are interested in and you can move forward and backward through the guide with a click of your mouse If for some reason your c...

Страница 30: ... Choose the Add button to display the Add Fonts dialog box 6 Insert the diskette containing the Canon TrueType Fonts into the diskette drive 7 In the Drives scroll menu select the appropriate drive where the diskette is located The fonts appear in the List of Fonts box 8 Select the fonts by clicking on the fonts you want to add To select all the fonts click the Select All button 9 Click on OK The ...

Страница 31: ...ts of the printer s features This is the easiest method for controlling the the look of your printed documents including typeface style and size and placement of text graphics and margins Normally settings made with your software applications override the settings made through the operator panel or the DIP switches See Chapter 4 Using the Printer With Your Software for details on setting up your s...

Страница 32: ...ndividual dots of ink Page Printers Page printers process and print information one page at a time The information sent from the computer to the printer is sometimes in simple ASCII code or more often in a page description language This information is a set of instructions that the printer must interpret to determine where the printer should position each dot Some common page description languages...

Страница 33: ...s code into the specific printing instructions on where to put each dot on the page This means that the printer itself must have a certain amount of processing power and memory to handle the instructions it receives from the computer Because processing takes place on both the computer and the printer the speed of laser printing depends on the processor speed and RAM available on both the computer ...

Страница 34: ...jet printer is to select the correct paper Your printer produces letter quality output on most plain papers it does not require special ink jet papers However the print quality varies with different paper types Be sure to test a type of paper before you purchase a large quantity Plain Papers The printer supports paper sizaes of letter legal A4 and B5 in portrait orientation You can use regular cop...

Страница 35: ...e paper specifications see Appendix A Specifications Before Loading Paper To ensure trouble free paper handling you ll want to set the paper thickness lever and paper selection lever before loading paper Setting the Paper Thickness Lever You use the paper thickness lever to adjust the distance between the print head and the paper to accommodate different paper thicknesses This distance is called t...

Страница 36: ...tting the paper thickness lever to the right position This unit moves the print head unit further from the paper Print quality may diminish slightly but the smudges should go away Setting the Paper Selection Lever Set the paper selection lever to the proper position before loading paper There are two positions according to paper type The back position is for normal plain paper or transparencies ...

Страница 37: ...set the paper selection lever to the front position only when loading envelopes or when manually feeding paper If it is set to the front position when you are automatically feeding stacks of normal paper the printer may feed multiple sheets or jam Be sure to remove any paper from the sheet feeder before setting the paper selection lever When the paper selection lever is in the back position a leve...

Страница 38: ...e lever after loading the paper Printer Settings for Various Print Media The following table summarizes the printer settings for the various types of print media Paper type Paper thickness lever Paper selection lever Loading method Plain Paper Left Back Automatic Envelope Right Front Automatic Transparency Left Back or Front Automatic or Manual Thick paper Right Back or Front Automatic or Manual I...

Страница 39: ...default settings you can change them from within your application For example In Microsoft Word for Windows 2 0 you can select Print Setup from the File menu and then select Setup from the Printer Setup dialog box Windows displays the Canon BJ 200ex Setup dialog box in which you can define all your printer settings See Chapter 4 Using the Printer With Your Software for complete details on the prin...

Страница 40: ... lever is set to the back position 3 Extend the paper support and the paper output tray Pull the paper support up until it stops The paper support keeps paper straight and limits the possibility of jams Extend the paper output tray ...

Страница 41: ... the printer until it stops Align the edge of the paper with the right edge of the sheet feeder Insert the paper so that the side you want to print on is facing you If you are using a preprinted stock such as letterhead insert the top of the paper into the sheet feeder first Make sure the stack of paper does not exceed the paper limit mark on the right side of the sheet feeder ...

Страница 42: ...r into the printer 6 Adjust the paper guide to the stack of paper This keeps the paper feeding straight into the printer and reduces skewing Be sure there is no gap between the paper guide and the edge of the stack of paper ...

Страница 43: ... the paper output tray is 20 sheets of paper To reduce paper jams remove paper from the output tray before the count reaches 20 If paper curls after printing remove it immediately otherwise paper jams may occur The platen a roller on the inside of the printer may become inked if you print data beyond the width of the page If this happens clean the platen with a soft cloth For details on cleaning t...

Страница 44: ...t Manual Feed for the Paper Source If you are using an MS DOS application your driver should have a manual feed selection For example in Microsoft Word the Print Options menu includes a Paper Feed option for which you select Continuous or Manual Manually Feeding Paper You use the manual function when printing on heavier weight paper up to 28 lb or 105 g m To manually feed a single sheet follow the...

Страница 45: ...2 Open the top cover and check the paper thickness lever If you are manually feeding thick paper or transparencies set the paper thickness lever to the right 3 Set the paper selection lever to the front ...

Страница 46: ...ert the single sheet Slide in the paper until it stops inside the sheet feeder and hold it for about two seconds Align the sheet with the right edge of the sheet feeder Adjust the paper guide to the sheet The printer automatically loads the paper into position ...

Страница 47: ...n envelope set the paper selection lever to the back position Printing on Transparencies You can stack approximately 40 transparencies in the sheet feeder However this special medium may not advance correctly under unusual environmental conditions such as extreme temperatures and humidity If you have trouble with transparencies becoming skewed or feeding multiple sheets do not stack them in the sh...

Страница 48: ...Follow these guidelines when automatically feeding stacks of special paper When automatically feeding transparencies remove each sheet after it is delivered Do not allow transparencies to stack up in paper output tray Let the printed transparencies dry completely before storing them The complete drying time required for Canon s transparencies is approximately 15 minutes When a transparency has dri...

Страница 49: ...ing the BJ 200ex printer driver for Windows change the Paper Size setting to Envelope Check your software to see if it prints envelopes in portrait or landscape orientation It s a good idea to print on a sheet of paper before printing on an envelope to check the orientation Printing on envelopes in portrait orientation results in faster printing However several software packages such as WordPerfec...

Страница 50: ...lopes do not use this mode when loading regular or thick paper Selecting envelope mode cancels reduction mode if set Preparing the Printer When you are ready to print on envelopes follow these steps to stack envelopes in the sheet feeder You can also manually feed envelopes one at a time 1 Set the green paper thickness lever to the right 2 Set the paper selection lever to the front ...

Страница 51: ...irm surface and press down firmly on the edges to make the folds crisp Press around the envelopes to remove and curls and expel air from inside the envelopes Also press firmly on the area that corresponds to the edges of the flap 6 Insert the envelopes Slide the stack of envelopes into the sheet feeder until it stops Align the stack of envelopes with the right edge of the sheet feeder ...

Страница 52: ...hen printing on COM10 envelopes move the paper guide all the way to the left Depending on the size and shape of your interface connector the paper guide may touch it If this causes the envelopes to misfeed use an interface cable with a smaller connector ...

Страница 53: ... you are using Printing on Legal size Paper You can print on legal size paper by selecting a page size of 8 5 x 14 from within your software application or from the printer setup program within the application For example if you are using Windows simply select Legal for your paper size in the Setup program If you are using Word for Windows version 2 0 follow these steps to select the paper size 1 ...

Страница 54: ...ding commands The ESCape sequence for page length is ESC 0 n where n is the page length in inches For legal size paper the ESCape sequence is ESC 0 14 27 67 0 14 decimal or 1B 43 00 0E hexidecimal When printing on legal size paper do not extend the paper output tray Remove each sheet as it is printed Printing in Landscape Orientation The BJ 200ex Bubble Jet Printer does not have built in landscape...

Страница 55: ...More Fonts Fonts On the Fly The Publishers Power Pack Lotus 2 0 2 1 and 2 2 Sideways Microsoft Windows 3 1 Adobe Type Manager Bitstream Facelift for Windows The Publishers Power Pack TrueType Font Packs Many other graphics software packages offer landscape printing Call your specific software manufacturer to see if they offer landscape printing capabilities Printing the Test Patterns There are thr...

Страница 56: ...rn of characters in the default print mode and pitch In BJ 10 mode the pattern is printed is Courier typeface at 10 cpi the print mode is HQ In Epson LQ mode that pattern is printed in Roman typeface at 10 cpi the print mode is HQ Starting To start the Self Test follow these steps 1 Press the POWER button to turn off the printer 2 Press and hold the ON LINE and PRINT MODE buttons and press the POW...

Страница 57: ...rol modes BJ 10 mode or Epson LQ mode The printer prints all characters in the available print styles and pitches Starting To start the Font List follow these steps 1 Press the POWER button to turn off the printer 2 Press and hold the ON LINE button and press the POWER button until the beeper sounds once ...

Страница 58: ... of paper and goes back on line In BJ 10 mode the Font List looks like this In Epson LQ mode the pattern looks like this Demo Prints 1 and 2 You can print these samples in both printer control modes BJ 10 mode or Epson LQ mode Demo Print 1 shows normal mode and Demo Print 2 shows Smoothing mode The Demo Prints describe a few of the printer s features in different languages Starting ...

Страница 59: ... Stopping To stop printing the Demo Print press and hold the ON LINE button for one second The printer stops printing ejects the current sheet of paper and goes back on line Demo print 1 looks like this Demo Print 2 is similar to Demo Print 1 but shows the advantages of Smoothing mode In Smoothing mode the jagged edges and ragged stair stepping curves of characters and graphics are polished and re...

Страница 60: ...ll stop printing and go off line 2 To start printing again press the ON LINE button 3 If data remains in the print buffer the ON LINE light blinks To print the data press the ON LINE button to set the printer off line and then press the FF button ...

Страница 61: ...ith your application program you need to tell the application what type of printer you are using by selecting the printer driver that corresponds to your printer Canon provides a BJ 200ex printer driver for Microsoft Windows The easiest way to use your printer is to install the Windows driver and perform your print operations through the Windows environment If you are using Microsoft Windows you h...

Страница 62: ...at run in Windows If the Print Setup option does not appear in the File menu for your application refer to the user s manual supplied with the application It should provide information about changing the printer setup parameters To configure your BJ 200ex printer driver follow these steps 1 Start the application you want to use in the Windows environment 2 Open the document you want to print 3 Cho...

Страница 63: ... dialog box they are provided by the application you are using Refer to that application s documentation for more information Paper Size option Click on the arrow next to the Paper Size setting to select one of the following paper sizes from the drop down list When printing on envelopes or thick paper make sure the paper selection lever is set to the front position and the paper thickness lever in...

Страница 64: ...ality printed image for this type of paper with minimal bleeding When you select Plain Paper the Paper Source defaults to Auto Sheet Feeder and the Print Quality defaults to Normal 360 x 360 dpi When you are printing on plain paper set the paper thickness lever inside the printer to the left position Transparency This mode is for printing on transparency stock Use the Canon Transparencies Q07 0001...

Страница 65: ...on the arrow next to the Print Selection setting to select one of the following options from the drop down list Black and White This option prints documents in black ink only Use this setting when printing text files that have no graphic images Grayscale Use this option to produce graphic images in shades of gray Print Quality options Click on the Print Quality selections when you want to use Adju...

Страница 66: ... this mode to print at the highest resolution 720 x 360 dpi You can select Smoothing with Normal only Orientation option Click on the Orientation setting you want to use The page orientation determines the direction of printing on the page Other selections Click on Options to access the special options provided by the BJ 200ex printer driver for Windows These options are discussed in the next sect...

Страница 67: ...speed and is best suited for printing documents that contain large areas of solid color such as bar charts and graphs Diffusion This setting randomly places individual dots to create shades of gray By randomly placing dots the printer can achieve subtle gradations This method is best suited for printing documents that contain finely detailed graphics or photographic images Using diffusion slows th...

Страница 68: ...al steps for printing from the various applications you may run in the Windows environment The exact steps for printing a document may vary depending on the application program you are using Refer to your program s documentation for the exact printing procedure 1 Start the program you used to create the document and open the document you want to print 2 Choose Printer Setup from the File menu 3 Se...

Страница 69: ...n off the Print Manager in the Windows Control Panel This avoids the extra step of sending the print file to the Print Manager and may increase your printing speed by as much as 25 depending on the computer you are using See the next section for details Add a permanent swap file in Windows Under the 386 Enhanced icon in the Windows Control Panel add or create a permanent swap file that is from 4 M...

Страница 70: ...e able to prepare the print file faster Using the Windows Print Manager The Print Manager is part of the Windows operating system and controls the printing of your files Background Printing When the Print Manager is active the print file that your application and printer driver create is not sent directly to the printer Instead the print file is sent to the Print Manager The Print Manager then sen...

Страница 71: ...ed printing Printing usually works best with the BJ 200ex when the Print Manager is turned off You can turn off the Print Manager by using the Control Panel in the Main Group window Select the Printers icon then click on the X that is in the Use Print Manager check box This will make the X disappear Setting Up MS DOS Application Programs If you are not using Windows follow the guidelines in this s...

Страница 72: ...t will have nearly the same operating capabilities as the Bubble Jet Printer BJ 200ex Software developers continuously create printer drivers If your application software does not list a Canon BJ 200ex driver call your software application s technical support line and ask if a BJ 200ex driver is available If they are unable to assist you call the Canon help desk to see if a driver is available To ...

Страница 73: ...t the Canon BJ or the IBM Proprinter X24E printers but does not support an Epson LQ printer you can use the printer in LQ mode You can also select a printer control mode based on specific text features you want to use in your document If you will be printing only text no graphics or printing italic characters select LQ mode if Epson drivers are available If you plan to print both text and graphics...

Страница 74: ...n contains the procedures you perform to install the Bubble Jet Printer BJ 200ex driver for WordPerfect version 5 1 or 6 0 for MS DOS These instructions assume you have installed WordPerfect and are familiar with using it 1 Make sure your computer is turned on 2 Make a backup copy of the diskette containing the Canon BJ 200ex printer drivers for WordPerfect if you have not already done so This is ...

Страница 75: ... to the computer In addition to data the instructions you send may include special command sequences known as control codes and ESCape sequences These command sequences tell the printer such things as how many lines to skip and where to start printing Some control codes are standard throughout the microcomputer industry and are recognized by all printers Two examples of these are form feed FF and ...

Страница 76: ... way the application handled it To determine if an application is overriding your commands print the document using a generic driver and see if the correct commands are reflected in the printed copy If they are the application printer driver is overriding the commands If you would like to receive a list of the control codes and ESCape sequences the printer recognizes you can use Canon s toll free ...

Страница 77: ...e feed If for some reason your application program does not perform these basic functions you can control them using the printer s operator panel You can also select specific printer functions such as print mode selection and print head cleaning Any setting you make with your softare application override settings mad with the operator panel In addition to the operations described in this chapter y...

Страница 78: ...r is off line then press and hold the LF FF button for more than one second The printer will eject the current sheet of paper Selecting a Print Mode Your printer incorporates two print modes that allow you to choose between print speed and print quality Print mode Function Speed at 10 cpi HS High speed and draft quality printing 248 cps HQ High quality printing 204 cps Smoothing High quality print...

Страница 79: ...eed is slower than HQ mode Use the HS mode when you are printing draft documents Your document will print faster but the print density will be less than in HQ mode HS mode uses half the amount of ink as HQ mode Selecting reduction mode cancel Smoothing mode if set Using the Reduction Modes The printer supports two reduction modes for printing spreadsheets and other wide documents on regular paper ...

Страница 80: ...hen using reduction mode you must select the correct paper size within your application In the example above you would specify a paper size of 15 x 11 inches in your application Be sure to account for your margins Selecting the Reduction Mode We recommend that you use reduction mode with MS DOS applications only not Windows applications Windows applications have a fit to page feature that is not c...

Страница 81: ...ff the printer Selecting reduction mode cancels envelope mode if set and selecting envelope mode cancels reduction mode if set Performing Automatic Line Feeds You can set the printer so that it performs an automatic line feed each time it receives a carriage return Then when the printer receives a carriage return code from the computer it moves to the beginning of the next line You only need to se...

Страница 82: ... anything on top of the printer Always use a three wire grounded power receptacle electrical wall outlet with three holes for your printer s power cord Do not modify the cord to remove the ground pin Make sure the power is off any time you connect or disconnect the power cord or interface cable Do not move the mechanism that holds the ink cartridge You may damage delicate mechanical parts Do not t...

Страница 83: ...ey may leave paper particles inside the printer 3 Clean the exterior of the printer Use a soft cloth moistened with water Clean any smudges or dust Do not clean the exterior of the printer with volatile liquids such as thinners benzine or any spray type or chemical cleaners doing so will damage the surface of the printer Do not submerge the printer in water Replacing the Ink Cartridge You use the ...

Страница 84: ...quality is inadequate The Bubble Jet Printer BJ 200ex was designed to be used exclusively with Canon ink cartridges Other inks may damage the print head capping and cleaning devices in the printer If you have problems that are caused by using third party ink or ink cartridges your warranty will be void Ink Cartridge Guidelines To avoid spilling ink follow these precautions Do not attempt to disass...

Страница 85: ...roducts for our inks only Canon cannot guarantee the quality or performance of your printer when you are using inks from other suppliers In addition if a problem emerges as a result of using ink from a supplier other than Canon your warranty will be invalid For optimum printing results use only the Canon BC 02 ink cartridge Installing the Ink Cartridge Canon makes numerous ink cartridges the BC 02...

Страница 86: ...p from the print head and then remove the orange tape Install the ink cartridge immediately after removing it from its protective packaging 5 Fit the ink cartridge over the yellow mounting base with the print head facing down When installed correctly the label on the cartridge will be upside down ...

Страница 87: ... only to set the cartridge in place and press the lock lever down Make sure there is no resistance when you press on the lock lever The lever should lock easily into place If you hear snapping noises or feel any resistance as you press down on the lever remove the ink cartridge and try again 7 Be sure no gap exists between the ink cartridge and cartridge holder When secure the ink cartridge makes ...

Страница 88: ...Head The print head on a new ink cartridge needs to be cleaned to ensure the best possible print quality The printer automatically cleans the print head when you follow these steps 1 Make sure the printer is turned on and on line 2 Press the ON LINE and PRINT MODE buttons at the same time When the ON LINE light starts to blink release the buttons The ON LINE indicator will blink for about 12 secon...

Страница 89: ...ter Take care when transporting it Install an ink cartridge immediately after opening its protective packaging Only clean the print head when you are having print quality problems Never unplug the printer or use a power strip to turn off the printer when the printer s power is turned on Transporting the Printer While the Bubble Jet Printer BJ 200e is small and compact it is not a portable printer ...

Страница 90: ...acking materials Do not remove the ink cartridge from the printer or ship an ink cartridge from which you have removed the protective cap An opened ink cartridge that is not installed in the printer may leak and the print head may dry out Also if you do not tape the ink cartridge to the side of the printer ink may spill into the printer ...

Страница 91: ...ght is on ON LINE HQ and HS lights are blinking Operational Problems No power reaching printer Data from computer in not printed Ink cartridge moves ink does not appear Overall printing is slow from MS DOS Overall printing is slow from Windows Printing Problems Data from computer printed but is not what you expected Printed characters do not match characters on the screen Printing Beyond Edge of P...

Страница 92: ...our printer and you cannot resolve it by referring to the information in this chapter contact the Canon help desk at 1 800 423 2366 1 800 423 2366 U S A or 1 800 263 1121 1 800 263 1121 Canada The staff at the help desk is trained in the technical support of Canon s products and should be able to help you with your problem If your printer requires service the staff at the help desk can provide you...

Страница 93: ...NE and HQ or HS indicators light and the print head is in the home position If nothing happens call the Canon help desk Data from computer is not printed The printer may be off line ON LINE light off Press the ON LINE button to turn the printer on line ON LINE light is on If the printer does not come on line check the ERROR light The interface cable may not be securely connected to the printer and...

Страница 94: ...ections may not be secure Check that your cable connections are secure NOTE NOTE Make sure your interface cable is no longer than 6 6 feet Avoid useing A B switch boxes or switch boxes that have a total cable length of more than 6 6 feet Printer control mode may not match the printer device Check that the printer control mode BJ 10 or Epson LQ matches the printer driver you selected Previous softw...

Страница 95: ...our application requires 66 lines per page try setting DIP switch 2 to ON This enables text scale mode See Chapter 8 Customizing the Printer for details on the DIP switches Printer is not using font you selected with DIP switch settings Your software may be overriding the settings Change the initialization or setup string that your software sends You may need to do this using a menu or scrren prov...

Страница 96: ...the front For manually feeding paper set it to the front For transparencies or thick paper set it to the front Single sheets may not be feeding correctly When manually loading paper be sure to insert a single sheet of paper all the way into the sheet feeder If the paper is not inserted far enough the printer cannot load it Multiple sheets load into printer Sheets of paper may be sticking toghether...

Страница 97: ...s of the printer See Appendix A Specifications for details To clear paper jams see page 123 Print Quality Problems If your print quality is not what you expect it to be check the problems and solutions listed in the following table Problem Cause Solution Print density is low You are using HS mode and not getting satisfactory darkness Try HQ mode the print density in HQ mode is higher than HS mode ...

Страница 98: ...r details Repeat cleaning if necessary The paper thickness lever may not be set correctly Make sure the lever is left for plain paper and transparencies or right for thick paper or envelopes Paper edge is soiled with ink The platen in the printer may be soiled with ink Clean the platen with a soft cloth see chapter 6 Maintaining the Printer for details Feed a few sheets of paper through the printe...

Страница 99: ...ations 2 Click on Print Manager a dialog box appears 3 Select END TASK 4 Double Click on Program Manger 5 Select WINDOW 6 Select MAIN 7 Double Click on Control Panel 8 Double Click on Printers 9 Place and X in the box next to Print Manager 10 Select the Canon BJ 200ex 11 Select CONNECT 12 Change the value in Device Time outs from 15 to 30 seconds 13 Change the value in Transmission Retry from 45 t...

Страница 100: ...LM DLL 7 Now try to install the Visual Guide see page 28 Control Array error occurs when installing the Visual Guide THREED VBX file is causing a conflict with the new files If you are using MS DOS 6 x or later type the following command at the C prompt MOVE C WINDOWS SYSTEM THREED VBX C WINDOWS If you are using MS DOS 5 x or lower type the following COPY C WINDOWS SYSTEM THREED VBX C WINDOWS DEL ...

Страница 101: ...ndows Printer Driver If you are in WordPerfect 5 2 for Windows and the BOX prints but your text does not print follow these steps 1 Select File 2 Select Preferences 3 Check the Fast Graphic Printing option for the Windows Printer Driver Clearing Paper Jams When a paper jam occurs the ERROR light comes on and the printer goes off line Clear the paper jam as follows 1 Press the POWER button to turn ...

Страница 102: ...G lights come on and the print head moves to the home position The printer is now ready for printing If you are printing high density graphics when a paper jam occurs feed at least two sheets of paper through the printer to clean the rollers If the platen is soiled wipe it clean with a dry cloth ...

Страница 103: ...trol mode to Epson LQ You can also enable automatic emulation switching which allows the printer to switch between BJ 10 mode and Epson LQ mode The DIP switches are located under the cover on the left side of the printer Factory Default Settings The following table shows the factory default settings of the printer Function Setting Printer control mode BJ 10 Character Pitch 10 characters per inch c...

Страница 104: ...elope A4 size 2 Text scale mode Disabled Enabled 3 Page length 11 inches Disabled 4 Character set Set 1 Set 2 5 6 7 Code page See following descriptions 8 Automatic carriage return CR Line feed LF only LF with CR 9 Alternate Graphics Mode AGM Disabled Enabled 10 Buffer size Input 62 KB Download 0 KB Input 21 KB Download 41 KB 11 Printer control mode BJ 10 mode Epson LQ mode 12 Automatic emulation ...

Страница 105: ...is switch ON to enable Alternate Graphics Mode AGM In this mode the printer accepts high resolution 24 dot all points addressable APA graphics commands similar to those used with conventional 24 pin printers DIP switch 10 DIP switch 10 When this switch is OFF the printer allocates the entire buffer space 62 KB to the input buffer When you are using downloaded fonts change this switch to ON the pri...

Страница 106: ...scriptions 11 Printer control mode BJ 10 mode Epson LQ mode 12 Automatic emulation switching mode Disabled Enabled DIP switch 1 Use this switch to change the horizontal print position according to the size of your paper If you are using letter size paper or envelopes set this switch OFF the left margin will be 0 25 inch 6 4 mm If you are using A4 size paper or DL size envelopes set this switch ON ...

Страница 107: ... 8 9 10 DIP switches 8 9 10 These switches allow you to select one of eight font typefaces DIP switches Typeface 8 9 10 Roman OFF ON ON OFF ON ON OFF OFF ON Sans serif OFF OFF ON Draft OFF ON OFF Courier OFF ON ON Prestige ON OFF OFF Script ON OFF ON Orator ON ON OFF Orator S ON ON ON DIP switch 11 DIP switch 11 When this switch is OFF the printer is in BJ 10 mode When this switch is ON the printe...

Страница 108: ...oint pen to change the DIP switch settings A DIP switch is OFF when it is up and ON when it down 3 Close the DIP switch cover after making your selections The new DIP switch settings take effect when you turn on the printer If you turn off or reset the printer or if the printer receives the Set Initial Conditions command from a software program the printer resets its functions to the settings defi...

Страница 109: ...82 x 257 mm Envelope 9 5 x 4 1 inches U S Commercial number 10 220 mm x 110 mm European DL Paper Type Paper Type Plain paper Envelopes Commercial number 10 or European DL OHP film transparency film Canon Q07 0001 M1 or 3M CG 3480 Paper Weight Paper Weight 17 to 24 lb 64 to 90 g m2 with automatic feed 17 to 28 lb 64 to 105 g m2 with manual feed Paper Thickness Paper Thickness Less than 0 008 in 0 2...

Страница 110: ...Horizontal a 8 3 to 8 5 in 210 to 216 mm b 0 25 in 6 4 mm Letter size paper b 3 4 mm 0 13 in A4 size paper Vertical c 11 to 14 in 279 to 356 mm d 0 125 in 3 18 mm e 0 3 in 7 6 mm ...

Страница 111: ... number 10 a 220 mm for DL size b 0 25 in 6 4 mm c 1 24 in Commercial number 10 c 10 4 mm for DL size Vertical d 4 125 in Commercial number 10 d 110 mm for DL size e 0 67 in 17 mm f 1 0 in 25 4 mm Reduction Mode Reduction Mode U S paper sizes ...

Страница 112: ......

Страница 113: ...son LQ mode Epson LQ 510 emulation Line Feed Pitch BJ 10 mode 1 6 1 8 n 60 n 72 n 180 n 216 and n 360 Epson LQ mode 1 6 1 8 n 180 and n 360 n programmable Printing Characters Typeface BJ 10 mode Prestige and Courier Epson LQ mode Roman Sans serif Courier Prestige Script Orator Orator S and Draft ...

Страница 114: ...Characters per Line Maximum Number of Characters per Line BJ 10 mode Mode Pitch Characters per line 10 cpi 10 cpi 80 cpl 10 cpi double wide 5 cpi 40 cpl 10 cpi condensed 17 cpi 136 cpl 10 cpi condensed double wide 8 5 cpi 68 cpl 12 cpi 12 cpi 96 cpl 12 cpi double wide 6 cpi 48 cpl Proportional spacing PS Varies Epson LQ mode Mode Pitch Characters per line 10 cpi 10 cpi 80 cpl 10 cpi double wide 5 ...

Страница 115: ...Black Print head 64 bubble jet nozzles Number of characters printed Approx 700 000 characters cartridge in HQ mode 5 coverage Approx 1 400 000 characters cartridge in HS mode Ink amount Approx 0 9 oz 28g Acoustic Noise Level Acoustic Noise Level Approx 42 dB A Operating Environment Temperature 41º F to 95º F 5º C to 35º C Humidity 10 to 90 RH no condensation Storing Environment Temperature 32º F t...

Страница 116: ...lope Microsoft Publisher Method 1 To print envelopes in Microsoft Publisher follow these steps 1 Start Microsoft Publisher 2 Select and run the Envelope Page Wizard design assistant 3 From the Envelope Page Wizard select the options you want 4 After the envelope has been created delete the text box that says TIPS FOR PRINTING YOUR ENVELOPE 5 From the Edit menu select All 6 Click the group button t...

Страница 117: ...lopes and Labels 3 Click on the feed button 4 In the feed method select the first envelope from the left 5 Click on the OK button 6 Click on Print Microsoft Word 2 0 for Windows If you are using Microsoft Word for Windows version 2 0 and the Envelope Macro button in the button bar does not work follow these steps to print envelopes correctly First create the SetPrinterHeuristic dialog box 1 Start ...

Страница 118: ...ing to accommodate envelopes WordPerfect 5 2 If you are using WordPerfect version 5 2 follow these steps to print envelopes First time printing envelopes If you are printing envelopes for the first time follow these steps 1 Choose the Envelope Macro from the Main Screen If the macro is not displayed go to View and then to the Button Bar Setup Select FEATURES WWB and follow the steps for displaying...

Страница 119: ...y want to select a TrueType font or another printer font 7 After selecting all your options choose OK If you are using the Windows driver you see this message Windows printer driver did not accept the requested paper size Document will print on paper size the printer did select 8 Choose OK to print the envelope If you are using the WordPerfect driver no message appears and the printer prints the e...

Отзывы: