background image

27

2

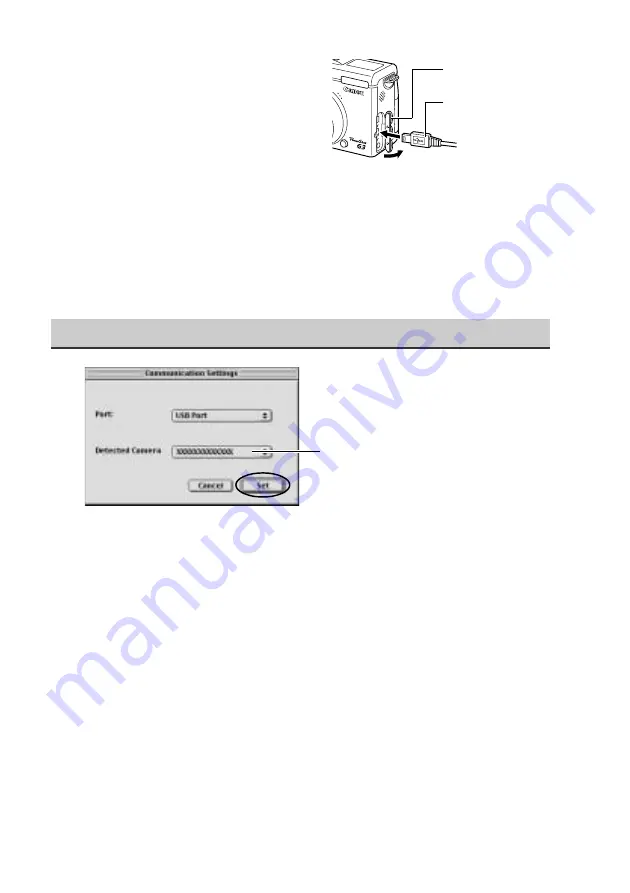
Connect the USB cable to the
camera’s Digital terminal.

• Open the terminal cover and

connect the cable.

Mac OS 8.6-9.2

• ImageBrowser will start and open the ImageBrowser Automation Wizard

dialog. Confirm that [Display Images] is selected and click the [OK] button.

Mac OS X

• Double-click the [Canon ImageBrowser] icon on the desktop. Once

ImageBrowser is started, click [Canon Camera] in the Explorer View section.

Set the communication settings (first time connection only)

Mac OS 8.6-9.2 screen shot shown.

• Confirm that [USB Port] and your camera model name are selected and click

the [Set] button.
The Camera window will open and display the camera images.

The name of your camera
model appears here.

2. USB cable

Insert the connector
until it clicks.

1. Terminal cover

Содержание 8120A001 - PowerShot G3 Digital Camera

Страница 1: ...re information about usage precautions and detailed instructions please refer to the other related manuals p 2 You must install the software bundled on the Canon Digital Camera Solution Disk before co...

Страница 2: ...tions 7 Printing Images by Connecting the Camera Directly to a Printer 15 Downloading Images to a Computer Windows 18 Downloading Images to a Computer Macintosh 25 For detailed instructions see the ot...

Страница 3: ...dicator beside the viewfinder stops blinking and lights steadily After charging detach the compact power adapter s DC plug from the camera 4 Slide the card slot cover in the direction of the arrow and...

Страница 4: ...First time the camera is powered on The Set Date Time menu will appear on the LCD monitor Select the items you wish to set using the B or A arrow on the omni selector and set the value using the C or...

Страница 5: ...on the LCD monitor 1 Open the LCD monitor The LCD monitor can be freely opened to various position 2 Turn the mode lever to The camera powers up in Replay mode The power mode indicator lights green Th...

Страница 6: ...menu tabs using the B or A arrow on the omni selector 3 Select a menu item using the C or D arrow on the omni selector 4 Select setting contents using the B or A arrow on the omni selector Press the b...

Страница 7: ...ff Flash Adjust Sets whether or not the flash is adjusted automatically Auto Manual Red eye Sets whether or not the red eye reduction lamp fires On Off Cont Shooting Sets the continuous shooting optio...

Страница 8: ...sponds to the AF point Center AF Point ND Filter Sets the ND filter On Off MF Point Zoom Sets whether or not the focusing point is magnified when using the manual focus On Off AF Mode Sets the frequen...

Страница 9: ...Content Digital Zoom Sets whether or not the digital zoom combines with the optical zoom to zoom images On Off Review Sets the duration images display on the LCD monitor after the shutter button is re...

Страница 10: ...vel of the LCD monitor Normal Bright Set up Menu Item Menu Screen Settings Content Default setting Erase all Erases all images from a CF card excluding protected images Slide Show Plays images in an a...

Страница 11: ...ets whether or not the camera automatically powers down after a specified period of time elapses without something being pressed On Off Date Time Sets the date time and date format Format Formats init...

Страница 12: ...elftimer Vol Adjusts the sound volume of the Selftimer Sound Off 1 2 3 4 5 File No Reset Sets how file numbers are assigned to images when new CF cards are inserted On Off Auto Rotate Sets whether or...

Страница 13: ...menus and messages on the LCD monitor The menu may appear differently in some regions English Italiano Deutsch Norsk Fran ais Svenska Nederlands Espa ol Dansk Chinese Suomi Japanese You can change the...

Страница 14: ...r any button other than the shutter button is operated Off Selftimer Sound Sets the sound informing you that the photo will be taken in 2 seconds Off Shutter Sound Sets the shutter sound when you depr...

Страница 15: ...he printer and connect the camera to the printer Open the LCD monitor With the CP 10 printer the printer s power turns on automatically 3 Press the printer s ON OFF button to turn on the power appears...

Страница 16: ...rect Print Function Compatible Bubble Jet Printer By connecting the camera with a single cable to a direct print function compatible BJ printer optional you can easily print your images with simple op...

Страница 17: ...ess the button The image will start to print and when it is completely finished the display will revert to standard replay mode We recommend the use of the compact power adapter CA 560 as the camera s...

Страница 18: ...s Me Windows 2000 Windows XP All procedures performed with a connection to a USB 2 0 compliant board are not guaranteed Installing the Software Do not connect the camera to the computer before the sof...

Страница 19: ...e CD ROM icon and select Open 3 Double click the SETUP exe icon If the exe extension does not show see the computer s manual for instructions on showing file name extensions 2 Click Software Installat...

Страница 20: ...s over select Yes I want to restart my computer now in the screen below and click Finish Remove the Canon Digital Camera Solution Disk once the installation is complete and before you connect the came...

Страница 21: ...n application program to start 2 Select an application to start Select Canon ZoomBrowser EX and click OK With Windows XP the Event dialog does not appear the first time the camera is connected after c...

Страница 22: ...ion the Event dialog will appear allowing you to select an application program to start 2 Select an application to start Select Canon ZoomBrowser EX and click OK ZoomBrowser EX starts the Camera Windo...

Страница 23: ...Camera window as thumbnails Select the images you wish to download in the Camera window and click Download image A Download Settings dialog allowing you to select the image destination folder will dis...

Страница 24: ...24 Make sure the settings are the same as the following and click OK At this point the Camera window will close and the main window will open The downloaded images will appear in the main window...

Страница 25: ...ped with genuine Apple brand built in USB interfaces All operations performed with a connection to a USB 2 0 compliant board are not guaranteed Installing the Software Close any programs that are runn...

Страница 26: ...software required for the camera will be installed 4 Once the installation is complete and the installer panel appears click Quit 5 Remove the Canon Digital Camera Solution Disk from the CD ROM drive...

Страница 27: ...le click the Canon ImageBrowser icon on the desktop Once ImageBrowser is started click Canon Camera in the Explorer View section Set the communication settings first time connection only Mac OS 8 6 9...

Страница 28: ...ges from the camera Click the File menu and select New Folder A folder with the name Untitled will be created Click it to change the folder name as you wish 2 In the Explorer View Section click the ne...

Страница 29: ...the Camera Select images in the Camera window and click the Download button The downloaded images are saved to the computer and appear in the Browser area RAW displays on RAW images Thumbnail The mov...

Страница 30: ...30 MEMO...

Страница 31: ...31...

Страница 32: ...CDI E069 010 XXXXXXX 2002 CANON INC PRINTED IN JAPAN...

Отзывы: