background image

Demo Mode

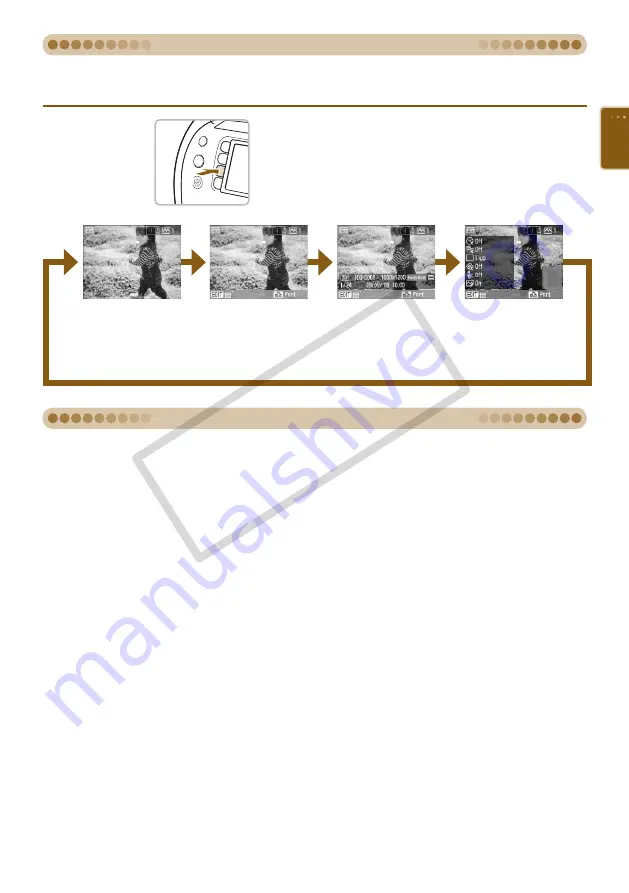
Changing the Information Displayed on the Screen

You can change the information that is displayed on the screen. However, if SELPHY’s power is turned 
off or the memory card is removed, the setting will return to [Tool Tips].

Change the information displays.

Press the 

m

(DISPLAY)

 button.

Every time the 

m

(DISPLAY)

 button is pressed, 

the display information will change as shown 
below.


No information

Commands only

(Default setting)

Image

information

Print settings

The current settings 

in “Printing a Variety 

of Images” 

(pp. 31-

35)

 will display.

If the [Auto Power Down] function is set to [Off] 

(pp. 70, 71)

, there are no cards in the card slots, 

and no user operations are performed for 20 sec., SELPHY will enter demo mode and some sample 
images will be displayed on the screen.
If a button is pressed or any user operation is performed, demo mode will be cancelled.

CO

PY

Содержание 3647B001 - SELPHY ES40 Photo Printer

Страница 1: ... Printer User Guide ENGLISH Make sure you read this guide before using the printer Store this guide safely so that you can use it in the future COPY ...

Страница 2: ...age Effects p 50 Speech Bubbles p 48 Print Settings You change print settings to imprint the shooting date adjust the colors and make many kinds of prints Border Color pp 33 39 Borders p 32 Image File Number p 32 Date p 32 Gold and Silver Prints When using the Gold or Silver Easy Photo Packs p 3 you can print gold and silver frames and clip art p 81 Optimize the Image p 34 Red Eye Correction p 34 ...

Страница 3: ...printer be sure to purchase a cartridge Easy Photo Pack separately Paper Size No of Possible Prints Ink Type Color of Cartridge Product Name Postcard size 100 x 148mm 4 x 6 in 100 Color Green Easy Photo Pack E P100 50 Color Green Easy Photo Pack E P50 20 Color Gold Gray Easy Photo Pack E P20G 20 Color Silver Gray Easy Photo Pack E P20S 25 BW Gray Easy Photo Pack E P25BW L size 89 x 119mm 3 5 x 4 7...

Страница 4: ... Colored Border 39 Printing with Frames 40 Printing with Clip Art 42 Printing Calendars 44 Printing using Multi Layouts 46 Printing with Speech Bubbles 48 Printing with Image Effects 50 Printing an ID Photo 52 Using SELPHY with Your Computer 55 What You Can Do with the Supplied Software 56 System Requirements 57 Install and Start the Software 58 Printing from Your Computer 60 Downloading Frames an...

Страница 5: ...please return it to the country of sale before proceeding with a warranty claim to a Canon Customer Support Help Desk LCD Monitor The LCD monitor is produced with extremely high precision manufacturing techniques More than 99 99 of the pixels operate to specification However some pixels may occasionally misfire or appear as red or black dots This has no effect on the printed image and does not con...

Страница 6: ...oted on the following pages are intended to prevent injuries to yourself and other persons or damage to the equipment Be sure to also check the guides included with any separately sold accessories you use WARNING Denotes the possibility of serious injury or death CAUTION Denotes the possibility of injury CAUTION Denotes the possibility of damage to the equipment Do not attempt to disassemble or al...

Страница 7: ...t may cause deformation of the printer s casing CAUTION Unplug the printer when not in use Not doing so could result in electrical shock or fire CAUTION Getting Started This section will prepare you to start printing images The postcard size cartridge sold separately p 3 will be used as an example in this section However you can print with other cartridges using the same steps 1 Prepare the cartri...

Страница 8: ...y cause the printer to malfunction Connecting SELPHY Plug the cord into SELPHY Fully insert the power cord into SELPHY s terminal Insert the electric plug into an outlet 2 Open the cover Slide the cartridge cover lever in the direction of the arrow to open the cover 3 protective paper Insert the cartridge With the protective paper facing towards you insert the cartridge as shown in the illustratio...

Страница 9: ...eel to choose a language then press the o button to change the language If a memory card is inserted in SELPHY the screen in Step 2 will not appear even if the Step 1 is followed Please remove the memory card before performing Step 1 You can also change language settings by pressing the m MENU button and choosing Printer Setup and then Language pp 70 72 Turning On SELPHY Turn on the power Press an...

Страница 10: ...ess the l r buttons to change the setting When you choose Sounds Only in the Language menu only sound effects will play Press the b BACK button to make the setting and restore the image display screen Display language settings pp 9 70 72 will not affect the voice guidance settings Each setting must be made separately Slide the cover in the direction of the arrow to open Sliding Slot Cover Slide th...

Страница 11: ...Card Microdrive xD Picture Card 2 4 Memory Stick Memory Stick PRO Memory Stick Duo Memory Stick PRO Duo Memory Stick micro 1 RS MMC is an abbreviation of Reduced Size MultiMediaCard 2 Purchase the CompactFlash Card Adapter for xD Picture Card For memory cards that require an adapter be sure to first insert the memory card into the adapter before inserting into the appropriate card slot If you inse...

Страница 12: ...ose an image Press the udl r the area on the w wheel buttons or turn the w wheel to choose an image then press the o button to go to single image view Press the b BACK button to restore 9 image view If there are more than 5 images on the memory card turning the w wheel quickly while in single image view will display the screen on the left Press the l r buttons or turn the w wheel to choose an imag...

Страница 13: ...late in the print output receptacle To cancel printing press the b BACK button followed by the o button 5 If the paper runs out remove the cartridge Slide the cover lever up to open the cartridge cover Slide the cartridge lever down The cartridge will be ejected 6 Insert a new cartridge p 7 Do not eject the cartridge open the cartridge cover or close the print output receptacle cover right after t...

Страница 14: ...t prints in an album choose an album with photo covers made of nylon polypropylene or cellophane Color may change over time or depending on storage conditions Canon assumes no liability for color changes Cleaning Up After Printing After you finish printing follow the steps below to clean up and store SELPHY Turn off the power p 9 remove the memory card and close the card slot cover Removed the pri...

Страница 15: ... in these recipes pp 16 19 Even beginners can print easily For more detailed information refer to the full instructions for each printer function Printing Recipes Use the following recipes to create original greeting cards scrapbooks and more Let s get started COPY ...

Страница 16: ...esses or messages Frames in Creative Print SELPHY Photo Print supplied software Use the Frames feature in Creative Print p 40 1 Press the c button and choose Frames 2 Choose an image 3 Choose a frame and print Using SELPHY Photo Print pp 56 60 1 Choose an image 2 Choose a frame and print Make your personalized greeting cards dazzling by using the gold or silver Easy Photo Packs p 3 COPY ...

Страница 17: ...ons Multi Layout in Creative Print Use the Multi Layout feature in Creative Print p 46 1 Press the c button and choose Multi Layout 2 Choose the page layout and background color 3 Choose images and print 4 Write down your comments with a marker pen 5 Mount the prints on the colored paper and add decorations to your taste Creating a Photo Diary COPY ...

Страница 18: ...n Creative Print p 44 1 Press the c button and choose Calendar 2 Choose the page layout and background color 3 Choose the year and the month and specify holidays or special occasions 4 Choose an image and print Turn your birthday and a photo into a calendar Create a calendar together as a family Creating a Photo Calendar COPY ...

Страница 19: ...theme 3 Choose the color of the mounting board for the background to go with your photos 4 Design the layout of your page 5 Cut your photos and colored paper and arrange and mount them on the mounting board 6 Add decorations and if desired write the title and any comments Combining different size photos can be visually effective Use your creativity to turn a fond memory into a scrapbook Creating a...

Страница 20: ...20 COPY ...

Страница 21: ...pes of memory cards that can be used in this printer are collectively referred to as memory cards The button functions are represented by icons shown on or around the buttons For a detailed explanation refer to Controls p 23 Language that displays on the screen appears inside square brackets Things you should be careful about Supplemental information p XX Reference pages XX stands for page number ...

Страница 22: ...put Receptacle p 13 Cartridge Cover p 8 Sliding Slot Cover pp 10 12 Cartridge Cover Lever p 8 Paper Handling Slot Carrying Handle AC IN Power Input Terminal p 8 Print Output Receptacle Button Air Vents p 8 USB Terminal for Computer Connection p 59 USB Terminal for Digital Camera Connection p 66 Card Slots pp 10 12 Speaker COPY ...

Страница 23: ... Button Change the display style p 26 or controls the size of the trimming frame p 36 9 0 Reduce Button 10 Increase Copies Button Specify number of copies choose setting items p 13 11 Decrease Copies Button 12 u Up Button Choose settings p 9 and images p 12 13 d Down Button 14 l Left Button 15 r Right Button 16 w Easy Scroll Wheel Behaves the same as the udl r buttons during most operations Also d...

Страница 24: ...full sized label sheet G Postcard size supporting gold printing S Postcard size supporting silver printing BW Postcard size black and white 7 Paper Status 1 2 full or more About 1 4 full or more About 1 8 full or more Less than 1 8 full Displays in red The cartridge is empty No Display The status is unknown 8 Number of images on the memory card current image total number of images 9 Time and date ...

Страница 25: ... pressed the display information will change as shown below No information Commands only Default setting Image information Print settings The current settings in Printing a Variety of Images pp 31 35 will display If the Auto Power Down function is set to Off pp 70 71 there are no cards in the card slots and no user operations are performed for 20 sec SELPHY will enter demo mode and some sample ima...

Страница 26: ...t or last image Single Image View Press the o button to display the selected image in single image view Rapidly turn the w wheel if there are more than 5 images on the memory card Press the l r buttons or turn the w wheel to choose an image That image will be shown magnified in the upper left of the screen If there are more than 6 images on the memory card press the l r buttons or turn the w wheel...

Страница 27: ...he l r buttons or turn the w wheel to view the only images taken on that date Search Key Jump Details Jump 10 Images Jumps 10 images at a time Jump 50 Images Jumps 50 images at a time Jump 100 Images Jumps 100 images at a time Jump Selected Images Jumps to images where you have set a number of copies p 13 Jump Selected Date Displays images by date You can also display the jump screen by pressing t...

Страница 28: ...mage and print Pressing the o button or the p button once will pause playback pressing the o button once more will resume playback Pressing the p button while playback is paused will print the currently displayed image When printing has finished playback will resume Only one image per page will be printed Page Layout settings made in Printing a Variety of Images p 33 will be disregarded You can ad...

Страница 29: ...e various print settings to get more enjoyment out of using SELPHY Refer to the Cartridge Feature Compatibility Table p 76 to learn which printing functions can be performed when each cartridge is installed Printing a Variety of Images COPY ...

Страница 30: ...ies Choose the number of copies Press the buttons to set the number of copies You can specify up to 99 copies per image If there are more than 1000 images on the card only 999 copies will be printed in order of the most recent by shooting date 3 Print Press the p button to start printing To cancel printing press the b BACK button followed by the o button You can print all images on a memory card a...

Страница 31: ...d change the settings Press the ud buttons or turn the w wheel to choose an item Press the l r buttons to make a selection then press the b BACK button and the screen in Step 3 will display If Borders is set to Bordered Border Color will appear Choosing a border color and pressing the o button will restore the setting screen If Adjust Image is set to On a settings screen will appear Refer to pp 32...

Страница 32: ...d by the digital camera it cannot be changed on SELPHY You can change the style of the printed date in Date Format p 35 Printing with the File Number File No 100 0002 The image file number registered by the digital camera will be printed on the image Off Default setting On Printing With or Without Border Borders Set images to print with or without a border Borderless Default setting Bordered When ...

Страница 33: ...t 8 up Prints eight images on one sheet 2 up Prints two images on one sheet Index Prints as an index 4 up Prints four images on one sheet Fixed Size Prints an image on the left side of the paper leaving the right side free to write messages after printing Fixed Size cannot be selected when using a card size cartridge p 3 The image position is determined by the order the images are selected Dependi...

Страница 34: ...size Getting the Best Results with Auto Correction Image Optimize SELPHY will automatically correct the image to achieve optimum image quality Off On Default setting Some images may not be adjusted correctly When Page Layout p 33 is set to Index Image Optimize will not be applied The correction may differ depending on the image size or layout settings Adjusting the Image s Qualities Adjust Image Y...

Страница 35: ...r blue subjects more vivid Sepia Tones the image into sepia Vivid Green Emphasizes green tints Makes mountains foliage and other green subjects more vivid B W Black and white Vivid Red Emphasizes red tints Makes red subjects more vivid PositiveFilm Combines the effects of Vivid Red Vivid Green and Vivid Blue to produce intense natural looking colors like those obtained with positive film When Page...

Страница 36: ...en press the o button The trimming frame a frame showing the part of the image that will be printed will appear on the image 3 Choose a horizontal or vertical trimming frame Every time the m DISPLAY button is pressed or the w wheel is turned the trimming frame will rotate between horizontal and vertical orientations 4 Choose where to trim the image Press the udl r buttons to move the frame Pressin...

Страница 37: ...es Press the p button to start printing After printing has finished all trimming frame settings will be cleared Images with a pixel resolution below 640 x 480 above 5616 x 3744 or an aspect ratio greater than 16 9 cannot be trimmed You can set up to 50 trimming frames at a time You can also trim images when using the Clip Art p 42 Calendar p 44 Multi Layout p 46 Speech Bubble p 48 or ID Photo p 52...

Страница 38: ...r turn the w wheel to select an item then press the o button 3 Print Choose an image for printing p 12 and a number of copies p 13 and press the p button to print After printing has finished the selected layout settings will clear For more instructions about creating a layout refer to Choosing a Layout and Printing Page Layout p 33 Settings made in Choosing a Layout and Printing Page Layout p 33 w...

Страница 39: ...a color then press the o button Print Choose an image for printing p 12 and a number of copies p 13 and press p to print After printing has finished the selected border color settings will clear If Borders p 32 settings are set to Borderless Border Color will not appear in the edit menu For complete information about Border Colors refer to Printing with a Colored Border Border Color p 33 Settings ...

Страница 40: ... button Press the udl r buttons or turn the w wheel to choose a frame then press the o button 2 Choose an image Press the l r buttons or turn the w wheel to choose an image then press the o button You can search images using the jump function p 27 by pressing the m EDIT button and displaying the edit menu 3 Choose a frame Press the l r buttons or turn the w wheel to choose frame then press the o b...

Страница 41: ...Colors p 35 settings made in Printing a Variety of Images will not be applied Changing the settings in My Colors p 35 will change the color settings on the image but will not affect the frame Images with a resolution below 640 x 480 or a width to height ratio greater than 2 1 cannot be printed with frames When a cartridge is replaced mid way through printing automatic adjustments trimming frames i...

Страница 42: ...Press the c button Press the udl r buttons or turn the w wheel to choose a stamp then press the o button 2 Choose an image Press the l r buttons or turn the w wheel to choose an image then press the o button You can use the trimming function p 36 or search images using the jump function p 27 by pressing the m EDIT button and displaying the edit menu 3 Choose stamps Press the udl r buttons or turn ...

Страница 43: ...rect Red Eye p 34 Image Optimize p 34 Adjust Image p 34 and My Colors p 35 settings made in Printing a Variety of Images will not be applied Changing the settings in My Colors p 35 will change the color settings on the image but will not affect the stamps Images with a pixel resolution below 640 480 or an aspect ratio greater than 2 1 cannot be printed with stamps When a cartridge is replaced mid ...

Страница 44: ... or turn the w wheel to choose a calender then press the o button 2 Choose a layout Press the udl r buttons or turn the w wheel to choose a layout then press the o button 3 Choose a background color Press the udl r buttons or turn the w wheel to choose a color then press the o button 4 Set the year month the starting day of the week and highlight holidays Press the ud buttons to choose an item the...

Страница 45: ...n You can use the trimming function p 36 or search images using the jump function p 27 by pressing the m EDIT button and displaying the edit menu 8 Review image and print Press the buttons to choose a number of copies Press the p button to start printing With the exception of Correct Red Eye p 34 Image Optimize p 34 Adjust Image p 34 and My Colors p 35 settings made in Printing a Variety of Images...

Страница 46: ... print a layout with two images Printing using Multi Layouts 1 Display the multi layout print screen Press the c button Press the udl r buttons or turn the w wheel to choose a Multi Layout then press the o button 2 Choose a layout Press the udl r buttons or turn the w wheel to choose a layout then press the o button 3 Choose a background color Press the udl r buttons or turn the w wheel to choose ...

Страница 47: ...4 Image Optimize p 34 Adjust Image p 34 and My Colors p 35 settings made in Printing a Variety of Images will not be applied In layouts with more than 2 images Correct Red Eye p 34 settings made in Printing a Variety of Images will not be applied Changing the settings in My Colors p 35 will change the color settings on the image but will not affect the background color Images with a resolution low...

Страница 48: ... Bubble then press the o button 2 Choose an image Press the l r buttons or turn the w wheel to choose an image then press the o button You can use the trimming function p 36 or search images using the jump function p 27 by pressing the m EDIT button and displaying the edit menu 3 Choose a speech bubble Press the udl r buttons or turn the w wheel to choose a Speech Bubble then press the o button 4 ...

Страница 49: ...just Image p 34 and My Colors p 35 settings made in Printing a Variety of Images will not be applied Changing the settings in My Colors p 35 will change the color settings on the image but will not affect the color of the speech bubbles Images with a resolution lower than 640 480 cannot be printed with speech bubbles When a cartridge is replaced mid way through printing automatic adjustments the p...

Страница 50: ...ffect then press the o button Image Effect Explanation of Effect Faded Edges Keeps the center of the image clear while gently fading out the edges Soft Edges Keeps the center of the image in focus while gently blurring the edges Soft Focus Softens the focus of the entire image Star Lights Turns the bright points of light in the image into stars for a sparkling effect Modern Bright Creates a soft w...

Страница 51: ...e shown on the screen in Step 4 may differ slightly from the actual printed photo With the exception of Borders p 32 settings made in Printing a Variety of Images will not be applied When color settings have been changed in My Colors p 35 the image effect will be applied to the image in addition to the color settings made in My Colors Images with a resolution lower than 640 480 cannot be printed w...

Страница 52: ... to choose a ID photo then press the o button 2 Choose an image Press the l r buttons or turn the w wheel to choose an image then press the o button You can search images using the jump function p 27 by pressing the m EDIT button and displaying the edit menu 3 Choose the size of your ID photo Press the ud buttons to select an item and press the l r buttons or turn the w wheel to choose the size of...

Страница 53: ...ith the recording pixels set to L large can be printed as ID photos If an image taken with a non Canon brand digital camera has roughly the same recording pixels as an L large image taken with a Canon digital camera it can also be printed as an ID photo However depending on the camera the message Incompatible image may appear in Step 2 and the image cannot be printed as an ID photo When a cartridg...

Страница 54: ...54 COPY ...

Страница 55: ...amps contents data to SELPHY Using SELPHY Photo Print you can view all images at once in a list and add text to images before printing them Following the audio guidance will allow inexperienced computer users to print easily Using SELPHY ES40 Contents Utility you can download new frames and clip art contents data to SELPHY Using SELPHY with Your Computer COPY ...

Страница 56: ...ecorations You can add frames or stamps to your images and print You can also add text to your images and print You can use gold and silver cartridges when printing with a Windows computer Print calendars You can add calendars to your prints SELPHY Photo Print SELPHY ES40 Contents Utility Download Frames and Stamps to SELPHY You can add frames and stamps contents data to SELPHY COPY ...

Страница 57: ... a CD ROM drive to install the software For Windows XP Microsoft NET Framework 2 0 max 280MB must be installed SELPHY may not operate correctly if it is connected to a computer via a USB hub SELPHY may not function properly if other USB devices with the exception of a USB mouse or USB keyboard are used at the same time Disconnect any other USB devices from your computer and then reconnect SELPHY D...

Страница 58: ...tallation when the screen on the left appears Follow the onscreen instructions to proceed If the User Account Control window appears follow the on screen instructions to proceed Proceed with the installation to display the screen on the left Macintosh Place the CD ROM in the computer s CD ROM drive and double click When the screen on the left appears click Install and follow the onscreen instructi...

Страница 59: ... between SELPHY and the computer is established From now on the software will automatically start when you perform Steps 2 to 4 Windows If the screen in Step 5 does not appear choose from the Start menu r All Programs r Canon Utilities r SELPHY Photo Print r SELPHY Photo Print Macintosh If the screen in Step 5 does not appear follow the procedure below to register your printer After clicking in th...

Страница 60: ...a print method Click Simple print You can make prints with frames stamps and speech bubbles by clicking Decoration print You can make prints with calendars added by clicking Calendar print 3 Choose an image Images will display in a list within the My Pictures folder in Windows and the Pictures folder in Macintosh You can display images saved in another folder if you press this button to choose a f...

Страница 61: ...left corner of the screen Turning off the Voice Guidance The voice guidance may not play properly on some computers If the voice guidance is difficult to hear follow these steps to turn off the voice guidance before using the software Turning off the Voice Guidance While in the screen from Step 1 in Printing from Your Computer p 60 check the Off radio button Turn off voice guidance In order for th...

Страница 62: ...rames p 40 and Printing with Clip Art p 42 Items to Prepare A computer with a memory card slot for a SELPHY compatible memory card or a computer connected to a commercially available card reader with a slot for a SELPHY compatible memory card A SELPHY compatible memory card p 11 1 Install the Software pp 58 59 Perform Steps 1 to 5 in Install and Start the Software 2 Start the software Perform Step...

Страница 63: ...and 5 to the memory card If Select a drive to write the data to displays choose the drive When downloading is completed click Exit You cannot download contents data to SELPHY directly from your computer After you have downloaded contents data to a memory card the next time you use SELPHY ES40 Contents Utility Frames written to memory card and Clip art written to memory card will appear on the left...

Страница 64: ...ss the o button to begin adding the contents data to SELPHY When finished the menu screen will display Until the contents data has finished updating do not remove the memory card turn off SELPHY s power or press any of SELPHY S buttons This may cause the printer to malfunction 5 Print using the added update contents You can print the added frames using the procedure described in Printing with Fram...

Страница 65: ...xplain how to connect SELPHY to a digital camera how to print images with settings specified on the digital camera and how to print wirelessly from a mobile phone Printing Images from your Digital Camera or Mobile Phone COPY ...

Страница 66: ... digital camera and play back the images on the digital camera Depending on the digital camera you use will appear on the digital camera s screen 4 Make the necessary settings on your digital camera to choose an image for printing Use digital camera operations to start printing Printing starts When a gold or silver cartridge is installed you cannot print directly from a digital camera You cannot s...

Страница 67: ...dard Index Date and File No set with the digital camera Number of sheets required Check the settings 4 Print Press the p button to start printing The date and file number are the DPOF settings made with the digital camera these settings cannot be changed with SELPHY If on a Canon brand digital camera the Print Type is set to Standard the settings made in Printing a Variety of Images pp 31 35 will ...

Страница 68: ...ur mobile phone and try again The following conditions could cause slow transmission and cause transmission to fail even within the 10 m range There is an obstacle between the Bluetooth unit and the mobile phone There is interference from magnetic fields static electricity or radio waves in the area The maximum file size that can be transmitted is 2 3 MB varies depending on mobile phone Data trans...

Страница 69: ...69 This section will explain how to personalize SELPHY how to fix any printing problems and gives useful information to know when using SELPHY Useful Information when Using SELPHY COPY ...

Страница 70: ...MENU button Press the ud buttons or turn the w wheel to choose Printer Setup then press the o button 2 Change a setting Please refer to each item pp 71 72 for settings and how to change settings After you have made your settings press the b BACK button and the screen in Step 3 displays 3 Make the setting Press the l r buttons or turn the w wheel to choose OK and press the o button to make the sele...

Страница 71: ...d buttons to choose an item and press the l r buttons or turn the w wheel to make a setting For Reset press the o button When Security is set to On choose Passkey and press the o button Choose a 4 digit passkey by pressing the l r buttons or turning the w wheel to move between digits and the ud buttons to change the numbers Then press the b BACK button Options Selectable Settings Device name Set t...

Страница 72: ...to Play Transitions Restore default settings Press the ud buttons or turn the w wheel to choose Reset All then press the o button After the confirmation screen appears pressing the o button will return the printer to its default settings The display language p 9 Date Format p 35 and Voice Guidance Settings p 10 will not be reset Will reset all of SELPHY s settings to their default Restore SELPHY s...

Страница 73: ... Wait until printing resumes The maximum number of images that can set for printing is 999 The maximum number of copies that can be printed per image is 99 Cannot print from memory card image does not display Confirm that the correct memory card is inserted all the way into the slot with the label facing forward pp 10 12 Make sure you are using a supported image type p 11 Confirm that any memory c...

Страница 74: ...of SELPHY will be used Cannot make clean prints Check if the ink sheet is dusty Check if dust has lodged within SELPHY p 77 Remove dust on the printer head with the supplied cleaner unit p 77 Check if condensation has formed within SELPHY p 77 Check if SELPHY is placed near a device with strong electromagnetic or magnetic fields p 8 Colors on the computer display and the print are different Color ...

Страница 75: ...ot sufficient to remove the paper do not attempt to forcibly pull it out Turn the printer off and on repeatedly until the paper is ejected Open the print output receptacle cover If the print output receptacle cover does not automatically open and paper gets stuck press the print output receptacle button p 22 to open the cover and pull out the paper Cartridge or Paper Problems How to Attach the Pri...

Страница 76: ...a Mobile Phone p 68 Printing from a Computer p 60 1 Available Not Available 1 When using SELPHY Photo Print on a Windows computer Print Modes Cartridge p 3 Error Messages If a problem occurs with SELPHY a message displays on the screen If a possible solution displays with the error message follow the instructions on the screen If no solution displays refer to Troubleshooting p 73 If these items do...

Страница 77: ... it in an airtight sealable plastic bag and allow for adjustment to temperature changes gradually before removing from the bag In the event that condensation does form within SELPHY keep it at room temperature until the water droplets evaporate naturally before use When SELPHY gets dirty wipe the casing with a soft dry cloth If the air vents p 8 have become dusty wipe the dust away If dust gets in...

Страница 78: ...em Automatic Automatic feed from the Easy Photo Pack Ejection System Automatic paper ejection to the print output receptacle LCD Monitor 3 5 inch type TFT LCD color Monitor 230 000 dots Interface USB Connecting to a PictBridge compliant device USB compliant Type A connector Connecting to a computer USB compliant Type B connector Wireless Bluetooth 2 Memory Cards SD Memory Card miniSD Card SDHC Mem...

Страница 79: ...31 35 Cleaner Unit 3 7 77 Clip Art Designs 81 Download New Clip Art 62 Printing 42 COMPACT PHOTO PRINTER Solution Disk 3 58 Computer Download Contents 62 Install and Start the Software 58 Print 60 System Requirements 57 View All Images 60 Contents Update 64 70 72 Controls 23 Copies 12 Correct Red Eye 31 34 Creative Print 2 40 53 D Date Format 2 31 35 Printing 2 31 32 Demo Mode 25 Digital Camera Pr...

Страница 80: ... My Colors 2 31 35 N Names of Components 22 O Optimize Image 31 34 P Postcard Size 3 Power Button 9 23 Cord 3 8 Print All Images 30 Print Effect Image Effect Printable Images 11 Printer Setup 70 Auto Power Down 71 Auto Rotate 71 Bluetooth 71 Default 72 Language 72 Transfer Content 72 Transition Effects 72 R Red Eye Correction 2 34 Remove the Cartridge 13 Reset All Settings 70 72 S Scrapbook 19 Scr...

Страница 81: ... and clip art stamps Decorate your favorite images and enhance your life with beautiful photos Frames Clip Art Frames and Clip Art stamps with support gold or silver printing The above are design samples The printed results may differ slightly depending on the paper size COPY ...

Страница 82: ...rs or omissions please contact the Canon Customer Support Help Desk indicated on the customer support list included with the product The above items notwithstanding Canon accepts no liability for damages due to mistaken operation of the products This product is designed to achieve excellent performance when used with genuine Canon accessories Canon shall not be liable for any damage to this produc...

Отзывы: