background image

  Printing the Selected Image (Basic Printing)

You can select images, specify the number of copies for each, and then print them all out. If you want 
to embed the date, follow the instructions on page 12 before printing.

Do not pull out the paper cassette or open the ink cassette cover just after turning on the printer or while 

printing. This will lead to malfunctions. 
During printing, the paper will pass in and out several times. Do not touch or pull on the paper until printing 

has finished and the printed sheet collects on the print output tray (on top of the paper cassette).
Do not let 10 or more sheets of printed paper collect on the print output tray.
Do not pull out the memory card during printing.


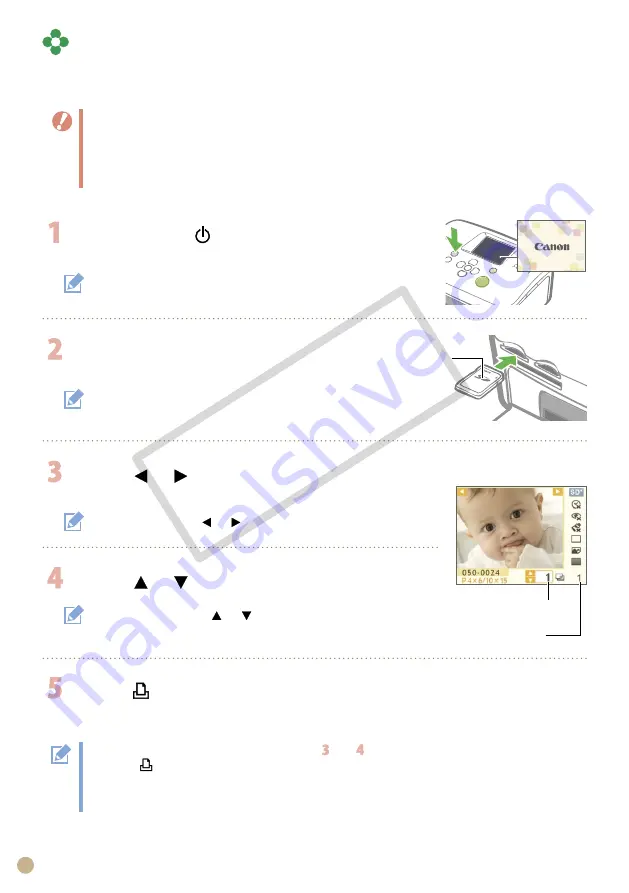
  Press and hold 

 until the start-up image 

appears on the LCD monitor to turn on the power.

  Insert a single memory card into the 

appropriate card slot.

When inserting a small memory card like miniSD Card in 
the  “SD/miniSD/MMC+/RS-MMC”  slot,  insert  the  card  in 
the lower portion of the slot.

  Press 

 or 

 to select the image you wish to 

print.

Press and hold down 

 or 

 : Jumps images by 5.

Number of copies of 

the selected image

  Press 

 or 

 to set the number of copies.

Press and hold down 

 or 

 : Increases or decreases the number 

of copies by 5.
You can specify up to 99 copies (or total of 999 prints).

  Press 

 .

Printing starts.

To print other images together, repeat the steps   and  .
Pressing 

 when the total number of prints is 0 copies will print one copy of the image displayed on the 

LCD monitor.
To remove a memory card, grasp the portion of the card protruding from the card slot and pull it out.
Use a marker pen to write on the printed sheets.


Number of sheets 

required

Label side

To change the display language, refer to page 14.

Insert all the way.

CO

PY

Содержание 2565B001

Страница 1: ...Printing Guide CDI E361 010 Easy Printing Beautiful Prints and Fun CANON INC 2008 PRINTED IN CHINA ENGLISH COPY ...

Страница 2: ...nd powerful printer for preserving precious family moments SELPHY enriches your daily life with beautiful photo prints Table of Contents Unpack p 4 Getting Started p 5 Printing from Memory Cards p 7 What You Can Do with Your SELPHY Printer p 9 Printing from Digital Cameras Mobile Phones or Computers p 15 COPY ...

Страница 3: ...ately p 20 Cleaning Storing or Carrying the Printer p 21 Troubleshooting p 23 Please Read Safety Precautions and Handling Precautions p 27 Specifications p 30 Scrapbook created by Art Craft DUO YOKOHAMA AOBADAI SHOP by KURETAKE Co Ltd m k COPY ...

Страница 4: ... Memory Card Slots Air Vents Paper Ejection Slot Ink Cassette Compartment Ink Cassette Lever Paper Cassette Slot Ink Cassette Compartment Cover Paper Cassette Slot Cover USB Terminal for Camera Connection USB Terminal for Computer Connection DC IN Power Input Terminal Printing Guide This guide Warranty Card Compact Power Adapter Paper Cassette Postcard Size Cleaner Starter Paper Pack Postcard Size...

Страница 5: ...e Size paper cassette close the inner lid and slide it until it clicks Always use the paper specific to SELPHY CP series printers included in the genuine Canon brand Color Ink Paper Sets Commercially sold printing paper regular postcards or paper specified for use in SELPHY ES series printers cannot be used Do not set 19 or more sheets in the paper cassette 13 or more for Wide Size sheets Mistaken...

Страница 6: ...nd connect your SELPHY printer in the following manner for safe use Do not block the air vents To a power outlet Power cord Compact power adapter Do not place the printer on an unstable or tilted surface Keep the printer at least 1 meter 3 ft from devices emitting electromagnetic waves or strong magnetic fields Confirm the size indication Should be the same 10 cm 4 in Make sure there is free space...

Страница 7: ...r Slot Memory Cards CompactFlash Card Microdrive xD Picture Card 1 SD Memory Card miniSD Card SDHC Memory Card miniSDHC Card MultiMediaCard MMCplus Card HC MMCplus Card MMCmobile Card RS MMC Card 2 microSD Card microSDHC Card MMCmicro Card Memory Stick Memory Stick PRO Memory Stick Duo Memory Stick PRO Duo Memory Stick micro You need to use the specific adapter for the memory card Please purchase ...

Страница 8: ...monitor to turn on the power Insert a single memory card into the appropriate card slot When inserting a small memory card like miniSD Card in the SD miniSD MMC RS MMC slot insert the card in the lower portion of the slot Press or to select the image you wish to print Press and hold down or Jumps images by 5 Number of copies of the selected image Press or to set the number of copies Press and hold...

Страница 9: ... or cancels printing 7 Starts printing 8 Switches between images or changes setting values LCD Monitor Display when Info Display p 14 is set to On 2 1 5 4 3 6 1 2 3 4 5 6 7 8 The LCD monitor may be covered with a thin plastic film for protection against scratches during shipment If so remove the film before using the printer 1 File Number 2 Installed ink cassette type In this example P stands for ...

Страница 10: ...e Layout Sets the number of images to print on a single sheet of paper The number of copies selected for an image p 8 will be printed in the set layout 1 up 2 up 4 up 8 up Index Image Optimize Corrects the images for optimum quality On Off Borders Prints bordered or borderless Bordered Borderless 1 Contrast and color depth are enhanced 2 Contrast and color depth are suppressed 3 Produces intense y...

Страница 11: ...ect Red Eye Depending on the image red eye may not be automatically detected or optimally corrected In the following examples red eye may not be corrected Faces that appear extremely small large dark or bright in relation to the overall image Faces turned to the side or at a diagonal or faces with a portion hidden Images could have portions other than the eyes mistakenly corrected Set Correct Red ...

Страница 12: ...lect Date Press or to set Date to On Press Returns to the menu screen Press again to return to image display An image in the memory card appears You can change the display order of the date in Date Format p 14 Printing with the date may not be possible depending on the selected layout p 10 Make sure that Info Display is set to On in the LCD monitor and check if Date is available p 9 COPY ...

Страница 13: ... provided with your camera Insert a memory card containing DPOF settings made with the camera into the card slot The confirmation screen for the DPOF settings appears Press and check the settings Print type set with the camera Index Standard Number of sheets required Date and File No set with the camera Press Printing starts The date and file number reflect the DPOF settings These settings cannot ...

Страница 14: ... of the print settings or file number of the image On Off The image display will be large but it will take some time until it displays Press Select Printer Setup with or then press Press or to select an item you wish to set Press or to change the setting value Press Returns to the menu screen Press again to return to image display Changing the Language setting 1 Select Language in step then press ...

Страница 15: ...t setup with the camera For camera handling details refer to the user guide provided with your camera Connect a camera with the printer using the USB cable supplied with the camera Turn on the power of the printer first then the camera Play back the images with the camera The or the icon appears on the LCD monitor of the camera Select the desired image on the camera and press the button of the cam...

Страница 16: ...is connected to the printer during wireless printing You cannot establish a wireless connection between the printer and a computer Only image data files up to approx 2 MB can be transmitted maximum data size varies depending on the mobile phone Data transmission time increases when data size is large Accordingly it may take some time before printing starts Movies E mails phone directories or image...

Страница 17: ...rinter before connecting a computer The printer may not function properly if other USB devices with the exception of a USB mouse or USB keyboard are used at the same time as the printer Disconnect all other USB devices from your computer and then reconnect the printer Do not put your computer into the standby mode or sleep mode while the printer is connected to a USB port If you accidentally do so...

Страница 18: ...the computer and double click the icon in the CD ROM window Click Agree if you consent to the software license agreement Click to select Easy Install then click Install Restart your computer Connect the computer to the printer see the figure left and turn the printer s power on Register your printer on the Printer List in the Printer Setup Utility Click to select your printer name Click Click Comm...

Страница 19: ...e the CD ROM after screen returns to the desktop Select Easy Installation and click Next Click OK then remove the CD ROM Refer to the Help menu of the software for operations Download ZoomBrowser EX ImageBrowser Software Guide PDF from http web canon jp imaging information e html For Ulead Photo Express LE customer support consult the following website http ulead com events canon selphy Follow the...

Страница 20: ... Color Ink Paper Set KP 108IP 108 Color Ink Paper Set KP 108IN 108 L Size Color Ink Paper Set KL 36IP 36 Paper Cassette PCL CP300 Card Size Color Ink Paper Set KC 36IP 36 Paper Cassette PCC CP300 Included with the SELPHY Color Ink Label Set KC 18IF Full page labels 18 Color Ink Label Set KC 18IL 8 label sheets 2 18 Wide Size Color Ink Paper Set KW 24IP 24 Paper Cassette PCW CP100 1 Some accessorie...

Страница 21: ...ts performance may be affected Cleaning the Printer Casing Wipe the casing with a soft dry cloth Never use volatile solvents such as benzine paint thinner or diluted neutral solvent They may cause deformation or peeling of the printer s casing Cleaning the Back of the Printer Clean the dust from the air vents on the back If dust enters from the air vents and gets on the ink sheet the printer may n...

Страница 22: ...ge over time depending on the conditions of storage Canon assumes no liability for color changes Carrying the Printer Remove the paper and ink cassettes and close the covers Carry the printer wrapped in a soft cloth to avoid scratching it If dirt or foreign objects enter the printer print quality may deteriorate Storing the Printer and Prints Storing the Printer Detach the power cord of the compac...

Страница 23: ... memory card or computer Is there paper in the paper cassette Is the paper cassette inserted all the way in Is the ink cassette inserted all the way in Is the ink sheet slack p 5 Are you using the specified paper Were the perforated portions of the paper folded over or separated before printing Has the printer overheated The printer will temporarily stop when it exceeds a certain temperature This ...

Страница 24: ...erting the card into the adapter p 7 Some memory cards require a specific adapter Cannot Print the Date Printing from Memory Cards Is the date imprint option set p 12 If you are using DPOF printing the date imprint settings are configured on the device used for the DPOF settings Printing from mobile phones When using Bluetooth the date will not be printed Printing from Cameras Is the date imprint ...

Страница 25: ... Frequent Paper Jams Has too much paper been placed in the paper cassette Do not place 19 or more sheets in the cassette 13 or more for Wide Size sheets Have 10 or more sheets collected on the print output tray Is the paper folded or bent Have you printed on a sheet that has already been used Cannot Print the Specified Number of Prints Paper Left Over Are you wasting ink sheet capacity with follow...

Страница 26: ... and back on There is a problem with the ink cassette Contact a Canon Customer Support center for assistance if the ink cassette is stuck in the printer Cannot read data from memory card The following images cannot be printed Images other than JPEG Corrupted images Press to return to the original screen No images on card Check to see if the memory card is properly inserted all the way into the slo...

Страница 27: ...ent and distance yourself from it Do not use flammable solvents such as alcohol benzine or paint thinner to clean the equipment Do not rest heavy objects on the power cord or plug pull on it with excessive force or damage it Do not use a power source compact power adapter that is not specified for the equipment Remove the power cord on a regular periodic basis and wipe away the dust or dirt that c...

Страница 28: ...r outlet Unplug the equipment when you are not using it Leaving the equipment plugged in during prolonged periods of non use poses risk of electric shock or fire Do not touch the paper or remove the paper cassette while printing is in progress Handling Precautions For the handling of memory cards cameras mobile phones or computers refer to the supplied user guide of each product Warning Against Co...

Страница 29: ...he paper cassette If the springs are bent or deformed paper will not feed correctly into the printer Do not place any foreign objects in the print output tray on the top of the paper cassette Do not touch the print side shiny side of the paper with your fingers Always hold the paper along the edges outside the perforated border Be sure that hands are dry before touching the paper Sharp objects wil...

Страница 30: ...prox 25 sec Wide Size Approx 1 min 5 sec Approx 1 min 5 sec Feeding System Automatic paper feed from paper cassette Ejection System Automatic paper ejection on top of paper cassette LCD Monitor 2 5 inch type TFT color Interface USB Connecting to a PictBridge compliant device a Canon Direct Print compliant camera USB compliant Type A connector Connecting to a computer USB compliant Type B connector...

Страница 31: ...s 0 45 C 32 113 F Dimensions 122 0 x 60 0 x 30 5 mm 4 80 x 2 36 x 1 20 in excluding power cord Weight Approx 310 g 10 9 oz When connecting to and using a household power outlet use only Compact Power Adapter CA CP200 rated input 100 240 V AC 50 60 Hz rated output 24 V DC Using anything else can cause fire overheating or electrical shock COPY ...

Страница 32: ...r modifications should be made you could be required to stop operation of the equipment Canon U S A Inc One Canon Plaza Lake Success NY 11042 U S A Tel No 516 328 5600 Canadian Radio Interference Regulations This Class B digital apparatus complies with Canadian ICES 003 Réglementation canadienne sur les interférences radio Cet appareil numérique de la classe B est conforme à la norme NMB 003 du Ca...

Отзывы: