Canon 1855B002 Скачать руководство пользователя страница 22

18

Routine Maintenance

2

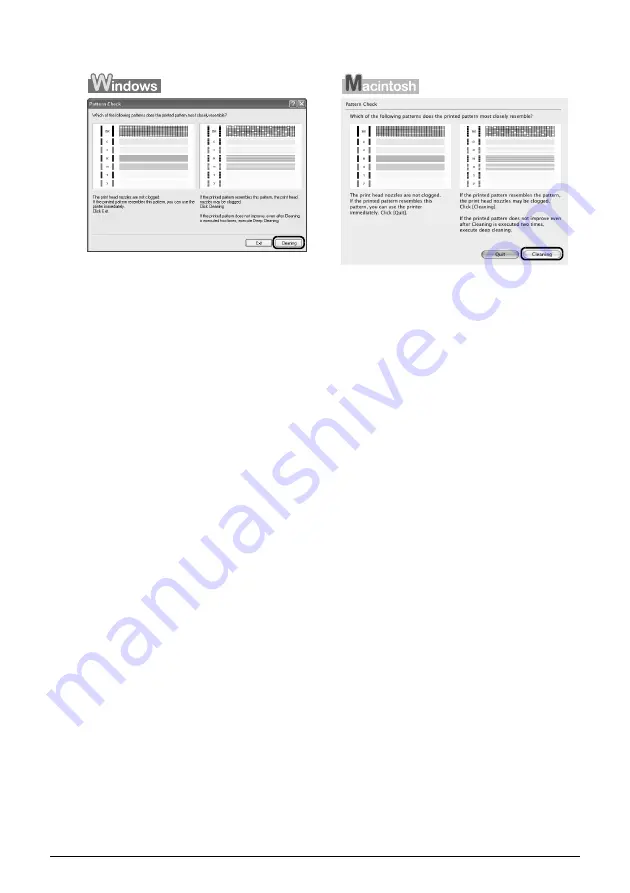
When cleaning is necessary, click 

Cleaning

 on the 

Pattern Check

 dialog box.

To proceed to cleaning of the Print Head, go to step 3-(3) of the Windows or Macintosh Print 
Head Cleaning procedure, depending on your platform. See “Print Head Cleaning” on 
page 19.
If no lines of the group (1) pattern are missing and the group (2) patterns have no white 
streaks, click 

Exit

 (Windows) or 

Quit

 (Macintosh) to exit nozzle check pattern examination.

Содержание 1855B002

Страница 1: ...uide series The FINE Cartridges are compatible with this product For information on product specifications please visit our website at www usa canon com QT5 0919 V01 XXXXXXXX CANON INC 2007 PRINTED IN VIETNAM Q T 5 0 9 1 9 V 0 1 ...

Страница 2: ...dated program specifics please visit our web site at www canontechsupport com Support program specifics are subject to change without notice Ordering Information For additional supplies use the following descriptions and order numbers Description Order FINE Cartridges PG 30 Black 1899B002 CL 31 Color 1900B002 PG 40 Black 0615B002 CL 41 Color 0617B002 Canon Specialty Papers All Occasion Photo Cards...

Страница 3: ...Photo Printer Quick Start Guide series ...

Страница 4: ...mpiled from publicly available information No representation is made regarding the accuracy thereof About Consumables Consumables ink tanks FINE Cartridges are available for 5 years after production has stopped Trademarks z Microsoft and Windows are either registered trademarks or trademarks of Microsoft Corporation in the U S and or other countries z Windows Vista is either a registered trademark...

Страница 5: ...aning 19 Print Head Deep Cleaning 21 Aligning the Print Head 23 Replacing a FINE Cartridge 26 Keeping the Best Printing Results 36 Cleaning Your Printer 37 Troubleshooting 41 Cannot Install the Printer Driver 42 The USB Connection Does Not Work Properly 43 Print Results Not Satisfactory 44 Printing Does Not Start 47 Paper Does Not Feed Properly 48 Paper Jams 49 ALARM Lamp Flashes Orange 50 Error M...

Страница 6: ...led properly z The printer is connected to your computer or a compatible device z The printer driver is installed 1 Press the POWER button The POWER lamp flashes and then remains lit green 2 Turn on your computer Note If preparatory operations above are not complete follow the Easy Setup Instructions to complete them Important If the ALARM lamp begins to flash orange see ALARM Lamp Flashes Orange ...

Страница 7: ... is turned off Important About the Power Plug When removing the power plug after turing off the printer be sure to confirm that the POWER lamp is not lit If the power plug is removed from the wall outlet with the POWER lamp still lit or flashing green the printer may become unable to print See Keeping the Best Printing Results on page 36 ...

Страница 8: ...edia Canon recommends that you use Canon genuine media to ensure optimal print quality z Photo Quality Media z Glossy Photo Paper z Matte Photo Paper z Photo Paper Plus Double Sided z Photo Paper Plus Glossy z Photo Paper Plus Semi gloss z Photo Paper Pro z Photo Stickers z Media Suited for Business Documents z High Resolution Paper ...

Страница 9: ...Photo Paper Everyday Use 3 GP 501 10 sheets A4 Letter 20 sheets 4 x 6 101 6 x 152 4 mm Left Glossy Photo Paper Matte Photo Paper MP 101 10 sheets A4 Letter 20 sheets 4 x 6 101 6 x 152 4 mm Left Matte Photo Paper Photo Paper Glossy GP 502 10 sheets Letter 20 sheets 4 x 6 101 6 x 152 4 mm Left Glossy Photo Paper Photo Paper Plus Glossy 3 PP 101 10 sheets A4 Letter 5 x 7 127 0 x 177 8 mm 20 sheets 4 ...

Страница 10: ...ng such paper will not only produce unsatisfactory results but can also cause the printer to jam or malfunction Additionally when printing on A5 or smaller sized paper do not use paper thinner than a post card including plain paper or notepad paper cut to a small size z Folded curled or wrinkled paper z Damp paper z Paper that is too thin weighing less than 64 gsm 17 lb z Paper that is too thick p...

Страница 11: ...hite Paper When printing on both sides we recommend Canon s Super White Paper Double Sided Paper size Standard sizes A4 B5 A5 Letter and Legal Non standard sizes 2 13 x 3 39 to 8 5 x 23 54 0 x 86 0 mm to 215 9 x 584 2 mm Paper weight 17 to 28 lb 64 to 105 gsm z You can load approximately up to 100 sheets of plain paper 17 lb 64 gsm However proper feeding of paper may not be possible at this maximu...

Страница 12: ...oading paper without aligning the edges may cause paper jams z If paper is curled hold the opposing curled corners and gently bend them in the opposite direction until the paper becomes completely flat See Paper is curled on page 46 z To avoid curling handle paper as follows Put unused paper back into the package and keep them on a level surface Take out only the necessary number of sheets from th...

Страница 13: ...lect the size for envelopes In Windows select DL Env or Comm Env 10 in Page Size In Macintosh select DL Envelope or 10 Envelope in Paper Size 3 Select Landscape in Orientation Note Reset the Paper Thickness Lever to the left when you finish printing For details on the Paper Thickness Lever refer to Front View in Main Components of the User s Guide on screen manual Important Be sure to set the prin...

Страница 14: ... 1 Select Print on the application software s File menu The Print dialog box opens 2 Make sure that Canon iP1800 series is selected in Select Printer 3 Click Preferences or Properties The Main sheet of the Printing Preferences dialog box appears 4 Specify the required settings 1 Select the desired media type in Media Type 2 Set Print Quality and Color Intensity as needed 3 Click OK The Print dialo...

Страница 15: ...s on the printer driver functions click Help or Instructions to view the online help or the Printer Driver Guide on screen manual The Instructions button is displayed on the Main and Maintenance sheets when the on screen manuals are installed on your computer z To display the preview and confirm how your document will look when printed select the Preview before printing check box Some application ...

Страница 16: ... 4 x Note z When you select the print mode appropriate to your document in Print Mode the document will be printed in color and at a print quality suited to the characteristics of the Media Type you have selected Printing a top quality photo Select when printing documents consisting mainly of photographs and graphics featuring fine color gradation Printing tables and charts Select when printing do...

Страница 17: ...st of print jobs in progress If you are using Mac OS X v 10 2 8 click the printer icon in the Dock to start up the Print Center and double click the name of your printer in the Printer List To cancel a print job in progress select the desired document in the Name list and click Delete To temporarily stop a job in progress click Hold To stop all the jobs in the list click Stop Jobs ...

Страница 18: ...nge see ALARM Lamp Flashes Orange on page 50 z Increase the Print Quality setting in the printer driver settings See Print Results Not Satisfactory on page 44 Step 1 See Printing the Nozzle Check Pattern on page 15 If lines are missing or if white streaks appear After cleaning the Print Head print and examine the nozzle check pattern Step 2 See Print Head Cleaning on page 19 If the problem is not ...

Страница 19: ...anual 3 Print the nozzle check pattern 1 Click the Maintenance tab 2 Click Nozzle Check 3 Confirm the displayed message and click Print Check Pattern The nozzle check pattern is printed Do not open the Front Cover while printing 4 Examine the pattern and take the appropriate action See Examining the Nozzle Check Pattern on page 17 1 Make sure that the printer is on load a sheet of A4 or Letter siz...

Страница 20: ...he displayed message and click Print Check Pattern The nozzle check pattern is printed Do not open the Front Cover while printing 4 Examine the pattern and take the appropriate action See Examining the Nozzle Check Pattern on page 17 Note Clicking Initial Check Items displays the items to be checked before printing the pattern ...

Страница 21: ...rn are missing the print head nozzle needs cleaning Example When lines are missing Black ink 2 If these patterns have white streaks the print head nozzle needs cleaning Example When white streaks appear Color ink Note The nozzle check pattern will not be printed correctly if there is not enough ink Replace the FINE Cartridge if the remaining amount of ink is insufficient See Replacing a FINE Cartr...

Страница 22: ...of the Print Head go to step 3 3 of the Windows or Macintosh Print Head Cleaning procedure depending on your platform See Print Head Cleaning on page 19 If no lines of the group 1 pattern are missing and the group 2 patterns have no white streaks click Exit Windows or Quit Macintosh to exit nozzle check pattern examination ...

Страница 23: ...d Cleaning finishes This takes about 60 seconds 3 Load a sheet of A4 or Letter sized plain paper in the Auto Sheet Feeder and set the Paper Thickness Lever to the left For details on the Paper Thickness Lever refer to Front View in Main Components of the User s Guide on screen manual 4 Confirm the displayed message and click Print Check Pattern The nozzle check pattern is printed Do not perform an...

Страница 24: ...r refer to Front View in Main Components of the User s Guide on screen manual 5 Confirm the displayed message and click Print Check Pattern The nozzle check pattern is printed Do not perform any other operations until the nozzle check pattern finishes printing 4 Check the print head condition with the printed nozzle check pattern and take appropriate action See Examining the Nozzle Check Pattern o...

Страница 25: ...hen the POWER lamp starts flashing green Do not perform any other operations until Print Head Deep Cleaning finishes This takes about one to two minutes 4 Check the condition of the Print Head 1 Load a sheet of A4 or Letter sized plain paper in the Auto Sheet Feeder and set the Paper Thickness Lever to the left For details on the Paper Thickness Lever refer to Front View in Main Components of the ...

Страница 26: ...ed plain paper in the Auto Sheet Feeder and set the Paper Thickness Lever to the left For details on the Paper Thickness Lever refer to Front View in Main Components of the User s Guide on screen manual 2 Print the nozzle check pattern to check the print head condition See Printing the Nozzle Check Pattern on page 15 3 If the print head nozzles are still not clean perform Print Head Deep Cleaning ...

Страница 27: ...r Thickness Lever refer to Front View in Main Components of the User s Guide on screen manual 2 Open the printer properties dialog box Refer to Opening the Printer Properties Dialog Box Directly from the Start Menu in Opening the Printer Properties Dialog Box Windows of the User s Guide on screen manual 3 Click the Maintenance tab and then Print Head Alignment 4 Confirm the displayed message and c...

Страница 28: ...r Letter sized plain paper in the Auto Sheet Feeder Set the Paper Thickness Lever to the left For details on the Paper Thickness Lever refer to Front View in Main Components of the User s Guide on screen manual 2 Open the Canon IJ Printer Utility dialog box Refer to Opening the Canon IJ Printer Utility Macintosh in the User s Guide on screen manual 3 Select Test Print in the pop up menu Note If it...

Страница 29: ... A Less noticeable vertical white streaks B More noticeable vertical white streaks C Less noticeable horizontal white streaks D More noticeable horizontal white streaks Important Do not open the Front Cover while printing Note If it is difficult to pick the best pattern pick the setting that produces the least noticeable white streaks Note When you turn off the printer be sure to press the POWER b...

Страница 30: ...y as a guide Open the Canon IJ Status Monitor to check the ink level information 1 Open the printer properties dialog box Refer to Opening the Printer Properties Dialog Box Directly from the Start Menu in Opening the Printer Properties Dialog Box Windows of the User s Guide on screen manual 2 Click View Printer Status on the Maintenance sheet The following message is displayed 1 Confirm whether an...

Страница 31: ... The x symbol appears above a FINE Cartridge that has run out of ink Replace the FINE Cartridge with a new one immediately Ink may have run out The symbol appears above a FINE Cartridge that may have run out of ink Replace the FINE Cartridge with a new one To confirm the FINE Cartridge information click Ink Details Knowing When to Replace FINE Cartridge When ink has run out or may have run out in ...

Страница 32: ...n printing can continue under the ink out condition z The function for detecting the remaining ink level will be disabled Replace the empty ink cartridge immediately after the printing The resulting print quality is not satisfactory if printing is continued under the ink out condition 1 FINE Cartridge with no ink If the ALARM lamp flashes orange sixteen times z Ink may have run out z The function ...

Страница 33: ...ob Click Stop Job to stop the current printing job Click Stop All Jobs to stop all printing jobs Replace the ink cartridge with a new one z If printing is in progress and you want to continue printing press the RESUME button for at least 5 seconds with the ink cartridge installed Then printing can continue under the ink out condition Note You can confirm the ink level with selecting Ink Level Info...

Страница 34: ... Stop Job to stop the current printing job Click Stop All Jobs to stop all printing jobs Replace the ink cartridge with a new one z The function for detecting the remaining ink level will be disabled since the ink level cannot be correctly detected If you want to continue printing without this function press the RESUME button for at least 5 seconds z Canon recommends to use new genuine Canon cartr...

Страница 35: ...artridge runs out of ink remember to return the Ink Cartridge Settings to Both Black and Color after replacing with new one 1 Open the Printer Properties dialog box Refer to Opening the Printer Properties Dialog Box Directly from the Start Menu in Opening the Printer Properties Dialog Box Windows of the User s Guide on screen manual 2 Click the Maintenance tab and then Ink Cartridge Settings 3 Sel...

Страница 36: ...g may not be displayed properly z Once a FINE Cartridge has been installed do not remove it from the printer and leave it out in the open This will cause the FINE Cartridge to dry out and the printer may not operate properly when it is reinstalled To maintain optimal printing quality use a FINE Cartridge within six months of first use z Color ink may be consumed even when printing a black and whit...

Страница 37: ...lder to stop or move it z Do not touch the metallic parts inside the printer Important If the Front Cover is left open for more than 10 minutes the FINE Cartridge Holder moves to the right Close and reopen the Front Cover to return the holder to the left Important z Handle FINE Cartridges carefully to avoid staining your clothes or surrounding work area z Discard empty FINE Cartridges according to...

Страница 38: ...andle FINE Cartridges carefully to avoid staining your clothes or surrounding work area z Do not re attach the protective tape once you have removed it Discard it according to the local laws and regulations regarding disposal of consumables z Once the protective tape is removed do not touch the electrical contacts or Print Head Nozzles on a FINE Cartridge The printer may not print out properly if ...

Страница 39: ... When you start printing after replacing the FINE Cartridge Print Head Cleaning is performed automatically Do not perform any other operations until Print Head Cleaning finishes The POWER lamp flashes green during cleaning z If the straight line is misaligned or the Print Head position is misaligned align the Print Head position See Aligning the Print Head on page 23 ...

Страница 40: ...t be done properly causing the Print Head to dry and clog When You Are Not Using the Printer for a Long Time When you are not using the printer for a long time print in both black white and in color or perform Print Head Cleaning about once a month to prevent degradation of the Print Head Numerous nozzles are installed in the Print Head for high precision printing Just as the uncapped tip of a bal...

Страница 41: ...Auto Sheet Feeder Set the Paper Thickness Lever to the left For details on the Paper Thickness Lever refer to Front View in Main Components of the User s Guide on screen manual 6 Confirm the displayed message and click OK The paper that is loaded in the printer will feed through the printer and be ejected 7 When the confirmation message is displayed click OK If this procedure does not solve the pr...

Страница 42: ...e of the printer is recommended You can clean this part in two ways z See Cleaning the Bottom Plate Bottom Plate Cleaning on page 38 z See Cleaning the Protrusions Inside the Printer on page 40 z Cleaning the Bottom Plate Bottom Plate Cleaning This section describes how to clean the inside of the printer If the inside of the printer becomes dirty printed paper may get dirty so we recommend perform...

Страница 43: ... stained Clean them according to instructions See Cleaning the Protrusions Inside the Printer on page 40 1 Make sure that the printer is turned on and then remove any paper from the Auto Sheet Feeder 2 Fold a single sheet of A4 or Letter sized plain paper in half widthwise and then unfold the paper 3 Load this and only this sheet of paper in the Auto Sheet Feeder with the open side to the front Se...

Страница 44: ...is not resolved after performing the Bottom Plate Cleaning twice the protrusions inside the printer may be stained Clean them according to instructions See Cleaning the Protrusions Inside the Printer on page 40 z Cleaning the Protrusions Inside the Printer If protrusions inside the printer are stained wipe off any ink from the protrusions using a cotton swab or the like Important Before cleaning t...

Страница 45: ...ts on page 45 z Printed Surface Is Scratched Paper Is Smudged on page 46 z Printing Does Not Start on page 47 z Paper Does Not Feed Properly on page 48 z Paper Jams on page 49 z ALARM Lamp Flashes Orange on page 50 z Error Message Appears on the Screen on page 51 z Writing Error Output Error Communication Error on page 51 z Error No 300 Is Displayed on page 52 z Error No 1700 1710 Is Displayed on ...

Страница 46: ... Setup Instructions to reinstall the printer driver Installation does not start automatically when the Setup CD ROM is inserted into your computer s disc drive Click Start My Computer double click the CD ROM icon In non XP Windows double click the My Computer icon on the desktop and then double click the CD ROM icon Note To use the Run command to start the setup program specify your disc drive and...

Страница 47: ...ribed in the Easy Setup Instructions for proper installation If the printer driver was not installed correctly uninstall the driver restart your computer and then reinstall the driver Refer to the Printer Driver Guide on screen manual Note If the installer was forced to be terminated due to a Windows error the system may be in an unstable condition and you may not be able to install the driver Res...

Страница 48: ...n the printer driver does not match the actual size of the printing paper part of the page may not be printed Check the page size setting in your application Then check Page Size on the Page Setup sheet in the printer properties dialog box of the printer driver Windows or Paper Size on the Page Setup dialog box of the printer driver Macintosh Cause Action FINE Cartridge is not installed properly T...

Страница 49: ...uled lines are printed misaligned or print results are otherwise unsatisfactory see Aligning the Print Head on page 23 and perform Print Head Alignment Print quality is not set appropriately Set the Print Quality setting to High in Windows or Fine in Macintosh 1 Open the printer properties dialog box Refer to Opening the Printer Properties Dialog Box from Your Application Program in Opening the Pr...

Страница 50: ...ke sure that the paper you are using is suitable for Borderless Printing For details refer to the Printer Driver Guide on screen manual Paper is curled For Plain Paper Turn the paper over and reload it to print on the other side Leaving the paper loaded in the Auto Sheet Feeder for a long time may cause the paper to curl If this happens load the paper with the other side facing up It may resolve t...

Страница 51: ... are left in queue Computer problems Restarting your computer may solve the problem If there are any unnecessary print jobs follow the procedure below to delete them 1 Open the printer properties dialog box Refer to Opening the Printer Properties Dialog Box Directly from the Start Menu in Opening the Printer Properties Dialog Box Windows of the User s Guide on screen manual 2 Click the Maintenance...

Страница 52: ...ading two or more sheets of paper align the edges of the sheets before loading z Always load the paper in portrait orientation regardless of the printing orientation z Load the paper with the print side facing UP Align the right edge of the paper stack against the Auto Sheet Feeder and slide the Paper Guide so that it just touches the left edge of the stack For details on loading paper see Loading...

Страница 53: ... see Loading Printing Paper on page 4 z When reloading the paper in the printer see Paper Does Not Feed Properly on page 48 to confirm that you are using the correct paper and are loading it into the printer correctly If you cannot remove the paper or the paper tears inside the printer or if the paper jam error continues after removing the paper contact your Canon Service representative Landscape ...

Страница 54: ...ridge If lines are misaligned or the resulting output is not satisfactory carry out the Print Head Alignment Seven Flashes FINE Cartridge is not installed in the correct position Confirm that the FINE Cartridges are installed in the appropriate positions See Replacing a FINE Cartridge on page 26 Eight flashes Ink absorber is almost full The printer has a built in ink absorber to hold the ink used ...

Страница 55: ... the printer For details on how to resolve the error see ALARM Lamp Flashes Orange on page 50 Printer port setting does not match the computer s interface connecting the printer Check the printer port settings 1 Click Start Control Panel Printers and Other Hardware Printers and Faxes In non XP Windows click Start Settings Printers 2 Click the Canon iP1800 series icon 3 Open the File menu and selec...

Страница 56: ...eries in Printer on the Print dialog box If iP1800 series does not appear in Printer follow the procedure below to check that the driver for your printer is installed to your computer 1 Select Print Fax Preferences from Printer In Mac OS X v 10 2 8 or 10 3 x select Edit Printer List from Printer 2 Check that iP1800 series is displayed in the list of printers and that the check box is selected In M...

Страница 57: ...nual alias on the desktop System Requirements Browser Help Viewer Note z Microsoft Internet Explorer 5 0 or later must be installed z The on screen manual may not be displayed properly depending on your operating system or Internet Explorer version We recommend that you keep your system up to date with Windows Update Note If you installed the User s Guide from the Manual folder in the Setup CD ROM...

Страница 58: ...Pro Operating environment Temperature 5 to 35 C 41 to 95 F Humidity 10 to 90 RH no condensation Storage environment Temperature 0 to 40 C 32 to 104 F Humidity 5 to 95 RH no condensation Power supply AC 100 240 V 50 60 Hz Power consumption Printing Approx 7 W Standby Approx 0 7 W OFF Approx 0 5 W External dimensions Approx 17 4 W x 9 3 D x 6 0 H inches Approx 442 W x 237 D x 152 H mm With the Paper...

Страница 59: ... Vista Pentium II 300 MHz 3 128 MB 400 MB Windows XP SP1 SP2 Windows 2000 Professional SP2 SP3 SP4 5 Operating System Processor RAM Hard Disk Space 4 Mac OS X v 10 4 Intel processor PowerPC G3 256 MB 200 MB Mac OS X v 10 2 8 v 10 3 128 MB Additional System Requirements for On Screen Manuals Browser Windows HTML Help Viewer Note Microsoft Internet Explorer 5 0 or later must be installed The on scre...

Страница 60: ... cord 2 or 3 way adapter etc Never use the printer if the power cord is bundled or knotted If you detect smoke unusual smells or strange noises around the printer immediately unplug the printer at the power supply and call for service Periodically unplug the printer and use a dry cloth to wipe off any dust or dirt collected on the plug and the power outlet If the printer is placed at a location ex...

Страница 61: ...gnore any of these safety precautions Choosing a location Do not install the printer in a location that is unstable or subject to excessive vibration Do not install the printer in locations that are very humid or dusty in direct sunlight outdoors or close to a heating source To avoid the risk of fire or electric shocks install the printer in a location with an ambient temperature range of 5 C to 3...

Страница 62: ...power cord and call for service Do not transport or store the printer on a slant vertically or upside down as the ink may leak and damage the printer FINE Cartridges Ink Cartridges For safety reasons store FINE Cartridges Ink Cartridges out of the reach of small children If a child ingests any ink consult a doctor immediately Do not shake FINE Cartridges Ink Cartridges Ink may spill out and stain ...

Страница 63: ...xperienced radio TV technician for help Use of a shielded cable is required to comply with Class B limits in Subpart B of Part 15 of the FCC Rules Do not make any changes or modifications to the equipment unless otherwise specified in the manual If such changes or modifications should be made you could be required to stop operation of the equipment Canon U S A Inc One Canon Plaza Lake Success NY 1...

Страница 64: ...ACTORY LOADED ON THE PRODUCT OR CONTAINED ON THE SOFTWARE DISKETTES OR CD ROMS ENCLOSED WITH OR ACCOMPANYING THE PRODUCT AND ANY UTILITY SOFTWARE DISTRIBUTED WITH OR FOR THE PRODUCT IS SOLD AS IS AND WITHOUT WARRANTY BY CANON USA THE SOLE WARRANTY WITH RESPECT TO SUCH SOFTWARE IS CONTAINED IN THE SOFTWARE MANUFACTURER S LICENSE AGREEMENT DISTRIBUTED THEREWITH INCLUDING ANY LIMITATIONS AND DISCLAIM...

Страница 65: ...eet address The Canon USA repair facility will ship out the replacement Product via 2nd day Air freight service prepaid by Canon USA After receipt of the replacement Product with instructions and a prepaid waybill follow the enclosed instructions on how to ship the defective Product to the Canon USA repair facility The defective Product must be returned in the shipping carton in which the replacem...

Страница 66: ...ct to the availability of refurbished or new replacement units Canon U S A Inc One Canon Plaza Lake Success NY 11042 USA 2007 Canon U S A Inc Canon is a registered trademark of Canon Inc in the United States and may also be a registered trademark in other countries ...

Страница 67: ...t Head aligning the Print Head 23 cleaning 19 deep cleaning 21 Printing from Your Computer Macintosh 12 Windows 10 R Replacing a FINE Cartridge ink level information 26 knowing when to replace ink tank 27 Replacing FINE Cartridges 32 Routine Maintenance 14 S Safety Precautions 56 Specialty Media 4 Specifications 54 System Requirements 55 T Troubleshooting 41 Turning off the Printer 3 Turning on th...

Страница 68: ...64 ...

Страница 69: ...65 ...

Страница 70: ...66 ...

Страница 71: ...dated program specifics please visit our web site at www canontechsupport com Support program specifics are subject to change without notice Ordering Information For additional supplies use the following descriptions and order numbers Description Order FINE Cartridges PG 30 Black 1899B002 CL 31 Color 1900B002 PG 40 Black 0615B002 CL 41 Color 0617B002 Canon Specialty Papers All Occasion Photo Cards...

Страница 72: ...uide series The FINE Cartridges are compatible with this product For information on product specifications please visit our website at www usa canon com QT5 0919 V01 XXXXXXXX CANON INC 2007 PRINTED IN VIETNAM Q T 5 0 9 1 9 V 0 1 ...

Отзывы: