background image

Chapter 4

4-11

F-4-22

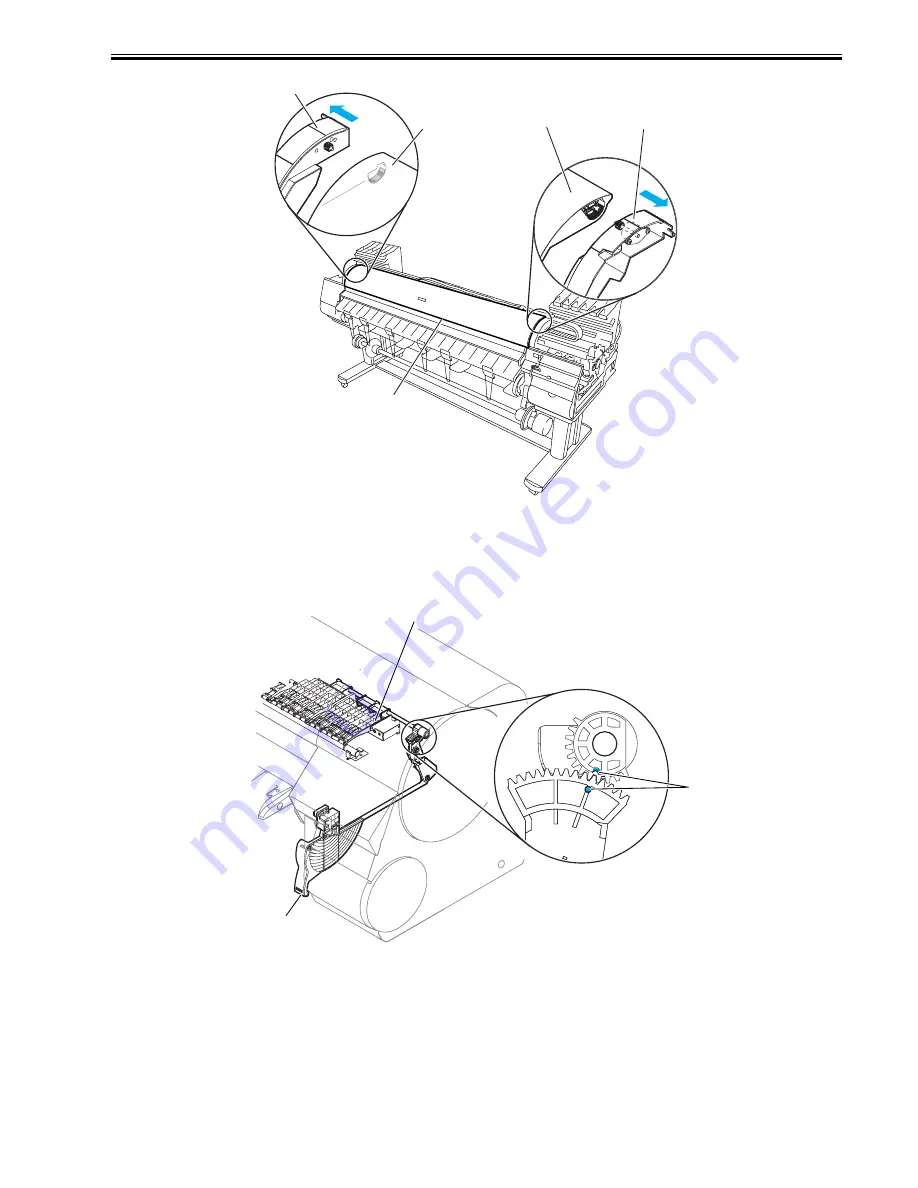
m) Release lever 

Removing the release lever

1) To remove release lever [1], remove the purge unit and then remove the release lever.  To do so, keep pinch roller [2] pressurized to ease to work of phase

alignment during gear installation.

Reinstalling the release lever 

1) To install the release lever, align the gear of the release lever with mark [3] (phase) in the receiving gear.

F-4-23

4.3.5 Drive unit

0014-8962

a) Feed motor 

Removing the feed motor 

1) To remove feed motor [1], loosen four screws [2] and remove timing belt [3] and spring [4].

2) Remove four loosened screws [2] to release feed motor [1] and remove the connector. 

Reinstalling the feed motor

To reassemble the feed roller drive timing belt [3] into position, set the tension of timing belt [3] by adjusting the pressure of spring [4].  Then, fix feed motor [1].

[2]

[1]

[1]

[2]

[2]

[1]

[2]

[3]

Содержание 1692B002

Страница 1: ...Oct 3 2006 Service Manual iPF8000 series iPF8000 ...

Страница 2: ......

Страница 3: ... need arises In the event of major changes in the contents of this manual over a long or short period Canon will issue a new edition of this manual The following paragraph does not apply to any countries where such provisions are inconsistent with local law Trademarks The product names and company names used in this manual are the registered trademarks of the individual companies Copyright This ma...

Страница 4: ...quiring care to avoid combustion fire Indicates an item prohibiting disassembly to avoid electric shocks or problems Indicates an item requiring disconnection of the power plug from the electric outlet Indicates an item intended to provide notes assisting the understanding of the topic in question Indicates an item of reference assisting the understanding of the topic in question Provides a descri...

Страница 5: ...sed to indicate Low The voltage value how ever differs from circuit to circuit In addition the asterisk as in DRMD indicates that the DRMD signal goes on when 0 In practically all cases the internal mechanisms of a microprocessor cannot be checked in the field Therefore the operations of the microprocessors used in the machines are not discussed they are explained in terms of from sensors to the i...

Страница 6: ......

Страница 7: ...ons 1 16 1 7 1 Safety Precautions 1 16 1 7 1 1 Moving Parts 1 16 1 7 1 2 Adhesion of Ink 1 17 1 7 1 3 Electrical Parts 1 18 1 7 2 Other Precautions 1 18 1 7 2 1 Printhead 1 18 1 7 2 2 Ink tank 1 19 1 7 2 3 Handling the Printer 1 20 1 7 3 Precautions When Servicing Printer 1 21 1 7 3 1 Notes on the Data Stored in the Printer 1 21 1 7 3 2 Confirming the Firmware Version 1 21 1 7 3 3 Precautions Agai...

Страница 8: ...ead Relay PCB 2 19 2 4 4 1 Head relay PCB components 2 19 2 4 5 Motor Driver 2 19 2 4 5 1 Media take up unit components 2 19 2 4 6 Maintenance Cartridge Relay PCB 2 20 2 4 6 1 Maintenance cartridge relay PCB components 2 20 2 4 7 Power Supply 2 20 2 4 7 1 Power supply block diagram 2 20 2 5 Detection Functions with Sensors 2 20 2 5 1 Cover system 2 20 2 5 2 Ink passage system 2 21 2 5 3 Carriage s...

Страница 9: ...oller HP sensor feed roller encoder or feed roller 4 27 4 5 2 Action to take after replacing the carriage unit or multi sensor 4 27 4 5 3 Action to take after replacing the head management sensor 4 27 Chapter 5 MAINTENANCE 5 1 Periodic Replacement Parts 5 1 5 1 1 Periodic replacement parts 5 1 5 2 Consumable Parts 5 1 5 2 1 Consumable parts 5 1 5 3 Periodic Maintenance 5 1 5 3 1 Regular Maintenanc...

Страница 10: ...585 03810206 2586 03810205 2588 03810215 2589 03810207 258A 03810209 258B 03810208 258C Ink low error occures when cleaning B is executed 6 7 6 1 3 21 03810204 2590 03810201 2591 03810202 2592 03810203 2593 03810212 2594 03810213 2595 03810206 2596 03810205 2598 03810215 2599 03810207 259A 03810209 259B 03810208 259C Ink low error occures when printing 6 7 6 1 3 22 03800301 2801 03800201 2802 0380...

Страница 11: ...CB 6 30 6 3 Version Up 6 37 6 3 1 Firmware Update Tool 6 37 6 4 Service Tools 6 38 6 4 1 List of Tools 6 38 Chapter 7 SERVICE MODE 7 1 Service Mode 7 1 7 1 1 Service Mode 7 1 7 1 2 Map of the Service mode 7 1 7 1 3 Details for Service mode 7 6 7 2 Special Mode 7 12 7 2 1 Special Modes for Servicing 7 12 Chapter 8 ERROR CODE 8 1 Outline 8 1 8 1 1 Outline 8 1 8 2 Warning Table 8 1 8 2 1 Warnings 8 1...

Страница 12: ...Contents ...

Страница 13: ...Chapter 1 PRODUCT DESCRIPTION ...

Страница 14: ......

Страница 15: ...age 1 7 1 5 4 Internal parts 1 8 1 6 Basic Operation 1 8 1 6 1 Operation panel 1 8 1 6 2 Main menu 1 9 1 7 Safety and Precautions 1 16 1 7 1 Safety Precautions 1 16 1 7 1 1 Moving Parts 1 16 1 7 1 2 Adhesion of Ink 1 17 1 7 1 3 Electrical Parts 1 18 1 7 2 Other Precautions 1 18 1 7 2 1 Printhead 1 18 1 7 2 2 Ink tank 1 19 1 7 2 3 Handling the Printer 1 20 1 7 3 Precautions When Servicing Printer 1...

Страница 16: ......

Страница 17: ...ality USB2 0 Hi speed interface and 10Base T 100Base TX in standard support of a TCP IP network plus optional support of IEEE1394 Barcodes printed on roll media make remaining roll media management possible Borderless four side printing support roll media removes laborious cutting work easing the job of creating posters to a significant degree High speed printing with a 1 inch head for each color ...

Страница 18: ...utter unit that mounts on the carriage unit is disposable Replace the cutter unit when it gets dull F 1 4 1 2 5 Roll holder 0013 6371 The printer comes with a roll holder for paper tubes having an inside diameter of 2 inches as standard It supports an optional roller holder for paper tubes having an inside diameter of 3 inches Both roll holders clamp the paper tubes of roll media with an outside d...

Страница 19: ...222 Printhead The expendable printhead is the same as the one that comes with the printer F 1 6 Ink tanks Expendable ink tanks contain 12 colors mat black black photocyan cyan photomagenta magenta yellow red blue green gray and photogray Each tank is available in two capacities 330 mL and 700 mL Usable for six months after unpacking F 1 7 Maintenance cartridge The expendable maintenance cartridge ...

Страница 20: ...39 609 6 mm 24 841 mm 33 11 914 4 mm 36 1030 mm 40 55 1066 8 mm 42 Emulation None Interface USB 2 0 Hi speed Network 10BASE T 100BASE TX IEEE1394 optional Printhead Ink Tank type Independent printhead ink tanks Printhead PF 02 Structure Integrated six color assembly Number of nozzles 2 560 for each color Ink tank PFI 301 MBK BK PC C PM M Y R G B GY PGY PFI 701 MBK BK PC C PM M Y R G B GY PGY Ink t...

Страница 21: ...esolution dpi Print pass Printing direction 1 Plain Paper Plain Paper High Quality Plain Paper High Grade Image draft 300 1200x1200 2 Bi directional standard 300 1200x1200 4 Bi directional High 600 2400x1200 8 Bi directional Line drawing Text draft 600 1200x1200 2 Bi directional standard 600 1200x1200 4 Bi directional Office document standard 600 1200x1200 4 Bi directional Recycled Coated Paper Co...

Страница 22: ...t compliant with IEEE1394 standard Cable side 6 pin connector plug compliant with IEEE1394 standard Cable side RJ 45 type compliant with ANSI EIA TIA 568A or ANSI EIA TIA 568B 1 5 Names and Functions of Components 1 5 1 Front 0014 8828 F 1 9 T 1 3 1 Upper cover Open this cover to install a printhead load media or clear jammed paper inside the printer 2 Delivery guides Allow printed paper to be del...

Страница 23: ...hernet cable to this connector 4 USB port Connect the USB cable to this port 5 Accessory pocket Holds printer manuals assembly tools and other items 6 Power cord connector Connect the power cord to this connector 1 Carriage cover Protects the carriage unit 2 Printhead fixer cover Clamps the printhead 3 Printhead fixer lever Locks the printhead lock cover 4 Cutter unit Round blade cutter used to cu...

Страница 24: ...nd is used to display the next option or the next item setting 7 button Menu This button is used to return to the next higher level menu 8 button Menu This button is used to go to the next lower level menu 9 Information button This button displays a submenu Information about the ink and media each time you press this button Head cleaning A is carried out when this button is held pressed for at lea...

Страница 25: ... the main menu The hierarchy of menus and parameters in the Main Menu is as shown below 2 Data lamp green Flashing when printing this lamp indicates that the printer is receiving or processing a print job Flashing when not printing this lamp indicates that the print job is paused or firmware data is being received Off This indicates that there is no print job 3 Message lamp orange On This indicate...

Страница 26: ... media take up unit is installed Displays only when On is selected for Chk Remain Roll m feet Cut Sheet Type Media Type Paper Details Media Type See Paper Details Menu Adjust Printer See Adjust Printer Menu Interface Setup See Interface Setup Menu Maintenance Repl Maint C No Yes Replace P head Printhead L No Yes Printhead R No Yes Repl S Cleaner No Yes Change Cutter No Yes Move Printer System Setu...

Страница 27: ... Head Height Automatic Lowest Low Standard High Highest Skew Check Lv Standard Off Loose VacuumStrngth Automatic Width Detection On Off NearEnd RllMrgn 5mm 20mm Cut Speed Standard Fast Slow Trim Edge First Automatic Forced No Cutting Cutting Mode Automatic Eject Manual Bordless Margin Automatic Fixed CutDustReduct Off On Nr End Sht Mrgn 5mm 20mm Return Defaults No Yes Adjust Length 0 70 0 00 0 70 ...

Страница 28: ...just Printer Menu Adjust Printer Auto Head Adj Advanced Adj No Yes Standard Adj No Yes Auto Print Off On Manual Head Adj No Yes Auto Band Adj Standard Adj No Yes Advanced Adj No Yes Manual Band Adj No Yes Adjust Length No Yes ...

Страница 29: ...255 0 255 0 255 Subnet Mask 0 255 0 255 0 255 0 255 Default G W 0 255 0 255 0 255 0 255 NetWare NetWare On Off Frame Type Auto Detct Ethernet 2 Ethernet 802 2 Ethernet 802 3 Ethernet SNAP Print Service Bindery PServer RPrinter NDSPserver NPrinter AppleTalk No Yes On Off Ethernet Driver Auto Detect On Off Comm Mode Half Duplex Full Duplex Ethernet Type 10 Base T 100 Base TX Spanning Tree Not Use Us...

Страница 30: ...SO A3 ANSI B Super Sht Selection 2 ISO B1 ANSI F Roll Selection 1 ISO A3 297mm 300mm Roll Roll Selection 2 10inch 254mm JIS B4 257mm Noz Check Freq 10 page Off 1 page Automatic Sleep Timer 5 min 10min 15min 20min 30min 40min 50min 60min Use Power Save On Off Length Unit meter feet inch Displays only when media take up unit is installed Skip Take Up Err On Off ...

Страница 31: ... Meaning of code address GMT Greenwich Mean Time AHST Alaska Hawaii Std Time AKST Alaska Standard Time PST Pacific Std Time MST Mountain Standard Time CST Central Std Time EST Eastern Standard Time 0 London GMT 1 Paris Rome 2 Athens Cairo 3 Moscow 4 Eerevan Baku 5 Islamabad 6 Dacca 7 Bangkok 8 Hong Kong 9 Tokyo Seoul 10 Canbera 11 NewCaledonia 12 Wellington 12 Eniwetok 11 Midway Is 10 Hawaii AHST ...

Страница 32: ...nit To prevent accidents the upper cover of the printer is locked during printing so that itdoes not open If the upper cover is opened in the online offline mode the carriage motor feed motor and other driving power supplies are turned off Test Print Menu Test Print Status Print Media Details Print Job Log Menu Map Nozzle Check No Yes No Yes No Yes No Yes No Yes Information Information System Info...

Страница 33: ...ul to the human body it contains organic solvents Avoid getting the ink in your mouth or eyes Flush well with water and see a doctor if contact occurs In case of accidental ingestion of a large quantity call a doctor immediately Since this ink contains pigment stains will not come out of clothing 1 Carriage belt 7 Purge unit 2 Ink tube 8 Pinch roller 3 Flexible cable 9 Feed roller 4 Carriage unit ...

Страница 34: ...ions 1 7 2 1 Printhead 0013 1937 1 How to Handle the Printhead Do not open the printhead package until you are ready to install the head When installing the printhead in the printer hold the knob 1 and then remove the protective cap 1 2 and protective cap 2 3 in that order Do not reattach the protective cap 2 3 to the printhead because the cap may damage the nozzles 4 To prevent the nozzles from g...

Страница 35: ...printing failure if the ink is drained for transport 4 Conductivity of Ink The ink used in this printer is electrically conductive If ink leaks to into the mechanical unit wipe clean with a soft well wrung damp cloth If ink leaks onto electrical units wipe them completely using tissue paper If you cannot remove ink completely replace the electrical units with new ones If electrical units are power...

Страница 36: ...ition using belt stoppers 1 so that the carriage does not become separated from the lock arm and damage or ink does not leak F 1 31 3 Replacing the maintenance cartridge When the maintenance cartridge detects that tank is full the Repl Maint C error appears In this case the maintenance cartridge must be replaced The printer will not operate until the error is cancelled Be careful that the waste in...

Страница 37: ...ervice mode to initialize the information about the number of cleanings Reference For the main controller replacement procedure see Disassembly Reassembly Points to Note on Disassembly and Reassembly PCBs You cannot check the counter information once it is initialized Be careful not to initialize the counter information before checking it You cannot modify the counter information from the operatio...

Страница 38: ...Chapter 1 1 22 ...

Страница 39: ...Chapter 2 TECHNICAL REFERENCE ...

Страница 40: ......

Страница 41: ...t 2 8 2 3 2 4 Printhead 2 10 2 3 2 4 1 Structure of Printhead 2 10 2 3 2 5 Purge Unit 2 11 2 3 2 5 1 Functions of Purge Unit 2 11 2 3 2 5 2 Structure of Purge Unit 2 12 2 3 2 6 Maintenance Cartridge 2 14 2 3 2 6 1 Maintenance cartridge 2 14 2 3 2 7 Air Flow 2 14 2 3 2 7 1 Air flow 2 14 2 3 3 Paper Path 2 14 2 3 3 1 Outline 2 14 2 3 3 1 1 Overview of Paper Path 2 14 2 3 3 2 Paper Path 2 16 2 3 3 2 ...

Страница 42: ... Power supply block diagram 2 20 2 5 Detection Functions with Sensors 2 20 2 5 1 Cover system 2 20 2 5 2 Ink passage system 2 21 2 5 3 Carriage system 2 23 2 5 4 Paper path system 2 24 2 5 5 Humidity sensor 2 24 2 5 6 Media take up Unit 2 25 ...

Страница 43: ...ng inks and cleaning the printhead after leaving the printer for extended periods of time J3401 J3201 J3202 J3002 J2501 J2502 J3602 J3601 J2702 J3001 J3150 J2801 J2601 J101 J103 J102 J701 J702 J703 J202 J201 J101 J102 J103 J2701 J1801 J2 J1 J3501 J105 J104 J3502 J803 J203 J802 J202 J801 J201 Ink detection sensor Ink detection sensor J3301 Main controller PCB Head management sensor Ink tank ROM PCB...

Страница 44: ...off the power switch 1 Power off sequence Power Button ON Device resource initializarion Printhead ink tank check Media feed system initialization Recovery system initialization Carriage position initialization Remaining ink level detection Waste ink level detection Power on automatic recovery operation Capping Waiting for print operation Initialization of software Initialization of various device...

Страница 45: ...t driver for print quality setting Standard to enable standard mode c High quality mode Imaging data prints in two four or eight passes per band Configure the print driver for print quality High to enable high quality mode d Highest quality mode Imaging data prints in eight or 16passes per band Configure the print driver for print quality Highest to enable highest quality mode Print Mode List T 2 ...

Страница 46: ... cool down to below a predetermined temperature or when 30 seconds or longer have elapsed since the detection of the temperature higher than the protection temperature Protection level 2 If the head temperature sensor DI sensor detects a temperature higher than the abnormal temperature the printer shuts down the print operation immediately moving the carriage to the home position for capping with ...

Страница 47: ... such as a paper feed unit 5 and is designed to feed convey and deliver paper in two ways A summary description of each mechanical component of the printer is given below F 2 4 2 3 2 Ink Passage 2 3 2 1 Ink Passage 2 3 2 1 1 Overview of Ink Passage 0012 6328 The ink passage comprises ink tanks a printheads caps a maintenance jet tray a maintenance cartridge ink tubes interconnecting the mechanical...

Страница 48: ...tion fin in a sub tank rotates and ink in a sub tank will be agitated In addition ink flows backward by moving the piston under the needle ink supply up and down in the ink tank and ink in the ink tank will be agitated 2 3 2 2 Ink Tank Unit 2 3 2 2 1 Structure of Ink Tank Unit 0012 6329 a Ink tanks The ink level in each ink tank is memorized in EEPROM attached to the tank and is detected as a dot ...

Страница 49: ... on the side of the ink tanks during their replacement The ink supply valves are caused to open and close by the valve open close mechanism that is activated by driving the valve motors The ink tank unit consists of tank bases each organized into one group of six colors and six color ink tubes The color specific ink supply valves are linked with the valve cams so they will open and close at the sa...

Страница 50: ...onmental condition temperature humidity and multi sensor measurements to automatically adjust the separation between the face of the printhead and the paper The table below shows the relation between the form kind and the height of the head T 2 4 g Paper leading edge detection function paper width detection function skew detection function The multi sensor attached to the lower left part of the ca...

Страница 51: ...iper blades are moistened with glycerin as they are pressed against an absorber impregnated with glycerin Maintenance jet ejection is carried out on the cap at the maintenance jet tray borderless printing ink tray and on the paper surface A suction operation is carried out by a suction cap in the purge unit f Carriage height adjustment unit The head height is adjusted with the carriage halted at i...

Страница 52: ...or six colors by itself a Nozzle arrangement The nozzle assembly is formed of 1 280 nozzles arranged at 600 dpi intervals in a zigzag pattern offering a total of 2 560 nozzles 1 200 dpi intervals 1 Carriage relay PCB 7 Shaft cleaner 2 Multi sensor 8 Maintenance jet tray 3 Head relay PCB 9 Carriage HP sensor 4 Lift cam sensor 10 Multisensor reference 5 Sensor flag 11 Head management sensor unit 6 L...

Страница 53: ...nd of printing during a suction operation and when the printer stands by in the wake of an error occurrence The capping function connects the printhead to the ink passage of the purge unit b Cleaning function The cleaning function restores the nozzle to facilitate ink discharges through them It consists of the following three operations Wiping operation Wipes off paper fibers or residual inks adhe...

Страница 54: ...al cleaning 720 hours or more elapsed capped Cleaning 6 Normal high cleaning 960 hours or more elapsed capped Cleaning 2 Ink level adjusting and cleaning Initial installation and 168 hours elapsed capped since the last session of agitation on settling Cleaning 16 Cleaning 16 Agitation on settling Power on Initial installation Cleaning 3 Cleaning on initial filling Powered on less than 72 hours aft...

Страница 55: ...f the inks that have been wiped off from the head with an ink scraper linked to the maintenance cartridge then wiping the blades with a blade cleaner Wet wiping is carried out for added wiping removal performance whereby the wiper blades are moistened with glycerin as they are pressed against an absorber impregnated with glycerin The quantity of glycerin used is managed by counting the number of t...

Страница 56: ... it shuts down even while it is printing The printer will remain inoperable until the maintenance cartridge is replaced Memo The maintenance cartridge houses EEPROM so that engine firmware can control the status of the maintenance cartridge by writing to and reading from the EEPROM content There is no need to initialize the counter information therefore when the maintenance cartridge is replaced 2...

Страница 57: ...ing is executed under the following conditions a Trim Edge First is set to Forced b Trim Edge First is set to Automatic and the need for cutting determined c A barcode is detected when Chk Remain Roll is on forced cutting regardless of the setting of Trim Edge First 9 Paper leading edge detection sensor Basic operation of the cut media loading sequence 1 Paper trailing edge detection sensor 2 Mult...

Страница 58: ...ng force is imparted from the feed motor to rotate the roll holder for rewinding the media The rewind clutch remains off when roll media feed forward F 2 16 2 3 3 3 Cutter Unit 2 3 3 3 1 Structure of the cutter unit 0012 6386 If the print driver is configured to use a cutter with roll media cutter unit attached to the left side of the carriage cuts roll media automatically Cutter unit won t cut ro...

Страница 59: ... DIMM and store the generated image data in another DIMM It also outputs the generated image data to the carriage relay PCB Interrupt controller This controller receives and processes internal interrupts and external interrupts from the USB image processing unit and expansion card slot Timer function Power supply 5 1V generation 32V generation Printhead Head relay PCB Temperature read control DI S...

Страница 60: ...ol function This function controls read operation by the head DI sensor Multi sensor control function This function controls the LED gain adjustment and controls obtainment of the reading of the multi sensor EEPROM control function This function controls the EEPROMs of individual ink tanks the maintenance cartridge EEPROM the EEPROM on the maintenance cartridge relay PCB and the head EEPROM in add...

Страница 61: ...ain controller based on the control commands from the main con troller Relay function of the power to the logic components in the printhead Supplies the power to the logic components in the printhead based on the control commands from the main controller b Multi sensor control IC IC501 IC502 These IC s generates the LED control signals and makes gain adjustment for the multi sensor c Image data re...

Страница 62: ...1 Cover system 0012 6490 Upper cover lock switch L R The microswitch based upper cover lock switches detect the open closed states of the upper cover When the upper cover close the switches are pressed to detect the closed state of the upper cover The printer has one switch installed on the left and right sides each to prevent one sided closure of the upper cover Ink tank cover switches L R The mi...

Страница 63: ...ansmitted the status of the purge unit such as capped suction and wiping is detected in a Combination of the status of detection by the pump cam sensor and the control of pump motor rotation by the pump encoder sensor Upper cover lock switch Ink tank cover switch Pressure release switch Pump encoder Pump cam sensor Head management sensor Valve open closed detection sensor Agitation cam sensor ...

Страница 64: ...continuity between two hollow needles When the ink level in the tank falls to a point below the wall surrounding the hollow needles in the air passage continuity with the hollow needle on the ink supply side is disrupted causing the sensor to detect that the ink is out F 2 28 Head management sensor The phototransmitter based head management sensor detects the status of ink discharge from the print...

Страница 65: ... the printheads and platen automatically Ambient temperature sensor The thermostat based ambient temperature sensor mounted on the head relay PCB detects the ambient temperature to which the carriage is exposed The resistance of the thermistor that varies as a function of temperature changes in the printer is transmitted to the main controller via the carriage relay PCB The ambient temperature is ...

Страница 66: ...d media sensor detects the presence or absence of paper on the platen The sensor detects the presence of paper when it receives sensor light reflected upon the paper Feed roller HP sensor The feed roller HP sensor detects transitions from white transmitted or a reference to black shielded when the printer is switched on thereby setting the home position of feed roller eccentricity correction Feed ...

Страница 67: ...sor The photointerrupter based media take up on off sensor detects the switch status of the media take up unit When the media take up switch is set to ON the sensor arm transmits the sensor light power on the media take up unit When the media take up switch is set to OFF the sensor arm shields the sensor light shutting down the media take up unit Media take up paper detection sensor When the senso...

Страница 68: ......

Страница 69: ...Chapter 3 INSTALLATION ...

Страница 70: ......

Страница 71: ...ion 3 1 3 1 2 1 Checking the Contents 3 1 3 1 2 2 Assembling the Stand 3 3 3 1 2 3 Installing the Printer 3 6 3 1 2 4 Installing the Basket 3 7 3 1 2 5 Installing the Media Take Up Unit Option 3 11 3 1 2 6 Removing Protection Materials 3 17 3 1 3 Checking the Images Operations 3 19 3 1 3 1 Checking the Image and Operation 3 19 ...

Страница 72: ......

Страница 73: ...th carrying in and installation of the product T 3 1 1 Installation space Height F 3 1 Width and depth F 3 2 3 1 2 Unpacking and Installation 3 1 2 1 Checking the Contents 0014 8918 1 Check for the components a Printer Package size and weight including palette 2070mm W x 1050mm D x 860mm H Approx 168Kg 224mm 8 8 356mm 14 1500mm 59 H 1144mm 45 100mm 3 9 600mm 23 6 200mm 7 9 200mm 7 9 W 1893mm 74 5 ...

Страница 74: ...older 3 Power cord 4 Printheads 2pcs 5 Ink tanks 12 colors 6 Eject supports 4pcs 7 Hex wrench 1 Basket unit 2 Basket rod 3 Bottom stand stay 4 Top stand stay 5 Right stand leg 6 Left stand leg 7 Rod holder 2pcs 8 Basket arm L 1 2 4 7 6 5 5 3 5 6 3 4 1 2 13 14 9 8 10 12 11 7 15 ...

Страница 75: ...on the left stand leg and right stand leg so that the markings on the bottom are right side up and can be read Insert the left side of the bottom stand stay into the side slot 1 of the left stand leg and insert the right side of the bottom stand stay into the side slot 2 of the right stand leg 9 Basket arm R 10 Leg cover 2pcs 11 Rod holder adapter 2pcs 12 M8 hex bolts 8pcs 13 Spanner 14 Hex wrench...

Страница 76: ... stand at the same time to stand it upright F 3 8 Rotate both ends of the stand simultaneously when standing the stand upright Rotating only one side before the other may bend the stand and cause problems in assembly 4 Insert the left end of the top stand stay into the side hole 1 on the left stand leg and insert the right end of the top stand stay into the side hole 2 on the right stand leg pushi...

Страница 77: ...s using the four M8 hex bolts on each side F 3 10 6 Attach the leg cover to the left and right stand legs Insert the protrusion 1 of the leg cover into the groove 2 of the top stand stay Insert the protrusion 3 of the leg cover into the groove 4 of the bottom stand stay F 3 11 7 Secure the leg cover to the left and right stand legs using one M4 hex screws on each side 1 2 1 1 4 4 3 3 2 2 1 1 ...

Страница 78: ...ing material F 3 13 2 While two people are holding the carrying handles under the printer on one end and lifting the printer a little have a third person to remove the packaging material from under the printer Also remove the packaging material on the other side of the printer by the same way F 3 14 3 Hold the carrying handles under the printer by two to three people on each side lift the printer ...

Страница 79: ...sitions is dangerous and may cause injury and damage if the printer is dropped 4 Align the triangles on the back of the printer and the stand when setting the printer on the stand Secure the printer and the stand firmly together using four M4 hex screws on each side F 3 17 3 1 2 4 Installing the Basket 0014 8929 Install the basket 1 Insert the basket arm R 1 in the hole 2 on the right side of the ...

Страница 80: ... in the arm fully into the hole on the left side of the bottom stand stay B Secure the basket arm L 1 and R 2 using one M4 hex screw on each side C F 3 19 3 Attach the rod holder to the rod holder adapter F 3 20 4 Insert the rod holder into each hole on the back of each stand leg 4 2 3 1 1 1 2 C B B C A ...

Страница 81: ...sket cloth at the front on the right side and the black cord 2 at the back F 3 22 6 Insert the basket rod in the middle of the basket cloth in the hole 1 on the bottom of the rod holder and thread the black cord from the back through the hook 2 on the top of the rod holder 1 2 ...

Страница 82: ...ll out the basket cloth with the edge facing out Bringing the edge of the basket cloth inside may prevent paper ejection F 3 24 8 Attach the basket rod at the front of the basket unit to the tips 1 of the basket arm L and R 1 2 ...

Страница 83: ...ng the Media Take Up Unit Option 0014 8925 Install the media take up unit option 1 In case the basket is installed lift the front basket rod 1 gently to release the lock lower the rod toward the front and push it all the way back Remove the front basket rod from the basket arms L and R than roll up the basket cloth and put it behind the bottom stand stay 1 1 ...

Страница 84: ...Chapter 3 3 12 F 3 27 2 Firmly secure the left and right media take up unit mounting brackets to the front 1 and the back 2 of the top stand stay using four M4 hex screws on each side 1 ...

Страница 85: ...h the protrusion 2 of the left media take up unit mounting bracket and hook up the hole 3 of the right media take up unit with the protrusion 4 on the right media take up unit mounting bracket Secure the media take up units firmly by using three M4 hex screws 5 on each side 1 2 ...

Страница 86: ... the right stand leg F 3 30 5 With the media take up sensor unit against the underside of the bottom stand stay and the right stand leg insert M4 hex screws in the three holes 1 and slide the screws out of the way toward the narrow end of the protruding holes Insert M4 hex screws in the small holes 2 as well Than tighten all five M4 hex screws firmly 2 1 3 4 5 5 ...

Страница 87: ...Arrange the basket cloth and basket rod so they do not interfere with the media take up sensor indicated by the dotted line F 3 32 6 Plug the cord of the media take up sensor unit into the right media take up unit 1 1 1 2 2 ...

Страница 88: ...the holders plug the cord into the power supply connector on the back of the printer F 3 34 When plugging in the power cord be careful about the positions of the prongs It may damage the cord or connector if you force the cord into the connector 8 Load the left side of the media take up spool on the media take up unit so that the gear 1 on the right side of the media take up spool meshes with the ...

Страница 89: ...Materials 0014 8930 1 Remove the tape and other packaging material used to secure the printer F 3 36 2 Open the upper cover F 3 37 3 Lift the release lever 1 A remove the protective sheet 2 from the platen and lower the release lever again B ON OFF 2 1 ...

Страница 90: ...wrench which have been removed since these are needed when moving the printer to another location later Neglecting to attach the belt stopper may cause damage to the printer when moving the printer to another location 5 Lift the ejection guide F 3 40 6 Attach four eject supports 1 on the back of the ejection guide 1 2 B A 1 ...

Страница 91: ...42 3 1 3 Checking the Images Operations 3 1 3 1 Checking the Image and Operation 0014 1896 Turn on the printer Load the print heads ink tanks and media following the instructions shown on the operation panel Install the printer driver in the PC and carry out test printing 1 ...

Страница 92: ......

Страница 93: ...Chapter 4 DISASSEMBLY REASSEMBLY ...

Страница 94: ......

Страница 95: ... Feeder unit 4 17 4 3 9 Purge unit 4 17 4 3 10 Ink tank unit 4 18 4 3 11 Linear encoder 4 21 4 3 12 Head management sensor 4 22 4 3 13 PCBs 4 22 4 3 14 Opening the cap and moving the wiper unit 4 23 4 3 15 Opening and closing ink supply valves 4 23 4 3 16 Draining the ink 4 24 4 4 Applying the Grease 4 25 4 4 1 Applying the Grease 4 25 4 5 Adjustment and Setup Items 4 27 4 5 1 Action to take after...

Страница 96: ......

Страница 97: ... them from the individual boxes when assembling or performing any other operations For details about handling of the feed roller refer to DISASSEMBLY REASSEMBLY Points to Note on Disassembly and Reassembly Feeder unit a Handling of the feed roller 4 2 Disassembly Reassembly 4 2 1 Diassembly Reassembly 0014 8946 See Parts Catalog for the process of disassembly and reassembly except for the followin...

Страница 98: ...ts s3 Upper rear cover s5 Upper cover Open left right ink tank units s4 Upper left upper right covers h1 Rear cover right s4 Rear cover left s2 Left right printheads Left right joint bases Ink tube joint Ink tube cover s2 Flexible cable c3 Carriage PCB cover s4 Carriage unit Move the carriage to above the platen Head management sensor s1 Lift unit s5 Cutter unit Pulley base s3 1 Carriage Unit Disa...

Страница 99: ... right covers h1 Rear cover right s4 Rear cover left s2 Left right printhead Left right joint bases Ink tube joint Ink tube cover s2 Flexible cable c3 Carriage PCB cover s4 Carriage unit Move the carriage to above the platen Head management sensor s1 Cable fixer base s3 Lift unit s5 Cutter unit Pulley base s3 Legend c Connector h Hook s Screw Printer Right circle cover L h1 Right circle cover S h1...

Страница 100: ...iage from contacting the parts to be removed You cannot move the carriage when capping has been performed Refer to DISASSEMBLY REASSEMBLY Points to Notes on Disassembly and Reassembly Opening the caps and moving the wiper unit to remove the caps and then move the carriage Legend c Connector h Hook s Screw Printer Automatic ink drain Manual ink drain Right circle cover L h1 Right circle cover S h1 ...

Страница 101: ...MBLY REASSEMBLY Points to Notes on Disassembly and Reassembly Ink tube unit 3 Ink tank unit Refer to DISASSEMBLY REASSEMBLY Points to Notes on Disassembly and Reassembly Ink tank unit 4 3 4 External covers 0014 8958 a Left circle cover L Right circle cover L Removing left circle cover L right circle cover L 1 To remove circle cover L 1 insert flathead screwdriver 2 at the position indicated to rem...

Страница 102: ...over S right circle cover S 1 Install circle cover S 1 with its part 2 inserted in part 3 of the right side cover and turn the cover rearward to install F 4 11 c Left right side covers Removing the left right side covers 1 To remove left right side covers 1 remove left right circle cover L and left right circle cover S 2 Remove three screws 2 and two hooks 3 and remove the cover by their bottom si...

Страница 103: ...iver and remove two connectors 3 F 4 13 e Upper left cover upper right cover Removing the upper left cover upper right cover 1 To remove upper left upper right cover 1 remove left right circle cover L left right circle cover S and left right side covers 2 Insert a flathead screwdriver at the indicated position to remove hook 2 1 3 2 2 1 3 ...

Страница 104: ...r cover left Removing the rear cover right rear cover left 1 To remove rear cover right 1 remove four screws 2 2 To remove rear cover left 3 remove the rear cover right and two screws 4 F 4 16 h Lower rear cover right left filter cover Removing the lower rear cover right left filter cover 1 To remove lower rear cover right 1 remove four screws 2 2 To remove lower rear cover left 3 remove two screw...

Страница 105: ...nk tank units 1 To open the left right ink tank units remove left right circle cover L left right circle cover S left right side covers upper left right cover and left right ink tank cover unit 2 Remove two screws 1 3 Remove screw 2 from the support plate at inner side of the printer 4 Remove screw 4 from the support plate 3 at outer side of the printer loosen screw 5 and slide the support plate t...

Страница 106: ... ink tank cover units and then open the left right ink tanks 2 Remove two screws 1 on front side of the printer and three screws 2 on the rear side and then remove upper rear cover 3 F 4 20 Note on installing the upper rear cover 1 Fit three rear panel screws 1 into screw holes on the right side F 4 21 l Upper cover Removing the upper cover 1 To remove the upper cover remove left right circle cove...

Страница 107: ... align the gear of the release lever with mark 3 phase in the receiving gear F 4 23 4 3 5 Drive unit 0014 8962 a Feed motor Removing the feed motor 1 To remove feed motor 1 loosen four screws 2 and remove timing belt 3 and spring 4 2 Remove four loosened screws 2 to release feed motor 1 and remove the connector Reinstalling the feed motor To reassemble the feed roller drive timing belt 3 into posi...

Страница 108: ...ce mode under the following conditions to launch automatic adjustment Service mode SERVICE MODE ADJUST PRINT PATTERN LF TUNING Media type Glossy photo paper 4 3 6 Carriage unit 0014 8964 a Removing the carriage unit 1 Drain the ink See Disassembly Reassembly Points to Note on Disassembly Reassembly Draining the ink 2 Turn off the power and move the carriage to above the platen If the carriage is l...

Страница 109: ...ve two screws 1 and ink tube cover 2 F 4 27 6 Detach joints 1 of the ink tube F 4 28 7 Remove four screws 1 and open carriage PCB cover 2 F 4 29 8 Disconnect five flexible cables from the carriage relay PCB 9 Cover the joint of the ink tube unit in a plastic bag or the like to prevent ink splashing and leakage and seal the mouth of the bag 2 1 1 2 1 1 2 ...

Страница 110: ...nt base from the carriage F 4 30 10 Twist off belt fixer knob 1 to loosen the belt and remove spring 2 guide 3 and pulley 4 F 4 31 11 Release carriage belt from the pulley of the carriage motor 12 Remove two screws 1 and pulley base 2 13 Remove screw 3 and the connector 4 to release head management sensor unit 5 14 Remove five screws 6 and lift unit 7 1 2 4 3 1 ...

Страница 111: ...ale could result in malfunctioning After detaching the joint of the ink tube unit the joint might become easy to come off by the ink that has adhered to it In that case please wash the joint by alcohol and remove the adhering ink F 4 33 b Mounting the carriage belt To install the carriage belt put in the point of the belt to the interior of the groove 1 and have all the cogs of carriage belt 3 eng...

Страница 112: ...embly Points to Note on Disassembly Reassembly Draining the ink 2 Remove the carriage unit See Disassembly Reassembly Points to Note on Disassembly Reassembly Carriage Unit 3 Disconnect five flexible cables from the main controller PCB 4 Remove the flexible cable leading to the carriage PCB cover from the guide 5 Remove three screws 1 and release ink tube fixer base 2 from the frame F 4 35 6 Uncla...

Страница 113: ...ry corrected variation in the paper feed distance per rotation is compensated for to enhance the media feed accuracy There fore when you have replaced the feed roller HP sensor feed roller encoder or feed roller related to correction of feed roller eccentricity adjustment is required Use the service mode under the following conditions Service mode SERVICE MODE ADJUST PRINT PATTERN LF TUNING Media ...

Страница 114: ...Ink tank unit 0014 8979 a Removing ink tank units 1 Drain the ink See Disassembly Reassembly Points to Note on Disassembly Reassembly Draining the ink 2 Detach the joint between the ink tube unit and ink tank unit 1 3 Remove four screws 2 and five connectors 3 and then remove the ink tank unit 1 3 2 1 2 3 ...

Страница 115: ... that case please wash the joint by alcohol and remove the adhering ink F 4 43 b Reinstalling ink tank units The left and right ink tank units are installed to different positions at waste ink tray 1 Install the right ink tank unit at screw position 2 Install the left ink tank unit at screw position 3 Installing position of each ink tank units are inner side of the printer 2 2 2 1 3 3 3 ...

Страница 116: ...4 4 20 F 4 44 c Removing the valve motor unit 1 To remove the valve motor unit remove the ink tank cover unit 2 Remove three screws 1 two connectors 2 and bearing 3 and then remove valve motor unit 4 3 3 2 2 1 ...

Страница 117: ... 4 45 4 3 11 Linear encoder 0014 8985 a Removing the linear encoder 1 Move the carriage to above the platen 2 Remove two screws 1 and upper rear stay 2 F 4 46 3 Remove two screws 1 and linear encoder 2 1 1 3 2 4 1 1 2 ...

Страница 118: ...NOZZLE CHK POS 4 3 13 PCBs 0014 8989 Do not replace the main controller PCB and the maintenance cartridge relay PCB ROM board at the same time Both PCBs hold vital information such as settings and a carriage drive time Before either PCB is replaced such information is temporarily saved through internal communication with the other PCB and is automatically written to the new PCB when it is installe...

Страница 119: ...nter enters PCB replacement mode 5 Wait until REPLACE MODE appears on the display 6 Select CPU BOARD and press the OK key 7 Turn off the power but not before making sure that Power off appears on the display 8 Turn on the power 9 Check the firmware version If the firmware is not the latest version upgrade the firmware to the latest version 4 3 14 Opening the cap and moving the wiper unit 0014 8991...

Страница 120: ...g Maintenance Move Printer from the main menu Execute Automatic Ink Drain once again if the printer shuts down due to a power failure or any other trouble before the operation completes 2 Manual Ink Drain Drain the ink passage of inks manually if any electrical component in the printer fails or firmware malfunctions or if the printer fails to be powered on 1 Remove right circle cover L right circl...

Страница 121: ...lace Kind Quantity Note 1 The joint base rail and rib of carriage unit Molykote PG 641 Smear the grease lightly 2 Two feed roller backup Permalub G No 2 approx 12mg Don t apply to central backup with bearing Bushing Permalub G No 2 Smear the grease lightly 3 Feed roller bearing Permalub G No 2 approx 24mg Apply if remove bearing from a feed roller 4 Pinch roller release cam three points x 10 parts...

Страница 122: ...Chapter 4 4 26 F 4 53 4 Pinch roller release cam 1 three points x 10 parts F 4 54 5 Upper cover stay shaft hole 1 gear shaft 2 shaft end 3 gear tooth face 4 1 2 3 1 ...

Страница 123: ...age unit and the nozzles in each printhead is varied from one unit to another the printer has its optical axis corrected and paper gap adjustment sensor gain and calibration adjusted prior to shipment When the carriage unit or multi sensor has been replaced they should require adjustment Execute service mode under the following conditions to launch automatic adjustment 1 Optical axis correction Se...

Страница 124: ......

Страница 125: ...Chapter 5 MAINTENANCE ...

Страница 126: ......

Страница 127: ...Contents Contents 5 1 Periodic Replacement Parts 5 1 5 1 1 Periodic replacement parts 5 1 5 2 Consumable Parts 5 1 5 2 1 Consumable parts 5 1 5 3 Periodic Maintenance 5 1 5 3 1 Regular Maintenance 5 1 ...

Страница 128: ......

Страница 129: ...ables Service WASTE INK ABSORBER UNIT QL2 2110 1 20000 A1 A WASTE INK ABSORBER UNIT L QL2 2108 2 20000 A3 A4 WASTE INK ABSORBER UNIT S QL2 1650 1 20000 A5 SUCTION FAN UNIT QM3 1012 1 20000 A6 DUCT QL2 1663 1 20000 A6 CARRIAGE UNIT QM3 1995 1 20000 D1 D2 D3 D TUBE UNIT QM3 2004 1 20000 D4 PURGE UNIT QM3 1004 1 20000 H1 H SENSOR UNIT QM3 1056 1 20000 K1 K MOTOR CARRIAGE QK1 2868 1 20000 M1 M FEED MO...

Страница 130: ......

Страница 131: ...Chapter 6 TROUBLESHOOTING ...

Страница 132: ......

Страница 133: ...2524 03830113 2525 03830106 2526 03830105 2528 03830115 2529 03830107 252A 03830109 252B 03830108 252C Ink tank is not installed This error occurs when the ink tank is replaced 6 6 6 1 3 17 03800204 2540 03830201 2541 03830202 2542 03830203 2543 03830212 2544 03830213 2545 03830206 2546 03830205 2548 03830215 2549 03830207 254A 03830209 254B 03830208 254C Invalid ink tank ID 6 6 6 1 3 18 03830304 ...

Страница 134: ...pped 6 11 6 1 3 43 03130031 2F14 ASIC Register cannot be written 6 11 6 1 3 44 03900001 4042 03900001 4049 Firmware error 6 11 6 1 3 45 E194 4034 Sensor calibration error 6 11 6 1 4 Troubleshooting When Service Call Errors Occur 6 12 6 1 4 1 E141 4046 Recovery system s count error 6 12 6 1 4 2 E144 4047 Supply system s count error 6 12 6 1 4 3 E146 4001 Waste ink count full 6 12 6 1 4 4 E161 403E ...

Страница 135: ...ened firmly 6 Whenever you have performed replacement or repair services make test prints to check whether the problem has been resolved 6 1 2 Troubleshooting When Warnings Occur 6 1 2 1 Ink Level Check 0012 6612 Cause The printer has detected that the ink level is below the lower limit 20 of the capacity by ink dot count Probable fault location Ink tank ink tank unit or main controller Countermea...

Страница 136: ...a type 2 Replace the main controller PCB 6 1 2 8 GARO W12xx 0013 2101 Either of the following numbers will be displayed for xx 21 22 23 25 31 32 33 34 35 Cause The GARO command in the received data was invalid Probable fault location Operation method or main controller Countermeasure 1 Check the operation method and retry printing 2 Replace the main controller PCB 6 1 2 9 Check printed document 00...

Страница 137: ...tected skew greater than the specified one When media was fed the multi sensor could not detect the right edge of media When media was fed the multi sensor could not detect the left edge of media Probable fault location Media media loading method paper path multi sensor head relay PCB carriage relay PCB or main controller PCB Countermeasure 1 Media check If there is any print or stain in the detec...

Страница 138: ... 3 7 03010000 2016 03010000 2E27 Paper feed error 0014 2776 Cause During paper feed or delivery paper jammed or paper was fed improperly During printing paper was fed out of the way During paper feed delivery or printing the feed motor has gone out of synchronization Probable fault location Paper path media sensor feed roller encoder feed roller HP sensor feed motor feed roller or main controller ...

Страница 139: ...ot be driven Probable fault location Media media take up paper detection sensor media take up motor media take up PCB media take up relay PCB main controller PCB Countermeasure 1 Visual check If the winding media is abnormal rewind the media correctly after the cause is removed Remove foreign substances between the light emission unit and light receiving unit of media take up paper detection senso...

Страница 140: ... ink tank unit or main controller PCB Countermeasure 1 Operation check Install the ink tank correctly 2 Visual check Remove foreign substances from the ink tank contacts and ink tank cover switch if any 3 Replace the ink tank 4 Ink tank cover switch Check for normal operation If the operation is abnormal replace the ink tank cover switch 5 Replace the ink tank unit 6 Replace the main controller PC...

Страница 141: ...ead R DI correction failed The version of printhead R was different Improper installation of the printhead L was detected A checksum error was detected in the EEPROM of the printhead L Printhead L DI correction failed The version of printhead L was different Probable fault location Printhead head relay PCB carriage relay PCB or main controller PCB Countermeasure 1 Replace the printhead 2 Cable con...

Страница 142: ... AXIS or SERVICE MODE AD JUST PRINT PATTERN LF TUNING in the service mode check that photo glossy paper is used Probable fault location Operation method printhead multi sensor head relay PCB carriage relay PCB or main controller PCB Countermeasure 1 Check whether the media type selected on the operation panel is the same as the type of the media used to print the adjustment pattern If they are dif...

Страница 143: ...e relay PCB 6 Replace the main controller PCB 6 1 3 30 03800500 2F2F 03800500 2F30 Head management sensor error 0012 6639 Cause The head management sensor detected an ink discharge error A sensor sensitivity error was detected during head management sensor position adjustment Probable fault location Printhead head management sensor or main controller PCB Countermeasure 1 Replace the print head 2 V...

Страница 144: ...130031 2F1F 03130031 2F20 Defective sensor in purge unit 0012 6646 Cause The each sensors in the purge unit could not detect the home position of the purge motor within the specified time Probable fault location Purge unit or main controller PCB Countermeasure 1 Visual check Remove foreign substance from purge unit if any 2 Replace the purge unit 3 Replace the main controller PCB 6 1 3 37 03130031...

Страница 145: ...or 4 Replace the lift drive unit 5 Replace the main controller PCB 6 1 3 42 03130031 2F13 A D Converter external trigger output stopped 0013 7238 Cause Defective main controller PCB Probable fault location Main controller PCB Countermeasure 1 Turn off the printer and then turn it off again 2 Replace the main controller PCB 6 1 3 43 03130031 2F14 ASIC Register cannot be written 0013 7240 Cause A ma...

Страница 146: ...asure 1 Replace the waste ink box or fan unit After replacing the waste ink box or fan unit select SERVICE MODE INITIALIZE PARTS COUNTER to reset the counter 2 Replace the main controller PCB 6 1 4 4 E161 403E E161 403F Abnormally high head temperature 0013 7244 Cause The printhead temperature became abnormally high Probable fault location Printhead head relay PCB carriage relay PCB or main contro...

Страница 147: ... 3V 5 3 3V OUT power supply 3 3V 6 3 3V OUT power supply 3 3V 7 3 3V OUT power supply 3 3V 8 3 3V OUT power supply 3 3V 9 3 3V OUT power supply 3 3V 10 N C N C 11 GND GND 12 PME IN Power management enable signal 13 INTA IN Interrupt signal 14 GND GND 15 RST OUT PCI Reset signal 16 CLK OUT PCI Clock signal 17 GNT OUT Ground signal 18 GND GND 19 REQ IN Request signal 20 AD31 IN OUT Address and data ...

Страница 148: ... Address and data signal 58 AD14 IN OUT Address and data signal 59 AD13 IN OUT Address and data signal 60 AD12 IN OUT Address and data signal 61 GND GND 62 AD11 IN OUT Address and data signal 63 AD10 IN OUT Address and data signal 64 AD9 IN OUT Address and data signal 65 AD8 IN OUT Address and data signal 66 CBE0 IN OUT Bus command and byte enable signal 67 GND GND 68 AD7 IN OUT Address and data s...

Страница 149: ...ower supply A8 OUT_LIFTM0_A OUT Lift motor drive signal A A9 OUT_LIFTM2_AX_N0 OUT Lift motor drive signal AX A10 OUT_LIFTM1_B OUT Lift motor drive signal B A11 OUT_LIFTM3_BX_N1 OUT Lift motor drive signal BX A12 ATUKAIJYO IN Pressure release switch output signal A13 GND GND B1 PUMPM1_AM OUT Purge motor drive signal AM B2 PUMPM1_AP OUT Purge motor drive signal AP B3 GND GND B4 PUMPR_ENCA IN Pump en...

Страница 150: ... N C N C A9 N C N C A10 VM_26V OUT Power supply 26V A11 SPOOL_CL OUT Media take up clutch drive signal B1 VM_26V OUT Power supply 26V B2 KYUINFAN_ALARM_IN IN Suction fan alarm signal B3 KYUINFAN_PWM_ON OUT Suction fan duty control signal B4 GND GND B5 VM_26V OUT Power supply 26V B6 MISTFAN_R_ALARM IN Mist fan R alarm signal B7 GND GND B8 VM_26V OUT Power supply 26V B9 MISTFAN_L_ALARM IN Mist fan L...

Страница 151: ...2 IN 3 IN Hole sensor input signal 3 3 IN 1 IN Hole sensor input signal 1 4 IN 2 IN Hole sensor input signal 2 5 IN 1 IN Hole sensor input signal 1 6 IN 2 IN Hole sensor input signal 2 7 VM_GND GND 8 5V OUT Power supply 5V 9 OUT B OUT Motor output signal B 10 OUT B OUT Motor output signal B 11 OUT A OUT Motor output signal A 12 OUT A OUT Motor output signal A 13 OUT C OUT Motor output signal C 14 ...

Страница 152: ...signal 11 J3301 Pin Number Signal name IN OUT Function 1 MENT_SDA IN OUT Maintenance cartridge ROM control signal data 2 MENT_SCL IN OUT Maintenance cartridge ROM control signal clock 3 GND GND 4 3 3V OUT Power supply 3 3V 5 GND GND 6 FUTO_CLMP OUT Head management sensor clamp signal 7 FUTO_ON OUT Head management sensor ON signal 8 SNS5V OUT Power supply 5V 9 FUTO_CMP IN Head management sensor ink...

Страница 153: ...al 9 E 27 GND GND 28 H0 E DATA 9 EV_B OUT Even head R data signal 9 E 29 GND GND 30 H DASH LICC2_B Head analogue switch A D trigger signal 31 GND GND 32 H0 A DATA 0 OD_B OUT Odd head R data signal 0 A 33 GND GND 34 H0 A DATA 1 OD_B OUT Odd head R data signal 1 A 35 GND GND 36 H0 B HE 2_B OUT Head R heat enable signal 2 B 37 GND GND 38 H0 B DATA 2 OD_B OUT Odd head R data signal 2 B 39 GND GND 40 H...

Страница 154: ...2 H0 B DATA 2 EV_B OUT Even head R data signal 2 B 43 GND GND 44 H0 A DATA 1 EV_B OUT Even head R data signal 1 A 45 GND GND 46 H0 A HE 1_B OUT Head R heat enable signal 1 A 47 GND GND 48 H0 A DATA 0 EV_B OUT Even head R data signal 0 A 49 GND GND 50 H0 A HE 0_B OUT Head R heat enable signal 0 A J3601 Pin Number Signal name IN OUT Function 1 ENCODER_A IN Carriage encoder output signal A 2 ENCODER_...

Страница 155: ... GND GND 50 H1 C DATA 4 OD_B OUT Odd head R data signal 4 C J3602 Pin Number Signal name IN OUT Function 1 IO_ASIC_SDA IN OUT Head ROM controll signal data 2 IO_ASIC_SCL IN OUT Head ROM controll signal clock 3 GND GND 4 H1 E DATA 8 EV_B OUT Even head L data signal 8 E 5 OUT ENB OUT Head data enable signal 6 H1 D HE 7_B OUT Head L heat enable signal 7 D 7 GND GND 8 H1 D DATA 7 EV_B OUT Even head L ...

Страница 156: ...al 2 B J101 Pin Number Signal name IN OUT Function 1 VMGND GND 2 VMGND GND 3 VMGND GND 4 VMGND GND 5 VM IN Power supply 32V 6 VM IN Power supply 32V 7 VM IN Power supply 32V 8 VM IN Power supply 32V 9 VM IN Power supply 32V 10 VM IN Power supply 32V 11 VM IN Power supply 32V 12 VM IN Power supply 32V 13 SNS5V IN Power supply 5V 14 SNS5V IN Power supply 5V 15 GND GND 16 3 3V IN Power supply 3 3V 17...

Страница 157: ...gnal 11 F 30 GND GND 31 H1 F DATA 11 OD_B IN Odd head L data signal 11 F 32 GND GND 33 H1 F HE 10_B IN Head L heat enable signal 10 F 34 GND GND 35 H1 E DATA 9 OD_B IN Odd head L data signal 9 E 36 GND GND 37 H1 F DATA 10 OD_B IN Odd head L data signal 10 F 38 GND GND 39 H1 E DATA 8 OD_B IN Odd head L data signal 8 E 40 GND GND 41 H1 E HE 8_B IN Head L heat enable signal 8 E 42 GND GND 43 H1 D DAT...

Страница 158: ...en head L data signal 6 D 42 GND GND 43 H1 D DATA 7 EV_B IN Even head L data signal 7 D 44 GND GND 45 H1 D HE 7_B IN Head L heat enable signal 7 D 46 GND GND 47 H1 E DATA 8 EV_B IN Even head L data signal 8 E 48 GND GND 49 IO_ASIC_SCL IN OUT Head ROM control signal clock 50 IO_ASIC_SDA IN OUT Head ROM control signal data J104 Pin Number Signal name IN OUT Function 1 GND GND 2 GND GND 3 VH_MONI4 OU...

Страница 159: ... A DATA 0 EV_B IN Even head R data signal 0 A 4 GND GND 5 H0 A HE 1_B IN Head R heat enable signal 1 A 6 GND GND 7 H0 A DATA 1 EV_B IN Even head R data signal 1 A 8 GND GND 9 H0 B DATA 2 EV_B IN Even head R data signal 2 B 10 GND GND 11 H0 B DATA 3 EV_B IN Even head R data signal 3 B 12 GND GND 13 H0 C DATA 4 EV_B IN Even head R data signal 4 C 14 GND GND 15 H0 B HE 3_B IN Head R heat enable signa...

Страница 160: ...pply 5V J202 Pin Number Signal name IN OUT Function 1 SNS_5V OUT Power supply 5V 2 GND GND 3 CRCOVER IN Carriage cover sensor output signal J701 Pin Number Signal name IN OUT Function 1 H3V OUT Power supply 2 VH1_FB IN VH1 feed back voltage 3 VH1 OUT Power supply 4 VH1 OUT Power supply 5 VH1 OUT Power supply 6 VH1 OUT Power supply 7 VH1 OUT Power supply 8 VH1 OUT Power supply 9 GND GND 10 GND GND ...

Страница 161: ...nable signal 9 E 33 GND GND 34 H1 F DATA 10 EV OUT Even head L data signal 10 F 35 GND GND 36 H1 F DATA 11 EV OUT Even head L data signal 11 F 37 GND GND 38 H1 F HE 11 OUT Head L heat enable signal 11 F 39 GND GND 40 H1 F DATA 11 OD OUT Odd head L data signal 11 F 41 GND GND 42 H1 F DATA 10 OD OUT Odd head L data signal 10 F 43 GND GND 44 H1 F HE 10 OUT Head L heat enable signal 10 F 45 GND GND 46...

Страница 162: ...ature output signal 1 41 GND GND 42 H1 DSOUT2 IN Head L temperature output signal 2 43 GND GND 44 H1 DLD_LICC2 OUT Head L analogue switch latch signal 45 GND GND 46 H1 DATA_LICC2 OUT Head L analogue switch data signal 47 GND GND 48 H1 DASLK_LICC2 OUT Head L analogue switch clock signal 49 GND GND 50 H DASH_LICC2 OUT Head analogue switch A D trigger signal J801 Pin Number Signal name IN OUT Functio...

Страница 163: ... D 27 GND GND 28 H0 E DATA 8 EV OUT Even head R data signal 8 E 29 GND GND 30 H0 E DATA 9 EV OUT Even head R data signal 9 E 31 GND GND 32 H0 E HE 9 OUT Head R heat enable signal 9 E 33 GND GND 34 H0 F DATA 10 EV OUT Even head R data signal 10 F 35 GND GND 36 H0 F DATA 11 EV OUT Even head R data signal 11 F 37 GND GND 38 H0 F HE 11 OUT Head R heat enable signal 11 F 39 GND GND 40 H0 F DATA 11 OD O...

Страница 164: ... HE 2 OUT Head R heat enable signal 2 B 33 GND GND 34 H0 A DATA 1 OD OUT Odd head R data signal 1 A 35 GND GND 36 H0 A DATA 0 OD OUT Odd head R data signal 0 A 37 GND GND 38 H0 A HE 0 OUT Head R heat enable signal 0 A 39 GND GND 40 H0 A DATA 0 EV OUT Even head R data signal 0 A 41 GND GND 42 H0 A DATA 1 EV OUT Even head R data signal 1 A 43 GND GND 44 H0 A HE 1 OUT Head R heat enable signal 1 A 45...

Страница 165: ... 16 GND GND 17 H1 F DATA 10 EV IN Even head L data signal 10 F 18 GND GND 19 H1 E HE 9 IN Head L heat enable signal 9 E 20 GND GND 21 H1 E DATA 9 EV 0 Even head L data signal 9 E 22 GND GND 23 H1 E DATA 8 EV IN Even head L data signal 8 E 24 GND GND 25 H1 D HE 7 IN Head L heat enable signal 7 D 26 GND GND 27 H1 D DATA 7 EV IN Even head L data signal 7 D 28 GND GND 29 H1 D DATA 6 EV IN Even head L ...

Страница 166: ...ead L heat enable signal 1 A 24 GND GND 25 H1 A DATA 1 EV IN Even head L data signal 1 A 26 GND GND 27 H1 A DATA 0 EV IN Even head L data signal 0 A 28 GND GND 29 H1 A HE 0 IN Head L heat enable signal 0 A 30 GND GND 31 H1 A DATA 0 OD IN Odd head L data signal 0 A 32 GND GND 33 H1 A DATA 1 OD IN Odd head L data signal 1 A 34 GND GND 35 H1 B HE 2 IN Head L heat enable signal 2 B 36 GND GND 37 H1 B ...

Страница 167: ...ata signal 11 F 12 GND GND 13 H0 F HE 11 IN Head R heat enable signal 11 F 14 GND GND 15 H0 F DATA 11 EV IN Even head R data signal 11 F 16 GND GND 17 H0 F DATA 10 EV IN Even head R data signal 10 F 18 GND GND 19 H0 E HE 9 IN Head R heat enable signal 9 E 20 GND GND 21 H0 E DATA 9 EV IN Even head R data signal 9 E 22 GND GND 23 H0 E DATA 8 EV IN Even head R data signal 8 E 24 GND GND 25 H0 D HE 7 ...

Страница 168: ...D 19 H0 B HE 2 IN Head R heat enable signal 2 B 20 GND GND 21 H0 B DATA 2 OD IN Odd head R data signal 2 B 22 GND GND 23 H0 B DATA 3 OD IN Odd head R data signal 3 B 24 GND GND 25 H0 C HE 4 IN Head R heat enable signal 4 C 26 GND GND 27 H0 C DATA 4 OD IN Odd head R data signal 4 C 28 GND GND 29 H0 DSOUT2 OUT Head R temperature output signal 2 30 GND GND 31 H0 DSOUT1 OUT Head R temperature output s...

Страница 169: ...d L heat enable signal 11 F 18 H1 E DIA1 IN Head L DI sensor signal 1 E 19 H1 D DIA1 IN Head L DI sensor signal 1 D 20 H3V_1 OUT Power supply 21 H3V_1 OUT Power supply 22 H1 B DATA 3 EV OUT Even head L data signal 3 B 23 H1 A DATA 0 EV OUT Even head L data signal 0 A 24 H1 B HE 2 OUT Head L heat enable signal 2 B 25 VH1 OUT Power supply 26 VH1 OUT Power supply 27 H1 D DIA2 IN Head L DI sensor sign...

Страница 170: ...H1 A DATA 0 OD OUT Odd head R data signal 0 A 76 GND GND 77 GND GND 78 GND GND J602 Pin Number Signal name IN OUT Function 1 VH3 OUT Power supply 2 VH3 OUT Power supply 3 VH3 OUT Power supply 4 VHT34 OUT Power supply 5 H0 F DATA 10 EV OUT Even head R data signal 10 F 6 IO_ASIC_SDA IN OUT Head ROM control signal data 7 IO_ASIC_SCL OUT Head ROM control signal clock 8 VH2 OUT Power supply 9 H0 C DIA1...

Страница 171: ... H0 E DATA 8 OD OUT Odd head R data signal 8 E 42 H0 F HE 10 OUT Head R heat enable signal 10 F 43 H0 F DATA 11 EV OUT Even head R data signal 11 F 44 H0 E DATA 8 EV OUT Even head R data signal 8 E 45 H0 D DATA 6 EV OUT Even head R data signal 6 D 46 H0 C DIA2 IN Head R DI sensor signal 2 C 47 H0 C DATA 5 EV OUT Even head R data signal 5 C 48 H0 B DIA1 IN Head R DI sensor signal 1 B 49 H0 A HE 0 O...

Страница 172: ... 6 4 1 List of Tools 0012 6675 T 6 46 T 6 47 General purpose tools Application Long phillips scerewdriver Inserting and removing screw Phillips scerewdriver Inserting and removing screw Flat head screwdriver Removing the E ring Needle nose pliers Inserting and removing the spring parts Hex key wrench Inserting and removing hexagonal screws Flat brush Applying grease Lint free paper Wiping off ink ...

Страница 173: ...Chapter 7 SERVICE MODE ...

Страница 174: ......

Страница 175: ...Contents Contents 7 1 Service Mode 7 1 7 1 1 Service Mode 7 1 7 1 2 Map of the Service mode 7 1 7 1 3 Details for Service mode 7 6 7 2 Special Mode 7 12 7 2 1 Special Modes for Servicing 7 12 ...

Страница 176: ......

Страница 177: ...d even in the error status when an error message is shown on the display by turning the power off and then using the above key operation b How to exit the Service mode Turn off the printer c Key operation in the service mode Selecting menus and paremeters or key Going to the next lower level menu key Going to the previous higher level menu key Determining a selected menu or parameter OK key 7 1 2 ...

Страница 178: ...ROUGH DETAIL BASIC A F F 1 SAVE SETTINGS YES NO YES NO YES NO YES NO YES NO YES NO 0 1 GAP CALIB NOZZLE CHK POS MANUAL HEAD ADJ PRINT PATTERN HEAD ADJ AUTO HEAD ADJ SENSR CALIB A3 Not use CHANGE LF TYPE ADJ SETTING RESET SETTINGS DISPLAY A x A 1 YES NO SENSR CALIB A4 Not use CUTTER COUNTER ...

Страница 179: ...ACTORY CNT EXCHANGE CUTTER EXC MTC EXC HEAD R EXC HEAD L EXC CLR HEAD R EXC CLR HEAD L EXC BOARD EXC UNIT A EXC UNIT V EXC DETAIL CNT MOVE PRINTER N INK CHK BK N INK CHK MBK N INK CHK C N INK CHK M N INK CHK Y N INK CHK PC N INK CHK PM N INK CHK GY N INK CHK PGY N INK CHK R N INK CHK G N INK CHK B MEDIACONFIG CNT REPLACE COUNTER CLN A 1 CLN A 2 3 6 10 11 15 16 17 CLN A TTL CLN M 1 CLN M 4 5 6 CLN ...

Страница 180: ...EXC G N INK EXC B N INK EXC TTL INK EXC INK USE1 INK USE1 BK INK USE1 MBK INK USE1 C INK USE1 M INK USE1 Y INK USE1 PC INK USE1 PM INK USE1 GY INK USE1 PGY INK USE1 R INK USE1 G INK USE1 B INK USE1 TTL N INK USE1 BK N INK USE1 MBK N INK USE1 C N INK USE1 M N INK USE1 Y N INK USE1 PC N INK USE1 PM N INK USE1 GY N INK USE1 PGY N INK USE1 R N INK USE1 G N INK USE1 B N INK USE1 TTL INK USE2 BK INK USE...

Страница 181: ... 44 D CNT 24 36 D SQ 44 60 D SQ 36 44 D SQ 24 36 D SQ 17 24 D CNT 17 24 D CNT 17 D SQ 17 P CNT 36 44 P CNT 24 36 P SQ 36 44 P SQ 24 36 P SQ 17 24 P CNT 17 24 P CNT 17 P SQ 17 MEDIASIZE2 ROLL MEDIASIZE1 CUT MEDIASIZE2 CUT HEAD DOT CNT 2 BK MBK C M Y PC PM GY PGY R G B TTL PARTS CNT COUNTER A PARTS A6 A3 A4 A5 D2 D3 PARTS A1 COUNTER D PARTS D1 PARTS D4 COUNTER H PARTS H1 COUNTER K PARTS K1 COUNTER M...

Страница 182: ...mperature degrees C SIZE LF Detected size of loaded media feed direction 0 is always detected for the roll media mm SIZE LF Detected size of loaded media feed direction 0 is always detected for the roll media inch SIZE CR Detected size of loaded media carriage scan direction mm SIZE CR Detected size of loaded media carriage scan direction inch Display Description S N R Serial number of printhead R...

Страница 183: ...nce the PM ink tank was installed Day s GY Number of days passed since the GY ink tank was installed Day s PGY Number of days passed since the PGY ink tank was installed Day s R Number of days passed since the R ink tank was installed Day s G Number of days passed since the G ink tank was installed Day s B Number of days passed since the B ink tank was installed Day s Display Description NOZZLE 1 ...

Страница 184: ...ulative number of automatic cleaning 17 small suction operations Times CLN A TTL Total number of automatic cleaning operations Times CLN M 1 Cumulative number of manual cleaning 1 normal suction operations Times CLN M 4 Cumulative number of manual cleaning 4 ink draining from head after head replacement operations Times CLN M 5 Cumulative number of manual cleaning 5 ink draining from head and tube...

Страница 185: ...XX Ink color Cumulative consumption amount of refilled ink ml N INK USE1 TTL Total amount of the cumulative consumption of refilled ink ml Display Description Unit INK USE2 XX XX Ink color Consumption amount of generic ink of the currently installed ink tank ml INK USE2 TTL Total consumption amount of generic ink of the currently installed ink tanks ml N INK USE2 XX XX Ink color Consumption amount...

Страница 186: ...ets of A4 equivalent paper equal to or larger than 17 inches but less than 24 inches data size sheets D CNT 17 Cumulative number of sheets of A4 equivalent paper less than 17 inches data size sheets Display Description Unit P SQ 44 60 Cumulative print area of paper equal to or larger than 44 inches but less than 60 inches physical size m2 Sq f P SQ 36 44 Cumulative print area of paper equal to or ...

Страница 187: ...f the consumable part accumulate Display Description DATE yyyy mm dd Set date TIME hh mm Set time Display Description WARNING Initialize the history of WARNING All displayed contents of DISPLAY WARNING will be initialized ERROR Initialize the history of ERROR All displayed contents of DISPLAY ERROR will be initialized ADJUST Initialize the value of band adjustment by user and head adjustment The a...

Страница 188: ...ng the and buttons and then press the OK button to determine it CPU BOARD Select this after replacing the main controller PCB The data in the maintenance cartridge relay PCB is copied to the main controller PCB MC BOARD Select this before replacing the main controller PCB The data in the main PCB is copied to the maintenance cartridge relay PCB Use this when the maintenance cartridge relay PCB is ...

Страница 189: ...Chapter 8 ERROR CODE ...

Страница 190: ......

Страница 191: ...Contents Contents 8 1 Outline 8 1 8 1 1 Outline 8 1 8 2 Warning Table 8 1 8 2 1 Warnings 8 1 8 3 Error Table 8 2 8 3 1 Errors 8 2 8 4 Sevice Call Table 8 5 8 4 1 Service call errors 8 5 ...

Страница 192: ......

Страница 193: ...x Media error 0313xxxx xxxx Sensors fans motors error 0380xxxx xxxx Printhead error 0381xxxx xxxx 0383xxxx xxxx Ink error 0384xxxx xxxx Maintenance cartridge error 0387xxxx xxxx Cutter unit error 0389xxxx xxxx Media take up unit error 0390xxxx xxxx Firmware error Exxx xxxx Service call error Code Display massage Status 01810104 1000 Ink Lv1 Chk BK ink tank is almost empty 01810101 1001 Ink Lv1 Chk...

Страница 194: ...O image mode 01341231 1035 GARO W1231 Unsupported command in GARO setting mode 01341232 1036 GARO W1232 Invalid number of parameters in GARO setting mode 01341233 1037 GARO W1233 Reauired item was omitted in GARO setting mode 01341234 1038 GARO W1234 Data out of range in GARO image mode 01341235 1039 GARO W1235 Other warning in GARO setting mode 00000000 100F Feed Limit Force feed limit 01800500 1...

Страница 195: ...ed motor driving error 03130031 2F2E Roll media drive time out 03130031 2F32 Multi sensor faulty 03130031 2F3A Valve motor error 03130031 2F28 Lift motor time out 03130031 2F36 EEPROM error 03130031 2F37 linear scale error 03800101 2800 Printhead R not installed 03800102 2808 Printhead L not installed 03800201 2802 Improper printhead R installed 03800201 2804 Printhead R installed to left side 038...

Страница 196: ...atus not detected PGY 03830107 251A Ink tank status not detected R 03830109 251B Ink tank status not detected B 03830108 251C Ink tank status not detected G 03830104 2520 Ink tank not installed BK 03830101 2521 Ink tank not installed Y 03830102 2522 Ink tank not installed M 03830103 2523 Ink tank not installed C 03830112 2524 Ink tank not installed PM 03830113 2525 Ink tank not installed PC 038301...

Страница 197: ...cut sheet was already loaded even though received data indicated roll media 03860002 2E0C When the roll paper was loaded the data of the cut sheet specification was received 03861001 2405 Media set position unsuitable for borderless printing 03861001 2406 Received data unsuitable for borderless printing 03862000 2E09 Roll paper running out 03870001 2015 Cutting failure 03890000 2920 Cannot take up...

Страница 198: ......

Страница 199: ...Oct 3 2006 ...

Страница 200: ......

Отзывы: