CHANGING ELASTOMERS
1. Using an 8 mm wrench and a 4 mm hex
wrench, loosen the locknut.
2. Push the saddle forward slightly to remove
upper nylon and steel washers.
3. Remove the skewer bolt, keeping the lower
nylon washer and steel washer on the skewer.
4. Push the saddle farther forward to remove the elastomers and coupling washer.
5. Select elastomers as required. When mixing colors, the order does not matter.
6. Grease the skewer bolt shaft and the top and bottom of each elastomer.
7. Place the coupling washer between the elastomers and place them into the assembly.
8. Insert the skewer bolt through the lower elastomer and the coupling washer.
9. Push the saddle rearward while pushing the skewer through the top elastomer and hole.
10. Reinstall the nylon washers, steel washers and the locknut. DO NOT TIGHTEN.
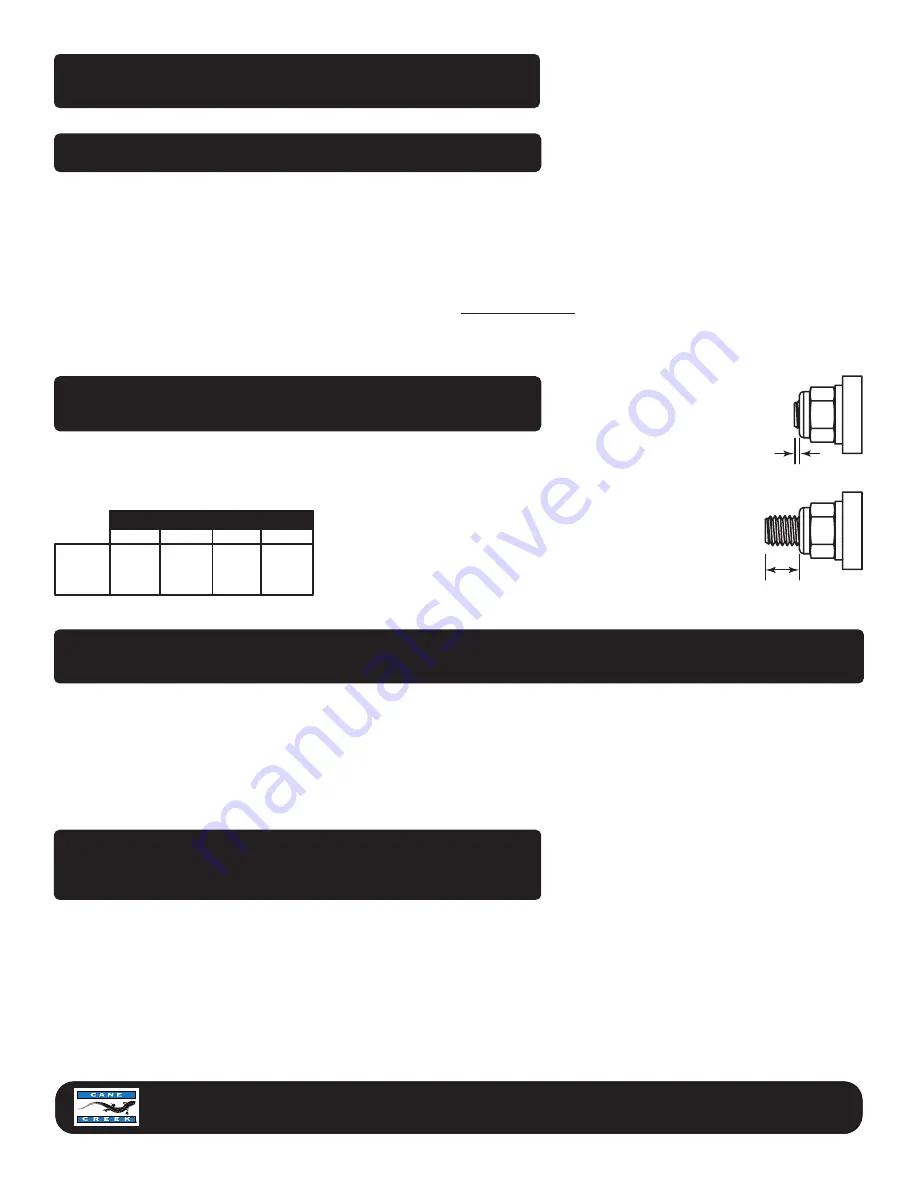
11. Install the locknut so that one full thread is exposed beyond the locknut. Additional tightening will add preload to the
assembly.
PRELOAD
ADJUSTMENT
The Skewer and locknut
can be used to add
additional preload to the assembly. While there must be at least one thread showing beyond the lock
nut, additional turns of the nut can add preload. Additional preload will increase the force required to
initiate travel and will minimize the suspension travel for
small bumps. Refer to the table (left) and illustration (right)
to set up preload. The values in the table are the thread
length beyond the end of the locknut to achieve the
preloads in the column heading for a given elastomer
spring combination.
MAINTENANCE
1. The pivot washers should occasionally be lubricated with a light oil.
2. The skewer and elastomers must be lubricated periodically with grease. Apply grease to the shaft of the skewer and to
the ends of the elastomers. The elastomers must be removed and reassembled as explained in the Changing Elas-
tomers section of the instructions.
WARRANTY
Cane Creek Cycling Components warrants its
bicycle products for a period of 1 year from the
original date of purchase. Any product that is
found to be defective in materials or workman-
ship will be repaired or replaced at the discretion of Cane Creek. This warranty applies to the original owner only. This warranty
does not cover damage or failure resulting from misuse, abuse, alteration, neglect, wear and tear, crash or impact, lack of mainte-
nance or other conditions judged by Cane Creek to be abnormal, excessive, or improper. It is mandatory that a Return Authoriza-
tion Number (RA#) be obtained by calling Cane Creek before any product is returned. Additionally, a dated Proof of Purchase must
accompany the product when returned.
(Revised 7.15.2003)
Cane Creek Cycling Components
• 355 Cane Creek Road • Fletcher, NC 28732
ph:
828.684.3551 •
fax:
828.684.1057 •
web:
www.canecreek.com •
e-mail:
WARNING!
Maximum Allowable Rider Weight = 250 lb (113 kg)
Notice!
DO NOT exceed 100 pounds (45 kg) preload or 7 threads
exposed!
The saddle and seatpost must be securely installed on the
bicycle to remove the elastomers or make any adjustments
Notice!
If you ride in muddy conditions, using either a fender or the Cane Creek Crudbuster neoprene boot will protect
the pivots and extend the life of your seatpost.
Notice!
Thudbuster seatposts are designed to absorb small
bumps only. You should still stand up when
encountering large obstacles on the road or trail.
Notice!
0.8mm Min. (1 thread)
5.6 mm Max (7 threads)
Additional Preload
lb
(kg)
(1.6 mm)
(1.0 mm)
(0.8 mm)
Grey/Grey
Blue/Blue
Black/Black
25 (11)
(3.5 mm)
(2.1 mm)
(1.7 mm)
50 (23)
(5.7 mm)
(3.3 mm)
(2.7 mm)
75 (34)
- - - - - - -
(4.7 mm)
(3.8 mm)
100 (45)


