background image

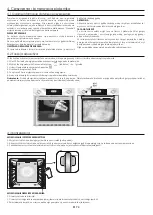
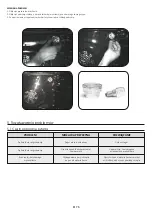
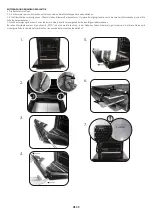
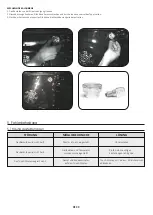
MUDANDO O BULBO

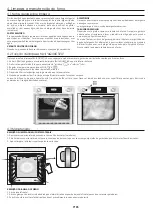
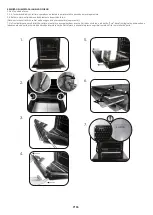
1. Desligue o forno da fonte de alimentação.
2. Desaperte a tampa de vidro, desaperte a lâmpada e substitua-a por uma nova lâmpada do mesmo tipo.
3. Quando a lâmpada defeituosa for substituída, substitua a tampa de vidro.

5. Resolução de problemas

5.1 Perguntas frequentes

PROBLEMA

POSSÍVEL CAUSA

SOLUÇÃO

O forno não aquece

O relógio não funciona

Acertar o relógio

Não foi configurada uma

função de cozedura e uma temperatura

Assegurar-se de que as

configurações necessárias estão corretas

O forno não aquece

Vapor e condensação no

painel da interface do utilizador

Limpar o painel da interface do utilizador 

com um pano em microfibra para 

remover a camada de condensação

Nenhuma reação da

interface de utilizador tátil

PT 87

Содержание FCEX65WIFI

Страница 1: ...DE INSTRUÇÕES DE UTILIZAÇÃO EINBAUBACKKÖFEN BEDIENUNGSANLEITUNG EN TR FR IT ES PL PT DE 02 14 28 40 52 64 76 88 CANDY HOOVER GROUP S R L Via Comolli 16 20861 Brugherio MB Italy FCP815X E0 E FCP825XL E0 E FCS200X WIFI FCS600X WIFI FCT615X WIFI FCT615XNF WIFI FCT825XL WIFI FCP602X E0 E FCP602X E0C E FCP602X E0E E FCT612X WIFI FCEX65WIFI FCXP825X E0 E FCXP645X E0 E FCXT600X WIFI FCT600N WIFI FCT605X ...

Страница 2: ...e parts After cleaning reassemble themaccordingtheinstructions Only use the meat probe recommended for this oven Do not use a steam cleaner for cleaning operations Connect a plug to the supply cable that is able to bear the voltage current and load indicated on the tag and having the earth contact The socket must be suitable for the load indicated on the tag and must have ground contact connected ...

Страница 3: ...y The shelf must be inserted completely into thecavity WARNING Do not line the oven walls with aluminium foil or single use protection available from stores Aluminium foil or any other protection in direct contact with the hot enamel risk melting and deteriorating the enamel of the insides WARNING Neverremovetheovendoorseal CAUTION Do not refill the cavity bottom with waterduringcookingorwhentheov...

Страница 4: ...ies 2 3 First use Product Description 6 3 1 Display description 3 2 Cooking modes Use of the Oven 7 4 1 General notes on cleaning 4 2 Aquactiva Function 4 3 Maintenance Instructıon for removal and cleanıng of the sıde racks Removal of the oven window Removal and cleaning of the glass door Changing the bulb Oven Cleaning and Maintenance 11 5 1 F A Q Troubleshooting 13 Summary EN 04 ...

Страница 5: ...he oven could require maintenance work it is advisable to keep another wall socket available so that the oven can be connected to this if it is removed from the space in which it is installed The power cable must only be substituted by technical service staff or by technicians with equivalentqualifications 1 3 Recommendations After each use of the oven a minimum of cleaning will help keep the oven...

Страница 6: ... wire grids 3 It located at both sides of the oven cavity It holds metal grills and drip pans 2 3 5 4 6 1 2 3 First Use PRELIMINARYCLEANING Clean the oven before using for the first time Wipe over external surfaces with a damp soft cloth Wash all accessories and wipe inside the oven with a solutionofhotwaterandwashingupliquid Settheemptyoventothemaximumtemperatureandleaveonforabout1hour thiswillre...

Страница 7: ...knob the temperature you want to cook with the thermostat knob Pushthecentralbutton1times Pressthebuttons or tosetthe lenghtofcookingrequired Releaseallbuttons NOTE If the oven is switched off or the lamp is functioning the cooking timeschedulefunctionwillnotwork It allows to preset the cooking time requiredfortherecipechosen To check how long is left to run press theMENUbutton1time To alter chang...

Страница 8: ...by if all wired network ports are connected and all wireless network ports are activated 2 0 W How to activate wireless network port Starting from an oven that is not enrolled putting the right knob on the Reset position Wifi module is switched on after 30 If oven is enrolled with WiFi off putting the right knob on WiFi position the WiFi module is switched on How to deactivate wireless network por...

Страница 9: ...simply FiAppfromtheStore Open the Candy simply Fi App and create your user profile by taping on Register Accepttheprivacypolicy andfillintherequiredfields NOTES The App is available for Android version 4 4 or higher and iOS version 8 0orhigher devices IfyoualreadyhaveaCandysimply Fiuserprofile youcanloginusingyour credentials STEP3 In the homepage tap on the icon with the three bars on the top lef...

Страница 10: ...xed Allowabouttenminutesextrawhencookingfoodsatthesametime DEFROST When the dial is set to this position The fan circulates air at room temperature around the frozen food so that it defrostsinafewminuteswithouttheproteincontentofthefoodbeingchangedoraltered FAN LOWER ELEMENT The bottom heating element is used with the fan circulating the air inside the oven This method is idealforjuicyfruitflans t...

Страница 11: ...nd detergent Alternatively you can wash the pan in the dishwasher or use a commercial ovendetergent Neverputadirtypanbackintotheoven EN 11 4 2 Aquactiva Function TheAquactivaprocedureusessteamtohelpremoveremainingfatandfoodparticlesfromtheoven 1 Pour300mlofwaterintotheAquactivacontaineratthebottomoftheoven 2 SettheovenfunctiontoStatic orBottom heater 3 SetthetemperaturetotheAquactiva icon 4 Allowt...

Страница 12: ...lass carefullyextractingitfromtheovendoor NB inpyrolyticovens alsoremovethesecondandthirdglass ifpresent 7 Attheendofcleaningorsubstitution reassemblethepartsinreverseorder On all glass the indication Low E must be legible and positioned on the left side of the door close to the left hand lateral hinge In this way the printed labelofthefirstglasswillbeinsidethedoor EN 12 ...

Страница 13: ...AQ PROBLEM POSSIBLE CAUSE SOLUTION The oven does not heat up The clock is not set Set the clock A cooking function and temperature has not been set Ensure that the necessary settings are correct The oven does not heat up Steam and condensation on the user interface panel Clean with a microfiber cloth the user interface panel to remove the condensation layer No reaction of the touch user interface ...

Страница 14: ...ın kapatılması gerekir Temizlendikten sonra parçalarıtalimatlaragöreyenidentakın Yalnızca bu fırın için tavsiye edilen et probunu kullanın Temizlik işlemleri için buharlı temizleyici kullanmayın Besleme kablosuna etikette belirtilen gerilimi akımı ve yükü kaldırabilecek toprak bağlantısı olan bir fiş takın Prizin etikette belirtilen yüke uygun toprak bağlantısı yapılmış ve çalışır durumda olması g...

Страница 15: ...men girerekyerleştirilmelidir UYARI Fırın duvarlarını alüminyum folyoyla veya mağazalarda satılan tek kullanımlık koruma malzemeleriyle kaplamayın Alüminyum folyo veya diğer koruma malzemeler sıcak emayeyle doğrudan temas ettiğinde erime riski oluşturur ve içeridekiemayeninbozulmasınanedenolabilir UYARI Fırın kapağının contasını hiçbir zaman çıkarmayın DİKKAT Pişirme sırasında veya fırın sıcakken ...

Страница 16: ...aları 3 2 Pişirme modları 4 1 Temizleme hakkında genel notlar 4 2 Kolay Temizlenme Fonksiyonu 4 3 Bakım Yan ızgaraların çıkarılması ve temizlenmesi Fırın kapağının sökülmesi Camın sökülmesi ve temizlenmesi Ampulün değiştirilmesi 5 1 Sorun giderme Tüketici hizmetleri Garanti belgesi Genel Açıklamalar 17 Ürün Açıklaması 18 Fırının Kullanımı 19 Fırının Temizlenmesi ve Bakımı 23 Sorun Giderme 25 ...

Страница 17: ...iç yüzeylerin bozulmasına neden olabilir Fırınınızın aşırı kirlenmesini ve bunun sonucunda duman kokusu oluşmaması için fırını çok yüksek sıcaklıklarda kullanmamanızı tavsiye ederiz Pişirme süresini uzun tutmak ve sıcaklığı biraz düşürmek daha iyidir Fırın ile birlikte verilen aksesuarlara ek olarak sadece çok yüksek sıcaklıklaradayanıklıtabaklarvepişirmekaplarıkullanmanızıtavsiyeederiz 1 4 Kurulu...

Страница 18: ...e tepsilerini ve tabaklarını tutar Yan tel ızgaralar 3 Fırın bölmesinin her iki tarafında bulunur Metal ızgaraları ve damlama tepsilerini tutar 2 3 İlk Kullanım İLKTEMİZLEME İlk kez kullanmadan önce fırını temizleyin Dış yüzeyleri yumuşak bir ıslak bezle silin Tüm aksesuarları yıkayın ve fırının içini sabunlu su ve sıvı bulaşık deterjanı karışımına batırılmış bir bezle silin Boş fırını maksimum sı...

Страница 19: ...me süresini ayarlamak için düğmelerine basın Bütün düğmelere basmaya son verin NOT Fırın kapanırsa veya lamba çalışırsa pişirme süresi zamanlama işleviçalışmaz Seçilmiş olan tarif için gerekli olan pişirme süresini ayarlayabilmenize olanaksağlar Ne kadar çalışma süresi kaldığını görmekiçinMENUdüğmesinebasın P ro g ra m l a n m ı ş o l a n s ü re y i değiştirmek için MENU ve düğmelerinebasın Ayarla...

Страница 20: ...a ürünün güç tüketimi 2 0 W Kablosuz ağ bağlantı noktasını etkinleştirme Kayıtlı olmayan bir fırından başlayarak sağdaki düğmeyi Reset Sıfırla konumuna getirin Wifi modülü 30 saniye sonra açılır Fırın WiFi kapalıyken kaydedilmişse sağdaki düğmeyi WiFi konumuna getirdiğinizde WiFi modülü açılır Kablosuz ağ bağlantı noktasını devre dışı bırakma Fırın kaydedilmişse sağdaki düğmeyi R e s e t S ı f ı r...

Страница 21: ...Ol öğesine dokunarak kullanıcı profilinizi oluşturun Gizlilik politikasını kabul edin ve gerekli alanlarıdoldurun NOT Uygulama Android sürüm 4 4 veya daha yeni ve iOS sürüm 8 0 veya dahayeni cihazlardakullanılabilir Eğer Candy simply Fi kullanıcı profiliniz varsa kimlik bilgilerinizi kullanarakoturumaçabilirsiniz 3 ADIM Anasayfada solüsttaraftaüççubuklusimgeyedokunarakprofilinizegirin veardından R...

Страница 22: ...fazladanyaklaşıkondakikadahabekleyin BUZ ÇÖZME Düğme bu konuma alındığı zaman fan oda sıcaklığında havayı donmuş gıdanın etrafında dolaştırır böylece gıdanınproteiniçeriğideğişmedenbirkaçdakikaiçindebuzuçözülür FAN ALT ISITICI Alt ısıtıcı eleman kullanılır fan fırının içindeki havanın sirkülasyonunu sağlar Bu yöntem sulu meyveler meyvelipastalar turtalar kişlerveetlibörekleriçinidealdir Gıdalarınk...

Страница 23: ...ksuileyıkayın Eğer yap artıkları kalırsa tepsiyi deterjanlı suya batırın Alternatif olarak tepsiyi bulaşık makinesinde yıkayabilir veya piyasada bulunan fırın deterjanlarınıkullanabilirsiniz Kirlitepsiyiaslafırınagerikoymayın 4 2 Kolay Temizlenme Fonksiyonu Aquactiva Aquactivabuharyardımıilefırınınızdakiyağveyemekartıklarınıtemizler 1 FırınınızınAquctiva KolayTemizlenmebölümüne300mlsuilaveedin 2 F...

Страница 24: ...şekildefırınkapağındançekerekçıkarın Not pirolitikfırınlardaikinciveüçüncücamı eğervarsa daçıkarın 7 Temizlemeveyedeğişimişlemininsonundaparçalarısökmeişlemininterssıralamasıiletoplayın Tüm camların üzerinde kelimesinin okunabilmesi ve kapağın sol tarafında bulunması gereklidir soldaki yatay menteşeyi kapatın Bu şekilde birinci Low E camınbaskılıyüzeyikapağıniçindekalacaktır TR 24 ...

Страница 25: ...un Giderme 5 1 Sorun giderme SORUN OLASI NEDENİ ÇÖZÜMÜ Fırın ısınmıyor Saat ayarlanmamış Saati ayarlayın Bir pişirme işlevi ya da sıcaklık ayarlanmamış Gerekli ayarların doğru olduğunu kontrol edin Fırın ısınmıyor Kullanıcı panelinde buhar veya yoğuşma var Yoğuşma tabakasını temizlemek için kullanıcı panelini mikrofiber bir bezle silin Dokunmatik kullanıcı paneli tepki vermiyor TR 25 ...

Страница 26: ...nedeniyle meydana gelebilecek arızalar garanti kapsamı dışındadır Ürünün müşteriye ulaştırılması sonrası yapılan taşıma işlemine bağlı arıza ve hasarlar tüketici tarafından yapılan yanlış depolama ve ortam koşulları nedeniyle cihazda meydana gelen hasarlar ve arızalar garanti kapsamı dışındadır Hatalı elektrik tesisatı ürünün üzerinde belirtilen voltajdan farklı voltajda kullanılması veya şebeke v...

Страница 27: ...p oranında beden indirimini veya imkan varsa malın ayıpsız misli ile değiştirilmesini satıcıdan talep edebilir Satıcı tüketicinin talebini reddetmez Bu talebin yerine getirilmemesi durumunda satıcı üretici ve ithalatçı müteselsilen sorumludur Garanti uygulaması sırasında değiştirilen malın garanti süresi satın alınan malın kalan garanti süresi ile sınırlıdır Malın tamir süresi 20 iş gününü geçemez...

Страница 28: ...s ou de racloirs métalliques acérés pour nettoyer les vitres des portes des fours car cela pourrait rayer la surfaceetprovoquerlarupturedelavitre Coupez le four avant de retirer les pièces amovibles Après le nettoyage remontez les selon les instructions Utilisez uniquement la sonde à viande recommandéepourcefour N utilisez pas un nettoyeur à vapeur pour le nettoyage Branchez le câble d alimentatio...

Страница 29: ...as être installé derrière une portedécorative pouréviterlasurchauffe Pour introduire la grille dans le four vérifiez que le butoir est dirigé vers le haut et au fond de la cavité La grille doit être complètement insérée dans la cavité AVERTISSEMENT Ne recouvrez pas les parois du four avec du papier aluminium ou une protection jetable disponible dans les magasins Le papier d aluminium ou toute autr...

Страница 30: ...ires 2 3 Première utilisation 3 1 Description de l affichage 3 2 Mode de cuisson 4 1 Remarques générales concernant le nettoyage 4 2 Aquactiva Fonction 4 3 Entretien Retrait et nettoyage des grilles latérales Retrait de la porte du four Retrait et nettoyage des vitres Remplacement de l ampoule 5 1 F A Q Instructions Générales 31 Description du produit 32 Utilisation du Four 33 Nettoyage du four et...

Страница 31: ...alimentation s avère nécessaire nous vous demandons de faire réaliser cette opération par le serviceaprès venteouunepersonnedequalificationsimilaire 1 3 Recommandations Après chaque utilisation du four réaliser un petit entretien qui favorisera le nettoyage parfait du four Ne pas tapisser les parois du four avec des feuilles en aluminium ou des protections jetables du commerce La feuille d alumini...

Страница 32: ...allique 4 égouttoir 5 Ventilateur derrière la plaque d acier 6 porte du four 2 2 Accessoires Selon le modèle Léchefrite 1 Alimentairerecueillelesgouttespendantlacuissonsurlegril Grilles latérales 3 Situées des deux côtés de la cavité du four Maintiennent les grilles métalliques et les lèchefrites 2 3 5 4 6 1 2 3 Première Utilisation UN PREMIER NETTOYAGE doit être réalisé avant la première utilisat...

Страница 33: ... bouton de fonction du four ainsi que la température de votre choixavecleboutonduthermostat Appuyer fois sur la touche 1 centrale Appuyer sur les touches ou pourréglerladurée Relâcherlestouches Choisir la fonction de cuisson avec le boutondesélection REMARQUE Si le four est éteint ou si la lampe fonctionne la fonction de programmation du temps de cuisson nefonctionnepas Sélectionner la durée de la...

Страница 34: ...e tous les ports de réseau sans fil sont activés 2 0W Comment activer le port de réseau sans fil À partir d un four qui n a pas été enregistré positionnez la touche de droite sur RESET Le modulesansfils allumeauboutde30s Si le four est enregistré et que la fonction Wi Fi est éteinte positionnez la touchede droite sur Wi Fi etlemodulesansfils allume Comment désactiver le port de réseau sansfil Si l...

Страница 35: ... en tapant sur Enregistrer Acceptez la politique de confidentialité et remplissezleschampsobligatoires NOTES L application est disponible pour les appareils Android version 4 4 ou supérieure etiOS version8 0ouultérieure Si vous possédez déjà un profil d utilisateur Candy simply Fi vous pouvez vousconnecterenutilisantvosinformationsd identification L ÉTAPE3 Sur la page d accueil tapez sur l icône d...

Страница 36: ...plus pourlacuissoncombinée DÉCONGÉLATION fonctionnement de la turbine de cuisson qui brasse l air dans l enceinte du four Idéale pour réaliser une décongélationavantunecuisson SOLE BRASSÉE idéale pour les tartes à fruits juteux les tourtes les quiches les pâtés Elle évite le dessèchement des aliments et favorise la levée pour les cuissons de cakes pâte à pain et autres cuissons par le dessous Plac...

Страница 37: ...essiviel Si les résidus restent collés le faire tremper dans de l eau et un produit détergent Il peut aussi être nettoyé dans un lave vaisselle ou avec un produitducommerce Nejamaisreplacerleplatrécolte sauceencrassédansunfour 4 2 Aquactiva Fonction LesystèmeAquactivautiliselavapeurpouréliminerlesgraissesetlesrestesdenourrituresincrustéessurlesparoisdufour 1 Verser300mld eaudanslazoneprévueàceteff...

Страница 38: ...t de la porte du four NB dans les fours de pyrolyse retirez également les deuxième et troisième verre le cas l extraire échéant 7 AlafindunettoyageRemonterlespiècesdansl ordreinverse Sur toutes les vitres l indication Pyro doit être lisible et positionné sur le côté gauche de la porte à proximité de la charnière latérale gauche De cette manière l étiquetteimpriméedupremierverreseraàl intérieurdela...

Страница 39: ... PROBLEMES CAUSE POSSIBLE SOLUTION Le four ne chauffe pas L horloge n est pas réglée Réglez l horloge Les réglages nécessaires ne sont pas imposés Assurez vous que les paramètres nécessaires sont corrects Le four ne chauffe pas Vapeur et de la condensation sur l ècran tactile Nettoyer avec un chiffan en microfibres l ècran tactile pour enlever la couche de condensation Aucume rèaction de l ècran t...

Страница 40: ... sorveglianza Non utilizzare materiali ruvidi abrasivi o raschietti metallici affilati per pulire le porte in vetro del forno dato che possono graffiare la superficieecausarelafrantumazionedelvetro Il forno deve essere spento prima di rimuovere lepartirimovibili Dopolapulizia rimontarlesecondoleistruzioni Utilizzare solo la sonda carne consigliata per questoforno Non utilizzare un getto di vapore ...

Страница 41: ...re il servizioclienti L elettrodomestico non deve essere installato dietro a una porta a scopo ornamentale per evitarneilsurriscaldamento Quando si posiziona uno scaffale all interno accertarsi che il blocco sia rivolto verso l alto e nella parte posteriore della guida Lo scaffale deve essereinseritocompletamentenellaguida AVVERTENZA Non rivestire le pareti del forno con fogli di alluminio o prote...

Страница 42: ...el display 3 2 Modalità di cottura 4 1 Note generiche di pulizia 4 2 Funzione Aquactiva 4 3 Manutenzione Rimozione e pulizia delle griglie Rimozione dello sportello del forno Rimozione e pulizia della porta in vetro Sostituzione della lampadina 5 1 F A Q Sommario IT 42 Avvertenze Generali 43 Descrizione del Prodotto 44 Utilizzo del Forno 45 Pulizia e Manutenzione del Forno 49 Risoluzione dei probl...

Страница 43: ...datecniciconqualificheanaloghe 1 3 Raccomandazioni Dopo l uso sono sufficienti alcune semplici operazioni di pulizia per mantenere il forno perfettamente pulito Non rivestire le pareti del forno con fogli d alluminiodacucinaofoglimonousocommerciali perchépotrebberofondersi a contatto con le superfici in smalto caldo e danneggiare le superfici in smalto all interno del forno Per evitare di sporcare ecce...

Страница 44: ...igocce 2 3 5 4 6 1 2 3 Primo utilizzo PULIZIAPRELIMINARE Puliresempreilfornoprimadiutilizzarloperlaprimavolta Pulirelesuperficiesterneconunpanno morbido leggermenteinumidito Lavaretuttigliaccessoriepulirel internodelfornocondeldetergenteperpiattiedacquacalda Verificarecheilfornosiavuoto impostarelatemperatura massimaelasciarloaccesoperalmeno 1ora cosìdarimuovere tuttigliodorinormalmentepresentineifo...

Страница 45: ...ti per regolare ladurata Lasciareitasti Selezionare la funzione di cottura conla manopolacommutatore NOTA se il forno viene spento o la l a m p a d a è i n f u n z i o n e l a programmazione del tempo di cotturanonfunziona Permette di impostare la durata della cottura del cibo inserito nel forno Per visualizzare il tempo rimanente premereil tastoSELECT Per modificare il tempo rimanente premereil t...

Страница 46: ...a 001 BER 98 dBm BLE Sensibilità a 0 1 BER 98 dBm Informazioni sui prodotti per apparecchiature collegate in rete Consumo energetico del prodotto in standby di rete se tutte le porte di rete cablate sono collegate e tutte le porte di retewirelesssonoattive 2 0W Comeattivarelaportadiretewireless Partendoda un fornononregistrato mettere lamanopoladestra sullaposizionediReset Il moduloWi Fisiaccended...

Страница 47: ... AppCandysimply Fidallostore Apri l App Candy simply Fi e crea il tuo profilo utente facendo tap su Registrati Accettal informativasullaprivacyecompletaicampi NOTA L Appèdisponibileper dispositiviAndroid dallaversione4 4 eiOS dalla versione8 Se hai già creato un profilo utente Candy simply Fi fai login utilizzando le tuecredenziali STEP3 Nella homepage dell App fai tap sull icona con le tre barre ...

Страница 48: ...e permette di far circolare l aria a temperatura ambiente intorno al cibo surgelato facendolocosìscongelarein pochiminutisenzamodificareodalterareilcontenutoproteico SUOLAVENTİLATA adattapercotturedelicate torte soufflè STATICO sono in funzione le resistenze superiore e inferiore È la cottura tradizionale ottima per arrostire cosciotti selvaggina idealeper biscotti melealfornoeperrendereicibimoltocro...

Страница 49: ...ergere la vaschetta in acqua e detergente In alternativa è possibile anche lavare la vaschetta nella lavastoviglieoppureutilizzare undetergenteperforniditipocommerciale Nonreinseriremaiunavaschettasporcanelforno 4 2 Funzione Aquactiva Laproceduradipulizia AQUACTIVA utilizzailvapore perfacilitarelarimozionedal fornodigrassoedipezzidi ciborimasti 1 Inserire300mldiacquadistillataopotabilenel contenit...

Страница 50: ...a cura dalla controporta del forno NB nei forni pirolitici rimuovere anche il secondo e terzo vetro se presente 7 Alterminedellapuliziaosostituzioneriassemblarelepartinell ordineoppostoalla rimozione Su tutti i vetri l indicazione Low E deve essere correttamente leggibile e posizionata sul lato sinistro della porta vicino alla cerniera laterale sinistra In questomodo l etichettastampatadelprimovet...

Страница 51: ...m on lineoppurecontattacialnumerochetroviindicatonellapaginadiassistenzadelnostrositointernet SOSTITUZIONEDELLALAMPADINA 1 Scollegareilfornoallarete 2 Allentarelacoperturainvetro svitarelalampadinaesostituirlaconunanuovadellostesso modello 3 Unavoltasostituitalalampadinadifettosa riavvitarelacoperturainvetro 5 Risoluzione dei Problemi 5 1 FAQ PROBLEMA POSSIBLE CAUSE SOLUTION Il forno non si scalda...

Страница 52: ... de sacar las partes extraíbles Después de la limpieza vuelva a montarlas siguiendolasinstrucciones Utiliceúnicamentelasondatérmicarecomendada paraestehorno Noutilicelimpiadoresdevapor Conecte un enchufe en el cable que transporta la tensión la corriente y la carga indicadas en la etiqueta y que tiene el contacto de masa La toma de corriente debe ser la adecuada para la carga indicada en la etique...

Страница 53: ... de la cavidad La bandeja debe introducirse por completo enlacavidad ATENCIÓN No forre las paredes del horno con aluminio u otras protecciones comercializadas El aluminio o los protectores podrían derretirse al entrar en contacto directo con el esmalte caliente y deteriorarelesmaltedelinterior ATENCIÓN No quite nunca la junta de estanqueidaddelapuertadelhorno ATENCIÓN No llene el fondo del horno c...

Страница 54: ... Primer uso Descripción del producto 56 3 1 Descripción de la pantalla 3 2 Modalidades de cocción Utilización del horno 57 4 1 Notas genéricas de limpieza 4 2 Función Aquactiva 4 3 Mantenimiento Stacco e pulizia delle griglie laterali Extracción de la puerta del horno Extracción y limpieza de la puerta de vidrio Sustitución de la bombilla Limpieza y mantenimiento del horno 61 5 1 Preguntas más fre...

Страница 55: ...nacontinuidaddefectuosa NOTA puesto que el horno podría requerir la intervención del servicio de asistencia es aconsejable prever la disponibilidad de otro enchufe de pared al que conectar el horno después de extraerlo del espacio donde se ha instalado El cable de alimentación debe sustituirse únicamente por personal de asistenciatécnicaoportécnicosconunacualificaciónanáloga ES 55 1 3 Recomendacio...

Страница 56: ... corresponde 3 Rejilla metálica 4 Bandeja 5 Ventilador detrás de la placa de acero 6 Puerta del horno 2 2 Accesorios De acuerdo con el modelo Bandeja 1 Recoge los residuos que gotean durante la cocción de alimentos con las resistencias Soportes laterales 3 Se encuentran en ambos lados del hueco del horno Sostienen las rejillas metálicas y las bandejas graseras 2 3 5 4 6 1 2 3 Primer uso LIMPIEZAPR...

Страница 57: ...tordeltermostato Pulseelbotóncentral1veces Pulse las teclas para el ajuste deladuración Sueltelasteclas Seleccione la función de cocción con elmandoselectordefunción NOTA Si el horno está apagado o la luz está encendida la función de programación del tiempo de cocción nofuncionará Permite seleccionar el tiempo de cocción del alimento introducido en el horno Para visualizar el tiempo restante pulse...

Страница 58: ... mejorada Potencia de transmisión de RF típico 2 dBm BLE Potencia de transmisión de RF típico 7 5 dBm 802 11 b g n 2 412 GHz 2 484 GHz 802 11b DSSS 1 Mbps 19 5 dBm 802 11b CCK 11 Mbps 18 5 dBm 802 11g OFDM 54 Mbps 18 5 dBm 802 11n MCS7 14 dBm 802 11b 1024 bytes 80 dBm 802 11g 1024 bytes 70 dBm 802 11n 1024 bytes 65 dBm 802 11n HT40 1024 bytes 65 dBm Estándar inalámbrico Gama de frecuencias Potenci...

Страница 59: ...crea tu perfil de usuario pulsando sobre Registrar Acepta la política de privacidad y cumplimenta los campos solicitados NOTA La App está disponible para dispositivos Android versión 4 4 o superior iOS versión8 0osuperior Si ya dispones de un perfil de usuario de Candy simply Fi puedes iniciar sesiónutilizandotuscredenciales PASO3 En la página de inicio toque el icono con las tres barras en la par...

Страница 60: ...es idénticas o distintas en uno o dos niveles Este modo de cocción garantiza una distribuciónhomogéneadelcalorynomezclalosolores Paraunacoccióncombinadasedebenpreverunosdiezminutosmás DESCONGELACIÓN Funcionamientodelaturbinadecocciónquehacecircularelairedentrodelespaciodelhorno Idealpara realizarunadescongelaciónpreviaaunacocción RESISTENCIA INFERIOR CIRCULANTE Utilización de la resistencia inferi...

Страница 61: ...residuos grasos sumerja la fuente en agua y detergente También se puede lavar la fuente en el lavavajillas o bien utilizar un detergente comercialparahornos Nuncavuelvaaintroducirlafuentesuciaenelhorno 4 2 Función Aquactiva Elprocedimientodelimpieza AQUACTIVA utilizavaporparafacilitarlaeliminacióndegrasayrestosdealimentosdelhorno 1 Introduzca300mldeaguadestiladaopotableenelcontenedordeAQUACTIVA de...

Страница 62: ...ntrapuerta del horno N B si se trata de un horno pirolítico extraiga también el segundo y el tercer vidrio si los hubiera 7 Altérminodelalimpiezaosustitución vuelvaaensamblarlaspiezasenelordenopuestoalaextracción En todos los vidrios la indicación Low E debe ser correctamente legible y estar ubicada a la izquierda de la puerta cerca de la bisagra lateral izquierda De este modo laetiquetaestampadae...

Страница 63: ...rnillarlacubiertadevidrio 5 Solución de problemas 5 1 Preguntas más frecuentes PROBLEMA CAUSA POSIBLE SOLUCIÓN El horno no se calienta El reloj no está en hora Configure el reloj El bloqueo infantil está activado Desactive el bloqueo infantil El horno no se calienta Los ajustes necesarios no están configurados Asegúrese de que los ajustes necesarios sean correctos El horno no se calienta ES 63 ...

Страница 64: ...ch skrobaków ponieważ mogą one porysować powierzchnię i spowodować rozbicieszkła Piekarnik musi być wyłączony przed wyjęciem ruchomychczęści Po wyczyszczeniu zmontować je zgodnie z instrukcjami Używać wyłącznie termosondy zalecanej dla tego piekarnika Doczyszczenianieużywaćmyjkiparowej Podłączyć wtyczkę do kabla zasilającego odpowiedniego do wymaganego napięcia prądu i obciążenia wskazanego na tab...

Страница 65: ...czania we wnętrzu półki należy się upewnić że ogranicznik jest skierowany w górę i w stronętylnąkomory Półkamusibyć włożonacałkowiciedokomory OSTRZEŻENIE Nie zakrywać ścianek piekarnika folią aluminiowa ani dostępnymi na rynku foliami jednorazowymi Folia aluminiowa lub jakiekolwiek inne zabezpieczenia w bezpośrednim kontakcie z powierzchniami gorącej emalii mogłyby stopić się i uszkodzić emaliowan...

Страница 66: ...lne 2 2 Akcesoria 2 3 Pierwsze użycie Opis produktu 68 3 1 Opis wyświetlacza 3 2 Tryby pieczenia Obsługa piekarnika 69 4 1 Ogólne informacje dotyczące czyszczenia 4 2 Funkcja Aquactiva 4 3 Konserwacja Wyjmowanie i czyszczenie rusztów Wyjmowanie szyby piekarnika Wyjmowanie i czyszczenie drzwiczek Wymiana żarówki Czyszczenie i konserwacja piekarnika 73 5 1 Często zadawane pytania Rozwiązywanie probl...

Страница 67: ... do którego będzie można później podłączyć piekarnik po wyjęciu go z miejsca w którym go zainstalowano Przewód zasilający powinien być wymieniany wyłącznie przez personel techniczno serwisowy lub techników posiadającychjednakowekwalifikacje 1 3 Zalecenia Po każdym użyciu piekarnika kilka prostych czynności związanych z czyszczeniem gopozwoliutrzymaćpiekarnikwidealnejczystości Nie zakrywaj ścian pi...

Страница 68: ...od modelu Taca na tłuszcz 1 Gromadzitłuszczwyciekającyzżywnościpodczaspieczeniajejnaruszcie Boczne kratki druciane 3 Znajdują się po obu stronach komory piekarnika Utrzymują metalowe ruszty i tace na tłuszcz 2 3 5 4 6 1 2 3 Pierwsze Użycie CZYSZCZENIEPRZEDPIERWSZYMUŻYCIEM Przedużyciempiekarnikaporazpierwszynależy Wytrzećpowierzchniezewnętrznepiekarnikamiękkąwilgotnąszmatką Umyćwszystkieelementywyp...

Страница 69: ...lnić przyciski Wybrać funkcję za pomocą pokrętła wyboru funkcji UWAGA Jeśli piekarnik jest wyłączony lub włączona jest lampka funkcja harmonogramowania czasu pieczenia nie działa Pozwala ustawić czas trwania pieczenia Aby pokazać czas pozostały do końca pieczenia należy wcisnąć przycisk 2 Razy Aby zmienić czas pozostały do końca pieczenia należy wcisnąć przycisk Po zakończeniu ustawionego czasu pi...

Страница 70: ...nia przy podłączeniu do sieci jeśli wszystkie przewodowe porty sieciowe są podłączone i wszystkie bezprzewodowe portysieciowesąaktywowane 2 0W Jak dokonać aktywacji portu sieci bezprzewodowej W piekarniku który nie jest zarejestrowany ustawić prawidłowe pokrętło w położeniu resetowania Moduł Wi Fi włącza się po 30 sekundach Jeśli piekarnik jest zarejestrowany a Wi Fi jest wyłączone po ustawieniu r...

Страница 71: ...ć aplikację Candy simply Fi i utworzyć swój profil użytkownika dotykając przycisku Register Zarejestruj Zaakceptować politykę prywatnościiwypełnićwymaganepola UWAGI Aplikacja jest dostępna dla urządzeń z systemem Android wersja 4 4 lub wyższa oraziOS wersja8 0lubwyższa Jeśli mamy już profil użytkownika Candy simply Fi można zalogować się przyużyciuswoichdanychdostępowych ETAP3 Na stronie głównej d...

Страница 72: ...owej wokół zamrożonejżywności dziękiczemurozmrażasięwciągukilkuminutbezzmianyzawartościbiałkawżywnościlubjejzmiany WENTYLATOR DOLNY ELEMENT Dolny element grzewczy jest używany z wentylatorem krążącym w powietrzu wewnątrz piekarnika Tametodajestidealnadosoczystychowoców tart quicheipasztetów Zapobiegawysychaniujedzeniaizachęcado wstawaniadociasta ciastachlebowegoiinnychgotowanychnadoleproduktów Umi...

Страница 73: ... detergentem Ewentualnie można również umyć tacę w zmywarce lub użyć dostępnychnarynkudetergentówdopiekarników Nigdyniewkładaćponowniedopiekarnikazabrudzonejtacy 4 2 Funkcja Aquactiva WfunkcjiAquactivazostajewykorzystanaparawodna którapomagausunąćtłuszcziresztkipotrawzwnętrzapiekarnika 1 Wlać300mlwodydowgłębieniaAquactivaumieszczonegonadniepiekarnika 2 WybraćfunkcjępiekarnikaPieczenieStatyczne lub...

Страница 74: ... wyjmując ją z drzwiczek piekarnika uwaga w kuchenkach pirolitycznych usuń również drugą i trzecią szklankę jeśli są obecne 7 Pozakończeniuczyszczenialubwymiany ponowniezmontujczęściwodwrotnejkolejności Na całym szkle oznaczenie Pyro musi być czytelne i umieszczone po lewej stronie drzwi blisko lewego zawiasu bocznego W ten sposób drukowana etykietapierwszejszklankiznajdziesięwdrzwiach PL 74 ...

Страница 75: ... zadawane pytania PROBLEM MOŻLIWA PRZYCZYNA ROZWIĄZANIE Piekarnik nie rozgrzewa się Zegar nie jest ustawiony Ustawić zegar Nie ustawiono funkcji pieczenia i temperatury Upewnić się że wymagane ustawienia są prawidłowe Piekarnik nie rozgrzewa się Występowanie pary i skroplin na panelu wyświetlacza Wyczyścić panel wyświetlacza szmatką z mikrofibry aby usunąć powłokę skroplin Brak reakcji dotykowego ...

Страница 76: ...ervisionadas Não use materiais ásperos ou abrasivos ou raspadores metálicos afiados para limpar o vidro da porta do forno pois podem arranhar a superfície e fazercomqueovidroseparta O forno deve ser desligado antes de retirar as peçasamovíveis Depois da limpeza volte a montar de acordo com asinstruções Use apenas a sonda de carne recomendada para esteforno Nãouseumequipamentodelimpezaavaporpara ao...

Страница 77: ...o Quando colocar a prateleira no interior certifique se que o batente está colocado para cima e na parte de trás da cavidade A prateleira deve ser inserida completamentena cavidade AVISO Não forre as paredes do forno com película de alumínio ou proteção de uso único disponível nas lojas A película de alumínio ou qualquer outra proteção em contacto direto com o esmalte quente pode derreter e deteri...

Страница 78: ... 2 3 Primeira utilização Descrição do produto 80 3 1 Descrição do visor 3 2 Modos de cozedura Utilização do forno 81 4 1 Notas gerais sobre limpeza 4 2 Função de limpeza fácil AQUACTIVA 4 3 Manutenção Remoção e limpeza dos suportes laterais Remoção da janela do forno Remoção e limpeza da janela do forno Mudando o bulbo Limpeza e manutenção do forno 85 5 1 Perguntas frequentes Resolução de problema...

Страница 79: ... utilização única disponíveis no mercado O papel de alumínio ou qualquer outra proteção em contacto direto com o esmalte quente pode derreter e ou deteriorar a superfície de esmalte no interior do forno Para evitar o excesso de sujidade do seu forno e da libertação de cheiros e fumos forte recomendamos não usar o forno a temperaturas muito elevadas É preferível aumentar o tempo de cozedura e dimin...

Страница 80: ... metálicas laterais 3 Localizado em ambos os lados da cavidade do forno Contém grelhas etálicas e tabuleiro apara pingos 2 3 5 4 6 1 2 3 Primeira utilização LIMPEZAPRELIMINAR Limpar o forno antes de usar pela primeira vez Limpar todas as superfícies exteriores com um pano suave húmido Lavar todos os acessórios e limpar o interior do forno com uma solução de água quente e líquido de limpeza Ligar o...

Страница 81: ...rosbotões Seleccioneafunçãodecozeduracomo selector NOTA Se o forno for desligado ou se a lâmpada estiver a funcionar a função de programaçãodotempodecozeduranão funciona Permite programar o tempo de cozedura desejado Para verificar quanto tempo falta pressione o botão SELECT 2 vezes Para mudar a programação efectuada pressione SELECT e as teclas e Pressione qualquer botão para parar o sinal Pressi...

Страница 82: ...rede consumo de energia do produto em espera em rede se todas as portas de rede comfiosestiveremligadaetodasasportas deredesemfiosestiveremativadas 2 0W Comoativaraportaderedesemfios Num forno que não está registado coloqueo botão direito na posição Reiniciar O módulo Wifiéligadoapós30s Se o forno estiver registado com o WiFi desligado colocar o botão direito na posição WiFieomóduloWiFiéligado Com...

Страница 83: ...blemas em encontrar a password WPA WEP contacte o seu fornecedordeserviçosdeinternet PASSO2 DescarregueaAppCandysimply Fidalojaonline Abra a App Candy simply Fi e crie o seu perfil de utilizador digitando a palavra Registar Aceite a informação sobre política de privacidade e completeoscamposseguintes NOTES A App está disponível para dispositivos Android a partir da versão 4 4 e iOS apartirdaversão...

Страница 84: ...ornodoalimentocongeladoparaqueomesmodescongeleemalgunsminutossemalteraroteordeproteínadosalimentos VENTOINHA ELEMENTO INFERIOR O elemento de aquecimento inferior é utilizado com a ventoinha a fazer circular o ar no interior doforno Estemétodoéidealparapudinsdefrutasuculentos tartes quichesepastas Evitaqueosalimentossequemepromoveocrescimentodebolos pãoeoutrosalimentoscozinhadosnapartedebaixo Coloc...

Страница 85: ... o tabuleiro na máquina de lavar loiça ou usar um detergente apropriado para limpeza de fornos Nuncacolocaroudeixarotabuleirosujonoforno 4 2 Função de limpeza fácil AQUACTIVA OprocedimentodelimpezafácilAQUACTIVAusaovaporparaajudararemoveragorduraepartículasdecomidaqueficamnoforno 1 Verter300mldeáguaparaorecipientedelimpezafácilAQUACTIVAnaparteinferiordoforno 2 Definiratemperaturadofornoparaaquecim...

Страница 86: ...aindo ocuidadosamentedaportadoforno Nota emfornospirolíticos retiraraindaosegundoeoterceirovidro sepresente 7 No final da limpeza ou substituição voltar a montar as peças pela ordem inversa Em todos os vidros a indicação Pyro deve ficar legível e posicionada no ladoesquerdodaporta próximodadobradiçalateralesquerda Destaforma aetiquetaimpressanoprimeirovidroiráficarnointeriordaporta PT 86 ...

Страница 87: ...ROBLEMA POSSÍVEL CAUSA SOLUÇÃO O forno não aquece O relógio não funciona Acertar o relógio Não foi configurada uma função de cozedura e uma temperatura Assegurar se de que as configurações necessárias estão corretas O forno não aquece Vapor e condensação no painel da interface do utilizador Limpar o painel da interface do utilizador com um pano em microfibra para remover a camada de condensação Ne...

Страница 88: ...rden Verwenden Sie keine rauen oder abrasiven Materialien oder scharfen Metallabstreifer zur Reinigung der Ofentürscheiben da diese die Oberfläche zerkratzen und das Glas zerbrechen können Der Ofen muss ausgeschaltet werden bevor die herausnehmbarenTeileentferntwerden Montieren Sie diese nach der Reinigung wieder gemäßdenAnweisungen Verwenden Sie nur den für diesen Ofen empfohlenenKerntemperaturfü...

Страница 89: ...f nicht hinter einer dekorativen Tür installiert werden um eine Überhitzung zu vermeiden Wenn Sie den Einlegeboden innen platzieren achten Sie darauf dass der Anschlag nach oben und in die Rückseite des Hohlraums gerichtet ist Der Einlegeboden muss vollständig in den Hohlraumeingesetztwerden WARNUNG Decken Sie die Backofenwände nicht mit Aluminiumfolie oder anderem Einwegschutz ab der in direkten ...

Страница 90: ... Produktbeschreibung 92 3 1 BeschreibungderAnzeige 3 2 FunktionenzumGaren Betrieb des Backofens 93 4 1 Allgemeine Reinigungshinweise 4 2 Aquactiva Funktion 4 3 Wartung Ausbau und reinigung der seitengitter Entfernen des backofen fensters Entfernen und reinigen der glastür Wechseln der glühbirne Reinigung und Wartung des Backofens 97 5 1 Häufig gestellte Fragen Fehlerbehebung 99 Zusammenfassung DE ...

Страница 91: ...eventuelle Wartung des Ofens ist die Zugänglichkeit einer zweiten Wandsteckdose von Vorteil sodass er an diese angeschlossen werdenkann wennerausgebautwerdenmuss DasStromkabel darf nur von qualifizierten Kundendiensttechnikern oder Elektrikern ausgetauschtwerden 1 3 Empfehlungen Esempfiehltsich denBackofennachjederVerwendunggrobzureinigen Die Ofenwände nicht mit Aluminiumfolie oder sonstiger im Ha...

Страница 92: ...nen seitlicher Metallrost falls enthalten 3 Backrost 4 Fettpfanne Backblech 5 Lüfter hinter der Stahlabdeckung 6 Backofentür 2 2 Accessories Hängt vom Modell ab Fettpfanne 1 FängtdiebeimBackenausdenLebensmittelnaustretendeFlüssigkeitauf Seitliche Drahtgitter 3 Befinden sich auf beiden Seiten des Ofenraums Für Metallgrills und Auffangschalen 2 3 5 4 6 1 2 3 Erste Inbetriebnahme ERSTEREINIGUNG DenBa...

Страница 93: ...erOfenausodernur die Lampe eingeschaltet funktioniert das Programm der eingestellten Gardauernicht Es ermöglicht Ihnen die für das gewählteRezepterforderl icheBackzeit v o r z u p r o g r a m m i e r e n UmdieRestzeitzuerfahrendrückenSie d e n Kn o p f S E L E C T Z W E I M A L Um die eingestellte Zeit zu ändern drücken Sie den Knopf TIMER und nehmen Sie die neue Einstellung durch Betätigungder Kn...

Страница 94: ...nn alle kabelgebundenen Netzwerk Ports mit dem Netzwerk verbunden und alle drahtlosenNetzwerk Portsaktiviertsind 2 0W AktivierendesdrahtlosenNetzwerk Ports Ausgehend von einem nicht angemeldeten Ofen den rechten Knopf auf die Position Reset stellen Das WLAN Modul wird nach 30 eingeschaltet Wenn der Ofen mit deaktivertem WLAN angemeldet wird wird das WLAN Modul eingeschaltet indem der rechte Knopf ...

Страница 95: ...demStoreherunter Öffnen Sie die App Candy simply Fi und erstellen Sie durch Tippen auf Register Registrieren ein Benutzerprofil Akzeptieren Sie die DatenschutzrichtlinieundfüllenSiedieerforderlichenFelderaus HINWEIS Die App ist für Android Version 4 4 oder höher und iOS Geräte Version 8 0oderhöher erhältlich Wenn Sie bereits ein Benutzerprofil für Candy simply Fi haben können SiesichmitIhrenAnmeld...

Страница 96: ...itigzubereitetwerden isteinezusätzlicheGardauervon10Minutenerforderlich AUFTAUEN Wenn die Auswahl auf diese Funktion eingestellt wird Der Ventilator wälzt die Luft bei Raumtemperatur um sodass dasTiefkühlproduktinnerhalbwenigerMinutenaufgetautwird ohnedassseinEiweißgehaltsichändert UMLUFT UNTERHITZE Das untere Heizelement wird zusammen mit dem Ventilator gebraucht der die Luft im Ofen umwälzt Dies...

Страница 97: ... Fettpfanne nicht wieder zurück in den Backofenschieben 4 2 Aquactiva Funktion MitderAquactivaFunktionwirdDampfimInnerendesBackofenserzeugtumdierestlichenFett undSpeiseresteausdemBackofenzuentfernen 1 Gießen Sie 300 ml Wasser in den Behälter Aquactiva am Boden des Ofens ein 2 Wählen Sie die Backofenfunktion auf Ober Unterhitze oder Unterhitze 3 Stellen Sie die Temperatur auf das Aquactiva Symbol e...

Страница 98: ...iBacköfenmitPyrolyse Reinigungsfunktionauchdiezweite fallsvorhanden unddritte Scheibeherausnehmen 7 NachderReinigungoderdemAustauschderScheibe EinzelteileinumgekehrterReihenfolgewiedereinbauen Bei allen Glasscheiben muss die Aufschrift PYRO in der oberen linken Ecke in der Nähe des linken Scharniers gut lesbar sein Auf diese Weise wird sichergestellt dasssichdieAufschriftaufderInnenseitedererstenS...

Страница 99: ...n 5 Fehlerbehebung 5 1 Häufig gestellte fragen STÖRUNG MÖGLICHE URSACHE LÖSUNG Der Backofen wird nicht heiß Die Uhr ist nicht eingestellt Uhr einstellen Garfunktion und Temperatur wurden nicht eingestellt Prüfen ob die nötigen Einstellungen richtig sind Der Backofen wird nicht heiß Dampf und Kondenstropfen auf dem Touch Display Touch Display mit einem Mikrofasertuch abtrocknen Das Touch Display re...

Страница 100: ...5 mm Se il forno non dispone di una ventola di raffreddamento lasciare uno spazio 460 mm x 15 mm Si el horno no tiene ventilador de refrigeración practique una abertura 460 mm x 15 mm GB TR IT ES Si le four n a pas de ventilateur de refroidissement créer une ouverture 460 mm x 15 mm FR Se o forno não estiver equipado com uma ventoinha de arrefecimento faça uma abertura 460 mm x 15 mm Schaffen Sie ...

Страница 101: ...Inoltre si riserva il diritto di apportare modifiche al prodotto nell interesse dei consumatori senza alcun pregiudizio per la sua sicurezza ofunzionalità El fabricante no se responsabiliza de las inexactitudes debidas a fallos de impresión o transcripción contenidos en este folleto Nos reservamos el derecho a modificar los productos como sea necesario incluidos los intereses de consumo sin perjui...

Отзывы: