


8
C
C
O
O
N
N
T
T
R
R
O
O
L
L
P
P
A
A
N
N
E
E
L
L
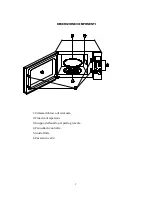
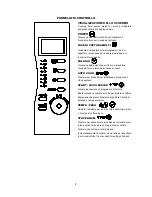
Display Screen
▪ Cooking time, power, weight or serving ,indicators
and present time are displayed here.
Power
▪ Touch this button a number of times to set
microwave cooking power level.
Multi Stage Cooking
▪ used to set several programs. The respective
lights will light up to indicate which stage the oven is
operating in.
Clock
▪ Touch this button to start setting the oven clock.
Auto Cook
▪ Press for instant settings to cook popular food,
Start/Quick Start
▪ Touch to start a cooking program.
▪ simply touch it a number of times to begin express
cooking without previously setting power level and
cooking time.
Time/Weight
▪ Turn the dial to enter the oven clock time, cooking
time and weight or serving of food.
Stop/Cancel
▪ Press to cancel setting or reset the oven before
setting a cooking program.
▪ Press once to temporarily stop cooking, or twice to
cancel cooking altogether.
▪ It is also used for setting child lock.