background image


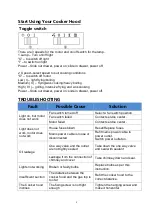
Start Using Your Cooker Hood


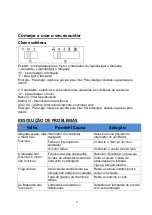
 Toggle switch 


There are 3 speeds for the motor and on/off switch for the lamp. 
1.Lamp 

– Turn on/off light 

“O” – to switch off light 
“I” – to switch on light 
Power 

– Slide out drawer, power on; slide in drawer, power off. 

 
2 .Speed 

–select speed to suit cooking conditions 

“O” – to switch off motor 
Low( I )

– light frying/boiling 

Medium( II ) 

– frying/wok cooking/heavy boiling 

High ( III ) 

– grilling, intensive frying and wok cooking 

Power 

– Slide out drawer, power on; slide in drawer, power off. 


TROUBLESHOOTING 

Fault 

Possible Cause 

Solution 

Light on, but motor 
does not work 

Fan switch turned off 

Select a fan switch position. 

Fan switch failed 

Contact service center. 

Motor failed 

Contact service center. 

Light does not 
work, motor does 
not work 

House fuses blown 

Reset/Replace fuses. 

Mains power cable is loose or 
disconnected 

Refit mains power cable to 
power outlet. 
Switch power outlet on. 

Oil leakage 

One way valve and the outlet 
are not tightly sealed 

Take down the one way valve 
and seal with sealant. 

Leakage from the connection of 
chimney and cover 

Take chimney down and seal. 

Lights not working 

Broken or faulty bulbs 

Replace bulbs as per this 
instruction. 

Insufficient suction 

The distance between the 
cooker hood and the gas top is 
too far 

Refit the cooker hood to the 
correct distance. 

The Cooker hood 
inclines 

The fixing screw is not tight 
enough 

Tighten the hanging screw and 
make it horizontal. 


Содержание CBT6RGX

Страница 1: ...1 CBT6RGX Cooker Hood Instruction Manual ...

Страница 2: ...2 Content 1 Safety instructions 2 Installation 3 Start using your cooker hood 4 Troubleshooting 5 Maintenance and cleaning 6 Environment protection ...

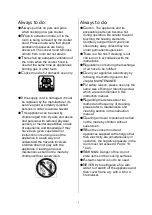
Страница 3: ...e extractors may adversely affect the safe operation of appliances burning gas or other fuels including those in other rooms due to back flow of combustion gases These gases can potentially result in carbon monoxide poisoning After installation of a range hood or other cooking fume extractor the operation of open flued gas appliances should be tested by a competent person to ensure that back flow ...

Страница 4: ...s to do Caution The appliance and its accessible parts can become hot during operation Be careful to avoid touching the heating elements Children younger than 8 years old should stay away unless they are under permanent supervision There is a fire risk if cleaning is not carried out in accordance with the instructions Regulations concerning the discharge of air have to be fulfilled Clean your appl...

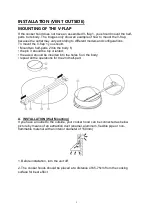
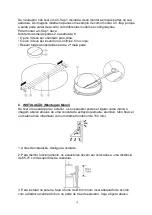
Страница 5: ...s 2 into the body 6 the pin 3 should be top oriented the axis 4 should be inserted into the holes 5 on the body repeat all the operations for the 2nd half part A INSTALLATION Wall Mounting If you have an outlet to the outside your cooker hood can be connected as below picture by means of an extraction duct enamel aluminum flexible pipe or non flammable material with an interior diameter of 150mm 1...

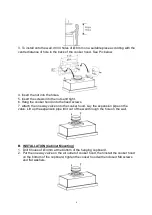
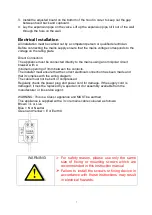
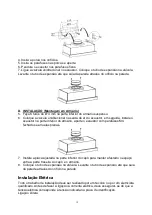
Страница 6: ...onto the fixed screws 7 Attach the one way valve onto the cooker hood Lay the expansion pipe on the valve Lift up the expansion pipe till it out of the wall through the hole on the wall B INSTALLATION Cabinet Mounting 1 Drill 6 holes of Ø 4mm at the bottom of the hanging cupboard 2 Put the one way valve on the air outlet of cooker hood then install the cooker hood on the bottom of the cupboard tig...

Страница 7: ...contacts The installer must ensure that the correct electrical connection has been made and that it complies with the wiring diagram The cable must not be bent or compressed Regularly check the power plug and power cord for damage If the supply cord is damaged it must be replaced by a special cord or assembly available from the manufacturer or its service agent WARNING This is a Class I appliance ...

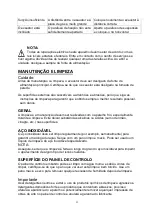
Страница 8: ...a fan switch position Fan switch failed Contact service center Motor failed Contact service center Light does not work motor does not work House fuses blown Reset Replace fuses Mains power cable is loose or disconnected Refit mains power cable to power outlet Switch power outlet on Oil leakage One way valve and the outlet are not tightly sealed Take down the one way valve and seal with sealant Lea...

Страница 9: ...ed regularly e g weekly to ensure long life expectancy Dry with a clean soft cloth A specialized stainless steel cleaning fluid may be used NOTE Ensure that wiping is done along with the grain of the stainless steel to prevent any unsightly crisscross scratching patterns from appearing CONTROL PANEL SURFACE The inlay control panel can be cleaned using warm soapy water Ensure the cloth is clean and...

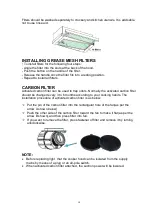
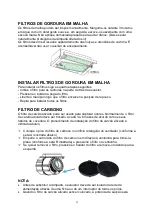
Страница 10: ...bon filter should be changed every 3 to 6 months according to your cooking habits The installation procedure of activated carbon filter is as below Put the pin of the carbon filter into the rectangular hole of the fan as per the arrow A shown below Push the other side of the carbon filter toward the fan to make it flat as per the arrow B shown and then press filter into fan If you want to remove t...

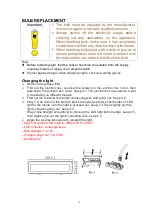
Страница 11: ...as wearing gloves Changing the light Remove the grease filter Find out the junction box unscrew the screws on the junction box cover then take down the junction box cover See pic 1 The junction box has version a and b depending on different models Find out the terminal of the light connecting wire and pull it out See pic 2 Way 1 Use a tool or the hand to press the spring splinter of both sides of ...

Страница 12: ... information please contact your local or regional authorities NOTE The following shows how to reduce total environmental impact e g energy use of the cooking process 1 Install the cooker hood in a proper place where there is efficient ventilation 2 Clean the cooker hood regularly so as not to block the airway 3 Remember to switch off the cooker hood light after cooking 4 Remember to switch off th...

Страница 13: ...13 CBT6RGX Exaustor Manual de instruções ...

Страница 14: ...14 Conteúdo 1 Instruções de segurança 2 Instalação 3 Começar a usar o seu exaustor 4 Resolução de problemas 5 Manutenção e limpeza 6 Proteção do ambiente ...

Страница 15: ...mesmo quando já conhece o produto O manual deve ser mantido num local seguro para referência futura Nunca Tente usar o exaustor sem os filtros de gordura ou se esses mesmos filtros estiverem excessivamente gordurosos Não instale acima de uma panela com uma grelha de alto nível Não deixe frigideiras sem vigilância durante a utilização pois gorduras ou ...

Страница 16: ... não ocorre Deve Importante Desligue sempre o fornecimento de energia elétrica durante a instalação e manutenção como é o caso da substituição de lâmpadas O exaustor deve ser instalado de acordo com as instruções de instalação e todas as medições cumpridas Todo o trabalho de instalação deve ser realizado por uma pessoa competente ou por um eletricista qualificado Elimine cuidadosamente o material ...

Страница 17: ...êndio se a limpeza não for realizada de acordo com as instruções Os regulamentos relativos à eliminação de ar devem ser cumpridos Limpe o seu aparelho periodicamente seguindo o método indicado no capítulo DE manutenção Por motivos de segurança use apenas o mesmo tamanho de parafusos de fixação ou de montagem recomendados neste manual de instruções Relativamente aos detalhes sobre o método e frequê...

Страница 18: ...as as operações para a 2ª meia parte C INSTALAÇÃO Montagem Mural Se tiver uma saída para o exterior o seu exaustor pode ser ligado como indica a imagem abaixo através de uma conduta de extração esmalte alumínio tubo flexível ou material não inflamável com um diâmetro interior de 150 mm 1 Antes da instalação desligue a unidade 2 Para melhor funcionamento os exaustores devem ser colocados a uma dist...

Страница 19: ...seguida instale o exaustor na parte inferior do armário aperte o exaustor com parafusos M4 fechados e arruelas planas 7 Instale a placa ajustada na parte inferior do capô para manter afastado o espaço entre a parte traseira do capô e o armário 8 Coloque o tubo de expansão na válvula Levante o tubo de expansão até que saia da parede através do orifício na parede Instalação Elétrica Todo o trabalho ...

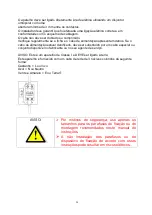
Страница 20: ... estiver danificado deve ser substituído por um cabo especial ou conjunto disponível no fabricante ou no seu agente de serviço AVISO Este é um aparelho de Classe I e DEVE ser ligado à terra Este aparelho é fornecido com um cabo de rede de 3 núcleos coloridos da seguinte forma Castanho L ou Vivo Azul N ou Neutro Verde e Amarelo E ou Terra AVISO Por motivos de segurança use apenas os tamanhos para o...

Страница 21: ...RESOLUÇÃO DE PROBLEMAS Falha Possível Causa Solução lâmpada acesa mas o motor não funciona Interruptor do ventilador desligado Selecione uma posição do interruptor do ventilador Falha do interruptor do ventilador Contacte o Serviço Técnico O motor falhou Contactar o centro de serviços A lâmpada não funciona o motor não funciona Fusíveis da casa queimados Reiniciar Substituir os fusíveis O cabo de ...

Страница 22: ... A limpeza e a manutenção devem ser realizadas com o aparelho frio especialmente durante a limpeza Evite deixar substâncias alcalinas ou ácidas sumo de limão vinagre etc nas superfícies AÇO INOXIDÁVEL O aço inoxidável deve ser limpo regularmente por exemplo semanalmente para garantir uma longa duração Seque com um pano limpo e macio Pode ser usado um líquido de limpeza de aço inoxidável especializ...

Страница 23: ...epouso Repita para instalar todos os filtros FILTRO DE CARBONO O filtro de carvão ativado pode ser usado para capturar odores Normalmente o filtro de carvão ativado deve ser trocado a cada 3 a 6 meses de acordo com os seus hábitos de cozedura O procedimento de instalação do filtro de carvão ativado é indicado abaixo Coloque o pino do filtro de carbono no orifício retangular do ventilador conforme ...

Страница 24: ...24 inferior ...
Страница 25: ...de gorduras Destape a caixa de junção desaparafuse os parafusos na tampa da caixa de junção e em seguida retire a tampa da caixa de junção Veja a figura 1 A caixa de junção tem as versões a e b dependendo de diferentes modelos Destape o terminal do fio de ligação da lâmpada e puxe o para fora Ver imagem 2 Possibilidade 1 Use uma ferramenta ou a mão para pressionar a mola em ambos os lados da lâmpa...

Страница 26: ...ontacte as autoridades locais ou regionais NOTA A seguir é apresentado como reduzir o impacto ambiental total por exemplo uso de energia do processo de cozedura 5 Instale o exaustor num local adequado onde exista ventilação eficiente 6 Limpe o exaustor regularmente para não obstruir as vias aéreas 7 Lembre se de desligar a lâmpada do exaustor depois de cozinhar 8 Lembre se de desligar o exaustor d...

Отзывы: