background image

C A M B R I D G E   T P 5 0 0

(17)

Fill it up!

Preparation and Filling

Fill the spa to its correct operating level. Be sure to open all valves and jets in the plumbing system before filling to allow

as much air as possible to escape from the plumbing and the control system during the filling process.

After turning the power on at the main power panel, the top-side panel display will go through specific sequences. These

sequences are normal and display a variety of information regarding the configuration of the hot tub control.

Priming Mode - MO19*

This mode will last for 4-5 minutes or you can manually exit the priming mode after the pump(s) have primed.

Regardless of whether the priming mode ends automatically or you manually exit the priming mode, the system will

automatically starts normal heating and filtering at the end of the priming mode. During the priming mode, the heater is

disabled to allow the priming process to be completed without the possibility of energizing the heater under low-flow or

no-flow conditions. Nothing comes on automatically, but the pump can be energized by pushing the “Jets”

or “Aux” buttons.

Priming the Pump

As soon as the above display appears on the panel, push the “Jets” button once to start the Pump in low-speed and then again 

to switch to high-speed. will now be running in high-speed to facilitate priming. If the pump has not primed after 2 minutes, and 

water is not flowing from the jets in the spa, do not allow the pump to continue to run. Turn off the pump and repeat the process. 

Note: Turning the power off and back on again will initiate a new pump priming session. Sometimes momentarily turning the 

pump off and on will help it to prime. Do not do this more than 5 times. If the pump will not prime, shut off the power to the spa 

and call for service.

Important:

 A pump should not be allowed to run without priming for more than 2 minutes. Under NO circumstances should

a pump be allowed to run without priming beyond the end of the 4-5 minute priming mode. Doing so may cause damage to

the pump and cause the system to energize the heater and go into an overheat condition.

Exiting Priming Mode

You can manually exit Priming Mode by pressing the “Warm” or “Cool” button. Note that if you do not manually exit the

priming mode as described above, the priming mode will be automatically terminated after 4-5 minutes. Be sure that the

pump have been primed by this time. Once the system has exited Priming Mode, the top-side panel will momentarily display the 

set temperature but the display will not show the water temperature yet, as shown below.

This is because the system 

requires approximately 1 minute 

of water flowing through the 

heater to determine the water

temperature and display it.

Содержание Cambridge

Страница 1: ...C A M B R I D G E T P 5 0 0 Cambridge Spa Owners Manual TP500 200 x 200 x 88cm 79 x 79 x 35 KH 10077 For Service Support please contact us anytime support canadianspacompany com canadianspacompany com ...

Страница 2: ...this product yourself as opening or removing audio covers may expose you to dangerous voltage or other risk of injury Refer all servicing to qualified service personnel 12 CAUTION Risk of Electrical Shock When the power supply connections or power supply cord s are damaged if water is entering the audio video compartment or any electrical equipment compartment area if the protective shields or bar...

Страница 3: ...is available please contact us for more information Cancellation Policy We require a 48 hour cancellation notice in writing or email prior to your scheduled delivery If we are notified later then a reasonable cancellation charge will be applied Service and Warranty Procedures Please read through your warranty carefully as some items are deemed user serviceable and considered general maintenance it...

Страница 4: ...f your spa Increase or decrease the force of your jets by opening or closing the air control valves 5 SPEAKERS x 2 Audio speaker system for playing music from an MP3 device 6 LED CUP HOLDERS x 2 Placeholder for drinking receptacle 7 AIR VALVE To adjust air flow into water stream 8 JET VARIOUS Device that ejects air and water creating water movement in the spa Adjustable directional rotational and ...

Страница 5: ...r OZONE GENERATOR Device that generates ozone to aid in maintaining water quality Ozone helps eliminate organic material such as body oils dead skin cells and hair DRAIN VALVE Valve located on the outside of spa cabinet used to drain water from the spa A garden hose can be attached to the drain valve EQUIPMENT BAY Located under the spa shell covered by access panels that houses the spa controller ...

Страница 6: ...gland All electrical wiring to a spa must be installed by a qualified licensed electrician and meet required electrical standards Water The best means of filling your spa is with a garden hosepipe use cold water not hot water Please ensure that you have one readily available If you are aware that your water pressure is poor we should be advised prior to delivery The design of our spas allows for e...

Страница 7: ...ng Push hose pipe into filter housing until it stops Fill up to top of the honeycomb grill of the skimmer see photo above Secure hose placement and turn on water Filling the spa through the filter housing prevents an air lock from occurring in the spa pump which is an air pocket preventing the flow of water through the pump Permanent damage caused by running the pump with an air lock or without wa...

Страница 8: ... clips ELECTRICAL REQUIREMENTS FOR WIRED HOT TUBS Consumer panel RCD Breaker Hot tub control box K4 115V 115V 230V F3 0 3A SLO BLOW J25 HTR1 J26 HTR2 J27 HTR3 J30 TEST J31 CE HTR SEL F7 10A 250VAC F2 10A 250VAC TB1 K1 T1 K2 K8 J33 J32 J9 K6 1 J60 J46 J38 J39 J41 J19 J50 J13 F6 30A F8 30A J56 J57 J55 J59 J51 J52 J98 J10 J81 J20 J18 J43 CIRC PUMP OZONE A V HOT PUMP 1 J5 AUX J35 MAIN J34 MAIN J109 J2...

Страница 9: ...pa is wired correctly 2 The spa begins an automatic priming routine which will last 6 minutes Pr is on the LED display 3 The priming routine will automatically run each spa pump to prime When the Pr is displayed press any PUMP button to prime that pump or wait for the priming routine to turn on the Pump IMPORTANT To avoid pump damage do not run pumps for more than 1 minute without moving water If ...

Страница 10: ...r hot tub or spa making cover removal and replacement a quick one handed operation while reducing wear and tear on your hot tub cover Mounts directly to the spa Made of black powder coated Aluminum Requires 31cm 46 cm rear clearance TOP MOUNT HOT TUB COVER LIFTER Fully compatible with ALL our Canadian Spa hot tubs and spas and most other brands this Cover Lifter is the ideal choice to complement y...

Страница 11: ... run either continuously or periodically depending on conditions In colder climates an optional additional freeze sensor may be added to protect against freeze conditions that may not be sensed by the standard sensors Auxiliary freeze sensor protection acts similarly except with the temperature thresholds determined by the switch See your dealer for details Clean up Cycle When a pump is turned on ...

Страница 12: ...he levels using pH Up or decrease with pH Down The granules are dosed directly into the spa water pH Up KA 10051 pH Down KA 10050 FREE Water Test App Chemical Guide Starter Chemical Kit KA 10122 Deluxe Chemical Kit KA 10089 Foam Free If your spa water has a tendency to foam then we recommend you add Foam Free The product is added directly to the spa water If the water continues to foam even after ...

Страница 13: ...taminants combined chlorine Chlorine level too high A pH too low B combined chlorine due to high concentration of organic contaminants A high concentration of organic contaminants using up sanitizers B test trips may be ineffective SOLUTION A shock treatment with Granular Chlorine B add Granular Chlorine use SPA BALL C add pH DOWN until pH level reads 7 2 7 6 D add pH DOWN adjust total alkalinity ...

Страница 14: ...al team will effectively solve your issue quickly and efficiently 24 7 Priming Mode will run for approximately 5 minutes Press TEMP UP to skip Priming Mode then the spa will begin to run Jets on low speed and after a few minutes the heater will start when in R Ready Mode Display Symbols TEMP DOWN Decrease Temperature TEMP UP Increase Temperature JETS Activates jets LIGHTS On Off Light modes MENU P...

Страница 15: ...el is now unlocked and normal operations enabled HOLD Temp Up button HOLDING FOR 1 00 will be displayed Pump s will shut down for 1 minute to allow time to replace filters Press Temp Up to restart or wait for the minute HOLD to end FLTR 1 Temp Up button BEGN will be displayed Temp Up button Hour will be flashing Press Temp Up button to cycle to the hour preferred to start Menu button to select min...

Страница 16: ...water Flow from Jets Air lock See air lock procedure Adjustable jets turned off Turn jets on Faulty pump or motor Contact dealer Slice valve closed Open slice valve Clogged filter Clean or change filter Jet popped Out Jet face not seated Insert jet and turn clockwise until jet snaps into place you will feel the jet seat Broken jet Contact dealer No air flow from jet Adjustable jets turned off Turn...

Страница 17: ...ain to switch to high speed will now be running in high speed to facilitate priming If the pump has not primed after 2 minutes and water is not flowing from the jets in the spa do not allow the pump to continue to run Turn off the pump and repeat the process Note Turning the power off and back on again will initiate a new pump priming session Sometimes momentarily turning the pump off and on will ...

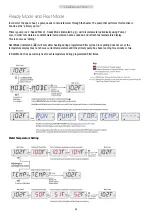
Страница 18: ...lly using Pump 1 Low in order to maintain a constant water temperature heat as needed and refresh the temperature display This is known as polling Rest Mode indicated by will only allow heating during programmed filter cycles Since polling does not occur the temperature display may not show a current temperature until the primary pump has been running for a minute or two In Rest Mode the spa will ...

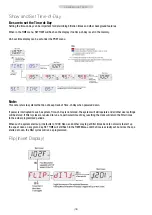
Страница 19: ...wered down If power is interrupted to such a system Time of Day is not stored The system will still operate and all other user settings will be stored If filter cycles are required to run at a particular time of day resetting the clock will return the filter times to the actual programmed periods When such a system starts up it defaults to 12 00 Noon so another way to get filter times back to norm...

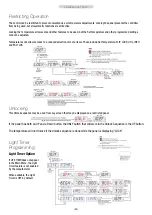
Страница 20: ...educed selection of menu items These include Set Temperature FLIP LOCK UTIL INFO and FALT LOG Light Timer Programming Light Timer Option If LITE TIMR does not appear in the Main Menu the Light Timer feature is not enabled by the manufacturer When available the Light Timer is OFF by default Unlocking This Unlock sequence may be used from any screen that may be displayed on a restricted panel If the...

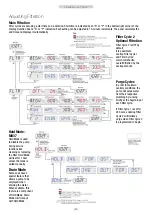
Страница 21: ...gin Adjusting Filtration Main Filtration Filter cycles are set using a start time and a duration Start time is indicated by an A or P in the bottom right corner of the display Duration has no A or P indication Each setting can be adjusted in 15 minute increments The panel calculates the end time and displays it automatically Hold Mode MO37 Hold Mode is used to disable the pump during service funct...

Страница 22: ...n or Off does not reset any Reminder counts CLN UP Cleanup Cleanup Cycle Duration is not always enabled so it may not appear When it is available set the length of time Pump 1 will run after each use 0 4 hours are available 22 Additional Utilities Utilities In addition to INFO The Utilities Menu contains the following A B A B Sensor Temperatures When this is set to On the temperature display will ...

Страница 23: ...o Hot OHS MO29 One of the water temp sensors has detected spa water temp 110 F 43 3 C and spa functions are disabled System will auto reset when the spa water temp is below 108 F 42 2 C Check for extended pump operation or high ambient temp J29 Warning MO44 J29 is typically used as a Heater Disable input As such it should not typically be shorted at power up This message appears if J29 is shorted ...

Страница 24: ...heater and the spa is shut down You must press any button to reset when water is below 108 f 42 2 C See Flow Related Checks below A Reset Message may Appear with other Messages Some errors may require power to be removed and restored Flow Related Checks Check for low water level suction flow restrictions closed valves trapped air too many closed jets and pump prime On some systems even when spa is...

Страница 25: ...ssages General maintenance helps The display of Reminder Messages can be suppressed by using the PREF Menu Reminder Messages can be chosen individually by the Man ufacturer They may be disabled entirely or there may be a limited number of reminders on a specific model The frequency of each reminder e g 7 days can be specified by the Manufacturer Press a Temperature button to reset a displayed remi...

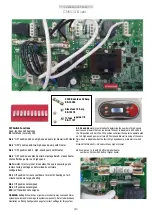
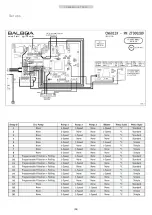
Страница 26: ...inute cool down for gas heating A8 in Off position not assigned A9 in Off position not assigned A10 in Off position not assigned WARNING Setting DIP switches or jumpers incorrectly may cause abnormal system behavior and or damage to system components Refer to Switchbank illustration on Wiring Configuration page for correct settings for this system A2 A3 and A4 work in combination to determine the ...

Страница 27: ...C A M B R I D G E T P 5 0 0 Set ups 28 ...

Страница 28: ...ed by the warranty TERMS CONDITIONS AND LIMITATIONS Any defect or damage caused by installation alteration or repair by anyone who is not an employee of Canadian Spa Co or authorised service technician is not covered by the Warranty This Warranty becomes void if the spa has been subjected to misuse abuse alteration or attempted alteration repairs or attempted repairs by anyone other than an author...

Отзывы: