background image

FOP1INZWKS-2002  |  RÉVISION P01  |  2020-08

1/6

INSTALLATION GUIDE LINE 
LIGNE GUIDE D'INSTALLATION
LÍNEA GUÍA DE INSTALACIÓN

103''
2616mm

15 21/32''
398mm

169 3/4''
4312mm

39 11/32''
999mm

48''
1219mm

132''
3353mm

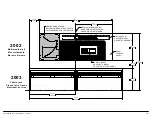
2002

Multimedia wall

Mur multimédia

Muro multimedia

2003

Fabric rack

Présentoir à tissus

Mostrador de telas

PANEL
PANNEAU
PANEL

WALL SUPPORT
SUPPORT MURAL
SOPORTE PARA MURO

LIGHTBOX AND SPACER
BOITIER LUMINEUX ET SOUFFLAGE
CAJA LUMINOSA CON VENTILACIÓN

18 7/8''
479mm

84 7/8''
2156mm

66''
1676mm

TV WALL MOUNT
SUPPORT TV MURAL
SOPORTE DE TV PARA MURO

Содержание QUI1SACZ2002

Страница 1: ...99mm 48 1219mm 132 3353mm 2002 Multimedia wall Mur multimédia Muro multimedia 2003 Fabric rack Présentoir à tissus Mostrador de telas PANEL PANNEAU PANEL WALL SUPPORT SUPPORT MURAL SOPORTE PARA MURO LIGHTBOX AND SPACER BOITIER LUMINEUX ET SOUFFLAGE CAJA LUMINOSA CON VENTILACIÓN 18 7 8 479mm 84 7 8 2156mm 66 1676mm TV WALL MOUNT SUPPORT TV MURAL SOPORTE DE TV PARA MURO ...
Страница 2: ...l est suggéré d être à deux pour assembler le présentoir Se sugiere armar el mostrador entre 2 personas Place the panel over the wall support Push the panel against the wall Move the panel downwards to fix in position Placer le panneau au dessus du support mural Pousser le panneau contre le mur Descendre le panneau pour fixer en place Colocar el tablero por encima de los soportes del muro Empujar ...

Страница 3: ...de alimentación eléctrica que vienen del techo o del suelo a la izquierda del panel Tomar las medidas de los cables visibles Cortar la canaleta proporcionada a la medida deseada Cubrir los cables eléctricos al interior de la canaleta a b 6 x Place the spacer of the lightbox against the big panel Mark the location of ten holes with help of a scribe tool Put the spacer aside Placer le soufflage du b...

Страница 4: ...e frame by inserting the corner brackets in the grooves Assembler le cadre en insérant les équerres dans les rainures Ensamblar el marco insertando los soportes de esquina en las ranuras 7 g f e Procedure to install the display LIGHTBOX Procédure pour installer le présentoir BOITIER LUMINEUX Procedimiento de instalación del mostrador CAJA LUMINOSA 2002 4 x e f 8 9 Screw the bolts with the help of ...

Страница 5: ...r que le côté cousu de la bande de silicone est inséré EN PREMIER Instalación del lienzo Comenzar por las esquinas insertar la banda de silicón en la ranura del marco Nota ocultar los hilos sueltos al interior antes de insertar la tela en la ranura para ocultarlos Asegurarse que el lado costurado de la banda de silicón sea insertada DE PRIMERIO 2002 Procedure to install the display LIGHTBOX Procéd...

Страница 6: ...as barras de soporte al televisor con la ayuda de las herramientas suministradas Utilizar el cuarto orificio de arriba y la primera ranura No utilizar herramientas eléctricas 4 x f 4 x i 8 x j 14 HARDWARE SUPPLIED INSIDE THE TV WALL MOUNT BOX QUINCAILLERIE FOURNIE DANS LA BOITE DU SUPPORT À TV HERRAMIENTAS SUMINISTRADAS CON LA CAJA DE SOPORTE PARA TV i f f j 2x i j 2x a Plug in the TV power cord t...

Страница 7: ... LE SAC CODE PRODUIT SAC QUI1SACZ2002 CODE PRODUIT INFO CLIENT FOP1INZWKS 2002 REVISION P01 DESCRIPTION NOM QTÉ VIS 8 X 1 3 4 RND ZC FOAVISZ8X1 3 4 RND ZC 16 VIS 8 X 1 PAN LUB FOAVISZ8X1 PAN LUB 8 CHEVILLE AUTOFOREUSE POUR GYPSE 8 FOPANCZANCRAGE MUR SEC 16 ATTACHE ADHÉSIVE BLANC WKSACCZCABLECLIP WH 2 ...

Отзывы: