Camus Hydronics DynaFLO DOWB-1 Скачать руководство пользователя страница 7


1.4 

– Sequence of Operation 

1.  Power is supplied as per Section 4.2 
2.  The appliance is filled with water (or a water-glycol 

mixture) in all pipes and the heat exchanger. 

3. 

The  power  switch is  placed in  the “ON”  position. 
120  VAC  power  is  supplied  to  the  control  and 
actuator transformers.  120 VAC is also applied to 
the actuator. 

4.  The  circulator  installed  on  the  DHW  side  starts 

running. 

5.  The  touch-screen  digital  display mounted  on the 

DynaFLO turns ON. 

6.  The  built-in  PID  integrated  in  the  control  keeps 

monitoring  the  DHW  outlet  temperature  and 
calculates  the  difference  in  value  between  the 
DHW outlet temperature and the user selected set 
point.    It  continuously  attempts  to  achieve  a 
difference of 0 by modulating the electro-hydraulic 
actuator  thereby  regulating  the  amount  of  heat 
exchanged in the heat exchanger. 
 

Please refer to Part 5 for more details about operation and 
configuration of the control. 
 

1.5 

– Codes 

The  equipment  shall  be  installed  in  accordance  with 
those installation regulations in force in the local area 
where  the  installation  is  to  be  made.   

These  shall  be 

carefully followed in all cases. Authorities having jurisdiction 
shall  be  consulted  before  installations  are  made.    All 
electrical  wiring  must  be  done  in  accordance  with  the 
requirements  of  the  authority  having jurisdiction  or, in the 
absence  of  such  requirements,  with  National  Electrical 
Code, ANSI/NFPA70 and/or the Canadian Electrical Code 
part 1 CSA C22.1. Where required by the authority having 
jurisdiction,  the  installation  must  conform  to  American 
Society of Mechanical Engineers Safety Code for Controls 
and Safety Devices for Automatically Fired Boilers, ASME 
CSD-1. 
 

1.6 

– Warranty 


Factory  warranty  (shipped  with  unit)  does  not 
apply  to  units  improperly  installed  or  improperly 
operated.  


Factory  warranty  shall  apply  only  when  the 
appliance  is  installed  in  accordance  with  local 
plumbing  and  building  codes,  ordinances  and 
regulations, the printed instructions provided with 
it and industry best practices. 


Excessive 

water  hardness

  causing  a  scale 

buildup  in  the  stainless  steel  heat  exchanger  or 
pipes  is  not  a  fault  of  the  appliance  and  is  not 
covered by warranty. Consult the factory for usage 
recommendations in hard water areas. 


Using  or  storing 

corrosive  chemicals

  in  the 

vicinity  of  this  appliance  can  rapidly  attack  the 
stainless steel tubes and coils and voids warranty. 


Damage  caused  by 

freezing  or  dry  firing 

voids 

warranty. 


The manufacturer shall 

NOT

 be held liable for any 

personal  injury  or  property  damage  due  to 

condensation of any exterior part of the appliance 
including pipes. 

Part 2 

– Installation 

2.1 

– Checking the Equipment 

Check  for  signs  of  shipping  damage  upon  receiving 
equipment. Pay particular attention to parts accompanying 
the  appliance,  which  may  show  signs  of  being  hit  or 
otherwise being mishandled. Verify total number of pieces 
shown on packing slip with those actually received. In case 
there is damage or a shortage, immediately notify carrier. 
 

2.2 

– Mechanical Environment 

Install this appliance in a clean, dry location with adequate 
air supply.  
 
The  mechanical  room  MUST  NOT  be  used  to  store 
corrosive or flammable chemicals, such as gasoline or paint 
thinner. Such chemicals must not be stored in the vicinity of 
this  appliance.  Chillers  or  other  equipment  utilizing 
refrigerant  should  also  not  be  installed  in  the  same 
mechanical room as fuel burning appliances. 
 

2.3 

– Locating the Equipment 

The appliance should be located close to a floor drain in an 
area where leakage from the appliance or connections will 
not result in damage to the adjacent area or to lower floors 
in  the  structure.  Under  no  circumstances  is  the 
manufacturer to  be  held responsible  for  water  damage  in 
connection with this unit, or any of its components. 
 

2.4 

– Clearances


This  appliance  is  suitable  for  installation  with  minimum 
clearances to combustibles as follows: 
 

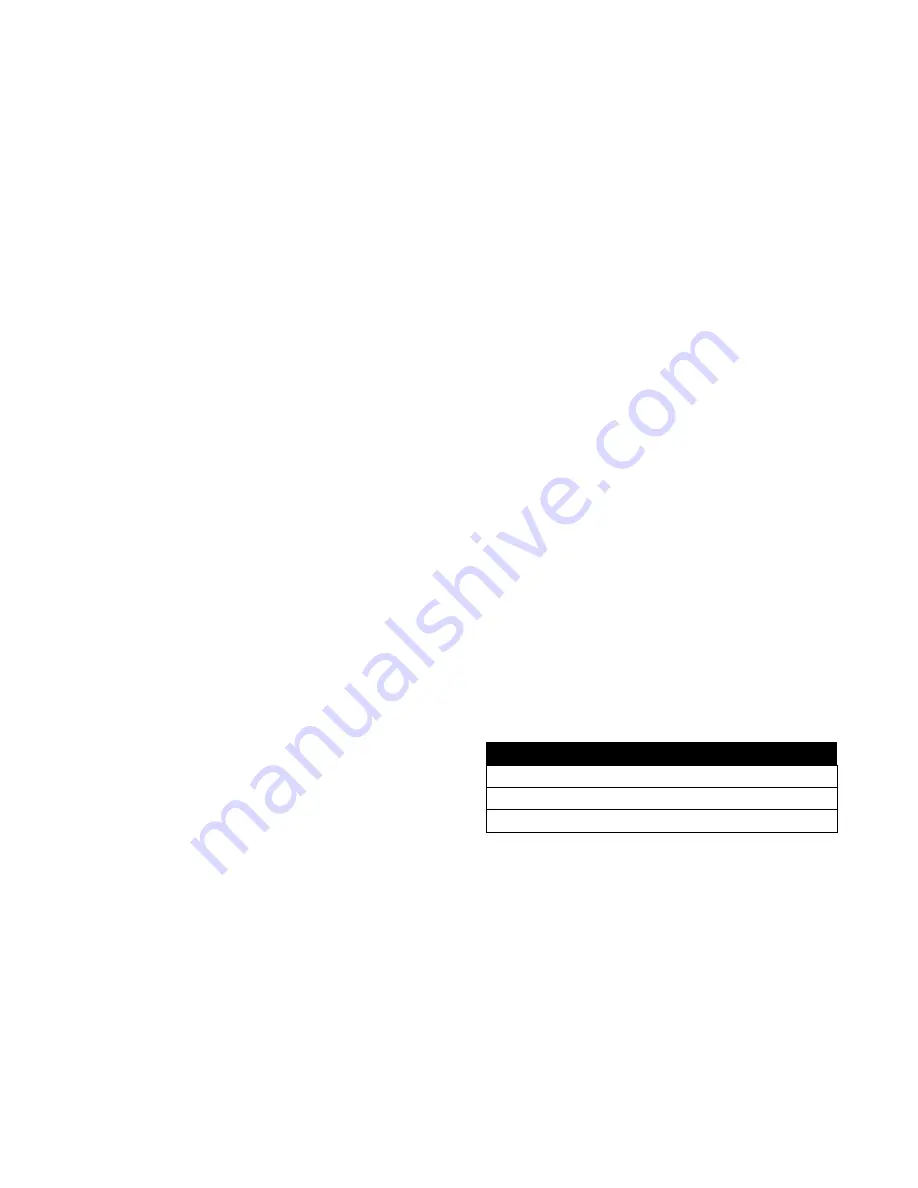
Table 1: Clearances From Combustibles 


Clearances, All Models 

Top 

12" (30cm) 

Sides 

12" (30cm) 

Rear 

12" (30cm) 

Part 3 

– Heat Exchanger 

3.1 

– Overview 

The  heat  exchanger  installed  in  the  DynaFLO  is  a  very 
compact assembly composed of stainless steel plate packs 
sealed together by means of brazing metal (Copper) along 
the  border  of  the  units.  This  eliminates  the  need  for 
traditional gaskets or external pressure retaining parts. All 
of the heat exchangers used in DynaFLO models are ASME 
certified,  have  CRN  and  are  NSF  372 certified.  The  plate 
packs  making  up  the  heat  exchanger  have  special 
corrugation  patterns  that  promote  turbulent  flow  which  in 
turn  dramatically  increases  rate  of  heat  transfer.  Regular 
maintenance  and  cleaning  of  the  heat  exchangers  are 
required. The manufacturer is not responsible for damages 

Содержание DynaFLO DOWB-1

Страница 1: ...Immediately call your gas supplier from a neighbour s phone Follow the gas supplier s instructions If you cannot reach your gas supplier call the fire department A Qualified installer service agency or the gas supplier must perform installation and service WARNING Do not store or use gasoline or other flammable vapours and liquids in the vicinity of this or any other appliance TO THE INSTALLER Aft...

Страница 2: ......

Страница 3: ...put Wiring 7 Part 5 Control 8 5 1 Overview 8 5 2 Screen Navigation 9 5 2 1 Control 11 5 2 2 Alarm 11 5 2 3 Setup Installer Level Password 3232 12 5 2 3 1 Alarm Configuration 12 5 2 3 2 Data Logging 13 5 2 3 3 DataXport 14 5 2 3 3 Modbus 16 5 2 3 4 PID Configuration 16 Part 6 Components 17 6 1 Electro Hydraulic Actuator 17 6 1 1 Operation 17 6 1 2 Stroke Calibration 17 6 1 3 Manual Operation 17 6 2...

Страница 4: ... the equipment Study its contents carefully The unit will provide good service and continued operation if proper operating and maintenance instructions are followed No attempt should be made to operate the unit until the principles of operation and all of the components are thoroughly understood It is the responsibility of the owner to provide training and advice in all aspects of safety not only ...

Страница 5: ...ners lead free pressure relief valve or lead free temperature and pressure relief valve Optional air vent high limit switch and a very precise electro hydraulic 3 way actuator that can be turned into a 2 way operation If your DynaFLO model is equipped with the IntelliFLO option your DynaFLO will also have a flowmeter installed on the DHW inlet To avoid any confusion throughout this manual an image...

Страница 6: ... 44 S6 D4 D6 58 1 4 16 44 Camus Model Outlet Connections Camus Model Outlet Connections DOWB S1 1 5 FNPT DOWB D1 1 5 FNPT DOWB S2 1 5 FNPT DOWB D2 1 5 FNPT DOWB S3 2 FNPT DOWB D3 2 FNPT DOWB S4 2 FNPT DOWB D4 2 FNPT DOWB S5 2 FNPT DOWB D5 2 FNPT DOWB S6 2 FNPT DOWB D6 2 FNPT ...

Страница 7: ...toring corrosive chemicals in the vicinity of this appliance can rapidly attack the stainless steel tubes and coils and voids warranty Damage caused by freezing or dry firing voids warranty The manufacturer shall NOT be held liable for any personal injury or property damage due to condensation of any exterior part of the appliance including pipes Part 2 Installation 2 1 Checking the Equipment Chec...

Страница 8: ...estic supply to take away any heat left on the boiler side before shutting down 2 Once the heat exchanger has cooled down close down the domestic supply to DynaFLO 3 Turn off the DynaFLO by switching the power button 4 Drain the unit by using the drain valves provided on DynaFLO 5 Remove the Victaulics 6 Remove the heat exchanger shroud 7 Slowly remove the heat exchanger while sliding it on the bu...

Страница 9: ...ey can be seen in the image below 4 2 Field Power Supply The main field 120VAC power supply can be inserted through the knock out holes that are placed on the sides of the control box mounted on top of the heat exchanger cabinet This connection must be made by a licensed electrician when the unit is not energized and in accordance with section 4 1 of this manual A strain relief should be used The ...

Страница 10: ... this contact is either continuously ON whenever there is an active alarm regardless of acknowledged or not or continuously OFF whenever there are no alarms This is to protect other contacts or electrical systems that might be present in a remote system circuit The electrical specifications of the relays can be seen below Depending on the type of load and circuit that O0 and or O1 are intended to ...

Страница 11: ...d it is recommended not to change them The image below demonstrates the relationship between the controller and other components For alarms the controller also has a digital output O1 that is programmed to turn ON and stay ON once there is a new alarm this output could be used for remote operations The controller also has another digital output O0 that starts switching ON and OFF once there is a n...

Страница 12: ...Setup menu The higher level password is needed for configuring the P I and D parameters as these parameters are no recommended to be changed Modbus Map Parameter Register Traditional Modbus Reference Read Write Notes 16 Bit Registers 40010 R DHW Out Temp Read MI 9 Set Point Read MI 97 40005 R Actuator Position Read MI 95 40096 R Set point Write MI 87 60088 W Only Possible when the control is set t...

Страница 13: ...p Display Setup Password Required 3232 Alarm Configuration Data Logging Modbus PID Configuration Flowmeter Calibration Factory Level Password Required PID Parameters Factory Level Password Required Control Alarm ...

Страница 14: ... the touch screen However when Remote_Direct or Remote_SP is selected those parameters can only be configured by sending Modbus commands The first option Local_Manual as mentioned bypasses the local built in PID and makes the Actuator Position display touch accessible such that the user can control the actuator by inserting the position into this display This could become useful in calibrating or ...

Страница 15: ...hich is explained in the next section The corresponding registers relating to alarms are tabulated in the Modbus Map table in section 5 1 As mentioned in section 4 4 two digital outputs are associated with alarms O0 and O1 Whenever there is an active alarm regardless of the alarm acknowledged or not O1 will come on and it will stay on for as long as the new alarm remains active even if it becomes ...

Страница 16: ...llers Instructions on how to use DataXport are given in the next section Once DataXport is set up and DynaFLO s controller is connected to the computer using a USB cable data logging can begin On DynaFLO s controller the following parameters are logged when Data Logging ON OFF is turned ON RTD1 Actuator Position Setpoint Total Number of Alarms Pending for Acknowledgement Date and Time Log Interval...

Страница 17: ...the controller s ladder application This name is DynaFLO PLC 1 Select PC Ports from the Design Menu PC Ports window opens 2 Double click a line that corresponds to the COM number that is used with the USB cable connecting the PC to DynaFLO s controller 3 Make the desired selections as follows 4 Click OK then Close When to Log The schedule determines the time intervals between data log actions 1 Se...

Страница 18: ...he right hand side of the PLC window Select desired schedules that you have previously created 4 Select the PLC Type as Samba 5 Select MB to Set 51 6 Select the PC Port on your computer that is using the USB cable connected to DynaFLO s controller 7 Select Enabled to include this project site when DataXport project is run 8 Select Create Excel Files so that DataXport creates Excel files whenever a...

Страница 19: ...ser to a display that allows the user to change the Proportional Integral and Derivative parameters that govern the performance of the local built in PID loop However these parameters have been fine tuned through extensive testing specifically for DynaFLO and changing these parameters are not recommended as the performance of the local PID loop is very sensitive to a change in these parameters The...

Страница 20: ...tion procedure the contacts inside this slot must be short circuited for example with a screwdriver Automatic calibration can then proceed as depicted in the following image Actuator runs to the 0 stroke position 1 green LED flashes Actuator then runs to the 100 stroke position 2 green LED flashes Measured values are stored in the EPROM The actuator now moves to the position defined by control sig...

Страница 21: ... discharge line be piped from the valve in order to carry the overflow to a safe place of disposal The discharge line must be the same size as the valve outlet and must pitch downward from the valve and terminate at least 6 152mm above the floor drain where any discharge will be clearly visible 6 2 2 Re inspection of T P relief valve Temperature and Pressure Relief Valves should be re inspected AT...

Страница 22: ...peed operation WARNING THE CIRCULATORS ON DYNAFLO HAVE BEEN EVALUATED FOR USE WITH WATER ONLY AND WATER GLYCOL MIXTURE ETHYLENE PROPYLENE ONLY The venting of the rotor chamber may be done automatically However to assure proper and faster venting of this circulator we recommend the manual venting procedure as follows 1 Place a container under the back of the circulator to catch any water that may r...

Страница 23: ...e noise Install expansion joints Install fixture to change system s natural frequency Adjusts pump speed Replace pump motor Knocking from foreign bodies in the pump or on valve Turn valve around if installed incorrectly Clean impeller Adjust valve pressure Adjust valve spring Replace pump Noise From Radiator Excessive pressure passing the thermostatic valve Reduce the speed setting Flow decreases ...

Страница 24: ...DynaFLO due to safety reasons and therefore for a few minutes they apply the same firing rate to the now very hot incoming boiler water This leads to an even hotter boiler outlet temperature which can trip the high limit switch on the boiler in the matter of a few minutes This situation is more common if the boiler and piping are small and do not contain a significant volume of water to absorb the...

Страница 25: ...22 Appendix B Electrical Schematics DynaFLO ...

Страница 26: ... the item The exchanged or repaired heat exchanger will carry the balance of the remaining original warranty provided with the appliance based on the FOB date In the event a replacement heat exchanger is delivered and if the defective heat exchanger is deemed to be repairable by CAMUS the repaired heat exchanger will be returned to the customer and a credit will not be issued ANY OTHER PART If any...

Страница 27: ...24 ...

Страница 28: ...ting boilers as well as a supplier of specialty HVAC products Our service line is open 24 hours 7 days a week The CAMUS CERTIFIED seal assures you that Reliability Efficiency Serviceability are built into every single unit For more information on our innovative products from CAMUS Hydronics Limited call 905 696 7800 today ...

Отзывы: