background image

Page 3 

Installation Guidelines / Directives d’installation

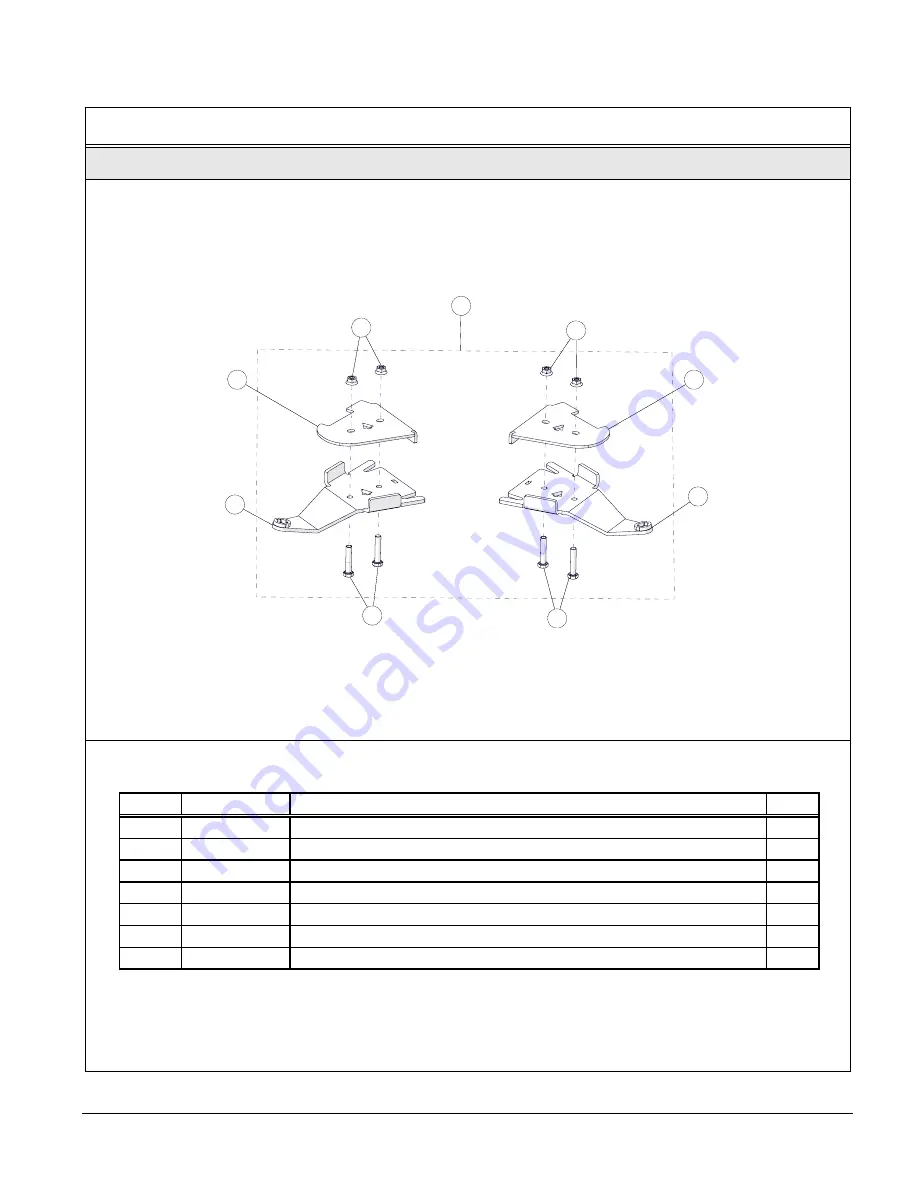
FRONT ANCHOR BRACKET PARTS LIST / LISTE DE PIÈCES - ANCRAGE AVANT

Figure 1

1

6

6

5

4

7

3

2

7

1

6

6

5

4

7

3

2

7

ITEM

P/N

DESCRIPTION

QTY

1

1004-06-0290  FRONT BRACKET KIT / ENSEMBLE ANCRAGE AVANT

1

2

1004-06-1060  ANTI-ROT. FRONT BRACKET - LH / ANCRAGE ANTIROT. AV. - GA

1

3

1004-06-1070  ANTI-ROT. FRONT BRACKET - RH / ANCRAGE ANTIROT. AV. - DR

1

4

1006-06-0132  FRONT BRACKET COVER - LH / COUVERT ANCRAGE AV. - GA

1

5

1006-06-0142  FRONT BRACKET COVER - RH / COUVERT ANCRAGE AV. - DR

1

6

1033-10-0050  HEX BOLT / BOULON HEX - HCS, M10-1.5X50, 8.8, ZP, DIN931

4

7

1074-10-0001  NYLON NUT / ÉCROU NYLON - FNN, M10-1.5, 8, ZP, DIN6926 

4

Содержание Camoplast ATV T4S

Страница 1: ...Installation Guidelines Directives d installation Suzuki No 5000 06 0760 VERSION C ...

Страница 2: ...olideal Inc Printed in Canada Imprimé au Canada IMPORTANT Please read carefully each part of this document as well as the User Manual prior to assembling installing and using the track systems Veuillez lire attentivement ce document en entier ainsi que le Manuel de l utilisateur avant d assembler d installer et d utiliser les systèmes de traction ...

Страница 3: ...ET KIT ENSEMBLE ANCRAGE AVANT 1 2 1004 06 1060 ANTI ROT FRONT BRACKET LH ANCRAGE ANTIROT AV GA 1 3 1004 06 1070 ANTI ROT FRONT BRACKET RH ANCRAGE ANTIROT AV DR 1 4 1006 06 0132 FRONT BRACKET COVER LH COUVERT ANCRAGE AV GA 1 5 1006 06 0142 FRONT BRACKET COVER RH COUVERT ANCRAGE AV DR 1 6 1033 10 0050 HEX BOLT BOULON HEX HCS M10 1 5X50 8 8 ZP DIN931 4 7 1074 10 0001 NYLON NUT ÉCROU NYLON FNN M10 1 5...

Страница 4: ...LH ANCRAGE ANTIROT AR GA 1 10 1005 06 0700 R ASS ANTI ROT REAR BRACKET RH ANCRAGE ANTIROT AR DR 1 11 1007 06 0700 P1 REAR BRACKET COVER COUVERT ANCRAGE ARRIÈRE 2 12 1033 10 0055 HEX BOLT BOULON HEX HCS M10 1 5X55 8 8 ZP DIN931 2 13 1033 10 0150 HEX BOLT BOULON HEX HCS M10 1 5X150 8 8 ZP DIN931 2 14 1033 10 1080 HEX BOLT BOULON HEX HCS M10 1 5X80 10 9 ZP DIN931 2 15 1050 06 0758 BUSHING ESPACEUR 0 ...

Страница 5: ... N DESCRIPTION QTY 19 1084 06 4575 FOOTREST PROTECTOR KIT ENS PROTECTEUR MARCHEPIED 1 20 1045 06 2750 U BOLT BOULON EN U UB M6 1 0X27X50 4 8 ZP 4 21 1060 06 0001 WASHER RONDELLE 6 4 X 20 X 1 5 ZP DIN9021 8 22 1071 06 0001 NYLON NUT ÉCROU NYLON NN M6 1 ZP DIN982 8 23 1084 06 0087 FOOTREST PROTECTOR L PROTECTEUR MARCHEPIED G 1 24 1084 06 0097 FOOTREST PROTECTOR R PROTECTEUR MARCHEPIED D 1 ...

Страница 6: ...ION 1 For installation purposes directional arrows have been cut out of the main components in the anchor bracket kits These arrows indicate the front of the vehicle relative to the component See Figure 4 1 Pour faciliter le positionnement des ancrages au véhicule des flèches indiquant l avant du véhicule ont été découpées aux composantes principales des ancrages Assurez vous que ces flèches point...

Страница 7: ...r un dispositif de levage en guise de support permanent 1 Position the vehicle on a flat and level surface or on a suitable lifting device shift the transmission to neutral and turn off engine 1 Placer le véhicule sur une surface plane et au niveau ou sur un dispositif de levage mettre la transmission au point mort et arrêter le moteur 2 Identify and position each unit of the track system near the...

Страница 8: ...es cales de sûreté Assurez vous que le véhicule est bien immobile et qu on peut y travailler en toute sécurité 2 Remove rear wheels Make sure that wheel studs and wheel hubs are free of dirt See Figure 6 2 Enlever les roues arrière Assurez vous que les goujons de roue et les moyeux de roue sont exempts de toute saleté Voir la Figure 6 Figure 6 3 If applicable remove CV joint protectors 3 Retirer l...

Страница 9: ...5 Remove bolt that secures the lower suspension arm to the wheel hub Position rear anchor bracket 9 10 under lower suspension arm Insert the new M10x150mm bolt 13 through the anchor bracket lower suspension arm and wheel hub Position the anchor bracket cover 11 over the suspension arm Bolt these two brackets together as shown on Figure 8 Secure with nuts provided Tighten bolts to 50 N m 37 lb ft o...

Страница 10: ...y the vehicle s manufacturer when tightening wheel nuts 6 Fixer le système de traction au moyeu de roue arrière utiliser les écrous de roue 12 fournis Voir la Figure 9 NOTE Retirer le protecteur en caoutchouc du moyeu s il y a lieu NOTE Assurez vous que la goupille fendue de l écrou de l essieu n interfère pas au coeur du moyeu du système de traction NOTE Serrer les écrous de roue au couple de ser...

Страница 11: ...eur court C de la rondelle D et de l écrou autobloquant E Serrer à un couple de 70 N m 52 lb pi Voir la Figure 10 NOTE Assurez vous d assembler les pièces dans l ordre indiqué Figure 10 8 Inspect the rear track systems and ensure that all mounting bolts were correctly tightened during installation Lower the vehicle on the ground and proceed to install the front track systems 8 Inspecter les systèm...

Страница 12: ... de roue sont exempts de toute saleté Voir la Figure 11 Figure 11 3 If applicable remove CV joint protectors 3 Retirer les protecteurs de joint homocinétique s il y a lieu 4 Remove the bolt washer and bushings from the front stabilizing rod end and insert the bolt in the front anchor bracket s end Refer to Figure 12 NOTE It is not possible to insert this bolt once the bracket is attached to the su...

Страница 13: ...ension de façon à ce que le tenon de la partie pliée s aligne dans l ouverture de la partie inférieure Insérer les boulons M10x50 mm 6 par le dessous de l ancrage Assembler les deux parties avec les écrous 7 fournis Serrer l assemblage à un couple de 50 N m 37 lb pi Voir la Figure 13 Figure 13 Figure 14 6 Using the wheel nuts 12 provided secure undercarriages to front wheel hubs The procedure and ...

Страница 14: ...Ensure that parts are assembled in the correct order 7 Fixer le bras stabilisateur B au boulon déjà installé sur l ancrage de suspension A à l aide des deux espaceurs C de la rondelle D et de l écrou autobloquant E Serrer à un couple de 70 N m 52 lb pi Voir la Figure 15 NOTE S assurer d assembler les pièces dans l ordre indiqué Figure 15 Installation Guidelines Directives d installation ...

Страница 15: ...le au sol 4 Install footrest protectors 1 Use M6x1 0 U bolts and cut end of bolts 2 See Figure 16 4 Installer les protecteurs de repose pied 1 Utiliser les boulons en U M6x1 0 et couper l excédent 2 Voir la Figure 16 Figure 16 ADJUSTMENTS AJUSTEMENTS CAUTION The track systems are designed to provide the best performance in terms of traction and floatability Adjustments such alignment track tension...

Страница 16: ...o solve any problem related with track system installation Consultez votre concessionnaire ou votre distributeur afin de résoudre tout problème entourant l installation des systèmes Dealer or distributor phone Tél du concessionnaire ou du distributeur Serial No No de série Purchase date Date d achat ...

Отзывы: