Campbell TE525 Скачать руководство пользователя страница 8

TE525 Tipping Bucket Rain Gage 

3.1  Ships With 

The TE525 ships with: 

(1) Calibration sheet  
(2) Hose clamps from original manufacturer 
(1) ResourceDVD 
(3) Screws from original manufacturer 

4.  Quickstart 

Please review Section 7, 

Operation

, for wiring, CRBasic programming, and 

Edlog programming.  

4.1  Siting 

The rain gage should be mounted in a relatively level spot which is 
representative of the surrounding area.  The lip of the funnel should be 
horizontal and at least 30 cm above the ground.  It should be high enough to be 
above the average snow depth.  The ground surface around the rain gage 
should be natural vegetation or gravel.  It should not be paved. 

The rain gage should be placed away from objects that obstruct the wind.  The 
distance should be 2 to 4 times the height of the obstruction. 


The pipe used to mount the bucket must be vertical.  Use a torpedo level or 
something similar to get it as vertical as possible.  


Take the funnel off of the top of the bucket and look inside towards the 
bottom of the bucket — notice the bubble level.  Center the bubble level 
while mounting the bucket to the pipe.  Replace the funnel and seat it 
completely when the installation is complete. 

4.2  Mounting 

The CM300-series mounting poles provide a stainless steel 1.5 IPS vertical 
pole for mounting the TE525 rain gage.  Pole length is 58 cm (23 in), 119 cm 
(47 in), and 142 cm (53 in) for the CM300, CM305, and CM310 models 
respectively.  The CM300-series offers pedestal base options as well, as shown 
in FIGURE 4-2. 

Use the enclosed hose clamps to mount the gage as shown in FIGURE 4-1.  
The lip of the gage should be at least 5 cm (2 in) above the post or pole.  Level 
the rain gage after mounting it. 

Before final leveling, press either end of the bucket down against 
its stop to make sure the bucket is NOT hung up in the center. 

NOTE 

Содержание TE525

Страница 1: ...TE525 Tipping Bucket Rain Gage Revision 10 13 C o p y r i g h t 1 9 9 0 2 0 1 3 C a m p b e l l S c i e n t i f i c I n c...

Страница 2: ......

Страница 3: ...s warranty The customer shall assume all costs of removing reinstalling and shipping defective products to Campbell Campbell will return such products by surface carrier prepaid within the continental...

Страница 4: ...g container Campbell Scientific s shipping address is CAMPBELL SCIENTIFIC INC RMA _____ 815 West 1800 North Logan Utah 84321 1784 For all returns the customer must fill out a Statement of Product Clea...

Страница 5: ...am Datalogger and Generate Wiring Diagram 4 5 Overview 7 5 1 Wind Screen 7 5 2 Snowfall Adapter 7 6 Specifications 8 7 Operation 9 7 1 Wiring 9 7 2 Datalogger Programming 10 7 2 1 Pulse Count Example...

Страница 6: ...Figures 4 1 TE525 Tipping Bucket Rain Gage 3 4 2 Pedestal base options 3 7 1 Rain Gage Schematic 10 Tables 7 1 Wiring for Pulse Channel Input 9 7 2 Wiring for Control Port Input 9 7 3 Multipliers for...

Страница 7: ...ibration check and factory calibration Debris filters funnel and bucket reservoirs should be kept clean The black outer jacket of the cable is Santoprene rubber This compound was chosen for its resist...

Страница 8: ...mount the bucket must be vertical Use a torpedo level or something similar to get it as vertical as possible Take the funnel off of the top of the bucket and look inside towards the bottom of the buc...

Страница 9: ...TE525 Tipping Bucket Rain Gage 24 8 FIGURE 4 1 TE525 Tipping Bucket Rain Gage FIGURE 4 2 Pedestal base options 3...

Страница 10: ...amming the datalogger to measure the tipping bucket rain gages is to use Campbell Scientific s SCWin Program Generator Short Cut This section shows Short Cut s programming for the TE525 TE525WS The TE...

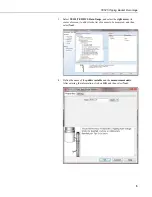
Страница 11: ...n Gauge and select the right arrow in center of screen to add it to the list of sensors to be measured and then select Next 4 Define the name of the public variable and the measurement units After ent...

Страница 12: ...hen select Finish 6 In the Save As window enter an appropriate file name and select Save 7 In the Confirm window click Yes to download the program to the datalogger 8 Click on Wiring Diagram and wire...

Страница 13: ...ensor network Refer to www campbellsci com cws900 for more information Connector that attaches to a CS110 Electric Field Meter or ET series weather station cable termination option C Military style co...

Страница 14: ...e Dataloggers CR200 X series CR800 series CR1000 CR3000 CR5000 CR9000X CR510 CR500 CR10 X CR23X CR7 21X TE525 TE525WS TE525MM Sensor Type tipping bucket potted magnetic momentary contact reed switch S...

Страница 15: ...E 7 1 TABLE 7 1 Wiring for Pulse Channel Input Color Description CR800 CR850 CR1000 CR3000 CR5000 CR9000 X CR510 CR500 CR10 X 21X CR7 CR23X CR200 X Series Black Signal Pulse Channel Pulse Channel Puls...

Страница 16: ...ch closure code 2 for the PConfig parameter Dataloggers that use CRBasic are the CR200 X CR800 CR850 CR1000 CR3000 CR5000 and CR9000 X In Edlog the Pulse P3 is used to measure the rain gage Choose swi...

Страница 17: ...e Rain True 1 DataInterval 0 60 Min 0 Totalize 1 Rain_mm FP2 0 EndTable BeginProg Scan 1 Sec 1 0 For TE525MM Rain Gage use multiplier of 0 1 in PulseCount instruction PulseCount Rain_mm 1 1 2 0 0 254...

Страница 18: ...y the pulse count instruction 2 Verify that the Configuration Code Switch Closure and Multiplier and Offset parameters for the Pulse Count instruction are correct for the datalogger type 3 Disconnect...

Страница 19: ...ge 5 The following number of tips should occur TE525 TE525MM 100 3 TE525WS 57 2 6 Adjusting screws are located on the bottom adjacent to the large center drain hole Adjust both screws the same number...

Страница 20: ...TE525 Tipping Bucket Rain Gage 14...

Страница 21: ...1 0000 Execution Interval seconds 1 Pulse P3 1 1 Reps 2 1 Pulse Channel 1 3 2 Switch Closure All Counts 4 3 Loc Rain_mm 5 0 254 Multiplier 6 0 Offset 2 If time is P92 1 0 Minutes Seconds into a 2 60...

Страница 22: ...fset 2 If time is P92 1 0 Minutes Seconds into a 2 60 Interval same units as above 3 10 Set Output Flag High Flag 0 3 Set Active Storage Area P80 1 1 Final Storage Area 1 2 101 Array ID 4 Real Time P7...

Страница 23: ......

Страница 24: ...W7 CANADA www campbellsci ca dataloggers campbellsci ca Campbell Scientific Centro Caribe S A CSCC 300 N Cementerio Edificio Breller Santo Domingo Heredia 40305 COSTA RICA www campbellsci cc info camp...

Отзывы: