
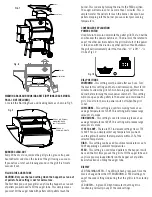

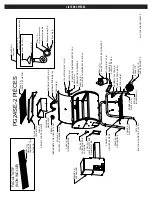


WARMING RACK AND COOKING GRATE (OPTIONAL RACK MODEL
PG24-1 NOT INCLUDED)
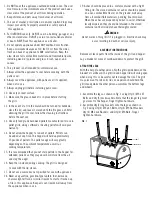
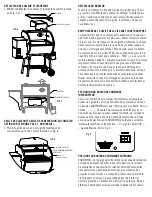
1. Install the Warming Rack and Cooking Grate as shown in Fig 9.
BURNER CLEAN-OUT
Every 20 hours of use, remove the grill grates, grease tray, and
heat deflector and clean the inside of the grill using a vacuum.
If you notice a lot of ash blowing around in the grill it is time to
vacuum it out.
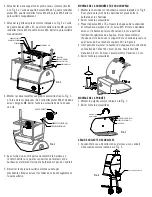
FILLING THE AUGER TUBE
CAUTION: Only use the feed setting when the hopper has ran out
of pellets. Feed setting is not for normal use.
The first time you use your grill or any time the hopper has ran out
of pellets you will need to fill the auger tube. This simply means
you must fill the auger tube with pellets until pellets reach the
burner. This is done by turning the dial to the FEED position.
The auger will remain on for no more than 7 minutes. This is
ample time for the pellets to reach the burner. Once you hear
pellets dropping into the burner you can select your cooking
temperature.
CONTROLLER EXPLANATION
POWER SWITCH
Used to turn the main power onto the pellet grill. The fan will be
on whenever the power switch is on. The dial must be rotated to
any of the other positions before the grill will start. If the power
is turned on with the dial in any other position than Shutdown
the grill will immediately start that function. “O” is Off. “-“ is
On. See Fig 10
DIAL POSITIONS
SHUTDOWN -
This setting must be used after each use. Turn
the dial to this setting and the fan will remain on. Wait for 10
minutes to allow the grill to finish burning any pellets in the
burner before turning the main power switch off. This setting
will burn up any extra pellets in the burner and cool down the
grill. Do not turn the main power switch off when the grill
is hot.
LOW SMOKE
- This setting is used for smoking foods at an
average temperature of 160F. This setting will produce large
amounts of smoke.
HIGH SMOKE
- This setting is used for smoking foods at an
average temperature of 220F. This setting will produce large
amounts of smoke.
175F TO 400F
- There are 25F increment settings from 175F
to 400F. You can simply select any temperature you want
and the grill will control the temperature within 15F of the
selected temperature.
HIGH
- This setting can be used to achieve temperatures up to
500F depending on ambient temperatures.
FEED
- This setting is used to feed pellets to the hopper. It will
be used the first time you use the grill to fill the auger tube and
any time you may inadvertently run the hopper out of pellets.
See instructions on filling the auger tube.
DISPLAY
LED FLASHING GREEN
– The LED will flash green each time the
dial is changed from the OFF, SHUTDOWN, or FEED settings, to
any of the cook settings indicating that the grill is in the startup
cycle.
LED GREEN – A green LED light indicates that the grill in
functioning normally in any of the cook settings.
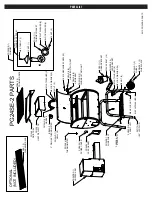
Fig. 8
PG24-2 (1)
COOKING GRATE
PG24-1 (OPTIONAL)
WARMING RACK
(NOT INCLUDED)
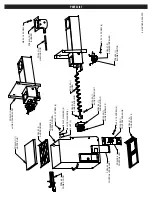
Fig. 10
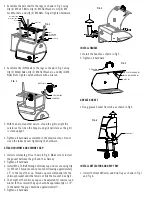
HEAT DEFLECTOR
DRIP TRAY
HEAT DEFLECTOR
DRIP TRAY
FIG. 7
Fig. 9


