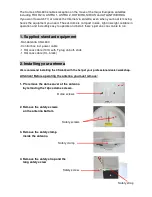
Before mounting we recommend to test the antenna at the selected mounting place!
In some cases it may happen that the antenna does not work properly.
After checking please mount the antenna as follows:
1. Put the antenna on the selected mounting place and adjust if necessary.
The mounting place must be even and there should be no obstructions which may
interfere with reception of the satellite signal.
2. Mark the outline of the antenna’s bolts with a suitable pen.
3. Thrill the mounting holes and fix the antenna with the supplied nuts
3. Connections
Lay the cables carefully to avoid short circuits! Pay attention to existing cables!
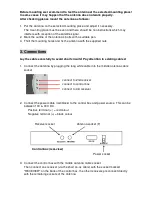
1. Connect the antenna by plugging the long white cable into the middle antenna cable
socket.
2. Connect the power cable (red/black) to the control box and power source. This can be
between 10V & 30V D.C.
Positive terminal (+) = red colour
Negative terminal (+) = black colour
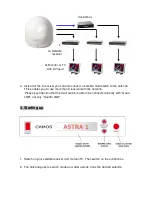
3. Connect the control box with the middle antenna cable socket.
Then connect one receiver (via the short co-ax cable) with the socket marked
"RECEIVER" on the back of the control box, the other receivers pls connect directly
with the remaining sockets of the antenna.
Receiver socket
Antenna socket (F)
Power socket
Control box (rear-view)
connect to control box
connect to 2nd receiver
connect to 3rd receiver


