


82
DMX
IT
ALIANO
POLSKI
ESP
AÑOL
FRANCAIS
DEUTSCH
ENGLISH
MODE STANDALONE DIRECT LED (MÉLANGE DE COULEURS RGBAL)
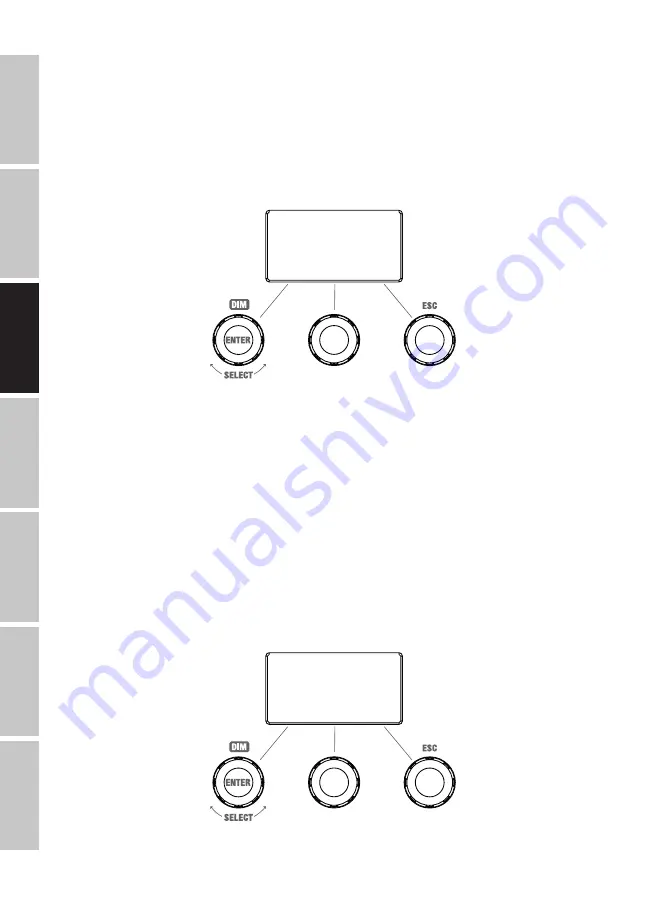
À partir de l’écran principal, appuyer sur l’encodeur rotatif à bouton poussoir de gauche pour ac-
céder au menu permettant de sélectionner le mode de fonctionnement (Mode). Tourner l’encodeur
de gauche (SELECT) pour sélectionner à présent le mode de fonctionnement
DIRECT LED
(faire
attention à la flèche de sélection à gauche), puis appuyer sur l’encodeur de gauche pour valider
(ENTER). Régler ensuite la luminosité générale (DIM) et l’intensité des couleurs R, G, B, A et L ainsi
que l’effet stroboscopique (stroboscope) à l’aide des trois encodeurs rotatifs à bouton poussoir
(voir l’illustration).
Tourner l’encodeur =
Régler la luminosité (DIM)
Appuyer sur l’encodeur =
Sélectionner le mode de fonction-
nement (Mode)
Tourner l’encodeur =
Régler la luminosité de G, A ou
du stroboscope
Appuyer sur l’encodeur =
Ouvrir le menu principal
(Menu)
Tourner l’encodeur =
Régler la luminosité de R, B ou L
Appuyer sur l’encodeur =
Commuter entre R+G, B+A et L+Stroboscope (Colour)
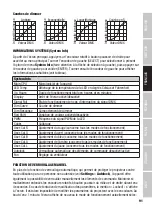
DIRECT LED | Auto
DIM R G
100% 255 255
Mode Colour Menu
MODE STANDALONE GEL (Presets de filtre couleur)
À partir de l’écran principal, appuyer sur l’encodeur rotatif à bouton poussoir de gauche pour ac-
céder au menu permettant de sélectionner le mode de fonctionnement (Mode). Tourner l’encodeur
de gauche (SELECT) pour sélectionner à présent le mode de fonctionnement
GEL
(faire attention
à la flèche de sélection à gauche), puis appuyer sur l’encodeur de gauche pour valider (ENTER).
Régler ensuite la luminosité (DIM) et le preset de filtre couleur (GEL) à l’aide des encodeurs
rotatifs à bouton poussoir de gauche et du milieu (voir l’illustration). Les presets de filtre couleur
avec les désignations de filtre Lee et les numéros de filtre Rosco correspondants se trouvent dans
les tableaux DMX de la section PILOTAGE DMX (mode 18 canaux, canal 16 « Color Presets » sans
« User Colour 1-8 »).
Tourner l’encodeur =
Régler la luminosité (DIM)
Appuyer sur l’encodeur =
Sélectionner le mode de fonction-
nement (Mode)
Appuyer sur l’encodeur =
Ouvrir le menu principal
(Menu)
Tourner l’encodeur =
Sélectionner le preset de filtre
GEL | Auto
DIM GEL
100% Plasa Red
Mode Menu


