background image

14

PL

WAŻNA INFORMACJA: bezpiecznik należy wymieniać wyłącznie na bezpiecznik tego samego typu i o takich samych parametrach. Jeśli 

bezpiecznik stale się przepala, należy skontaktować się z autoryzowanym centrum serwisowym.

IT

NOTA IMPORTANTE: sostituire il fusibile solo con un fusibile dello stesso tipo e con gli stessi valori. Se il fusibile continua a saltare, rivolgersi a 

un centro di assistenza autorizzato.

5

BACKLIT LC DISPLAY / BELEUCHTETES LC-DISPLAY / ÉCRAN LCD RÉTRO-ÉCLAIRÉ / PANTALLA LCD RETROILUMINADA /  

PODŚWIETLANY WYŚWIETLACZ LCD / DISPLAY LCD ILLUMINATO

EN

Displays the operating mode and other system settings. The illumination of the LC display switches off automatically after approx. 70 seconds 

of inactivity. Pressing any one of the 4 control buttons will turn the illumination of the LC display on again.

DE

Zeigt Betriebsmodus und weitere Systemeinstellungen an. Die Beleuchtung des LC-Displays schaltet sich nach circa 70 Sekunden Inaktivität 

automatisch ab. Durch Betätigen einer der 4 Bedientasten wird die Beleuchtung des LC-Displays wieder eingeschaltet.

FR

Affiche le mode de fonctionnement et d’autres paramètres système. Le rétro-éclairage de l’écran LCD s’éteint automatiquement au bout 

d’environ 70 secondes d’inactivité. Pour réactiver le rétro-éclairage, il suffit d’appuyer sur l’une des 4 touches utilisateur.

ES

Indica el modo de funcionamiento y otros parámetros del sistema. Después de 70 segundos de inactividad, la pantalla LCD se apaga 

automáticamente. Pulse uno de los 4 botones para que la pantalla LCD se encienda de nuevo.

PL

Pokazuje informacje o trybie pracy i o innych ustawieniach systemowych. Podświetlenie wyświetlacza LCD wyłącza się automatycznie po ok. 

70 sekundach bezczynności. Po naciśnięciu jednego z 4 przycisków obsługi podświetlenie wyświetlacza LCD zostanie ponownie włączone.

IT

Indica la modalità di funzionamento e altre impostazioni di sistema. L’illuminazione del display LCD si disattiva automaticamente dopo circa 

70 secondi di inattività. Premendo uno dei 4 tasti di comando, l’illuminazione del display LCD si riattiva.

6

CONTROL BUTTONS / BEDIENTASTEN / TOUCHES UTILISATEUR / BOTONES DE AJUSTE / PRZYCISKI OBSŁUGI / TASTI DI COMANDO

EN

MODE - Selection of the standalone functions, DMX modes, and DMX address. ENTER - allows to change a value and confirm value changes. 

UP and DOWN - Press the UP and DOWN buttons for example, to adjust the microphone sensitivity, strobe speed, or the DMX address.

DE

MODE - Auswählen der Stand-Alone-Funktionen, DMX-Modi und DMX-Adresse. ENTER - Ermöglicht einen Wert zu ändern und Wertänderungen 

zu bestätigen. UP und DOWN - Betätigen Sie die UP und DOWN Tasten, um z.B. Mikrofonempfindlichkeit, Stroboskopgeschwindigkeit, oder 

DMX-Adresse zu ändern.

FR

MODE – Sélection des fonctions en mode Autonome, du mode DMX et de l’adresse de départ DMX ENTER – Permet de modifier une valeur et 

de valider les changements de valeurs. UP et DOWN – Les touches UP et DOWN servent, par exemple, à régler la sensibilité du microphone intégré, 

la fréquence des éclairs du stroboscope, ou à modifier l’adresse de départ DMX.

ES

MODE: Permite seleccionar el funcionamiento autónomo, el modo DMX y la dirección DMX. ENTER: Permite cambiar un valor y confirmar los 

cambios. UP y DOWN: Con estos botones se puede, por ejemplo, ajustar la sensibilidad del micrófono, la frecuencia de destellos del estrobo o la 

dirección DMX.

PL

MODE – wybór funkcji Standalone, trybów DMX i adresu DMX. ENTER – umożliwia zmianę wartości i potwierdzanie zmian wartości. UP i DOWN 

– przyciski UP i DOWN służą m.in. do ustawiania czułości mikrofonu, zmiany prędkości efektu lampy stroboskopowej lub do zmiany adresu DMX.

IT

MODE - consente di selezionare le funzioni standalone, le modalità DMX e l’indirizzo DMX. ENTER: consente di modificare un valore e di 

confermarne le modifiche. UP e DOWN: questi tasti consentono ad esempio di modificare la sensibilità del microfono, la velocità stroboscopica o 

l’indirizzo DMX.

7

POWER OUT

EN

Neutrik powerCON power output socket. Used to supply power to additional CAMEO spotlights. Make sure that the total current consumption in 

amperes (A) of all connected devices does not exceed the specified value on the device. 

DE

Neutrik powerCON Netzausgangsbuchse. Dient der Netzversorgung weiterer CAMEO Scheinwerfer. Achten Sie darauf, dass die gesamte 

Stromaufnahme aller angeschlossenen Geräte den auf dem Gerät in Ampere (A) angegebenen Wert nicht überschreitet. 

FR

Embase de renvoi secteur Neutrik powerCON. Permet d’alimenter d’autres projecteurs CAMEO. Assurez-vous que la consommation totale de 

tous les appareils connectés ne dépasse pas la valeur en Ampères (A) indiquée sur l’appareil. 

ES

Salida eléctrica por Neutrik powerCON. Sirve para alimentar otros focos CAMEO. Asegúrese de que el consumo total de todos los equipos 

conectados no supere los amperios especificados del equipo. 

PL

Gniazdo sieciowe wyjściowe Neutrik PowerCON. Gniazdo służy do zasilania dodatkowych reflektorów CAMEO. Należy upewnić się, że całkowity 

pobór mocy wszystkich podłączonych urządzeń nie przekracza wartości podanej na urządzeniu w amperach (A). 

IT

Presa di uscita Neutrik powerCON. Serve per l’alimentazione elettrica di altri fari CAMEO. Assicurarsi che il totale della potenza assorbita di tutti 

i dispositivi collegati all’apparecchio non superi il valore indicato in ampere (A). 

8

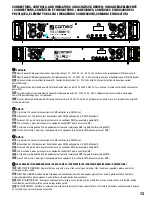
DMX OUT

EN

3-pin female XLR socket for looping through the DMX control signal.

DE

Weibliche 3-Pol XLR-Buchse zum Weiterleiten des DMX-Steuersignals.

FR

Embase XLR 3 points femelle pour renvoi du signal DMX entrant.

ES

XLR hembra de 3 pines para reenviar la señal de control DMX.

PL

3-stykowe, żeńskie gniazdo XLR do przesyłania sygnału sterowania DMX.

IT

Presa XLR femmina a 3 poli per l’inoltro del segnale di controllo DMX.

Содержание CLPIXBAR500PRO

Страница 1: ...1 USER S MANUAL BEDIENUNGSANLEITUNG MANUEL D UTILISATION MANUAL DE USUARIO INSTRUKCJA OBS UGI MANUALE D USO PROFESSIONAL RGBWA UV LED BAR CLPIXBAR500PRO CLPIXBAR600PRO...

Страница 2: ...the equipment is installed securely and cannot fall down 7 During installation observ e the applicable safety regulations for your country 8 Never install and operate the equipment near radiators heat...

Страница 3: ...product has been developed for professional use in the field of event technology and is not suitable as household lighting 2 Do not stare even temporarily directly into the light beam 3 Do not look at...

Страница 4: ...zschlags oder wenn Sie das Ger t l nger nicht verwenden 32 Das Ger t darf nur im spannungsfreien Zustand Trennung des Netzsteckers vom Stromnetz installiert werden 33 Staub und andere Ablagerungen im...

Страница 5: ...amment au niveau de l arri re de l appareil ou de son adaptateur secteur et de la prise murale 26 Lors du branchement de l appareil v rifiez que l acc s au c ble secteur ou au bloc adaptateur reste fa...

Страница 6: ...r el equipo utilice un pa o seco 20 Procure seguir las normas vigentes en su pa s sobre reciclaje de desechos Separe los componentes de pl stico papel y cart n del paquete para reciclarlos en sus cont...

Страница 7: ...Urz dzenie instalowa i eksploatowa z dala od grzejnik w zasobnik w ciep a piec w i innych r de ciep a Zadba o zainstalowanie urz dzenia w taki spos b aby zawsze by o ono wystarczaj co ch odzone i nie...

Страница 8: ...encjalnym zagro eniu dla zdrowia Utrata s uchu w wyniku wysokiego poziomu g o no ci i d ugotrwa ego nara enia podczas stosowania tego produktu mo e powsta wysoki poziom ci nienia akustycznego SPL kt r...

Страница 9: ...di presa Volex prima necessario sbloccare la relativa spina Volex del dispositivo stesso Tirando il cavo di rete per il dispositivo potrebbe spostarsi e cadere provocando danni alle persone o di altr...

Страница 10: ...emote Device Management This remote management system allows the status query and configuration of RDM devices via an RDM enabled controller DE PROFESSIONAL RGBWA UV LED BAR 6IN1 LED 6X12W BAR CLPIXBA...

Страница 11: ...ment Cette extension au DMX512 permet la configuration et le suivi des appareils compatibles via un contr leur compatible RDM ES BARRA DE LEDS PROFESIONAL RGBWA UV BARRA DE 6 LEDS DE 12 W 6 EN 1 CLPIX...

Страница 12: ...o cowych RDM za pomoc sterownika obs uguj cego standard RDM IT BARRA A LED RGBWA UV PROFESSIONALE BARRA DA 6 LED 6 IN 1 DA 12 W CLPIXBAR500PRO BARRA DA 12 LED 6 IN 1 DA 12 W CLPIXBAR600PRO FUNZIONI DI...

Страница 13: ...ines para conectar un equipo de control DMX como una mesa DMX PL 5 stykowe m skie gniazdo XLR do pod czenia urz dzenia steruj cego DMX np pulpitu mikserskiego DMX IT Presa XLR maschio a 5 poli per il...

Страница 14: ...tonome du mode DMX et de l adresse de d part DMX ENTER Permet de modifier une valeur et de valider les changements de valeurs UP et DOWN Les touches UP et DOWN servent par exemple r gler la sensibilit...

Страница 15: ...s appears on the display Pressing the ENTER button makes the cursor appear in the top line of the display Now the desired program 1 15 can be selected using the UP and DOWN buttons Confirm the input w...

Страница 16: ...the upper line of the display Press ENTER and the cursor appears in the lower line of the display and then use the UP and DOWN buttons to select the desired DMX start address between 001 and 512 Conf...

Страница 17: ...mme Dr cken Sie ENTER um die Eingabe zu best tigen MUSIKSTEUERUNG SOUND Dr cken Sie die MODE Taste so oft bis in der oberen Zeile des Displays SOUND erscheint Nun wird der Scheinwerfer ber das eingeba...

Страница 18: ...G00 G99 BLEU Intensit B00 B99 BLANC Intensit W00 W99 AMBRE Intensit A00 A99 UV LUMI RE NOIRE Intensit U00 U99 STROBOSCOPE Fr quence F00 F99 Les programmes 02 15 permettent de r gler s par ment la rapi...

Страница 19: ...los LEDs se va a adiendo a la mezcla para conseguir distintos colores La velocidad del efecto se ajusta de forma independiente y se puede a adir un efecto estrobo 05 CHANG Change 15 colores distintos...

Страница 20: ...racy i prze cza si na tryb kt ry ostatnio wybrano PROGRAMY WEWN TRZNE Naciska przycisk MODE dop ki na wy wietlaczu nie pojawi si jeden z 15 program w wewn trznych Po naci ni ciu przycisku ENTER kursor...

Страница 21: ...menu DIMMER RESPONSE oferuje dwie mo liwo ci reakcji reflektora na zmiany warto ci DMX DIMMER RESPON01 reflektor gwa townie reaguje na zmiany warto ci DMX DIMMER RESPON02 reflektor zachowuje si podob...

Страница 22: ...fetto con i pulsanti UP DOWN 00 indica la velocit pi bassa mentre 99 la pi elevata Premendo nuovamente il pulsante ENTER si conferma l inserimento e il cursore si sposta nel campo Fxx Con i tasti UP e...

Страница 23: ...s avec des diffuseurs amovibles se fixant au bo tier par l interm diaire de 2 ou 3 vis molet es Avec le diffuseur en place la lumi re se r partit de fa on plus homog ne sans diffuseur on gagne en clai...

Страница 24: ...OS EN AMBOS MODELOS CLPIXBAR500PRO Y CLPIXBAR600PRO PL TRYBY DMX 2 KANA OWE 6 KANA OWE 1 6 KANA OWE 2 8 KANA OWE I 12 KANA OWE S IDENTYCZNE W OBU MODELACH CLPIXBAR500PRO ORAZ CLPIXBAR600PRO IT LE MODA...

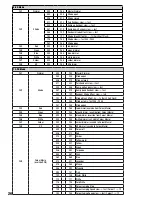
Страница 25: ...e 110 117 White 118 125 Cold White 126 128 Colour Jumping Stop 129 192 Colour Jumping Speed slow fast Colour 1 12 193 255 Colour Fading Speed slow fast Colour 1 12 CH4 White add to Colour Macro 000 25...

Страница 26: ...ndom slow fast 080 102 Random Strobe Effect slow fast 103 127 Strobe Break Effekt 5s 1s Very Short Flash 128 250 Strobe slow fast 0Hz 20Hz 251 255 Strobe open CH3 Red 000 255 red dimmer override from...

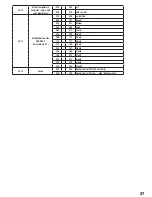
Страница 27: ...lour Macro CT 000 005 no function 006 023 Dream 024 041 Meteor 042 059 Fade 060 077 Jump 078 095 Flow1 096 113 Flow2 114 131 Flow3 132 149 Flow4 150 167 Flow5 168 185 Flow6 186 203 Flow7 204 221 Flow8...

Страница 28: ...255 green dimmer CH11 000 255 blue dimmer CH12 000 255 white dimmer CH13 000 255 amber dimmer CH14 000 255 UV dimmer CH15 Pixel 3 000 255 red dimmer CH16 000 255 green dimmer CH17 000 255 blue dimmer...

Страница 29: ...255 green dimmer CH11 000 255 blue dimmer CH12 000 255 white dimmer CH13 000 255 amber dimmer CH14 000 255 UV dimmer CH15 Pixel 3 000 255 red dimmer CH16 000 255 green dimmer CH17 000 255 blue dimmer...

Страница 30: ...ed slow fast Colour 1 12 193 255 Colour Fading Speed slow fast Colour 1 12 CH40 Colour Temperature Correction add to RGB and Colour Macro 000 005 off 006 255 cold to warm CH41 Auto Mode Override RGBWA...

Страница 31: ...5 amber dimmer CH14 000 255 UV dimmer CH15 Pixel 3 000 255 red dimmer CH16 000 255 green dimmer CH17 000 255 blue dimmer CH18 000 255 white dimmer CH19 000 255 amber dimmer CH20 000 255 UV dimmer CH21...

Страница 32: ...56 000 255 UV dimmer CH57 Pixel 10 000 255 red dimmer CH58 000 255 green dimmer CH59 000 255 blue dimmer CH60 000 255 white dimmer CH61 000 255 amber dimmer CH62 000 255 UV dimmer CH63 Pixel 11 000 25...

Страница 33: ...255 green dimmer CH11 000 255 blue dimmer CH12 000 255 white dimmer CH13 000 255 amber dimmer CH14 000 255 UV dimmer CH15 Pixel 3 000 255 red dimmer CH16 000 255 green dimmer CH17 000 255 blue dimmer...

Страница 34: ...CH53 000 255 blue dimmer CH54 000 255 white dimmer CH55 000 255 amber dimmer CH56 000 255 UV dimmer CH57 Pixel 10 000 255 red dimmer CH58 000 255 green dimmer CH59 000 255 blue dimmer CH60 000 255 whi...

Страница 35: ...ed slow fast Colour 1 12 193 255 Colour Fading Speed slow fast Colour 1 12 CH76 Colour Temperature Correction add to RGB and Colour Macro 000 005 off 006 255 cold to warm CH77 Auto Mode Override RGBWA...

Страница 36: ...first DMX device e g DMX Controller 2 Connect the female 3 pin XLR connector of the DMX cable connected to the first projector to the DMX input male 3 pin socket of the next DMX device In the same wa...

Страница 37: ...B DMX Controller 2 Verbinden Sie den weibliche XLR Stecker des an den ersten Scheinwerfer angeschlossenen DMX Kabels mit dem DMX Eingang m nnliche XLR Buchse des n chsten DMX Ger ts Verbinden Sie den...

Страница 38: ...r XLR m le de l appareil DMX suivant Reliez la sortie DMX de cet appareil selon le m me m thode l entr e DMX de l appareil DMX suivant et ainsi de suite Veillez ce que tous les appareils DMX soient re...

Страница 39: ...embra del cable DMX del primer foco a la entrada DMX del equipo siguiente conector de chasis macho Conecte la salida DMX de este ltimo equipo a la entrada DMX del equipo siguiente y as sucesivamente T...

Страница 40: ...sk wtyczk XLR kabla DMX pod czonego do pierwszego reflektora pod czy do wej cia DMX m skie gniazdo XLR nast pnego urz dzenia DMX Wyj cie DMX tego urz dzenia pod czy w taki sam spos b do wej cia DMX na...

Страница 41: ...o proiettore DMX con l ingresso DMX presa XLR maschio del successivo dispositivo DMX Analogamente collegare l uscita DMX di questo dispositivo con l ingresso DMX del dispositivo seguente e cos via Ten...

Страница 42: ...Neutrik powerCON input and output Fuse F2AL 250 V F2AL 250 V Housing Material aluminium steel aluminium steel Housing Colour black black Housing Cooling convection convection Luminous Intensity Singl...

Страница 43: ...DMX Embase XLR 3 points femelle Embase XLR 5 points femelle Embase XLR 3 points femelle Embase XLR 5 points femelle Modes DMX 2 canaux 6 canaux 1 6 canaux 2 8 canaux 12 canaux 38 canaux 42 canaux 2 c...

Страница 44: ...or Neutrik powerCON Entrada y salida por Neutrik powerCON Fusible F2AL 250V F2AL 250V Material de la carcasa Aluminio acero Aluminio acero Color de la carcasa Negro Negro Refrigeraci n Convecci n Conv...

Страница 45: ...enza di illuminazione 41 a 10 potenza di illuminazione Ingresso DMX A 3 poli e 5 poli XLR maschio A 3 poli e 5 poli XLR maschio Uscita DMX A 3 poli e 5 poli XLR femmina A 3 poli e 5 poli XLR femmina M...

Страница 46: ...t werden FR GARANTIE FABRICANT LIMITATION DE RESPONSABILIT Nos conditions actuelles de garantie et de limitation de responsabilit sont disponibles l adresse suivante http www adamhall com media shop d...

Страница 47: ...ewentualne sprawdzenie uzgodnionych umownie warunk w utylizacji urz dze Niniejszy produkt nie mo e by utylizowany razem z innymi odpadami przemys owymi IT MANUFACTURER S WARRANTY LIMITATION OF LIABILI...

Страница 48: ...48 WWW CAMEOLIGHT COM Adam Hall GmbH Daimlerstrasse 9 61267 Neu Anspach Germany Tel 49 0 6081 9419 0 Fax 49 0 6081 9419 1000 web www adamhall com e mail mail adamhall com REV 01...

Отзывы: