background image

p. 

77

 - M

an

u

al


fo

th

e

 F

A

0

0

0

6

7

-E

N

fo

r th

e F

A

0

0

0

6

7

-E

N

 v.


11

- 0

5

/2

0

15 - © C

am

e S

.p.

A

. - T

h

e m

an

u

al

's c

onte

nt

s m

ay b

e e

d

ite

d at a

ny ti

m

e w

ith

ou

t n

oti

ce

.

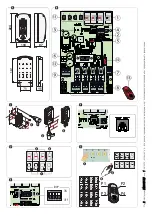
MEMORIZING TRANSMITTERS IN SEQUENTIAL MODE   

-

Press any key on the MASTER transmitter. After 10 

seconds, the receiver's display will read Sto 1. Keep the 
key pressed until the LED stays on permanently.

Within 20 seconds, press a key on the transmitter you 

want to memorize; the wording in the display will flash to 
show that memorization is now complete.

Repeat 

 and 

 for all transmitters you wish to add.

Control several outputs simulataneously 

The control of several operators/accessories connected 
to OUT1 and OUT2 can be associated to one transmitter 
button, even if they are separately associated with the 
MASTER transmitter.

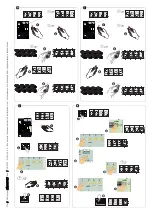
MEMORIZING A SECOND MASTER TRANSMITTER 

You can memorize a second MASTER transmitter among 
those you have already memorized in your receiver.

☞ 

If you repeat this procedure with another transmitter, it 

will replace any previous second MASTER transmitter.

-

 Press a key on the transmitter that you want to memorize 

as second MASTER transmitter. The display will show the 
position occupied by the transmitter.

Set DIP switch 2 to ON. The display will show the first 

free position and a flashing S.

-

 Press 1 (UP) or 2 (DOWN) to select the position.

Press and keep pressed the key of the first MASTER 

transmitter. The display will flash the position and the letter M.

Set DIP switch 2 to OFF.

Edit Password 

The (123) default password can be edited with a combination 
of between 1 and 500.

Set DIP switches 1 and 2 to ON; The display shows 001 

and C.

  Press CLEAR; the display will flash 000 and C.

Press 1 (UP) or 2 (DOWN) to select the default password.

Press CLEAR; the display will flash 123 and C.

  Within five seconds press button 4; the display shows both 

000 and - flashing.

Press 1 (UP) or 2 (DOWN) to setup a new password. Press 

CLEAR; the display will show M flashing.

Set DIP switches 1 and 2 to OFF.

Saving data 

You can save data on the Memory Roll.

 Cut off the main power supply every time you connect 

or disconnect the Memory Roll card.

Fit the Memory Roll card into the connector.

-

 Power up and keep the Master transmitter's button 

MASTER BARRIER the receiver's 2 button pressed 
simultaneously until the letter U appears after about 10 
seconds.

  Release the key and button simultaneously.
  The data is now transferred to the Memory Roll.

-

 Cut off the main power supply and remove the Memory 

Roll card.

Manually memorizing a transmitter 

-

Set DIP switch 2 to ON. The display will show the fi rst free 

position and a fl ashing S.

-

Press 1 (UP) or 2 (DOWN) to select a diff erent free 

position. The S fl ashes only if the position you have 
selected is free.

-

On the MASTER transmitter press the button that is 

associated with the output to which you want to add a 
transmitter; the output you have selected is displayed in 
fl ashing mode.

-

Within 20 seconds press the button of the new transmitter 

you want to memorize; after a few seconds the displayed 
wording stops fl ashing to indicate that memorization has 
been successful.

-

 Set DIP switch 2 back to OFF again.

Deleting a transmitter 

You can delete one or more transmitters.

-

  Press a key on the transmitter you want to delete to 

check which position it occupies in the receiver.

-

  Set DIP switch 1 to ON; the display shows 001 C and 

stays on permanently.

-

  With 1 UP and 2 DOWN, select the position of the 

transmitter that you want to delete.

-

  press any key on the Master transmitter; a fl ashing C is 

displayed

-

  RESETDIP switch 1 to OFF.

Inhibiting the keys on one transmitter 

You can inhibit one or more buttons on a transmitter, 
instead of deleting it.

-  Press a button on the transmitter. The display shows 

which position is occupied.

- SetDIP switch 2 to ON. The display will show the first free 

position and a flashing S.

- Press 1 (UP) or 2 (DOWN) to select the positon. The S on 

the display stays lit.

- Press the button on the transmitter you want to inhibit. 

The writing on the display starts flashing.

- Within ten seconds press CLEAR; the occupied position is 

again displayed and remains lit.

- SetDIP 2 to OFF.

Содержание RBE4RC

Страница 1: ...RICEVITORE ROLLING CODE FA00067M04 Русский RU Français FR English EN Italiano IT MANUALE DI INSTALLAZIONE RBE4RC ...

Страница 2: ...0 75 1 2 3 4 ON A B ON OFF DIP 1 2 3 4 ON 1 2 3 4 ON A TRIMMER UP 1 2 3 4 DOWN UP UP UP UP UP UP P U UP P UP P P P P P P P P Pag 2 2 Manuale FA00067 IT FA00067 IT ver 1 1 05 2015 Came S p A I contenuti del manuale sono da ritenersi suscettibili di modifica in qualsiasi momento senza obbligo di preavviso ...

Страница 3: ...AC DC UP 1 2 3 4 DOWN 1 2 3 4 ON A B 1 2 3 4 ON 1 2 3 4 ON 1 2 3 B CLEAR 1 2 3 4 MP CLE CLE CL CLE CL CLE CLE E CLE E C C C C C C C C C C C CLE E E E E E E E L L L 1 2 3 B 3 4 5 1 2 3 4 ON UP 1 2 3 4 DOWN UP UP UP UP U U UP U UP 1 2 3 4 DOWN UP UP U U UP UP U UP UP U U Pag 3 3 Manuale FA00067 IT FA00067 IT ver 1 1 05 2015 Came S p A I contenuti del manuale sono da ritenersi suscettibili di modific...

Страница 4: ...U UP P P P P P P P P P P P P P P P P P P P P 0V 12V 24V AC DC UP 1 2 3 4 DOWN 1 2 3 4 ON A B x 1 2 3 4 ON 1 2 3 4 ON 0V 12V 24V AC DC UP 1 2 3 4 DOWN 1 2 3 4 ON A B x 1 2 3 4 ON 3 4 B 4 4 4 4 4 4 4 4 4 4 4 4 4 4 4 4 10 1 2 3 4 ON Pag 4 4 Manuale FA00067 IT FA00067 IT ver 1 1 05 2015 Came S p A I contenuti del manuale sono da ritenersi suscettibili di modifica in qualsiasi momento senza obbligo di ...

Страница 5: ... 4 ON B 4 4 4 1 2 3 4 ON A B MEMORY ROLL 1 2 3 4 ON A B MEMORY ROLL UP 1 2 3 4 DOWN U U U U U U U U U U U U U U U U U U U U U U ï ï V W U E1 E3 10 11 1 2 3 5 7 C1 FA 0V 12V 24V AC DC NC NO C NO C NO C NO C x Pag 5 5 Manuale FA00067 IT FA00067 IT ver 1 1 05 2015 Came S p A I contenuti del manuale sono da ritenersi suscettibili di modifica in qualsiasi momento senza obbligo di preavviso ...

Страница 6: ...Trasmettitore MASTER Automazioni e o accessori da comandare OUT1 in modalità monostabile o bistabile OUT2 in modalità monostabile con temporizzazione regolabile da 1 a 300 s OUT3 e OUT4 in modalità monostabile Tipocavo FRORCEI20 22CEIEN50267 2 1 2x1mm2 INSTALLAZIONE Ogni installazione e uso difformi da quanto indicato nel seguente manuale sono da considerarsi vietate Fissare la base della ricevent...

Страница 7: ...gono visualizzati 001 e C Premere CLEAR vengono visualizzati 000 e C lampeggiante Premere 1 UP o 2 DOWN per selezionare la password di default Premere CLEAR vengono visualizzati 123 e C entrambi lampeggianti Entro 5 s premere il pulsante 4 vengono visualizzati 000 e lampeggiante Premere 1 UP o 2 DOWN per impostare una nuova password Premere CLEAR viene visualizzata M lampeggiante Posizionare i DIP...

Страница 8: ...in OFF RipristinodellaprogrammazionedallaMemoryRoll Per ripristinare la programmazione memorizzare un trasmettitore come MASTER e successivamente recuperare i dati dalla scheda Memory Roll Togliere la tensione ogni volta che si connette o si disconnette la scheda Memory Roll Inserire la scheda Memory Roll sul connettore Dare tensione e tenere premuti contemporaneamente il tasto del trasmettitore M...

Страница 9: ...EN ROLLING CODE RECEIVER FA00067 EN INSTALLATION AND OPERATION RBE4RC ...

Страница 10: ...N 1 2 3 4 ON A B x 180 75 1 2 3 4 ON A B ON OFF DIP 1 2 3 4 ON 1 2 3 4 ON A TRIMMER UP 1 2 3 4 DOWN UP UP UP UP UP UP P U UP P UP P P P P P P P P p 2 2 Manual for the FA00067 EN for the FA00067 EN v 1 1 05 2015 Came S p A The manual s contents may be edited at any time without notice ...

Страница 11: ... P P P P 0V 12V 24V AC DC UP 1 2 3 4 DOWN 1 2 3 4 ON A B 1 2 3 4 ON 1 2 3 4 ON 1 2 3 B CLEAR 1 2 3 4 MP CLE CLE CL CLE CL CLE CLE E CLE E C C C C C C C C C C C CLE E E E E E E E L L L 1 2 3 B 3 4 5 1 2 3 4 ON UP 1 2 3 4 DOWN UP UP UP UP U U UP U UP 1 2 3 4 DOWN UP UP U U UP UP U UP UP U U p 3 3 Manual for the FA00067 EN for the FA00067 EN v 1 1 05 2015 Came S p A The manual s contents may be edite...

Страница 12: ... 4 DOWN U U U U U U U UP P P P P P P P P P P P P P P P P P P P P 0V 12V 24V AC DC UP 1 2 3 4 DOWN 1 2 3 4 ON A B x 1 2 3 4 ON 1 2 3 4 ON 0V 12V 24V AC DC UP 1 2 3 4 DOWN 1 2 3 4 ON A B x 1 2 3 4 ON 3 4 B 4 4 4 4 4 4 4 4 4 4 4 4 4 4 4 4 10 1 2 3 4 ON p 4 4 Manual for the FA00067 EN for the FA00067 EN v 1 1 05 2015 Came S p A The manual s contents may be edited at any time without notice ...

Страница 13: ...4 4 4 4 4 4 4 4 1 2 3 4 ON B 4 4 4 1 2 3 4 ON A B MEMORY ROLL 1 2 3 4 ON A B MEMORY ROLL UP 1 2 3 4 DOWN U U U U U U U U U U U U U U U U U U U U U U ï ï V W U E1 E3 10 11 1 2 3 5 7 C1 FA 0V 12V 24V AC DC NC NO C NO C NO C NO C x p 5 5 Manual for the FA00067 EN for the FA00067 EN v 1 1 05 2015 Came S p A The manual s contents may be edited at any time without notice ...

Страница 14: ...1 and 300 seconds OUT3 and OUT4 in monostable mode Cabletype FRORCEI20 22CEIEN50267 2 1 2x1mm2 INSTALLATION Any installation and or use other than that specified in this manual is forbidden Fasten the receiver s base to an impact protected area using suitable tools and equipment Carefully perforate the pre drilled Ø 20 mm holes Fit the cable glands with the corrugated tubes for threading the elect...

Страница 15: ...o OFF Saving data You can save data on the Memory Roll Cut off the main power supply every time you connect or disconnect the Memory Roll card Fit the Memory Roll card into the connector Power up and keep the Master transmitter s button MASTER BARRIER the receiver s 2 button pressed simultaneously until the letter U appears after about 10 seconds Release the key and button simultaneously The data ...

Страница 16: ...f the main power supply every time you connect or disconnect the Memory Roll card Fit the Memory Roll card into the connector Power up and keep simultaneously pressed the key on the MASTERtransmitter and button 1 on the receiver Within 10 seconds the letter P will appear on the display Release the key and button simultaneously The data have been stored in the receiver Cut off the main power supply...

Страница 17: ...FR RÉCEPTEUR ROLLING CODE FA00067 FR MANUEL D INSTALLATION RBE4RC ...

Страница 18: ... B x 180 75 1 2 3 4 ON A B ON OFF DIP 1 2 3 4 ON 1 2 3 4 ON A TRIMMER UP 1 2 3 4 DOWN UP UP UP UP UP UP P U UP P UP P P P P P P P P Page 2 2 Manuel FA00067 FR FA00067 FR vers 1 1 05 2015 Came S p A Le contenu du manuel est susceptible de subir des modifications à tout moment et sans aucun préavis ...

Страница 19: ...2V 24V AC DC UP 1 2 3 4 DOWN 1 2 3 4 ON A B 1 2 3 4 ON 1 2 3 4 ON 1 2 3 B CLEAR 1 2 3 4 MP CLE CLE CL CLE CL CLE CLE E CLE E C C C C C C C C C C C CLE E E E E E E E L L L 1 2 3 B 3 4 5 1 2 3 4 ON UP 1 2 3 4 DOWN UP UP UP UP U U UP U UP 1 2 3 4 DOWN UP UP U U UP UP U UP UP U U Page 3 3 Manuel FA00067 FR FA00067 FR vers 1 1 05 2015 Came S p A Le contenu du manuel est susceptible de subir des modific...

Страница 20: ... U U U U UP P P P P P P P P P P P P P P P P P P P P 0V 12V 24V AC DC UP 1 2 3 4 DOWN 1 2 3 4 ON A B x 1 2 3 4 ON 1 2 3 4 ON 0V 12V 24V AC DC UP 1 2 3 4 DOWN 1 2 3 4 ON A B x 1 2 3 4 ON 3 4 B 4 4 4 4 4 4 4 4 4 4 4 4 4 4 4 4 10 1 2 3 4 ON Page 4 4 Manuel FA00067 FR FA00067 FR vers 1 1 05 2015 Came S p A Le contenu du manuel est susceptible de subir des modifications à tout moment et sans aucun préav...

Страница 21: ...4 1 2 3 4 ON B 4 4 4 1 2 3 4 ON A B MEMORY ROLL 1 2 3 4 ON A B MEMORY ROLL UP 1 2 3 4 DOWN U U U U U U U U U U U U U U U U U U U U U U ï ï V W U E1 E3 10 11 1 2 3 5 7 C1 FA 0V 12V 24V AC DC NC NO C NO C NO C NO C x Page 5 5 Manuel FA00067 FR FA00067 FR vers 1 1 05 2015 Came S p A Le contenu du manuel est susceptible de subir des modifications à tout moment et sans aucun préavis ...

Страница 22: ... en mode monostable ou bistable OUT2 en mode monostable avec temporisation réglable entre 1 et 300 s OUT3 et OUT4 en mode monostable Typecâble FRORCEI20 22CEIEN50267 2 1 2x1mm2 INSTALLATION Toute installation et toute utilisation autres que celles qui sont indiquées dans ce manuel sont interdites Fixer la base du récepteur dans une zone protégée à l aide d éléments de fixation appropriés Percer av...

Страница 23: ...iche les messages 123 et C tous deux clignotants Dans les 5 s qui suivent appuyer sur le bouton 4 l écran affiche les messages 000 et clignotant Appuyer sur 1 UP ou 2 DOWN pour configurer un nouveau mot de passe Appuyer sur CLEAR l écran affiche un M clignotant Positionner les micro interrupteurs DIP 1 et 2 sur OFF Sauvegarde des données Il est possible de sauvegarder les données dans la carte Mem...

Страница 24: ... interrupteurss DIP 1 et 2 sur OFF RéinitialisationdelaprogrammationdepuislaMemoryRoll Pour réinitialiser la programmation mémoriser un émetteur comme MAÎTRE puis récupérer les données depuis la carte Memory Roll Mettre hors tension à chaque connexion ou déconnexion de la carte Memory Roll Insérer la carte Memory Roll sur le connecteur Mettre sous tension et appuyer en même temps sur la TOUCHE de ...

Страница 25: ...RU РАДИОПРИЕМНИК С ДИНАМИЧЕСКИМ КОДОМ FA00067 RU ИНСТРУКЦИЯ ПО МОНТАЖУ RBE4RC ...

Страница 26: ... x 180 75 1 2 3 4 ON A B ON OFF DIP 1 2 3 4 ON 1 2 3 4 ON A UP 1 2 3 4 DOWN UP UP UP UP UP UP P U UP P UP P P P P P P P P Стр 2 2 Инструкция FA00067 RU FA00067 RU вер 1 1 05 2015 Came S p A Все данные содержащиеся в этой инструкции могут быть изменены в любое время и без предварительного уведомления ...

Страница 27: ...AC DC UP 1 2 3 4 DOWN 1 2 3 4 ON A B 1 2 3 4 ON 1 2 3 4 ON 1 2 3 B CLEAR 1 2 3 4 MP CLE CLE CL CLE CL CLE CLE E CLE E C C C C C C C C C C C CLE E E E E E E E L L L 1 2 3 B 3 4 5 1 2 3 4 ON UP 1 2 3 4 DOWN UP UP UP UP U U UP U UP 1 2 3 4 DOWN UP UP U U UP UP U UP UP U U Стр 3 3 Инструкция FA00067 RU FA00067 RU вер 1 1 05 2015 Came S p A Все данные содержащиеся в этой инструкции могут быть изменены ...

Страница 28: ...U UP P P P P P P P P P P P P P P P P P P P P 0V 12V 24V AC DC UP 1 2 3 4 DOWN 1 2 3 4 ON A B x 1 2 3 4 ON 1 2 3 4 ON 0V 12V 24V AC DC UP 1 2 3 4 DOWN 1 2 3 4 ON A B x 1 2 3 4 ON 3 4 B 4 4 4 4 4 4 4 4 4 4 4 4 4 4 4 4 10 1 2 3 4 ON Стр 4 4 Инструкция FA00067 RU FA00067 RU вер 1 1 05 2015 Came S p A Все данные содержащиеся в этой инструкции могут быть изменены в любое время и без предварительного уве...

Страница 29: ...3 4 ON B 4 4 4 1 2 3 4 ON A B MEMORY ROLL 1 2 3 4 ON A B MEMORY ROLL UP 1 2 3 4 DOWN U U U U U U U U U U U U U U U U U U U U U U ï ï V W U E1 E3 10 11 1 2 3 5 7 C1 FA 0V 12V 24V AC DC NC NO C NO C NO C NO C x Стр 5 5 Инструкция FA00067 RU FA00067 RU вер 1 1 05 2015 Came S p A Все данные содержащиеся в этой инструкции могут быть изменены в любое время и без предварительного уведомления ...

Страница 30: ...брос 5 Разъем для карты памяти 6 Разъем RS232 для подключения к ПК 7 Контакты подключения антенны 8 Контакты внешних подключений 9 Контакты электропитания 10 Разъем для платы радиоприемника AF 11 Кнопки программирования 12 Предохранитель 250 мА 13 МАСТЕР передатчик Управляемые приводы и или аксессуары OUT1 в моностабильном или бистабильном режиме OUT2 в моностабильном режиме с регулировкой времени...

Страница 31: ...енному передатчику Установите DIP переключатель 2 в положение ON На дисплее появится первая свободная позиция и буква S начнет мигать Нажмите1 ВВЕРХ или2 ВНИЗ длявыборапозиции Нажмите и удерживайте кнопку первого МАСТЕР передатчика Надисплеемигаютномерпозицииибуква М Установите DIP переключатель 2 в положение OFF Изменение пароля Можно изменить пароль по умолчанию 123 на комбинацию от 1 до 500 Уст...

Страница 32: ...олное удаление настроек программирования Установите сперва DIP переключатель 1 и затем DIP 2 в положение ON на дисплее появятся 001 и C Нажмите CLEAR буква C мигает Нажмите 1 ВВЕРХ или 2 ВНИЗ для ввода пароля Нажмите CLEAR пароль и буква C мигают В течение 5 секунд нажмите кнопку 4 на дисплее отображаются CLr и А затем 001 и С мигающие Память свободна Установите DIP переключатели 1 и 2 в положение...

Отзывы: