24
Manually setting sub crossovers and bass
management
The CXR performs bass management for any speaker that is set to ‘Small’ in
the Speaker Configuration. This means that bass for speakers that are unable
to reproduce bass effectively is instead routed to the subwoofer.
CXR Speaker Configuration
Menu
Exit
C
FL
SW1
FL
SL
SBL
FR
SR
SBR
Front Left
Test Tone : Off
Size Small
Distance
3.6 m
Level
O.O dB
Crossover
8O Hz
Next Speaker
Back
OK
OK
Speaker Configuration: 7.1Ch
The crossover adjustments in the Speaker Configuration crossover menu are
used to determine the point at which this transition is made. In other words
they set the frequency below which bass is routed away from any ‘Small’
speakers and into the Subwoofer channel. It should be understood that bass
sent to the subwoofer by bass management is different to bass encoded into
the surround-sound material as a dedicated Low Frequency Effects channel.
If the source material contains a separate LFE channel (i.e. Dolby Digital or
DTS material) this is always routed to the subwoofer (if it is On) and is not
affected by the crossover setting. Some encoding types (such as Dolby Pro
Logic II/IIx and Neo:6) do not actually have a LFE channel.
The default setting for all bass management crossovers is 80Hz and is a good
global starting point. If you do not wish to make any adjustments simply leave
all crossovers at this default setting.
Note:
These settings are actually only used for speakers that have been set
to Small in the Speaker Configuration Menu.
For advanced users it is however possible to adjust the speaker crossovers
used for any speakers set as ‘Small’ independently to allow for the fact that
you may wish to direct bass away from front floorstanding speakers (and to
the Subwoofer) at perhaps 50Hz but away from Surround Left and Rights at
perhaps 100Hz. If you wish to make these adjustments it is best to consult
your loudspeaker manufacturers documentation or contact your dealer to
determine the frequency response of your system and where each speaker
types bass response starts to tail off (often called the 3dB or 6dB roll off/cutoff
point). This would be approximately the point the corresponding crossover
should be set to.
Alternatively, the auto setup procedure can measure and set appropriate
crossover points for your speakers.
Speaker Auto setup
Before auto setup can be run you should select the number of subwoofers
in your system.
If a one or two subwoofers are selected then the auto setup will use SW1 for
the setup. SW2 is not used in the auto setup calibration; the setting for SW1
is copied to SW2 but can then be individually modified in the manual Speaker
Configuration if necessary. The two subwoofer outputs use the same signal
but can be set with different levels.
Using the supplied calibrated microphone, the CXR can perform 'auto setup'
by automatically determining the number of speakers you have connected,
their 'size' and crossover frequencies (for the purpose of bass management)
and their distances from the listening position.
Before performing this procedure, make sure to connect and correctly
position all of your speakers.
If rather than a standard 5.1 or 7.1 setup, you are bi-amping your front
speakers or wish to run a 5.1 + Height configuration be sure to make these
settings first before then running auto setup. This is important as the CXR
needs this information in order to test the speakers correctly during the auto
setup process.
Performing auto setup
Auto setup will go through the process to check if your speakers are available,
its size, crossover and distance from the microphone.
CXR200
HDMI 8/ MHL
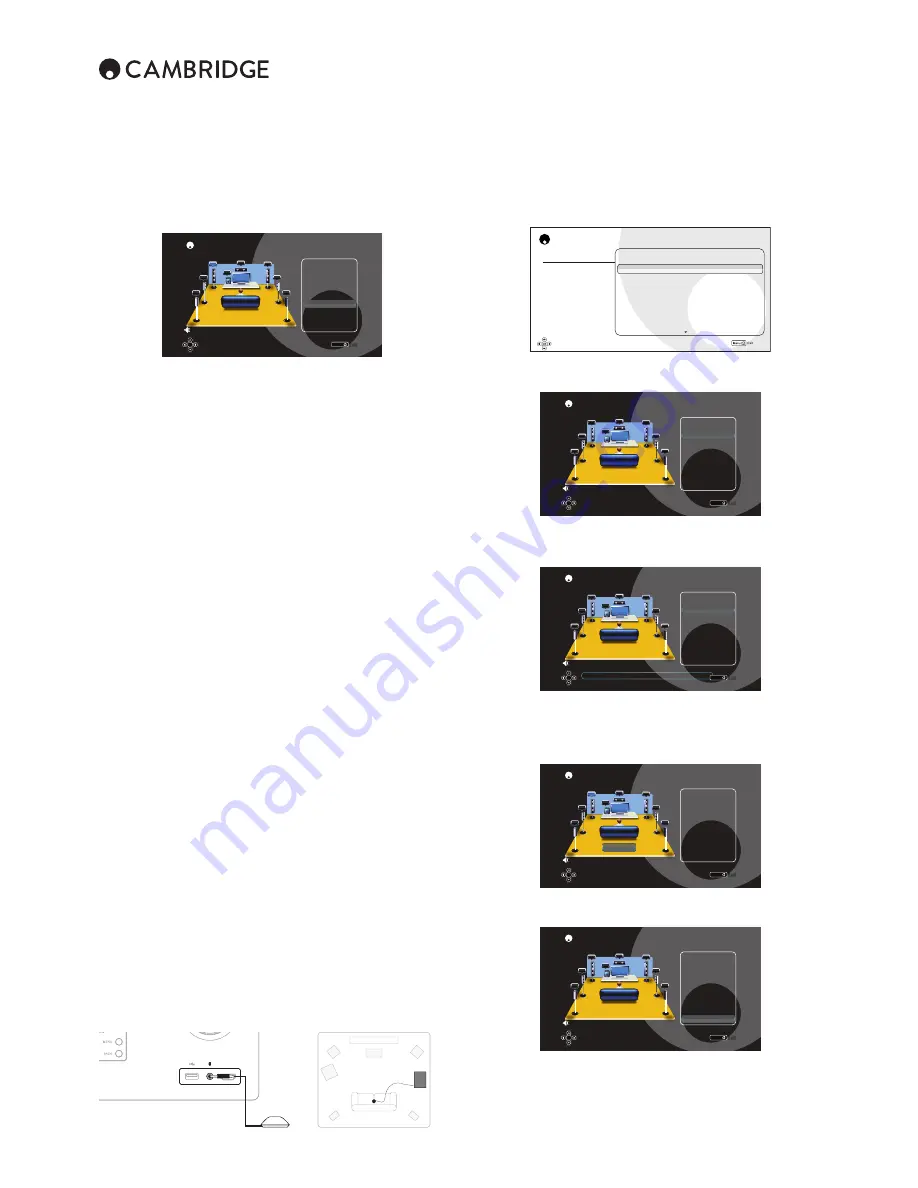
Firstly, connect the supplied microphone to the front MP3 audio input on the
front panel and place it at your normal listening position in the room.
Press the Home button on the remote control to access the Setup Menu
and then select the Speaker Setup Menu. Now select the Auto Setup menu.
CXR Setup Menu
Speaker Setup
Input Setup
Zone 2 Settings
Network Setup
General Settings
HDMI Output Setup
Advanced Setup
Speaker Configuration
Auto Setup
Unit
SW Selection
Back Amp Configuration
►
►
Metres
SubSubwoofer2
Bi-Amp
Select 'Run Auto Setup' option to begin the process.
CXR Speaker Configuration
Menu
Exit
C
FL
SW1
SL
SBL
FR
SR
SBR
Test Tone : Off
Run Auto Setup
Accept Setup
OK
OK
Speaker Configuration: 7.1Ch
You will then be asked to select which speaker channel setup you want to
process. Press the Enter button on the remote.
CXR Speaker Auto Setup
Menu
Exit
C
FL
SW1
SL
SBL
FR
SR
SBR
Select Speaker Channel
Test Tone : Off
7.1
5.1
3.1
2.1
OK
OK
Speaker Configuration: 7.1Ch
Please check mic is connected in MP3 aux input.
The CXR will start the auto calibration process and a series of test signals will
now be sent to all of the speakers (including the Subwoofer).
Once finished the CXR will display a screen similar to the one below. Press
the Enter button on the remote to accept the auto calibration setup.
CXR Speaker Configuration
Menu
Exit
C
FL
SW1
SL
SBL
FR
SR
SBR
Test Tone : Off
Accept Setup
OK
OK
Speaker Configuration: 7.1Ch
FL
Front Left
Size Small
Distance 2.4m
Level -2.OdB
Crossover
6O Hz
Next Speaker
Back
When an error occurred during the process, the CXR will display a screen
similar below.
CXR Speaker Auto Setup
Menu
Exit
C
FL
SW1
SL
SBL
FR
SR
SBR
Test Tone : Off
Error Speaker List:
SUB
Back
OK
OK
Speaker Configuration: 7.1Ch
Speaker Error Status
If any of the speaker appear unconnected, carefully check the connections on
the speaker and the back of the CXR. Also check any bi-wiring links on the
speakers. Run the Auto Setup again.
When the auto setup of the CXR is completed successfully, check all
measurements are correct then select Accept Setup.
Speaker Configuration cont.
Содержание CXR120
Страница 1: ...CXR120 200 AV RECEIVER ...


