background image

3

Speaker Placement

Installation Sequence

1. Read all of the instructions

before installing the
speaker system.

2. Using the placement instructions

as a guide, position the satellites,
the center channel speaker and
subwoofer around your com-
puter. Install the Desktop Stands
and Floor Stands as appropriate.

3. Connect the satellite speakers,

center channel speaker, and
subwoofer to the back of the
Decoder Amplifier. Be sure to
connect the subwoofer’s black
plug to the 

LFE

 output jack and

the center channel speaker’s
black plug to the 

C

 output jack.

4. Connect the SPDIF output of your

digital program source to the
Decoder Amplifier. Connect the
stereo output of your sound card
(line out) to the LINE IN of the
Decoder Amplifier. If present,
connect the rear stereo output of
your sound card to the REAR IN
input of the Decoder Amplifier.

5. Verify the Decoder Amplifier’s

power switch is in the “off”
position. Connect the power
supply adapter to the
Decoder Amplifier.

6. Turn on the power. Set the

Volume Control to approximately
“10 o’clock”. Press the Speaker
Test button. Use the test sound to
verify that each speaker is
operating properly. Then adjust
the position of each loudspeaker
so each can be heard clearly.
Finally, adjust the Center,
Subwoofer and Surround level
controls for balanced output
between the speakers. Press
the Test mode button again,
if necessary.

7. You may wish to experiment with

speaker placement briefly before
concealing the connecting cables
and making the installation
more permanent.

8. The unit is ready for you to enjoy.

Refer to the Quick Reference
guide for information about
settings for specific program
sources like DVD, CDs, Video CD
and games.

The Front Satellites.

 The front

satellites play stereo music, the off-
screen sounds of video playback
and the front channels of four
channel games.

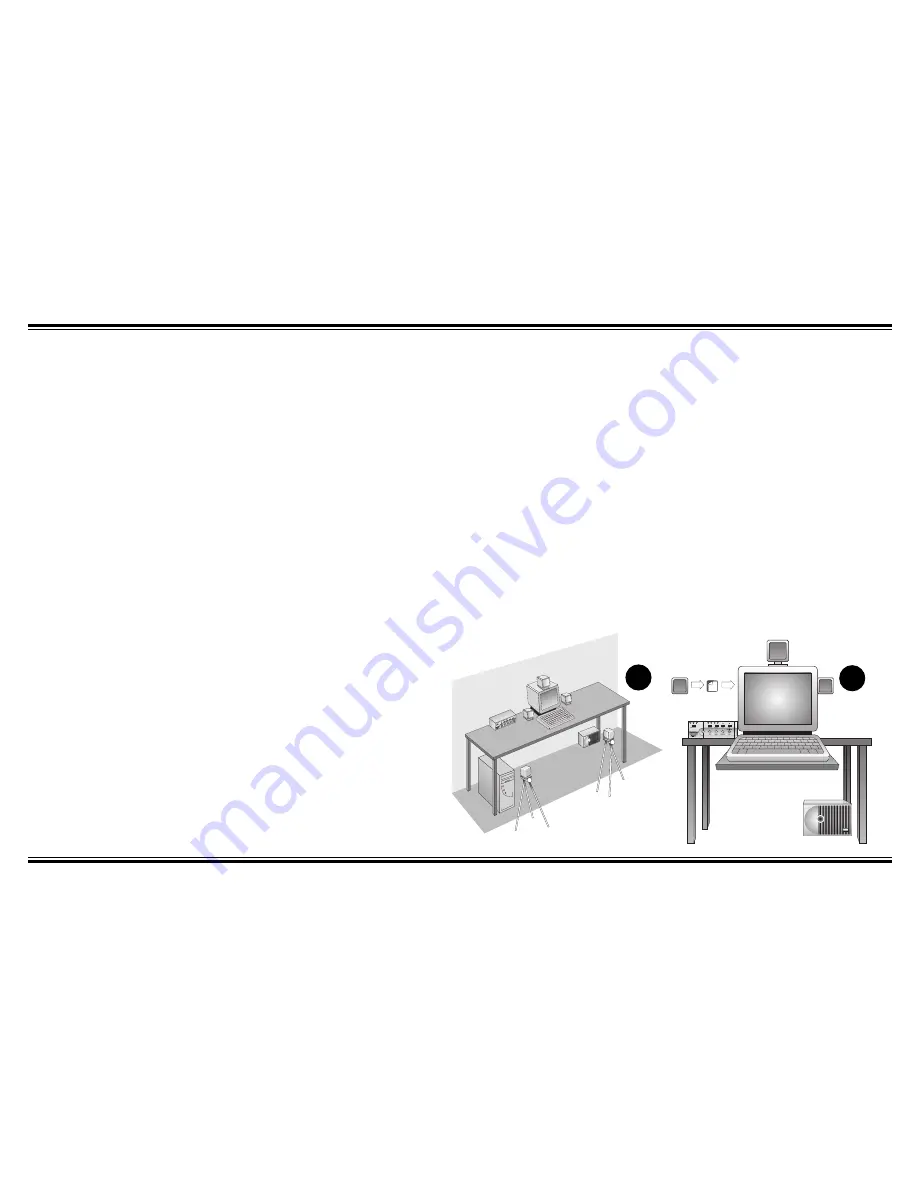
These satellites should be placed

to the sides of your monitor (see

Diagram A

). Be sure to have a clear

line of sight from your listening
position to these satellites. The
satellites intended for front
placement have 3 meters (9 feet)
of cable.

Install the satellite’s Desktop

Stands when using them on the
desktop. Be sure to apply the self-
adhesive feet to the Desktop Stands.
The feet prevent movement on the
desktop.

The satellites may also be hung on

the wall behind the monitor using the
screw and wall anchors provided (see
“Mounting The Speakers”, page 7).

If you wish to save desktop space,

use the hook and loop fasteners to
attach the satellite speakers to the
sides of the computer monitor
(see 

Diagram B

).

The Center Channel Speaker.

 The

center channel speaker provides the
on-screen dialog and sounds in
Dolby Digital, Dolby Surround or
Creative Multi Speaker Surround
modes. It should be placed as close to
the center of your computer monitor
as possible.

A

B

Содержание DTT51

Страница 1: ...1998 Cambridge SoundWorks Inc DeskTopTheater 5 1 Amplified Five Satellite Subwoofer Speaker System With Dolby Digital Processor Installation and Operating Instructions...

Страница 2: ...Class B limits for radio interference as specified in the Canadian Department of Communications Radio Interference Regulations Cet appareil est conforme aux normes de CLASSE B d interference radio tel...

Страница 3: ...n the other This plug will fit into the power outlet only one way This is a safety feature If you are unable to insert the plug fully into the outlet try reversing the plug If the plug should still fa...

Страница 4: ...r Channel Stands 6 The Floor Stands 7 Mounting The Speakers 7 Decoder Amplifier Placement 8 Making Connections 8 Wiring Diagram 9 Decoder Amplifier Functions 9 Surround Reference 11 Dolby Digital 11 D...

Страница 5: ...Dolby Digital multichannel sound from your computer It makes the most of your computer DVD player processing both Dolby Digital and Dolby Surround program material It will decode the Dolby Surround c...

Страница 6: ...e Input Processed SPDIF IN CREATIVE MULTI SPEAKER SURROUND MUSIC MOVIE STEREO FOURPOINT PRO LOGIC DIGITAL PRO LOGIC ANALOG DOLBY DIGITAL DOLBY MODE Digital Pro Logic Mode Auto Detected DeskTop Theater...

Страница 7: ...utput between the speakers Press the Test mode button again if necessary 7 You may wish to experiment with speaker placement briefly before concealing the connecting cables and making the installation...

Страница 8: ...ge 7 The Rear Satellites The rear satellites provide the surround effects in Dolby Digital Dolby Surround and Creative Multi Speaker Surround modes They also provide the discrete rear sounds produced...

Страница 9: ...ram I After you positioned the rear satellites use the test sound to make sure each speaker can be heard clearly The Subwoofer The subwoofer s optimum position is on the floor against the wall under t...

Страница 10: ...l the rear Satellites in the Floor Stands do not apply the self adhesive feet to the base of their Desktop Stands The stands for the center channel speaker are installed by inserting the strut of the...

Страница 11: ...feet attached to the base of the desktop stand The front of the slot is the side further away from the rear leg socket Make sure the stand is securely pressed into the slot 5 At the base of the rear...

Страница 12: ...gital SPDIF output of your signal source to the Decoder Amplifier using the cable with RCA plugs at each end Use the signal cable with green stereo miniplugs at each end to connect the stereo line out...

Страница 13: ...four channel positional audio effects No lights illuminated Mutes any analog stereo or CMSS output Use this setting if you wish to play an analog stereo signal through the Dolby Pro Logic processor Fo...

Страница 14: ...the test sound can be clearly heard Finally adjust the front panel level controls for the center subwoofer and rear speakers Adjust each control so its speaker achieves a balanced output level with t...

Страница 15: ...urce may be a DVD s digital output Most DVD s containing Dolby Surround program material will cause both the Dolby Digital and Digital Pro Logic lights to illuminate DeskTop Theater 5 1 will decode th...

Страница 16: ...ut for WAV AVI MIDI and other audio software files Dolby decoding cannot decode WAVE formatted sources Audio Mode Selection The stereo soundtracks of some movies on the Video CD VCD format contain dif...

Страница 17: ...1000 Faxback information is available by calling 405 372 5227 Specifications DeskTop Theater 5 1 Six channel Amplifier Specifications Left Right Left Surround Right Surround amplifiers each of four On...

Страница 18: ...90 43 HST 33 1 39 20 90 47 V 32bis Minitel 3615 CREATIVE and 3617 CREATIVE Germany Tel 49 089 9579081 for Central and Fax 49 089 9577453 Eastern Europe BBS 49 089 9577274 Holland Tel 3115578244 Italy...

Страница 19: ...n material and workmanship for a period of one 1 year from date of purchase With respect to defects Cambridge SoundWorks will at its option replace the product or repair the defect in the product with...

Страница 20: ...311 Needham Street Newton MA 02464 1 800 367 4434 Fax 617 527 3194 www hifi com or e mail us at info hifi com 898 Rev A Printed In China...

Отзывы: