


740A
azur
9
ENGLISH
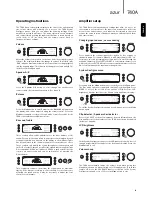
Operating instructions
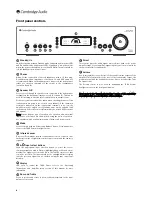
The 740A has a custom-made display on the front of the unit showing
the current status and allowing you to access the 740A System
Configure menus. Here you can adjust the listening settings of the
amplifier to personal preference. The menu system is easy to navigate
and control, simply by using the input select buttons to turn a feature on
(solid circle) or off (no circle) and the volume control knob to
increase/decrease settings.
Volume
Adjust the volume control knob on the front panel (or using the remote
control). The display will show the change in volume in decibels (dB).
‘OdB’ indicates maximum volume while lower volume settings progress
into the negative range. This can also be changed to volume units (0-72)
in the System Configure menu.
Speaker A/B
Press the
Speaker A/B
button to scroll through the speaker sets
connected via the rear panel: speakers A, B or A and B.
Balance
Press the
Mode
button to enter Balance mode. BALANCE will appear on
the display and can be adjusted using the volume control. Press the
Mode
button again to return to Volume mode or wait 5 seconds for the
740A to automatically exit Balance mode.
Bass and Treble
These controls allow subtle adjustments to the tonal balance of the
sound. Press to release and rotate to adjust (press back in when desired
settings found). An icon appears on the display to show if Bass/Treble
has been adjusted. In the central position these controls have no effect.
These controls only modify the sound through your loudspeakers and
the Pre-Out sockets; they do not affect the signals sent through the Tape
Out connections. With a well produced CD and a good system the tone
controls are unnecessary and can be switched out by pressing the
Direct
button:
This completely removes them from the signal path for maximum
fidelity. If the musical recording is of poor quality or other factors are
affecting the sound quality, it may be necessary to adjust the tone
controls to compensate.
Speaker A/B
Volume
Mode
Volume
Mode
Volume
Bass
Treble
Direct
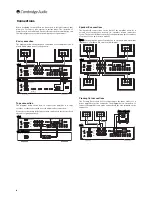
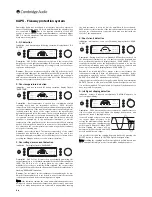
Amplifier setup
The 740A features many advanced settings that allow it’s use to be
customised to user preference. The inputs can be named to reflect the
actual source units you have, each input can be trimmed so that each
sounds the same in terms of loudness when you switch between them
and other options.
Changing input names / source naming
Press and hold the relevant input select button for four seconds to
change its name. For example, if Input 1 is a CD player, name it “CD” etc.
Letters are selected by turning the volume control to scroll through the
available characters. Press LEFT or RIGHT to select which character you
wish to edit. Press EXT CHAR to access an extended character set. Press
OK to confirm and exit the input name change menu.
System Configure menu
Press and hold the
Mode
button to access the System Configure menu.
The first menu options are Input gain trim and Fixed input gain. Press
MORE to access the second menu options of Clip detector, LCD
brightness, Speaker short detector, Volume ramp and Volume display.
To exit the System Configure menu and its sub-menus, press the
Mode
button again.
Clip detector / Speaker short detector
Refer to the ‘CAP5’ section of this manual for more information on the
Clip and Short detection features of the 740A, as both can be enabled
(default) or disabled.
LCD brightness
In the System Configure menu press the LCD input select button to scroll
through bright/dim/off settings for the front panel display. Press the
Mode
button to exit.
Volume ramp
The 740A automatically ramps the volume down when going into
Standby mode and up when coming out of Standby mode. To turn this
feature off, press the VOL RAMP input select button in the System
Configure menu and set to off. Press the
Mode
button to exit.
Mode
Volume
Mode
Volume
Mode
Volume
Mode
Volume
Mode
Volume
Bass
Treble
Direct


