Cambridge Audio 851W Скачать руководство пользователя страница 5

851W

azur

ENGLISH

5

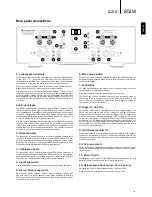
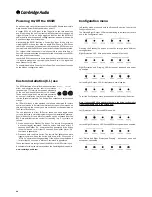
Rear panel connections

1. Loudspeaker terminals

For normal wiring, connect the wires from your left channel loudspeaker 

to  the  LEFT  +  &  -  terminals,  and  the  wires  from  the  right  channel 

loudspeaker to the RIGHT + & - terminals. In each case, the red terminal 

is the positive output and the black terminal is the negative output. 
Other  dual  mono  schemes  are  also  possible  if  two  851Ws  are  used. 

Refer to later sections of this manual for more information.
Use  speakers  with  a  nominal  impedance  of  between  4-8  ohms.  Care 

should be taken to ensure no stray strands of wire short the loudspeaker 

outputs  together.  Please  ensure  that  the  loudspeaker  terminals  have 

been tightened completely to provide a good electrical connection. It is 

also possible for the sound quality to be affected if the screw terminals 

are loose.

Audio input types

The 851W features either unbalanced (phono/RCA) or balanced (XLR) 

input connections. Either type may be used but not both at the same 

time. The balanced connection is the higher quality option and can reject 

noise and interference in the cable when used with other equipment 

that supports this function. An XLR connector is wired Pin 1 - Ground; Pin 

2 - Hot (in-phase); Pin 3 - Cold (phase-inverted).
Use the Left and Right Input Type switch (Item 4) to select the connection 

type  you wish  to  use.  When  using  either the balanced or unbalanced 

input,  make  sure  that  no  cables  or  equipment  are  connected  to  the 

unused input, as this may degrade operation. The unused input does 

not need to be terminated and this should not be done.

2. Balanced Audio

For connection to the balanced XLR outputs of suitable pre-amplifiers 

that have this kind of output (such as our own 851E model). The pre-

amplifier used should be capable of providing at least 1V rms of output 

per phase (i.e. at both of  + and – terminals of the XLR, more is also fine). 

Nearly all modern pre-amplifiers fulfill this requirement.

3. Unbalanced Audio

For  connection  to  the  normal  (single  ended)  RCA/Phono  outputs  of  a 

suitable pre-amplifier (such as our own 851E model). The pre-amplifier 

used should be capable of providing at least 1V rms of output (more is 

fine). Nearly all modern pre-amplifiers fulfil this requirement.

4. Input Type switch

Use to select a balanced or unbalanced connection type for the input.

5. Stereo/Mono mode switch

Switches  the  851W  between  ‘normal’  Stereo  operation  (where  one 

851W is used for a pair of speakers) and Mono operation (where two 

851W’s are used one for each speaker). Refer to later sections of this 

manual for more information.

6. Mono mode switch

When Mono mode has been selected, switches the 851W between Bi-

Amped Mono and Bridged Mono. Refer to later sections of this manual 

for more information.

7. Control Bus

In

 - Allows un-modulated commands from multi-room systems or other 

components to be received by the unit.

Out

 - Loop out for Control Bus commands to another unit.

The  851W  can  also  be  switched  between  On  and  Standby  mode  by 

connecting  the  Control  Bus  output  of  an  851E  pre-amplifier  to  the 

Control Bus input of the 851W. Refer to the ‘Power syncing’ section of 

this manual for more information.

8. Trigger In, Out/Thru

For  Custom  Install  use  or  with  preamps  and  with  trigger  outputs,  the 

851W  can  be  turned  on  and  off  (i.e.  brought  in  and  out  of  Standby 

mode) by the presence of 5-12V DC at the Trigger input. A trigger input 

will also produce an internally generated 12V DC trigger output at the 

Output/Thru connection. Turning the 851W on from the front panel also 

produces a 12V DC trigger output at the Output/Thru connection. This 

can  be  used  to  turn  on/Standby  other  connected  power  amplifiers  or 

other equipment if desired. Refer to the ‘Power syncing’ section of this 

manual for more information. 

9. IR (Infra-Red) Emitter In

Allows modulated IR commands from multi-room systems or IR repeater 

systems to be received by the unit. Commands received here are not 

looped out of the Control Bus. Refer to the ‘Custom installation’ section 

for more information. 

10. AC power socket

Once you have completed all connections to the unit, plug the AC power 

cable into an appropriate mains socket then switch on. Your unit is now 

ready for use.

11. Power On/Off

Switches the unit on and off. If the 851W is not going to be used for long 

periods of time it should be turned off using this switch.

12. 

Mains Voltage Selector Switch (CU version only)

Switches the 851W mains voltage between 100V and 115V. 

Note:

 For use by Cambridge Audio service personnel only!

1

2

2

3

3

4

4

6

5

11

10

7

8

9

12

1

Содержание 851W

Страница 1: ...Your music our passion 851W azur Power Amplifier User s manual 2 ENGLISH ...

Страница 2: ...ies for left and right channels twin rectifiers and separate PSUs for dual mono operation of the left and right power amplifiers Your power amplifier can only be as good as the system it is connected to Please do not compromise on your pre amplifier source equipment speakers or cabling Naturally we recommend models from the Cambridge Audio Azur range particularly the matching 851E pre amplifier Th...

Страница 3: ...uct any air inlets or outlet grilles Do not cover the ventilation grilles with items such as newspapers tablecloths curtains etc This unit must not be used near water or exposed to dripping or splashing water or other liquids No objects filled with liquid such as vases shall be placed on the unit Important safety instructions The lightning flash with the arrowhead symbol within an equilateral tria...

Страница 4: ...e units are not user serviceable Never attempt to repair disassemble or reconstruct the unit if there seems to be a problem A serious electric shock could result if this precautionary measure is ignored In the event of a problem or failure please contact your dealer Cambridge Audio warrants this product to be free from defects in materials and workmanship subject to the terms set forth below Cambr...

Страница 5: ...y all modern pre amplifiers fulfil this requirement 4 Input Type switch Use to select a balanced or unbalanced connection type for the input 5 Stereo Mono mode switch Switches the 851W between normal Stereo operation where one 851W is used for a pair of speakers and Mono operation where two 851W s are used one for each speaker Refer to later sections of this manual for more information 6 Mono mode...

Страница 6: ...ive The LED light emitting diode is on for an active output off for inactive i e muted 3 Protection If this LED is constantly on the 851W has detected a fault on either the Left or Right channel and is protecting itself 4 Clipping This LED indicates that the 851W has detected that either the Left or Right channel is being overdriven or clipped Clipping distortion is caused at high volume levels wh...

Страница 7: ...ency terminals to the high frequency terminals must not be removed only to be removed for a bi wiring system Unbalanced stereo connections The diagram below shows the 851W connected to an 851E using the Unbalanced Audio inputs via phono RCA connectors single wired to a pair of loudspeakers Balanced stereo connections The diagram below shows the 851W connected to an 851E using the Balanced Audio in...

Страница 8: ...e recommended method when using an 851E and other Cambridge Audio equipment with Control Bus In Out Trigger In Out can be useful if the 851W and indeed 851E is desired to be controlled by other equipment that features trigger outputs Custom install and or Multi Room Systems etc Advanced connections As well as normal single wired stereo operation whether balanced or unbalanced several other modes o...

Страница 9: ...Mono settings that allow two or more 851Ws to be used as mono blocs for high end systems Below is an example using two 851Ws in Bi Amped Mono with an 851E In Bi Amped Mono mode each 851W drives one speaker Note Unbalanced connections can also be used Important 851W settings Only use the Left Inputs on the 851W for Bi Amped operation In this configuration the Stereo Mono switch on the 851W must be ...

Страница 10: ...ut demodulated on the Control Bus Output The unit responds to direct IR Control codes as well as toggle codes for some features to simplify programming custom installation systems Special direct On Off and Mute commands can be accessed from the 851E pre amplifier remote control for teaching into C I systems as follows 1 Press and hold the Standby On button The remote first generates a standby togg...

Страница 11: ...ring the output transistors to keep them working inside their Safe Operating Area SOA The SOA is a set of limits given by the output transistor manufacturer to ensure reliability V I also protects the amplifier against short circuits on the speaker terminals during use Remedy The amplifier is being used outside its performance envelope Reduce the volume Also check to see if there is a short or par...

Страница 12: ...Bi Amp or Bridged There is a loud buzz or hum Ensure that no interconnects are loose or defective Ensure that your tape deck turntable is not too close to the unit There is weak bass or diffused stereo imaging Ensure that the loudspeakers are not wired out of phase For more frequently asked questions FAQs technical advice and information on getting the most out of your 851W please visit the Suppor...

Страница 13: ...e Audio is a brand of Audio Partnership Plc Registered Office Gallery Court Hankey Place London SE1 4BB United Kingdom Registered in England No 2953313 www cambridge audio com 2013 Cambridge Audio Ltd AP32386 2 ...

Отзывы: