background image


TLC Scanner 4 


Instruction Manual, June 2018 

Page 13 

5


Maintenance 

Dust and powder (e.g. from TLC plates) that has accumulated in 
the measuring compartment has to be removed with  a vacuum 
cleaner regurarly. 
Maintenance should be performed only by authorized technicians 
who are familiar with the Scanner’s technical and functional char-
acteristics. Experience has shown that a Scanner 4 in daily use re-
quires maintenance about once a year. If the instrument is used less 
frequently, maintenance should be carried out every two years.


Before opening or replacing parts on the instrument, make sure the 
instrument is disconected from the mains. 

5.1


Replacing the lamps 

 
Exchange lamps only when they have cooled down properly. 


Switch OFF the Scanner 4 and disconnect the power cord. Let 
the lamps cool down 


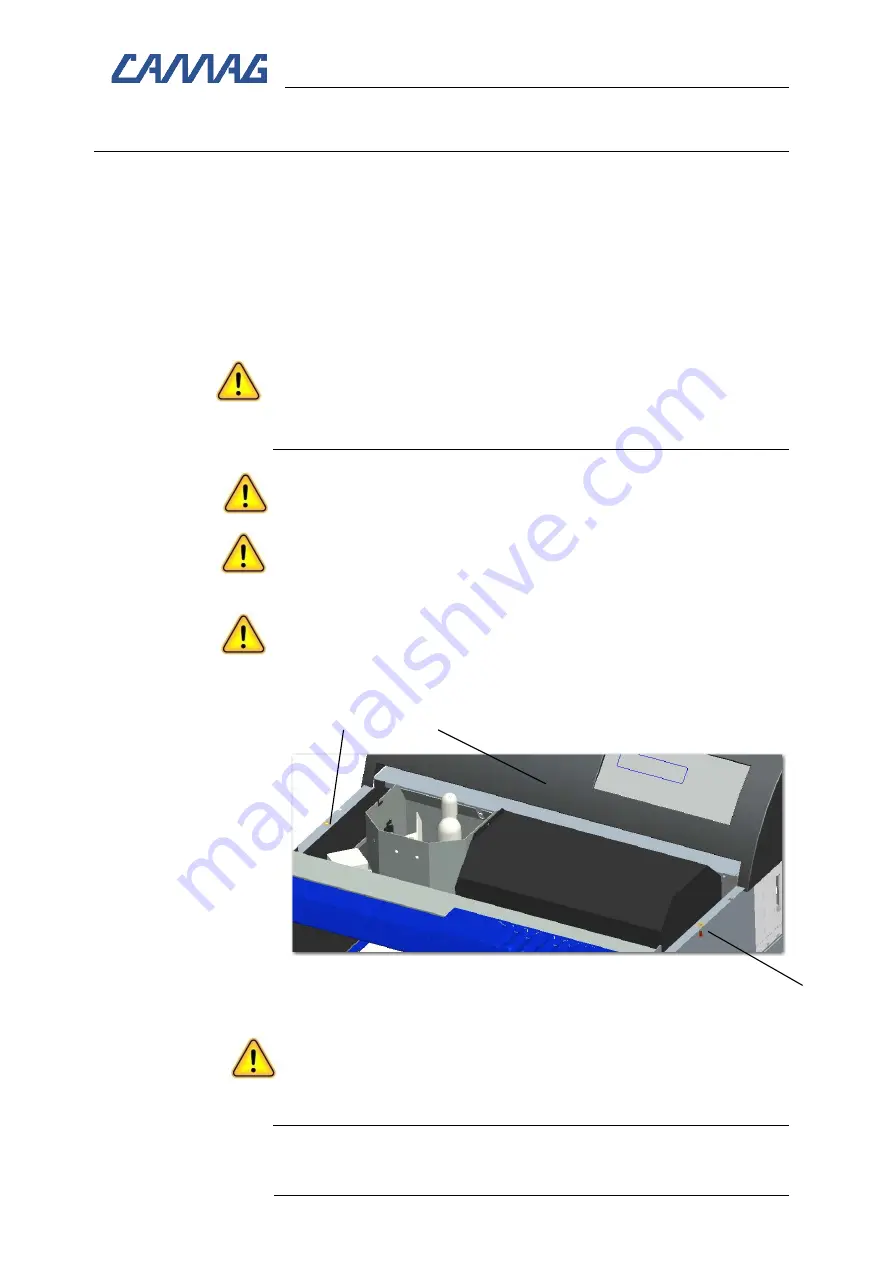
Remove the screws (1) and (2) of the Top-cover (3) 


Lift up the Top-cover and place it on the backside as shown in 
Fig.7  make sure  the panel ribbon cable does not get discon-
nected 


Fig. 7:  Remove the Top – cover


Run the function NEW XX LAMP of the USER DIALOG to adjust 
the lamp (see following pages) 
Make sure not to touch the glass of the lamps with your bare 
fingers. 

5.2


Mercury lamp exchange 

The mercury vapour lamp (cat. no. 027.6440) - Fig.8 (1), has a life 
time of about 500 hours. Towards the end of the life time the lamp 

(2) 

(1) 

(3) 

Содержание 027.6200

Страница 1: ...INSTRUCTION MANUAL TLC SCANNER 4 ...

Страница 2: ... The keypad and display 11 4 1 ILLUM Compartment illumination 11 4 2 LOAD Table in load position 11 4 3 Arrow keys Move stage 12 4 4 RESET Warm start of the Scanner 4 12 5 Maintenance 13 5 1 Replacing the lamps 13 5 2 Mercury lamp exchange 13 5 3 Deuterium lamp exchange 14 5 4 Halogen Tungsten lamp exchange 14 5 5 Compartment illumination lamp exchange 15 5 6 Maintenance data sheet 17 6 The USER D...

Страница 3: ...er chromatograms and other objects up to 200x200 mm in size While the Scanner 4 performs the actual densitometric measure ment data is processed by the CAMAG visionCATS winCATS Pla nar Chromatography Manager running on a connected computer This manual is about the instrument itself It describes how to set up and maintain the device Fig 1 The CAMAG TLC Scanner 4 ...

Страница 4: ...instrument If the instrument is used in a manner not specified in this man ual the protection provided by the equipment may be impaired Attention For safety reasons the instrument may only be used for the purposes described in the operating manual The instrument is manufactured and tested in accordance with the respective European safety publications shown on the Dec laration of Conformity DoC The...

Страница 5: ...the power supply Use only the original with the instrument delivered power cord type If the instrument is found to be defective it must be switched off and steps must be taken to ensure that it cannot be switched on by mistake If liquids penetrate the inside of the instrument the power has to be disconnected immediately Small amounts of liquid can be wiped off and or dried with a of a blow dryer w...

Страница 6: ...les and UV absorbent gloves must be worn To ensure sufficient cooling the ventilation holes of the instru ment must never be obstructed 2 Parts information Parts supplied Part No Quantity Description 140 6200 1 Accessory kit 115 0123 2 L shaped magnetic strip 115 0124 2 Magnetic strip 115 6217 1 Foil holder 125 1028 1 RS232 connection cable 362 0008 2 Fuse 230V 2A slow blow 1 Power cord 705 0018 1...

Страница 7: ...o the instrument Operating temperature The temperature should be within a range of 20 to 35 C and free of significant variations Humidity Humidity and temperature conditions must not cause condensation Atmospheric conditions Adequate ventilation free of acidic alkaline or other gas that may corrode metal or painted surfaces must be se cured Further conditions Pollution Degree 2 Overvoltage Categor...

Страница 8: ...a noise reduction unit is in the same power line 3 2 Conditions for the installation Check the following requirements before installing the instrument Power supply and ground Line voltage 115 or 230VAC make sure the voltage selector switch is correctly set Frequency 50 or 60 Hz Power capacity 180 W Ground terminal A grounded outlet should be within 2 m of the in strument Gas supply for flushing th...

Страница 9: ...upply 3 Fig 3 The power connection Before connecting the Scanner 4 to the wall outlet check whether the voltage selector switch 1 is set in the appropriate position matching the mains power voltage of your laboratory The housing of the power socket also contains the two fuses All Scanners are fitted with the fuse matching the voltage range of the voltage selector switch Two extra fuses are supplie...

Страница 10: ...tor housing can be flushed with nitrogen Proceed as follows Remove the nut from the tubing nipple Fig 3 3 Push the connecting tubing of the nitrogen supply 3x4 3mm pneumatic tubing through the back of the nut over Push the tube over the nipple and tighten the nut manually Start nitrogen flushing at least 5 minutes before measurement starts Nitrogen consumption approx 6L min at 0 5 bar 7 psi 3 5 In...

Страница 11: ... a 2 mm offset in Y direction When mainly TLC HPTLC foils are used replace the standard plate stopper 2 with the special foil holder 115 6217 1 Fig 6 To replace the standard plate stopper remove the two knurled screws 3 and take out the plate stopper Then mount and screw on the optional foil holder With the two knurled screws loosened the foil holder can be moved into the desired position front po...

Страница 12: ...ess the ILLUM key to ignite the compartment illumination The Scanner 4 automatically moves the monochromator to 546nm and ignites the Tungsten lamp in order to make the slit visible The com partment illumination is turned OFF if the key is pressed a second time or the Scanner 4 door is closed 4 2 LOAD Table in load position Open compartment door fully Press LOD POS to move the scan ning table to t...

Страница 13: ...tion of the arrow The table will start slowly and acceler ates if the key remains pressed The current position of the table in X and Y is displayed live A diagonal movement pressing two keys is not possible 4 4 RESET Warm start of the Scanner 4 If for some unknown reason the Scanner 4 is neither reacting to the keypad nor software commands press RESET ...

Страница 14: ...g parts on the instrument make sure the instrument is disconected from the mains 5 1 Replacing the lamps Exchange lamps only when they have cooled down properly Switch OFF the Scanner 4 and disconnect the power cord Let the lamps cool down Remove the screws 1 and 2 of the Top cover 3 Lift up the Top cover and place it on the backside as shown in Fig 7 make sure the panel ribbon cable does not get ...

Страница 15: ...y pressing the LOAD POS key The following will now happen automatically The position of the lamp will be optimized in the ray path The emitted light energy of the new lamp will be measured and saved for use in the respective procedure of CAMAG software 5 3 Deuterium lamp exchange The Deuterium lamp cat no 027 6441 Fig 8 3 has a life time of about 1000 hours Towards the end of the life time the lam...

Страница 16: ...r carefully in the op posite manner 3 Fig 9 and Fig 10 Be careful Do not damage the filter holder Rotate the fluorescent tube about 90 degrees and remove it ac cording to Fig 11 Mount a new tube and make sure it sits properly in the holder 4W tubes UV 254 352 0014 UV 366 352 0013 Slide the PM cover carefully back into stop position 3 and re place and tighten the knurled screw 1 Fig 9 UV filter in ...

Страница 17: ...TLC Scanner 4 Instruction Manual June 2018 Page 16 Fig 10 Taking out the PM cover Fig 11 Replacing the compartment illumination lamp ...

Страница 18: ...interval if applicable In addition it identifies con sumable parts with the respective replacement cycle Maintenance interval Mainte nance 12 Months IQ OQ 12 Months Consumable parts Part No Description Replacement cycle 027 6440 Hg lamp Upon need 027 6441 D2 lamp Upon need 027 6442 W lamp Upon need 352 0014 Compartment illumination UV254 Upon need 115 0123 L shaped magnetic strip Upon need 115 012...

Страница 19: ...means of the key Use the keys and or to select the desired Baud rate Press or to save the new value The new Baud rate is now valid recommended 19 200 baud The new Baud rate will be recognized automatically by the CAMAG software at the next connection 6 2 LCD Contrast The keypad display of the Scanner 4 can be adapted to the current light conditions by means of this function in the USER Dialog To c...

Страница 20: ...s much as 2 minutes to run this task In the USER Dialog advance to the function NEW W LAMP by means of the key Use the key to select the Tungsten lamp optimizing function the message CONFIRM LOAD POS appears Proceed as outlined in the NEW HG LAMP part 6 6 TEST FUNCTIONS This function contains some basic information about the system that can be useful for diagnosing an error condition e g in a tele...

Страница 21: ...lectable 5 100 mm s return 150 mm s Power supply 115V and 230V 50 60 Hz Power consumption max 180 W Tungsten and Mercury lamps ON Nitrogen Consumption at approx 0 5 bar 6 L min Interface RS 232 port for connection to the PC Weight 37 kg Dimensions Width 570 590 mm Depth 590 650 mm height 367 mm 7 1 UV intensity of compartment illumination 7 2 Cut off Filter position Wavel ength 2cm above TLC plate...

Страница 22: ......

Страница 23: ...______________________________________________________________ __________________________________________________________________________________ __________________________________________________________________________________ __________________________________________________________________________________ __________________________________________________________________________________ _____...

Страница 24: ...______________________________________________________________ __________________________________________________________________________________ __________________________________________________________________________________ __________________________________________________________________________________ __________________________________________________________________________________ _____...

Страница 25: ...______________________________________________________________ __________________________________________________________________________________ __________________________________________________________________________________ __________________________________________________________________________________ __________________________________________________________________________________ _____...

Отзывы: