QUICK DEVICE INSTALL
WITH OPTIONAL OBDII PASS-THRU CABLE
TOLL FREE SUPPORT
PHONE //
+1 (877) 324-0999
EMAIL //
Copyright © 2020 CallPass, LLC | 08-2020
Quick Device Install Guide - OBDII
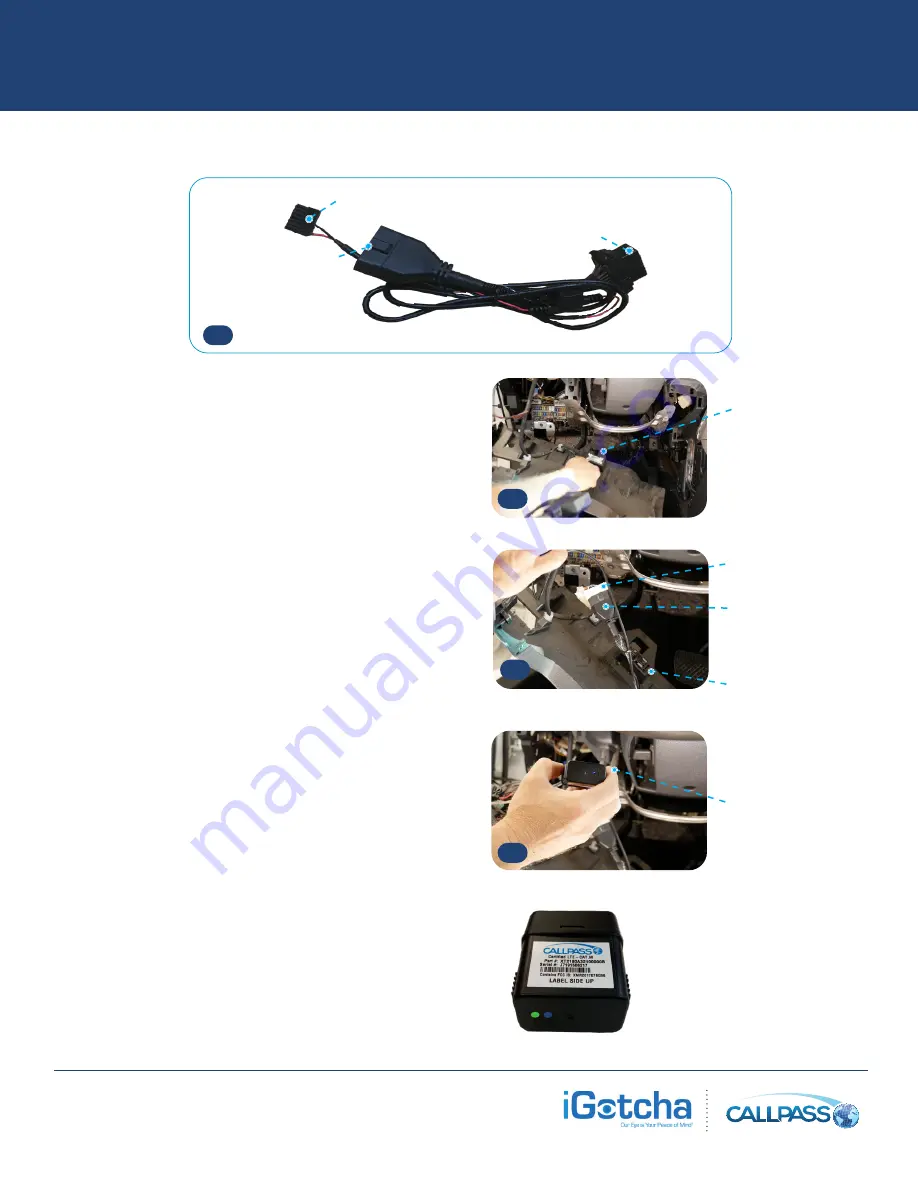
STEP 1
Identify the the connections on the supplied OBDII cable
as shown in Step 1. Note that the power cable is already
connected.
STEP 2
Remove the dash panel and locate the vehicle OBDII
connector. Snap the vehicle’s OBDII connector from its
bracket. If the OBDII connector is molded to a bracket,
detach the entire assembly.
STEP 3
Now install the supplied OBDII Pass-Thru Cable by
connecting the male end of the supplied OBDII
Pass-Thru Cable to the female end of the vehicle’s
factory OBDII cable.
STEP 4
Secure the OBDII plug back into the factory bracket or if
necessary, use the bracket supplied with the kit.
Simply plug the 14 pin power cable into the device. Now
that power is connected, the
GREEN LED
is solid and
represents GPS. The
BLUE LED
begins blinking while
searching for the Cellular signal. When acquired, the
BLUE LED
will pause then continue blinking in 3 second
intervals while the
GREEN LED
blinks steadily.
At this point, return back to your phone or tablet and push
the locate button. If the device responds with the correct
location, mount the device label side up with a zip tie
under the dash and replace any removed dash panels.
Your installation is complete.
This is a vehicle
OBDII connector.
This is the male end of
the supplied OBDII cable .
This is the female end
of the vehicle’s factory
OBDII plug.
This is the female end of
the supplied OBDII cable.
2
This is the 14 Pin Power
cable plugged into the device.
The device is now powered.
3
4
GREEN
LED = Power/GPS
BLUE
LED = Cellular
14 Pin Power
Cable
Male OBDII
Connection
Female OBDII
Connection
1
OBDII CABLE
WIRE CONNECTION IDENTIFIER


