Nous vous remercions d’avoir porté votre choix sur un produit Caliber. Vous
manifestez ainsi votre souhait de bénéficier de la technologie Car Audio la plus
évoluée. Caliber ne recule devant aucun effort pour vous proposer les meilleurs
produits et recherche sans cesse à satisfaire davantage encore ses clients.
Correctement installé, votre Caliber CXQ20 reproduira pendant de longues
années un son d’une qualité parfaite. Au préalable, lisez attentivement ce manu-
el afin de protéger votre véhicule et de profiter au mieux des performances de
votre installation Car Audio.
Garantie Caliber
Vu la complexité de nos produits, nous vous conseillons vivement de confier l’in-
stallation de cet égaliseur/filtre répartiteur à un revendeur agréé Caliber.Votre
appareil bénéficiera ainsi d’une garantie de 12 mois à partir de la date d’achat.
Si vous installez vous-même l’égaliseur/filtre répartiteur, nous vous souhaitons
de mener à bien cette tâche. En suivant nos recommandations, vous ne devriez
guère éprouver de difficultés. Toutefois, notre garantie est alors limitée à 30
jours à partir de la date d’achat.
Accessoires Caliber
Pour permettre à cet égaliseur/filtre répartiteur d’atteindre le niveau de per-
formances exceptionnel dont il est capable, il est nécessaire que les sources d’a-
limentation, les sources des signaux, les haut-parleurs et les raccordements
soient d’une parfaite qualité. N’oubliez pas que Caliber n’est pas simplement un
fabricant de composants car audio. Nous produisons également tout ce dont
vous avez besoin pour réaliser un système Car Audio “optimal” (à l’exception
du véhicule !). N’oubliez donc pas de choisir du matériel Caliber pour tous vos
raccordements et renseignez-vous sur notre gamme d’accessoires auprès de
votre revendeur Caliber.
Important
La qualité d’installation peut avoir une incidence sur les performances et la fia-
bilité de l’égaliseur/filtre répartiteur Caliber CXQ20. Si vous avez des question
ou des doutes concernant l’installation ou l’utilisation de l’appareil, n’hésitez pas
à contacter votre revendeur Caliber.
Un revendeur Caliber est sélectionné pour sa connaissance des installations
audio pour véhicule et a reçu la formation requise pour vous conseiller judicieuse-
ment et assurer l’entretien correct de votre système Car Audio. Il est toujours
là pour résoudre vos problèmes techniques et vous renseigner sur les nou-
veautés de la gamme Caliber.
Nous vous souhaitons de passer d’agréables moments en compagnie de votre
nouvelle acquisition. Réglez l’appareil jusqu’à obtenir un son parfait, tout en res-
tant attentif à la route.
3
Always use extreme caution in boosting frequencies. For every 3dB of boost,
twice the amount of power is needed from the amplifier for that particular
frequency. For example: Your amplifier is supplying 25W at a particular fre-
quency.When you boost up this frequency with 3dB, your amplifier will need
to supply 50W, and with a 6dB boost it will need to supply even 100W (that’s
4x the power). If too much boost is applied, the chances are your amplifier will
clip at these frequencies and possibly damage your speakers and amplifier.
4
Avoid equalizing more than + / - 6dB. If you have such a large deviation that
more than 6dB adjustment is needed, chances are that you have a phase pro-
blem.This can be in part due to the location of the speakers, or as simple as a
polarity problem at one or more speakers.
Checking the level settings once more
Now that you’ve had your fun in equalizing your system to your likings, it is time
to check the output levels of your CXQ20 once again. Since you have been playing
with power, in cutting or boosting certain frequencies, the output level may have
been affected. Play the dynamic track you had chosen for the initial level settings
once again, turn the volume on your radio to 3/4 of the maximum and adjust the
outputs accordingly. If distortion is heard, or the Peak Output LED’s are illumina-
ting, turn your output levels down. If on the otherhand you have a drop in volume
now, you can very slowly increase the output levels as long as the Peak Output
LED’s do not illuminate.
BE CAREFUL NOT TO OVERDRIVE YOUR AMPLIFIERS
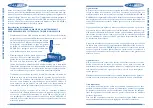
The Caliber CXR Sub-woofer Level Remote Control
Now here is an accessory which came with your CXQ20 that you are going to
have a lot of fun with. It gives you the complete control over your sub-woofer
level, from the front seat of your vehicle, and allows you to adjust the amount of
bass to the type of music you are playing.
The CXR Remote Control is easy to mount and comes with a 5 meter cable with
clip on telephone jacks at both sides. It will take you about 10 minutes to install
this Remote control on your dashboard. After you have plugged in your telepho-
ne jacks in the remote control and the CXQ20, you must turn up the Low Pass
output level a little.
And now:
Start your engine, turn on your audio, crank up the volume,
pay attention (to the road), sit back, relax and enjoy your
new Caliber sound system.
8
9
CHECKING
THE
SETTINGS
/
REMO
TE
CONTR
OL
AV
ANT DE COMMENCER


