background image

� 

CAL-ROYAL 

PRODUCTS,  INC. 

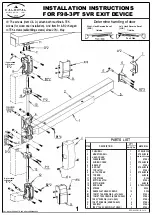
INSTALLATION INSTRUCTIONS 

FOR 98-3PT SVR EXIT  DEVICE 

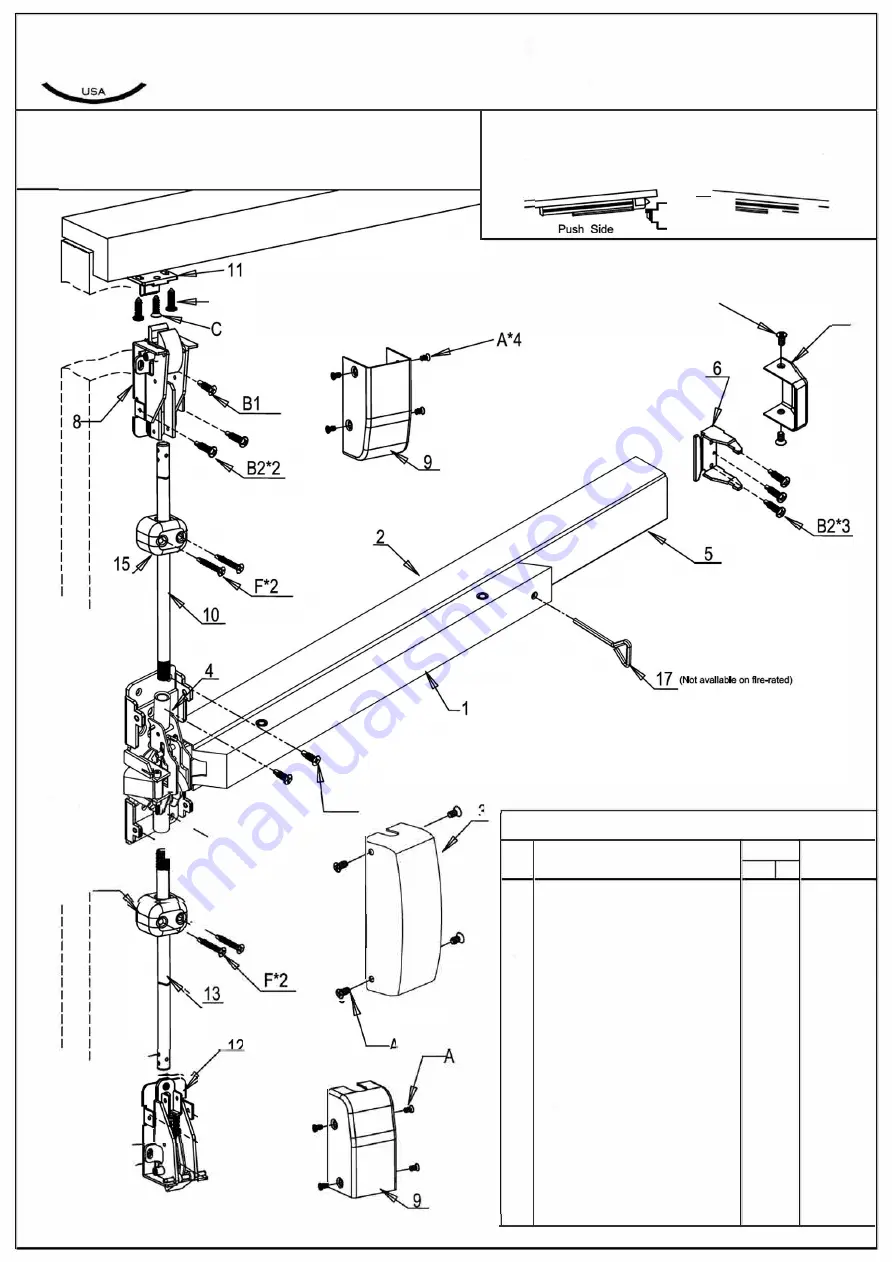
The screws (item C & D), attach both machine & TEK

screws (for wood door installation).  And Item 81 & 82 changed

to TEK screws (self-drilling screws) since 2014, May.

--0*2 

'-l-----

16 

I' 

B1*4 

���-

' ' 

i'--,_ 

-�

Dr��-

.......... 

� 

',

[J 

*4

'-_t,..--

✓ 

-

B2*2 

',, 

� 

-

� 

B1 

.,,. 

---

r<.....  __ .,,.

-< 

ll  ----

--

*4

Determine handing of door 

Right - Hand Reverse Bevel 

(RHR) 

Left- Hand Reverse Bevel 

(LHR) 

ITEM 

10 

11 

12 

13 

15 

16 

17 

B1 

B2 

Outside 

Outside 

ri,,<fiF 

Lr 

Push =;ide 

(J

A*2 

PARTS LIST 

DESCRIPTION 

Q'TY 

MATERIAL 

Noo-Rre  Are 

PUSH RAIL 

STEEUS304 

MOUNTING RAIL 

STEEUS304 

HEAD COVER 

AUZINCISTEEUS304 

CHASSIS ASSY 

STEEL 

SLIDING COVER 

STEEUS304 

BRACKET 

STEEL 

END CAP 

STEEUS304 

TOP LATCH 

STEEL 

LATCH COVER 

STEEUS304 

TOP ROD 

AUS304 

TOP STRIKE 

S304 

BOTTOM LATCH 

STEEL 

BOTTOM ROD 

AUS304 

ROD GUIDE 

STEEUS304 

STRIKE 

S304 

DOGGING HEX KEY 

STEEL 

SM4X8 FLAT HEAD SCREWS 

14 

S304 

10# 1¼" TEK SCREWS (FLAT HEAD) 

STEEL 

10# 1¼" TEK SCREWS (ROUND HEAD) 

STEEL 

10# 

¾" 

SCREWS (FLAT HEAD) 

STEEL 

10# 

%" 

SCREWS (ROUND HEAD) 

STEEL 

10# 2" TEK SCREWS (FLAT HEAD) 

STEEL 

CAL-ROYAL PRODUCTS, INC. USA I VERSION 2022 

EDG-404

5

-01/23-1 of 

8

Содержание 98-3PT

Страница 1: ...ide 4 J A 2 7 PARTS LIST DESCRIPTION Q TY MATERIAL Noo Rre Are PUSH RAIL 1 STEEUS304 MOUNTING RAIL 1 STEEUS304 HEAD COVER 1 AUZINCISTEEUS304 CHASSIS ASSY 1 STEEL SLIDING COVER 1 STEEUS304 BRACKET 1 S...

Страница 2: ...Reverse Bevel LHR D ITEM 1 2 3 4 5 6 7 8 9 10 11 12 13 15 16 A B1 B2 C D E F Outside Outside C ri fiF Lr Push ide 4 J A 2 7 PARTS LIST Q TY DESCRIPTION Non Are Are MATERIAL PUSHRAIL 1 STEEUS304 MOUNT...

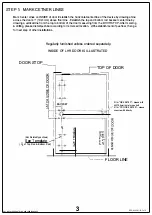
Страница 3: ...to its marked location With establishment of pushbar then go for next step of other installations Regularly furnished unless ordered separately INSIDE OF LHR DOOR IS ILLUSTRATED DOOR STOP__ _ r TOP OF...

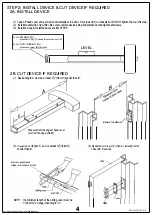
Страница 4: ...bolt E for NON FIRE RATED please use screw B2 directly e I 28 CUT DEVICE IF REQUIRED 1 Device length A must be at least 1 38mm s orter than B Measure from the edge of head cover not from the edge of...

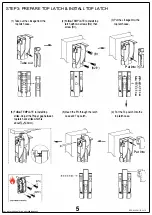
Страница 5: ...latch and strike which is about 2 0mm CAL ROYAL PRODUCTS INC USA IVERSION 2022 2 Follow TEMPLATE to install top latch with two screws 82 then screw 81 B2 2 0 0 0 5 Insert the Pin through the latch ca...

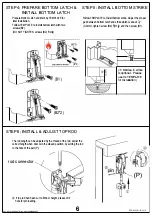
Страница 6: ...st the proper gap between bottom latch and strike which is about 3 0mm tighten screw B2 firmly and then screw B1 g ____ Mortise in strike is optional Please use its TEMPLATE for installation The rod l...

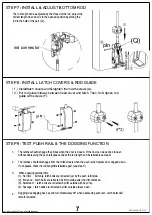
Страница 7: ...without depressing the push rail please check the rod length and installation see step 3 2 The latches should disengage from the strikes freely when the push rail is depressed or dogged down If not p...

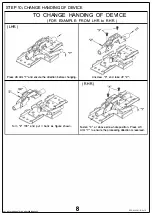
Страница 8: ...Press Lift Arm Y and ensure the direction before changing Turn Z 180 and put it back as figure shown CAL ROYAL PRODUCTS INC USA IVERSION 2022 8 Unscrew X and take off Z RHR Fasten X at above screw hol...

Отзывы: