background image

4


The receiver must only be connected to a power line 220-240V AC 50Hz, indoor in a dry and 
ventilated area. The main AC plug is the disconnecting system from 230V power, even if the   
receiver himself is off. The main AC Plug must be of easy access. Never open your receiver   

cover! Risk of electrical shock! Any repairing must be done by qualified people. 

OVERLOADING 

Do not overload a wall outlet, extension cord or adapter as this may result in fire or electric shock. 
Ensure that the power source (socket) is easily accessible. 

LIQUIDS 

This STB shall not be exposed to dripping or splashing and that no objects filled with liquids, 
such as vases, shall be placed on the STB. 

CLEANING 

Disconnect the STB from the main supply before cleaning. Do not use any kind of solvents to 
clean the STB, only use a soft-dry cloth. 

VENTILATION


The slots on top of the STB must be left uncovered to allow proper airflow to the unit. Ensure a minimum 
distance of 5cm around the apparatus for sufficient ventilation. Ensure that the ventilation is not impeded 
by covering the ventilation openings with items such as newspapers, table-cloths, curtains, etc. 
Do not stand the STB on soft furnishings or carpets. 
Do not expose the STB to direct sunlight or do not place it near a heater. 
Do not stack electronic equipments on top of the STB. 
Do not place naked flame sources, such as lighted candles on the apparatus. 

ATTACHMENTS


Do not use any unrecompensed attachments as these may cause hazard or damage to the STB. 

CONNECTION


TO THE CABLE 

Disconnect the STB from the main supply before connecting or disconnecting the cable. 
FAILURE TO DO SO CAN DAMAGE THE BOX. 

CONNECTION TO THE TV 

Disconnect the STB from the main supply before connecting or disconnecting the cable from TV. 
FAILURE TO DO SO CAN DAMAGE THE TV. 

LOCATION


Place the STB indoor in order not to expose to lightening, rain or Sunlight. 
Use the apparatus only in moderate climates (not in tropical climates). 

Battery handling


Batteries may contain toxic agents that are hazardous to the environment. 
Therefore, dispose of the batteries immediately according to the prevailing statutory regulations. 
Never throw the batteries in normal household waste.


SAFETY INSTRUCTIONS 

Содержание TVS 6500GD

Страница 1: ......

Страница 2: ...2...

Страница 3: ...atellites 18 2 6 Liste de transpondeurs TP 18 3 R glages 20 3 1 Langue 20 3 2 Syst me TV 20 3 3 Config Ecran 20 3 4 R glage de l heure 21 3 5 R glage Timer 21 3 6 Contr le parental 22 3 7 R glage de l...

Страница 4: ...TV et radios programmables S lection de 32 groupes de favoris diff rents Affichage l cran OSD multi langue Enti rement compatible avec le guide lectronique des programmes EPG jusqu 7 jours Compatible...

Страница 5: ...nne circulation d air dans l appareil Laissez un espace minimal de 5cm autour de l appareil afin de garantir une ventilation suffisante Veillez ce que la ventilation ne soit pas entrav e par des l men...

Страница 6: ...n d autres fonctions Toutes les fonctions peuvent tre utilis es l aide des touches de la t l commande et certaines peuvent l tre galement l aide des boutons situ s sur le panneau avant du r cepteur Le...

Страница 7: ...nn dans un menu ou valide une valeur souhait e dans tout mode de saisie PR PR Change de chaine radio ou passe l l ment pr c dent ou suivant dans un menu EXIT Retourne au menu pr c dent ou sort du menu...

Страница 8: ...ide une s lection et la touche LIST affiche une zone de liste d roulante Vous pouvez galement utiliser les touches num riques de la t l commande pour saisir une valeur num rique Utilisez les touches P...

Страница 9: ...Liste des satellites Config d antenne Recherche mono satellite Recherche multi satellite Liste de TP R glages syst mes Langue Syst me TV Config cran R glage de l heure R glage Timer Contr le parental...

Страница 10: ...vous d placez le curseur de s lection jaune vers le haut ou le bas une ligne grise vous donne des indications sur le programme en cours dans la petite fen tre 3 Appuyez sur la touche FAV pour activer...

Страница 11: ...a marquer du symbole du d placement Appuyez sur les touches PR PR pour d placer le curseur vers l emplacement o vous souhaitez positionner la cha ne puis appuyez sur la touche OK pour valider Appuyez...

Страница 12: ...r la touche verte pour activer le mode d dition des cha nes S lectionnez la cha ne puis appuyez sur la touche OK pour faire apparaitre la fen tre Renommer Dans cette fen tre appuyez sur la touche roug...

Страница 13: ...che OK pour faire appara tre la fen tre Effacer les cha nes par satellite appuyez sur les touches PR PR pour s lectionner les cha nes puis appuyez sur la touche OK pour ajouter le symbole de suppressi...

Страница 14: ...sur les touches PR PR pour d placer le curseur vers le haut ou le bas Nom utilisez les touches num riques pour modifier le nom du satellite Veuillez vous reporter la section 1 1 c Editer touche verte...

Страница 15: ...ton Non 2 3 Configuration d antenne Partie A Fixe Cette partie vous concerne si vous avez s lectionn Antenne fixe dans la fen tre type d antenne 1 Satellite tous les satellites s lectionn s dans la li...

Страница 16: ...s tend de 0 63 0 repr sentant la position d origine Vous pouvez s lectionner la valeur correcte apr s avoir tourn l antenne Aller X appuyez sur la touche OK s lectionnez la position correcte de r f re...

Страница 17: ...rmer cette boite de dialogue 6 Config Moteur Appuyez sur la touche OK pour acc der cette fen tre satellite transpondeur appuyez sur les touches s lectionnez le satellite et ou le transpondeur ou appuy...

Страница 18: ...Oui ou Non 3 Rechercher les chaines appuyez sur les touches pour s lectionner TV Radio Chaine TV ou Radio 4 Recherche r seau s lectionnez Oui ou Non Cet l ment devient gris lorsque l option Recherche...

Страница 19: ...e Ajouter TP Les op rations sont identiques celles d crites dans la section pr c dente diter des TP Veuillez vous y reporter pour ajouter des TP 4 Appuyez sur la touche jaune pour supprimer des TP La...

Страница 20: ...aux pr f rences de l utilisateur 3 2 Syst me TV Appuyez sur les touches PR PR pour d placer le curseur vers le haut ou le bas Appuyez sur les touches pour modifier les r glages Ceux ci prendront effe...

Страница 21: ...che MENU ou EXIT pour sortir de la fen tre et sauvegarder Si la valeur n est pas valide le message Entr e invalide Continuer l dition appara t Appuyez sur la touche OK au niveau du bouton Oui pour pou...

Страница 22: ...sse une deuxi me fois Ce doit tre le m me que celui saisi dans l l ment Nouveau mot de passe Le message Changement mot de passe r ussi appara t lorsqu ils sont identiques Dans le cas contraire le syst...

Страница 23: ...s touches PR PR pour d placer le curseur vers le haut ou le bas 3 Appuyez sur la touche EXIT ou pour acc der aux menus de gauche 4 1 Information Appuyez sur la touche OK pour acc der cette fen tre 4 2...

Страница 24: ...XIT ou pour acc der aux menus de gauche 4 S lectionnez le jeu auquel vous voulez jouer puis appuyez sur la touche OK pour y acc der 4 3 Mise jour par USB 1 Fichier affiche le nom du fichier de mise jo...

Страница 25: ...che pour ajouter le symbole de suppression au fichier s lectionn appuyez nouveau sur cette touche pour faire disparaitre le symbole Appuyez sur OK sur le fichier portant le symbole de suppression la b...

Страница 26: ...glages PVR 1 Timeshift S lectionner ON ou OFF 2 Saut s lectionnez 30 sec 1 min 5 min 10 min ou 30 min 3 Timeshift vers Enregistrer s lectionnez ON ou OFF 6 4 Enlever l USB en toute s curit Appuyez su...

Страница 27: ...ourn e 3 Informations d taill es Dans la fen tre EPG appuyez sur les touches PR PR pour s lectionner la cha ne et le programme puis appuyez sur la touche OK pour obtenir les informations d taill es su...

Страница 28: ...yer sur la touche PAUSE pour arr ter l image alors que le son continue Vous pouvez lire l image en appuyant nouveau sur la touche PAUSE 7 10 OK 1 Pendant que vous regardez ou coutez un programme appuy...

Страница 29: ...ces sur les cha nes du satellite num rique sur un signal de cha ne ou de vid o terrestre existant Le syst me est connect par des c bles RF et le canal de sortie du r cepteur interf re avec des signaux...

Страница 30: ...1 TVS 6500HD USER MANUEL...

Страница 31: ...m 17 3 4 Local Time Setting 17 3 5 Timer Setting 18 3 6 Parental Lock 18 3 7 OSD Setting 19 3 8 Favorite 19 3 9 Other 19 4 Tools 19 4 1 Information 19 4 2 Factory Setting 20 4 3 Upgrade by USB 20 5 Ga...

Страница 32: ...mable 32 different favorite groups selection Multi language OSD Fully support to 7 days Electronic Program Guide EPG Picture in Graphics PIG support True color On Screen Display Automatic network sear...

Страница 33: ...that the ventilation is not impeded by covering the ventilation openings with items such as newspapers table cloths curtains etc Do not stand the STB on soft furnishings or carpets Do not expose the S...

Страница 34: ...ers the desired value in any input mode When watching a channel change channels or move to the next higher or lower item in the menu When watching a channel adjust the volume or move to the left or ri...

Страница 35: ...w This menu consists of 6 major main menus as follow Edit Channel Installation System Setup Tools Game REC During the installation the OK key confirms a selection and LIST key shows Down List Box You...

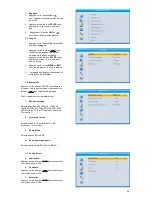
Страница 36: ...ite Other Display Setting Information Factory Setting Upgrade by USB Othello Sudoku Media Player PVR Storage Information PVR Setting Remove USB device safely 1 Press OK key or key to pop up the Input...

Страница 37: ...from the lock mode and you will find the Lock button return to the origin position 5 Press green colour key to move the Skip button upward Select the program and press OK key to mark this program wit...

Страница 38: ...the program and press OK key to pop up the Rename window In Rename window press red colour key to switch between capital letter and lower letter press green colour key to delete the character on the c...

Страница 39: ...by Satellite window press PR PR key to select the Programs and press OK key to add delete mark Press OK again the delete mark will disappear Press red key to select all programs to add delete Mark Pr...

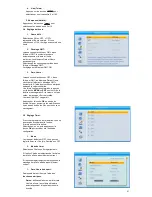
Страница 40: ...After pressing OK key you can use numeric keys to edit the longitude press EXIT key or the PR PR keys to exit editing mode The range of the longitude is from 1to 180 degree If beyond this range system...

Страница 41: ...tor Antenna in the Antenna Connection window 1 LNB Type Select the proper LNB type 2 Motor Type Select between DiSEqC1 2 and USALS If you select DiSEqC1 2 the following Local Longitude and Local Latit...

Страница 42: ...OK key to pop up the Limit Setup window Limit Setup Press keys to switch among Disable Limit East Limit and West Limit Limit Setup Move cursor to the Limit Setup button You can press key to turn west...

Страница 43: ...Channel Press keys to select among TV Radio TV Channel Radio 4 Network Search Select between No and Yes This item turns grey when Auto Scan is selected in the following Scan mode item 5 Scan Mode Pre...

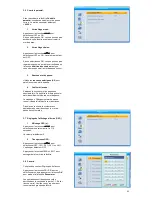
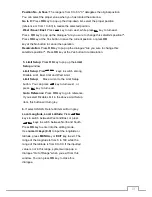
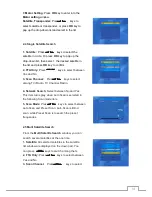
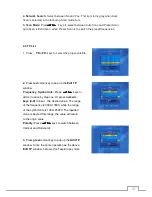
Страница 44: ...Press red colour key to pop up the Edit TP window Frequency Symbol rate Press keys to add or reduce by step one Or press numeric keys 0 9 to input the desired value The range of the frequency is 3000...

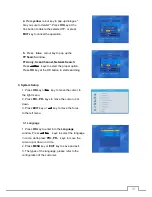
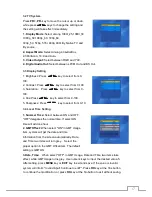
Страница 45: ...y at the OK button to start searching 3 System Setup 1 Press OK key or key to move the cursor to the right menu 2 Press PR PR keys to move the cursor up or down 3 Press EXIT key or key to move the foc...

Страница 46: ...m 0 100 5 Sharpness Press key to select from 0 10 3 4 Local Time Setting 1 Summer Time Select between ON and OFF OFF delegates the normal time If select ON time will add one hour 2 GMT Offset When sel...

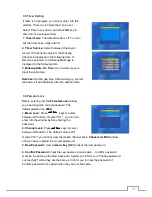
Страница 47: ...e duration time 3 6 Parental Lock Before entering into the Parental Lock window you need input the correct password The default password is 0000 1 Menu Lock Press keys to select between Off and On If...

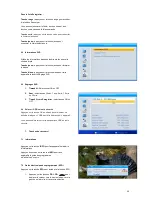
Страница 48: ...ite window here we don t explain any more 3 9 Other 1 LNB Power Select between Off and On 2 Channel Play Type Select among All Free Scramble 3 Channel Change Select between Black Screen and Freeze 4 A...

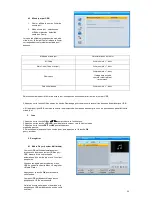
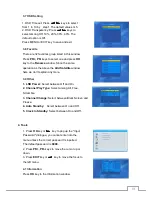
Страница 49: ...grade Mode Select between allcode maincode defaultdb userbd and Dump When users switch the upgrade mode Upgrade File will show the corresponding file according to the table below Upgrade Mode File fea...

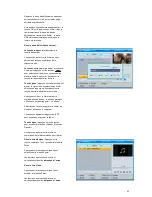
Страница 50: ...sert U disk to USB port except auto scan multi picture upgrade Or open USB menu according to Menu REC Media Player Press OK to enter into this window USB menu will be disabled when no USB device is pl...

Страница 51: ...the file Blue key Press blue key to enter the New Folder window you can press number 0 9 to edit In music list Press number key 1 to display the Sort window Press number key 2 to select the repeat mod...

Страница 52: ...pop up the Time Bar window Press PR PR keys to select up or down while press keys to select left or right in the time bar Press OK key at this button to return to the EPG window Press OK key at this...

Страница 53: ...ched channels If in the specific satellite only can select channel in the satellite group 7 7 Left Right Volume Press keys to change the volume Press keys to decrease the volume while press keys to in...

Страница 54: ...to the previous channel 7 13 FAV 1 Press FAV key to pop up the favorite group window 2 Press keys to select the favorite group Press PR PR keys to select the channel up or down Press OK key at the se...

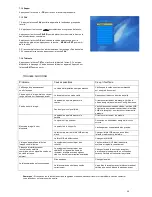
Страница 55: ...strong Connect a signal attenuator to the LNB input Satellite dish is too small Change to a larger dish LNB noise factor too high Change to an LNB with lower noise factor The LNB is faulty Change the...

Страница 56: ...27...

Страница 57: ...r alisation Service Communication...

Отзывы: