background image

9

Display route

Select this screen button from the ROUTE OPTIONS
screen to view the entire planned route on the map
screen.

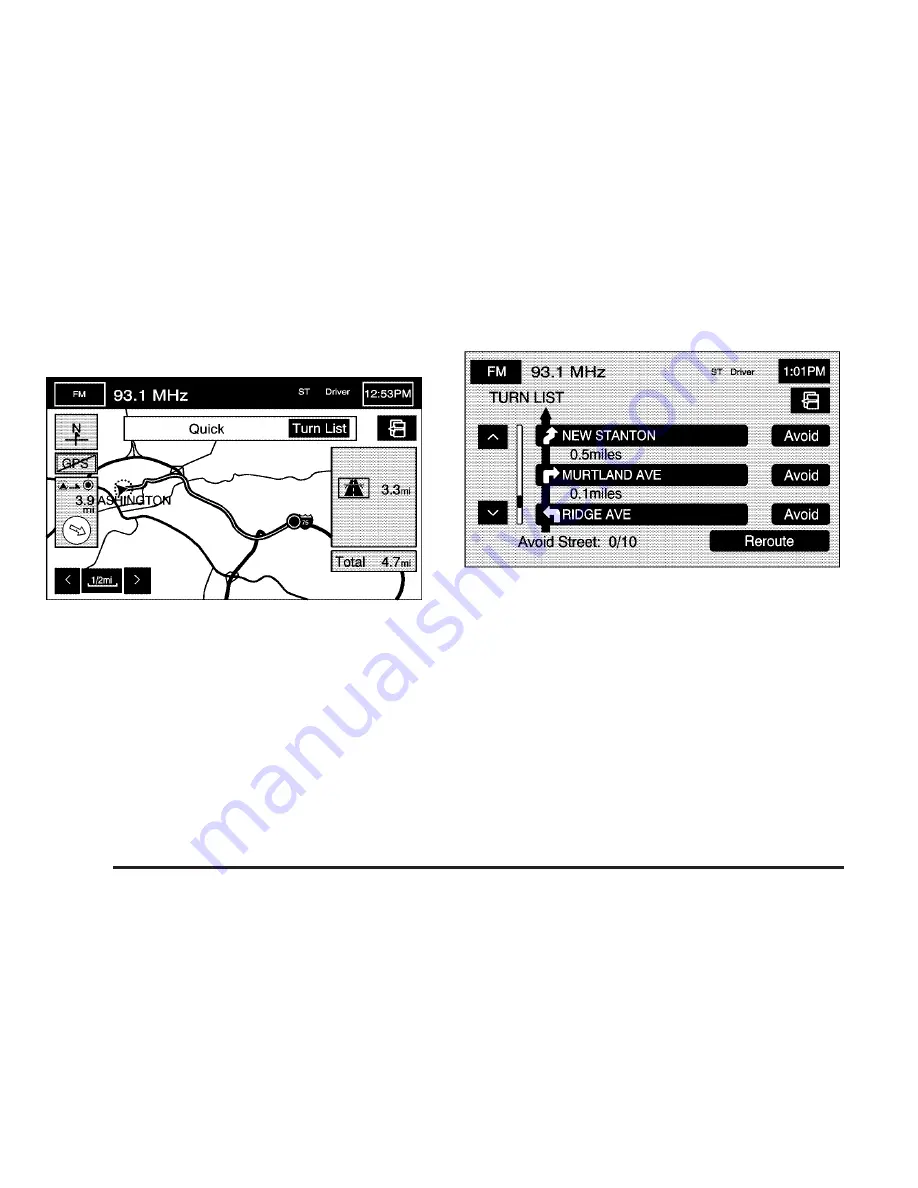
Turn List: Select this screen button to view or to edit
the list of upcoming maneuvers for the entire route. A list
of every turn on the route will display. With the turn
list displayed, you can select to avoid streets/turns on
the route.

y

/

z

(Scroll Arrows): Select the up and down

arrow screen buttons to scroll through the list of
maneuvers.

Avoid: To avoid a street, select the Avoid screen
button next to the turn. To cancel the avoided turn,
select Avoid again to deselect it.

2-20

Содержание 2006 STS

Страница 1: ...2 1 Features and Controls 2 2 Navigation Audio System 3 1 Navigation Audio System 3 2 Voice Recognition 4 1 Voice Recognition 4 2 Vehicle Customization 5 1 Vehicle Customization 5 2 Phone 6 1 Phone 6...

Страница 2: ...es in the product after that time without notice For vehicles first sold in Canada substitute the name General Motors of Canada Limited for Cadillac Motor Car Division whenever it appears in this manu...

Страница 3: ...Overview 1 2 Navigation System Overview 1 2 Getting Started 1 4 Cleaning the Display 1 12 Section 1 Overview 1 1...

Страница 4: ...Overview Navigation System Overview 1 2...

Страница 5: ...Loading Key See Six Disc CD DVD Changer on page 3 11 for more information K Z CD DVD Changer Eject Key See Six Disc CD DVD Changer on page 3 11 for more information L CD DVD Changer Loading Slot M On...

Страница 6: ...e familiar with it and to understand how the system works Keeping your mind on the drive is important for safe driving See Defensive Driving in the Index of your vehicle s owner manual for more inform...

Страница 7: ...your eyes on the road and your mind on the drive avoid engaging in extended searching while driving CAUTION Looking at the moving map on the navigation screen frequently or for too long while driving...

Страница 8: ...see Personalization on page 5 2 When getting started you may set the navigation system to your preference using various options To do so reference the following topics To adjust screen appearance see...

Страница 9: ...ge 3 2 for more information Setting the Time To set the time do the following 1 Press the power volume knob to turn the system on 2 Press the CONFIG hard key 3 Press the H clock screen button 4 Select...

Страница 10: ...ion on page 2 37 for more information Entering an Address To set a destination by entering a street address do the following 1 Press the power volume knob to turn the system on 2 Insert the DVD map di...

Страница 11: ...button to proceed 3 Press the ROUTE hard key Verify that the selected Region is correct 4 Press the i POI screen button 5 Enter the specific title of the POI in the name space i e Washington Monument...

Страница 12: ...er Navigation Menu on page 2 16 for more information Storing a Preset Destination 1 Press the power volume knob to turn the system on 2 Insert the DVD map disc See Installing the Map DVD under Maps on...

Страница 13: ...destination marked 5 Select the h destination symbol screen button 6 Select the Guide screen button 7 Once you begin driving you will hear an audio prompt to Proceed to the highlighted route You are...

Страница 14: ...eaning the Display If the panel or the display is stained wipe it with a dry soft cloth such as a silicon cloth Notice If you use abrasive cleaners when cleaning glass surfaces you could scratch the g...

Страница 15: ...stination 2 37 Keyless Access System 2 55 OnStar System 2 55 Configure Menu 2 57 Global Positioning System GPS 2 67 Vehicle Positioning 2 68 Problems with Route Guidance 2 69 If the System Needs Servi...

Страница 16: ...een M Load Press the CD DVD changer loading key to go to the loading screen and begin loading DVDs or CDs See Six Disc CD DVD Changer on page 3 12 for more information Z CD DVD Eject Press the eject k...

Страница 17: ...SETTING Function screen See Configure Menu on page 2 57 Map Press the map key to access the map screen k Navigation Repeat Press the navigation repeat key to repeat the last voice guidance prompt whil...

Страница 18: ...information or the correct search area has not been selected See Database Coverage Explanations on page 2 70 for more information Touch Sensitive Screen Buttons Touch sensitive screen buttons are loca...

Страница 19: ...tem Driver Information Center DIC Head Up Display HUD etc See Language under Personalization on page 5 2 for more information Once a language has been selected touch I agree to enter the navigation sy...

Страница 20: ...for a longer distance If the scroll feature is used to scroll the map and your vehicle icon becomes lost press the map hard key to return to the current vehicle location on the map When scrolling on t...

Страница 21: ...ars when time is not available or when you are scrolling on the map The distance and time to destination symbol indicates the distance and the estimated time remaining to your final destination or arr...

Страница 22: ...the direction your vehicle is traveling will always be at the top of the map screen The vehicle icon will always be headed in the direction your vehicle is traveling Select this screen symbol to swit...

Страница 23: ...tion planned at a time Touch anywhere on the map to display this button Select the memory point symbol to store the location on the screen as a memory point The system will automatically store the mem...

Страница 24: ...that are not part of the POI categories listed The following screen will be displayed after List Categories has been selected Then select the category and sub category from the list To display the POI...

Страница 25: ...icles current position Use the scroll symbols to move up and down the list Use the Sort by DIST distance Icon Name and Route as desired Once a POI icon has been selected the scroll symbol will appear...

Страница 26: ...om one of the following six options that allow you different views and information of the map screen Availability of these options depends on the current route Single Map Mode Select the map view symb...

Страница 27: ...D view and to turn the POIs on and off To change the heading direction in the right map touch the north up or heading up symbol Turn List Mode Select the turn list symbol to display the next three upc...

Страница 28: ...ext turn will be displayed As you approach the next turn the system will automatically display a zoomed in view of the upcoming maneuver Guidance Screen Mode Select the next maneuver symbol to display...

Страница 29: ...POIs for an exit select the exit then select the Map screen button The navigation system will display highway guidance any time you have a route on a highway or freeway or you can select the symbol To...

Страница 30: ...e 2 37 Change the selected region in the search area when entering your destination and route settings See Destination on page 2 37 For example if you were traveling from Michigan to Florida change th...

Страница 31: ...ton from the ROUTE OPTIONS screen to access the SEARCH CONDITION screen The search condition screen allows you to view your current destination and to change the planning methods between each destinat...

Страница 32: ...while you are driving on a planned route F Route Pref Route Preferences Select this screen button from the ROUTE OPTIONS screen to access the ROUTE PREFERENCES screen Touch any of the following option...

Страница 33: ...OUTE OPTIONS screen to access the DEST WAY POINT screen Use this screen to plan a destination with way points Five way points and one destination can be entered See Dest Way Pt under Memory Points lat...

Страница 34: ...maneuvers for the entire route A list of every turn on the route will display With the turn list displayed you can select to avoid streets turns on the route y z Scroll Arrows Select the up and down...

Страница 35: ...All screen button A confirmation window will display Select Yes to have all of the avoided streets added back to the route The Turn List screen will display G Route Preview Select this screen button...

Страница 36: ...n regarding the POI name address city and phone number Edit Select this screen button to change the way the skip scroll functions operate You can select to have the skip scroll go to the start point d...

Страница 37: ...STORED LOCATIONS screen you can access the following options N Memory Points Select this screen button from the STORED LOCATIONS screen to access the MEMORY POINTS screen This feature allows you the...

Страница 38: ...ar displaying the selected memory point location 5 If available touch the INFO button to view the address information of the selected point 6 Touch OK to store the point as a memory point To edit the...

Страница 39: ...the folder category the memory point is stored in 3 Select the Edit screen button 4 Select the memory point that you wish to edit 5 Select the Category screen button 6 Select the new folder category b...

Страница 40: ...ct the memory point from the list 5 Select the Position screen button 6 The system will display the map screen with the destination marked Touch the position on the map to move the memory point to tha...

Страница 41: ...creen button to store the changed phone number To delete a memory point 1 Select the Memory Points screen button from the STORED LOCATIONS screen 2 Select the folder category the memory point is store...

Страница 42: ...folder category 1 Select the Memory Points screen button from the STORED LOCATIONS screen 2 Select the folder category you want to change the name of 3 Select the Edit Category screen button 4 Use th...

Страница 43: ...box This will ensure that the system knows to avoid the freeway itself not the area around the freeway 5 Select the OK screen button to store the area To edit the name of the point to be avoided 1 Sel...

Страница 44: ...creen 2 Select the Delete screen button 3 Select the point you want to delete Use the scrolling arrows as needed 4 The system will display the map screen with the name of the point and a pop up confir...

Страница 45: ...enter the way point See Destination on page 2 37 for more information A map screen will appear with the way point marked 4 Select the o Way point symbol on the map screen to save the way point 5 Repe...

Страница 46: ...een 4 From the CHANGE LOCATION screen select the point whose location needs to change 5 The system will display the map screen with the destination marked Touch the position on the map to move the way...

Страница 47: ...Select a destination entry method See Destination on page 2 37 for more information 4 Select the OK screen button to store the destination The home icon will now be highlighted on the DESTINATION ENT...

Страница 48: ...a pop up confirmation message Select Yes to delete all of the destinations select No to not delete all of the destinations A Preset Dests Destinations This feature allows you to add delete or change...

Страница 49: ...You can choose whether or not to have the name show on the map screen next to the preset destination symbol by selecting the Show Name On or Off screen buttons To change the position of a preset desti...

Страница 50: ...Delete screen button 3 Select the preset destination you want to delete 4 The system will display the map screen with a pop up confirmation message Select Yes to delete the destination select No to n...

Страница 51: ...e regardless of which method of entry you used a map screen with the destination previewed will be displayed You can change route preferences route options map appearances or add a way point at this t...

Страница 52: ...list of states included in the highlighted region or to change the region The SEARCH AREA screen will display Touch the numbered screen button to the left of the search area map that corresponds with...

Страница 53: ...the street name using the alpha keypad 3 A list of available street names will be displayed if there are less than five items available Select the List screen button at any time to view the available...

Страница 54: ...ed on Your Route later in this section for more information To use the city name first destination entry method do the following 1 Touch the City button 2 Select from the choices shown on the city scr...

Страница 55: ...will appear with the destination marked 7 Select the h destination symbol screen button to calculate the route 8 Select the Guide screen button to start route guidance See Getting Started on Your Rout...

Страница 56: ...ance See Getting Started on Your Route later in this section for more information To select a POI from a category do the following 1 Touch the Category screen button from the POINT OF INTEREST screen...

Страница 57: ...revious destination will display Select a city from the list 2 Use the alpha keypad to enter the POI name Touch Sym symbol to select symbols and numbers for the POI touch Others to select special char...

Страница 58: ...would like to move the current position mark Once the scroll symbol is on the location the address information will display on the map screen 4 Touch the destination screen button or the way point scr...

Страница 59: ...items Select the street with the correct prefix Dr Ln St etc 3 After the first street has been chosen enter the second street name The List option may again become available 4 You may now choose the s...

Страница 60: ...BER screen To use the phone number destination entry method do the following 1 Input the area code and phone number of a POI using the numeric keypad Only business phone numbers can be entered 2 If th...

Страница 61: ...ch the Entrance or Exit screen button to choose a point You can choose an exit entrance point from the list of names that will appear You can input the exit entrance by name Touch the Input Name scree...

Страница 62: ...rent position After selecting a destination from the list a map screen will appear with the destination marked 3 Select the h destination symbol screen button to calculate the route 4 Select the Guide...

Страница 63: ...ect the desired memory point A map screen will appear with the destination marked 3 Select the h destination symbol screen button to calculate the route 4 Select the Guide screen button to start route...

Страница 64: ...information Name Touch this screen button to sort the list by name Date Touch this screen button to sort the list by the date the destination has been entered The list will be in order by the latest...

Страница 65: ...e See Getting Started on Your Route later in this section for more information Preset Destination j Preset Destination The preset destination entry method allows you to set a destination by choosing f...

Страница 66: ...vailable to set while the vehicle is moving or by voice recognition To use this destination entry method do the following 1 Select the home screen button from the DESTINATION ENTRY screen A map screen...

Страница 67: ...the Map screen See Change Route later in this section for more information If any of these features are turned off there will be a diagonal red line through its icon Once the route preference has been...

Страница 68: ...n and estimated travel time The quickest route may not be the shortest and vice versa When an optional route is selected it is shown on the map in another color Touch Info on the three routes screen t...

Страница 69: ...s turned off in feature programming a message will not appear on the cluster The number on the back of the transmitter corresponds to driver 1 or driver 2 The navigation system can store memory points...

Страница 70: ...l mute The volume of an OnStar call can be adjusted by using the steering wheel controls or the volume knob on the navigation system See OnStar System in the Index of your vehicle s owner manual for m...

Страница 71: ...the CONFIG hard key to access this menu allowing adjustment of several of the systems features and preferences See Memory under Personalization on page 5 2 for more information on how to store and re...

Страница 72: ...e items on this menu will depend on which audio source is playing See Navigation Audio System on page 3 2 for more information on each feature Auto Store Touch this button to turn the Auto Store on fo...

Страница 73: ...es Select the desired language to change the spoken language The list of languages will depend on the languages supported by the disc Subtitle Language Select this button to view a list of languages t...

Страница 74: ...ick POI Selection This option allows you to set six Point of Interest POI categories that you can select from while driving To set the Quick POI selection do the following 1 Select the Quick POI Selec...

Страница 75: ...d dragging on the map will activate fast scrolling Press touch once on the area to which you would like to move the current position mark 3 Touch the OK screen button once your vehicle is in the curre...

Страница 76: ...his option will display the estimated time of arrival to your destination Arrival Time Time to Destination This option will display how much time remains to reach your destination Guidance Screen This...

Страница 77: ...ed to default The system monitors the speed on different roads and updates the average speed the vehicle travels at This average speed is used to calculate the time it will take to reach the destinati...

Страница 78: ...for more information on these features Clock H Clock Adjust Touch this screen button to access the Clock Adjust screen and adjust several time features From this screen you can adjust the following 1...

Страница 79: ...ouch this screen button to increase the time by one hour Touch this screen button again to turn this feature off and decrease the time by one hour y z Touch the up arrow to increase the hour or minute...

Страница 80: ...n screen Touch the plus or minus signs on either side of the brightness bar graph to increase or decrease the brightness Screen OFF This feature allows you to turn the navigation screen off Touch any...

Страница 81: ...e map screen Refer to Symbols on page 2 6 This system may not be available or interference may occur if the following happens Signal obstructions caused by tall buildings large trucks tunnels objects...

Страница 82: ...hanges directions more than once or when the vehicle is turning on a turn table in a parking lot The vehicle is entering and or exiting a parking lot garage or a lot with a roof The GPS signal is not...

Страница 83: ...a long time to operate automatic rerouting during high speed driving Automatic rerouting may display a route returning to the set waypoint if you are heading for a destination without passing through...

Страница 84: ...ns The United States excluding Alaska and Hawaii and portions of Canada are contained on one DVD disc The map database contains three different levels of coverage detailed areas non detailed areas and...

Страница 85: ...Navigation Audio System 3 2 Six Disc CD DVD Changer 3 12 Auxiliary Devices 3 25 Radio Personalization 3 26 Section 3 Navigation Audio System 3 1...

Страница 86: ...rned off See Retained Accessory Power RAP in the Index of your vehicle s owner manual for more information The audio system is operated using navigation system menus The audio menus are explained in t...

Страница 87: ...canning While in A B C mode the system will change bands and screens to the current band If available on your vehicle you can also use the 1 6 preset seek steering wheel control Each press of this but...

Страница 88: ...The list names are A G Press the A B C screen button to enter this feature Press the left right arrow buttons to scroll through the lists The name of the list is displayed between the two arrows and t...

Страница 89: ...ackground noise can affect how well you hear the music playing through your vehicle s audio system At higher volume settings where the music is much louder than the background noise there may be littl...

Страница 90: ...ront or Rear screen buttons To center the balance and the fade touch the center where the two lines meet Digital Signal Processing DSP This feature is used to provide a choice of five different listen...

Страница 91: ...ouncements This symbol will appear on the status line when traffic is selected but the station does not broadcast traffic announcements TA Traffic Announcements This symbol will appear on the status l...

Страница 92: ...ountry Music CLASS Classical JAZZ Jazz Music XM Satellite Radio Service XM is a satellite radio service that is based in the 48 contiguous United States XM offers over 100 coast to coast channels incl...

Страница 93: ...nything 4 Select a category and the system will start seeking for available stations within the selected category To view the available channels within the category select the category then use the tu...

Страница 94: ...ge should disappear shortly Channel Off Air Channel not in service This channel is not currently in service Tune in to another channel Channel Unavail Channel no longer available This previously assig...

Страница 95: ...r security purposes XM receivers cannot be swapped between vehicles If this message is received after having your vehicle serviced check with your GM dealer XM Radio ID Radio ID label channel 0 If tun...

Страница 96: ...damaged such as cracked broken or scratched the CD will not play properly If the surface of the CD is soiled see Care of Your CDs in the Index of your vehicle s owner manual If there is no apparent d...

Страница 97: ...disc The player takes up to six disc s do not try to load more than six The system will not display the disc types when loading all until the discs have been read by the system Once all discs have be...

Страница 98: ...the system will go to the next track on the disc j Pause Select this screen button to pause play Select this button again to resume play Scan Select the Scan screen button to toggle between the follow...

Страница 99: ...RPT Repeat Track If this symbol appears on the display after pressing the repeat screen button the system will repeat the track currently playing Select the OFF screen button to turn off repeat play B...

Страница 100: ...ying a CD R the sound quality may be reduced due to CD R quality the method of recording the quality of the music that has been recorded and the way the CD R has been handled There may be an increase...

Страница 101: ...the Home folder This is the first folder on the disc r Reverse Press and hold this screen button to reverse through the current track Fast forward Press and hold this screen button to fast forward thr...

Страница 102: ...ather than sequential order Select the OFF screen button to turn off random play B RND Random All Folders If this symbol appears on the display after pressing the random screen button the system will...

Страница 103: ...g the up arrow will seek to the first track of the next disc with the same media type or go to the first track of the selected disc Press the down arrow to go to the beginning of the current track or...

Страница 104: ...r Dolby tracks in surround sound Menu Select this screen button to access the DVD s menu options Depending on the type of DVD you are using this screen button may or may not be available DVD Menu Sele...

Страница 105: ...ight arrows to reverse or fast forward within a track r Play Select the play screen button to begin playing the currently selected disc j Pause Select the pause screen button to pause the currently pl...

Страница 106: ...ying group on the disc Select the OFF screen button to turn off repeat play This function is available for DVD audio only OFF Select this screen button to turn off the scan random and repeat functions...

Страница 107: ...uch Enter to set your selection Keypad Select this button and a number keypad will appear Input the track number press enter and the system will play the track W Back Return Select either button to re...

Страница 108: ...video DVD in normal screen size Six Disc DVD Changer Errors Although the DVD or CD you are playing meets regulation requirements there are circumstances that may cause the disc to not play correctly...

Страница 109: ...center console The system requires standard RCA cables not included to connect the auxiliary device to the RCA jacks Refer to the manufacturer s instructions for proper usage The video and left and ri...

Страница 110: ...ettings as adjusted the last time your vehicle was operated This feature allows two different drivers to store and recall their own audio system settings The settings recalled by the audio system are...

Страница 111: ...Voice Recognition 4 2 Section 4 Voice Recognition 4 1...

Страница 112: ...When a multiple command is available choose the command that best works for you Words that are in brackets are optional For example for the command Radio band select FM stating Radio FM or Radio selec...

Страница 113: ...e help screens clearly state one of the help commands While in the help menu you can select from two screens the Command List and the Operating Guide The Command List shows a list of available voice r...

Страница 114: ...button and then touch one of the buttons on the right of the screen to choose the instructions to list Use the up and down arrows to scroll through the instructions Start Touch this screen button to d...

Страница 115: ...night mode See Screen Appearance under Configure Menu on page 2 50 for more information Display set auto mode This command instructs the system to switch the system display to auto mode See Screen Ap...

Страница 116: ...while a map screen is displayed Point of Interest POI Commands The following is a list of POI commands State the commands exactly as they are written to receive information from the system regarding t...

Страница 117: ...traction Navigation Tourist Information Navigation Video Rental Navigation Winery Financial Locations Navigation ATM Navigation Bank Navigation Other Financial Services Governmental Offices Navigation...

Страница 118: ...Food Navigation Coffee House Navigation Continental Restaurant Navigation Continental Food Navigation Fast Food Navigation Fast Food Restaurant Navigation French Restaurant Navigation French Food Navi...

Страница 119: ...with Enter destination when prompted You may also state Add waypoint or To waypoint after entering a destination to add a waypoint along the route to your final destination You can cancel the command...

Страница 120: ...ly given command Guidance Commands Navigation louder navigation softer These commands instruct the system to increase and decrease the volume of the voice guidance and voice recognition system prompts...

Страница 121: ...le Radio scan up radio scan down These commands instruct the system to scan up or down through radio stations Radio band select AM radio band select FM radio band select XM radio band select satellite...

Страница 122: ...tituted in place of the word center The word fade can be substituted in place of the word balance The word chapter can be substituted in place of the word track DVD Changer Commands The following comm...

Страница 123: ...play on the map screen when the vehicle is stopped The words heat A C and air conditioning can be substituted in place of the word heater The word defog can be substituted in place of the word defrost...

Страница 124: ...s the last segment of the phone number that was spoken Delete Deletes the entire phone number Dial Dials the phone number Phone dial name This command instructs the system to dial the phone number of...

Страница 125: ...Vehicle Customization 5 2 Personalization 5 2 Section 5 Vehicle Customization 5 1...

Страница 126: ...two people Features such as driver position door lock personalization passenger window personalization chime personalization driver information center remote lock and unlock confirmation suspension sy...

Страница 127: ...available are US English male speaking voice US English female speaking voice UK English German French Italian and Spanish To change the language do the following 1 Select the CONFIG hard key 2 Touch...

Страница 128: ...ouch the globe symbol screen button from the WARNING screen See Getting Started on page 1 4 for more information This will take you directly to the Language screen Choose the desired language Your cho...

Страница 129: ...etting by pressing the Personal Settings screen button 6 The appropriate driver information should be highlighted If you wish to change driver numbers touch the appropriate keyless access transmitter...

Страница 130: ...closed on Lights Horn Lights flash at UNLOCK on Lights flash at LOCK on Exterior lighting at UNLOCK on Horn chirps at LOCK off External Audible Keyless Entry Transmitter in vehicle reminder on Twiligh...

Страница 131: ...hange automatic door locking and unlocking and keyless access transmitter locking and unlocking The following choices are available Automatic Door Unlock When this feature is off the doors will not un...

Страница 132: ...u approach the vehicle with your keyless access transmitter and pull either front door handle all of the doors will automatically unlock See Door Locks in the Index of your vehicle s owner manual for...

Страница 133: ...one of the following lights horn menus After making selections touch the Back screen button to return to the PERSONAL SETTINGS screen When any of the following features are selected on the button nex...

Страница 134: ...ING front door handle or FRONT door unlocks when PULLING front door handle is turned on the exterior lamps will flash when the doors are unlocked See Automatic Door Lock earlier in this section for mo...

Страница 135: ...ctions touch the Back screen button to return to the PERSONAL SETTINGS screen When any of the following features are selected on the button next to the name will appear highlighted Select this screen...

Страница 136: ...volume cannot be turned off Magnetic Ride Control If your vehicle has this feature select between performance or touring modes Performance mode is used where road conditions or personal preference de...

Страница 137: ...recalled when the START button is pressed See Starting and Operating Your Vehicle in the Index of your vehicle s owner manual for more information REMOTE recall memory When on the previously programme...

Страница 138: ...the following remote start menus After making selections touch the Back screen button to return to the PERSONAL SETTINGS screen When this feature or any of the following features are selected on the b...

Страница 139: ...led seats if equipped will turn on when the vehicle is started using remote start It will be the same setting that was last used by the driver using that keyless access transmitter Memory If your vehi...

Страница 140: ...tem and the voice recognition system To store and recall memory settings is dependent on the type of configure menu screen that your vehicle s system displays Press the CONFIG hard key to determine wh...

Страница 141: ...rror climate control and radio positions recalled If the vehicle is in PARK P a beep will sound and your previously saved driving position will then be recalled If the vehicle is not in PARK P three b...

Страница 142: ...r driver number and repeat this procedure The memory settings are now programmed Any changes that are made to the Head Up Display HUD navigation system and climate controls while driving will be autom...

Страница 143: ...t your settings for the driver s seat the outside mirrors and the steering column to a comfortable driving position or exit position 5 Push and hold either the Driver 1 or Driver 2 screen buttons to s...

Страница 144: ...ver 1 or Driver 2 screen buttons to recall the driving positions Push and release the Exit screen button to recall the exit position If the vehicle is in PARK P a beep will sound and your previously s...

Страница 145: ...Phone 6 2 Bluetooth Phone 6 2 Section 6 Phone 6 1...

Страница 146: ...Search screen button The system will search for the compatible Bluetooth devices Your phone must be in the discoverable mode or the Bluetooth feature must be on to be found by the Bluetooth system 4 C...

Страница 147: ...isplay a list of all Bluetooth phones that have been registered connected to your vehicle From this list you can set your default device change the phones to be used in the vehicle search for a new de...

Страница 148: ...Bluetooth phones in a designated area Bluetooth Phone Screen This information on this screen depends on the information received from the phone Some phones may not support this feature While in this...

Страница 149: ...t of the phone s address book and data cannot be transferred from the Bluetooth phone book to the phone s address book or vise versa V Send End Call This screen button will let you place a call after...

Страница 150: ...lls up the list one entry at a time z Scroll Down This screen button scrolls down the list one entry at a time z Page Down This screen button scrolls down the list one page at a time Q OnStar Select t...

Страница 151: ...lect the name that you wish to delete 3 Select the Edit screen button 4 Select the Y delete screen button 5 The system will request confirmation Press Yes to confirm or No to cancel To add a nametag t...

Страница 152: ...ll after touching the appropriate phone book entry or to cancel a call at the end of the conversation Last 10 Calls Screen This screen shows either the last 10 calls that have been placed or the last...

Страница 153: ...to cancel a call at the end of the conversation Sent Selecting this screen button will give you the list of the last 10 calls sent from the system Received Selecting this screen button will give you t...

Страница 154: ...NOTES 6 10...

Страница 155: ...Guidance 1 11 Change Route 2 17 Cleaning the Display 1 12 Coordinates 2 50 D Database Coverage Explanations 2 70 Destination 2 37 Dialing and Making Calls Using Your Bluetooth Phone 6 5 Dialing from N...

Страница 156: ...ance Windows 2 12 H Hard Keys 2 2 Home 2 52 I Installing the Map DVD 2 5 Intersection 2 45 L Language 5 2 Lights Horn 5 9 Lock Unlock 5 7 M Magnetic Ride Control Magnetic Ride Control Displayed on Con...

Страница 157: ...46 Playing an Audio CD 3 14 Playing an Audio or Video DVD 3 19 Playing the Radio 3 2 Point of Interest POI 2 41 Preset Destination 2 51 Preset Stations 3 4 Previous Destination 2 49 Problems with Rout...

Страница 158: ...tions 1 8 Six Disc DVD Changer Errors 3 24 Store Memory Settings Displayed on Configure Menu 5 19 Symbols 2 6 System Needs Service If 2 70 T Three Routes 2 54 Touch Sensitive Screen Buttons 2 4 Travel...

Отзывы: