background image

24

KOOK 60 4.0 - KOOK 67 4.0 - KOOK 70 4.0 - KOOK 80 - KOOK 87 - KOOK 90 4.0

EN

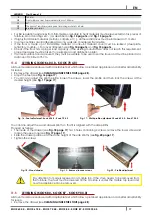
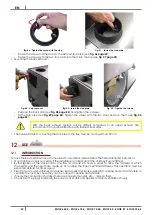
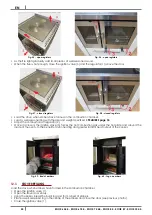
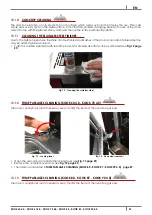
Fig. 55 - open registers

Fig. 56 - open registers

• 

As the fire lights gradually add small pieces of well-seasoned wood.

• 

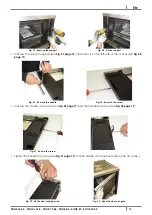
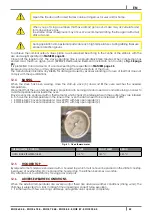
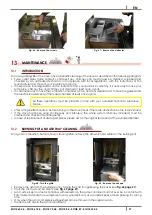
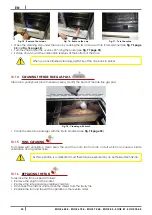
When the flue is hot enough, close the ignition valve (3) and the regulator (1) above the door.

Fig. 57 - closed registers

Fig. 58 - closed registers

• 

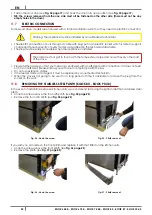
Load the stove when embers have formed in the combustion chamber.

• 

Load a well-seasoned log with the size and weight specified in 

FEATURES page 35

.

• 

Adjust the combustion air regulator (2).

• 

Once it is closed, the ignition valve (3) forces the hot combustion gas under the hot plate and around the 

inside of the oven, to the benefit of oven heating and greater radiant heat output of the cooker.

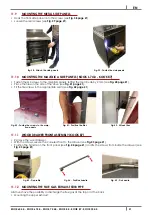
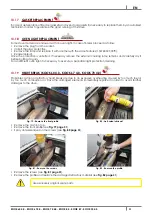
Fig. 59 - Bed of embers

Fig. 60 - Log on embers

12.3 

STOVE REFILLING

Load the stove when embers have formed in the combustion chamber.

• 

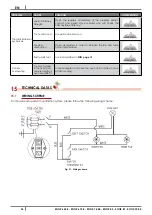
Open the ignition valve (1).

• 

Open the stove door slowly.

• 

Using the poker, break the burnt log and form a bed of embers.

• 

Place a well-seasoned log in the centre of the embers and close the door (see previous photos).

• 

Close the ignition valve (1).

Содержание KOOK 60 4.0

Страница 1: ... and maintenance manual Original Instructions 2018 CADEL srl All rights reserved tutti i diritti riservati KOOK 60 4 0 KOOK 67 4 0 KOOK 70 4 0 KOOK 60 4 0V KOOK 67 4 0V KOOK 70 4 0V KOOK 80 KOOK 87 KOOK 90 4 0 KOOK 80V KOOK 87V KOOK 90 4 0V ...

Страница 2: ......

Страница 3: ...ion air regulator 2 and the ignition valve 3 fig B As the fire lights gradually add small pieces of wood 2 logs weighing about 2 kg in total fig C C B Topping up with wood Load the hearth when there are embers in the combustion chamber Open the ignition valve 3 and slowly open the hearth door Using the poker break the burnt wood and form a bed of embers fig D Insert a log of wood weighing 2 2 kg i...

Страница 4: ......

Страница 5: ...ASSEMBLY KOOK 87 21 11 12 MOUNTING THE FLUE GAS EXHAUST STUB PIPE 21 12 USE 22 12 1 INTRODUCTION 22 12 2 IGNITION 23 12 3 STOVE REFILLING 24 12 4 BAKING 25 12 5 HOODED TOP 25 12 6 ADVERSE WEATHER CONDITIONS 25 12 7 CREOSOTE DANGER 26 12 8 FIRE EXTINGUISHING IN CASE OF FIRE 26 12 9 FLUE GAS PASS PROBLEMS KOOK 60 4 0 KOOK 67 4 0 KOOK 70 4 0 26 12 10 FLUE GAS PASS PROBLEMS KOOK 80 KOOK 87 KOOK 90 4 0...

Страница 6: ... Dir 2006 95 CEE for low tension Dir 2004 108 EC for Electromagnetic compatibility Read carefully the instruction contained in this manual to obtain the best efficiency This instruction manual is an integral part of the product make sure it is delivered with the appliance also in case of sold to others In case of loss please ask a copy to your local Technical Assistance Service In Italy biomass sy...

Страница 7: ...e ignition alcool petrol oil etc Do not sibject the cast iron cooktop to too high temperature cherry red because there is the risk of breakage During stove refilling do not wear flammable or large clothing Do not open and close the fire door violently the glass can brake During regular working is dangerous to keep open the ash drawer and or the fire box to increase air draught There are appropriat...

Страница 8: ...anty Also excluded from this guarantee are Parts subject to normal wear such as gaskets glass claddings and cast iron grids painted chrome plated or gilded parts handles and electric cables bulbs indicator lights knobs all parts which can be removed from the hearth Variations in colour of the painted or ceramic serpentine parts and craquelure ceramics as they are natural characteristics of the mat...

Страница 9: ... constructor instructions if the stove is made up of ceramic stone glass or any particularly fragile material components all must be moved with the utmost care Two people are needed for handling operations of the stove It is strongly recommended to reduce the weight by removing cook top fire door oven door drawer firewood holder and refractorty of the fire place see MAINTEINANCE page 27 9 CHIMNEY ...

Страница 10: ...ion collection chamber under the entrance accessible through the sealed metal gate The inner section of the chimney flue can be round the best one or square and the jointed sides must have a minimum radius of 20 mm The section dimension must be minimum Ø150 mm and maximum Ø240 mm Made the efficiency of the chimney flue overhauled by an expert stove repairer and if necessary cover the chimney flue ...

Страница 11: ... and chimney pot checked and cleaned by an expert chimney sweep at least once a week The chimney sweep has to release a written declaration about the security of the system Not cleaning compromise safety 9 6 CHIMNEY POT Fig 5 Anti wind chimney pots The chimney pot is important for the correct running of the heating appliance We recommend using an anti wind chimney pot see Fig 5 page 8 The hole wid...

Страница 12: ... an opening on the external wall of the room see Fig 7 page 9 The air inlet should have a total net surface of 100 sqcm2 the aforesaid surface is to widen if inside the room there are other activated appliances for example electric ventilators for foul air suction cooker hoods other stoves etc which depress the environment At switched on appliance it is necessary to check that the pressure fall be...

Страница 13: ...from wind effects turn the curve inlet downwards see Fig 8 page 10 Endow the curve with an external shield grid against birds in such a way that it cannot be obstructed by any object Check with your local authorities if exists any restrictive regulation regarding the combustible air inlet if present they must be applied 9 10 CHIMNEY FLUE CONNECTION Your stove works through a natural draught It is ...

Страница 14: ...outside and closed spaces also at open top It is forbidden to connect any other appliance wood stoves cooker hoods boilers etc The fume conduit must be placed at a distance of minimum 500 mm from flammable or heat susceptible components The fume conduit must be connected with stove exhaust in a fixed and tight manner and if required with the insertion of a damper see FEATURES page 35 It is prohibi...

Страница 15: ... 3 Chimney inspection entrance 4 Minimum safety distance 0 5 mt 5 Inclination 3 6 Level section 1 mt 7 Damper Old chimney flue with an inserted pipe of minimum Ø150 mm and with an external door which enables the chimney cleaning Fig 11 Example 3 LEGEND Fig 11 page 12 1 Insulating material 2 Inspection plug 3 Minimum safety distance 0 5 mt 4 Damper ...

Страница 16: ...f damp wood is much lower than the heat output of dry wood and pollutes a lot more To know the lenght of wood log to use check the dimensions of stove combustion chamber Here following some information about the quality of different type of woods TYPE OF WOOD QUALITY PERFORMANCE Oak Excellent 100 Hornbeam Excellent 100 Ash Very good 92 Maple Very good 91 Birch Good 89 Elm Good 84 Beech Good 80 Wil...

Страница 17: ...ove in bedrooms bathrooms and in rooms used for storing combustible materials In any case the stove must not be installed in rooms where it can get in touch with water or water splashes because this can cause burn hazards and short circuit To install more appliances the external air inlet must be correctly dimensioned see EXTERNAL AIR INLET page 9 Only in room used as kitchen is possible to use ap...

Страница 18: ...cm 12 75 cm 75 cm 75 cm Fig 13 Overall dimensions Kook 80 Kook 87 Kook 90 4 0 Please find here following the table with the measures for each stove model see Fig 13 page 15 POS KOOK 80 KOOK 87 KOOK 90 4 0 1 79 5 cm 89 5 cm 89 5 cm 2 86 cm 86 cm 86 cm 3 60 cm 60 cm 60 cm 4 15 4 cm 20 3 cm 20 4 cm 5 17 cm 17 cm 17 cm 6 13 3 cm 18 3 cm 18 3 cm 7 73 cm 73 cm 73 cm 8 Exhaust fumes d 14 cm Exhaust fumes...

Страница 19: ...lls Fig 14 General installation LEGEND Fig 14 page 16 1 Stove 2 100 mm 3 100 mm 4 1000 mm 5 50 mm 6 300 mm Fig 15 Built in installation LEGEND Fig 15 page 16 1 min 600 mm 2 Distance from fitted units 2 5 mm 3 min 450 mm 4 Distance from fitted units 2 5 mm 5 600 mm 6 Distance from side panels under the hot plate 2 5 mm 7 Distance from side panels under the hot plate 2 5 mm 8 Distance from flammable...

Страница 20: ...KOOK 70 4 0 All stove models are endowed with adjustable feet which allow a plumbed appliance and a better adaptability for recess Remove the drawer see CLEANING UNDER THE STOVE page 28 Adjust the feet see Fig 16 page 17 You can also adjust the plinth profile loosen the screws lower the profile and then lock the screws at the desired height see Fig 17 page 17 Fig 16 Feet adjustment Kook 60 4 0 Koo...

Страница 21: ...0 KOOK 67 4 0 KOOK 70 4 0 The hinges on the fire door can be moved to the other side if required Fig 22 Remove the brackets Fig 23 Remove the pin Fig 24 Insert the pin the other way round Remove the fire door see REPLACING THE DOORS page 32 Remove the brackets undoing the 4 x CH8 screws see Fig 22 page 18 Remove the brass pin see Fig 23 page 18 and insert it the other way round see Fig 24 page 18 ...

Страница 22: ...on the left side of the cooker see Fig 28 page 19 Fig 29 Remove the handle Fig 30 Remove the screw Unscrew the handle on the door see Fig 29 page 19 and the handle stop screw see Fig 30 page 19 Fig 31 Secure the screw Tighten the handle stop screw see Fig 31 page 19 and the handle on the opposite side of the door see Fig 32 Fix the door locking screw Fig 33 Hook the door on again ...

Страница 23: ... every other part of the stove Please further assure you that your network is endowed with an efficient earth connection if it does not exist or if it is not efficient please endow you with one in compliance with the law Do not use extension cables If the feeder cable is damaged it must be replaced by an authorized technician When the stove is not going to be used for a long period of time it advi...

Страница 24: ...stove see Fig 41 page 21 Fit the tile screws in the appropriate seats see Fig 42 page 21 Fig 40 Fasten the screws to the majo lica panels Fig 41 Position the tiles Fig 42 Attach tiles 11 11 WOOD DRAWER FRONT ASSEMBLY KOOK 87 Remove the wood drawer With the screws secure the coloured front to the drawer see Fig 43 page 21 Position the handle on the front panel see Fig 44 page 21 and fix the screws ...

Страница 25: ...orizontal duct connecting the stub pipe to the flue must be no longer than 30 cm 12 USE 12 1 INTRODUCTION To have the best performance with the lowest consumption please follow the here descripted instructions Wood ignition occurs very easily if the installation is correct and if the chimney flue is efficient By first ignition of the stove hold a slow fire for at least 4 5 hours in order to allow ...

Страница 26: ... Cooker side panel 6 Combustion chamber 7 Fan switch 8 Stainless steel top 9 Hot plate 10 Backsplash 11 Exhaust stub pipe 12 Stainless steel plinth Place firelighters in the burning pot with small pieces of well seasoned wood Light and if necessary keep the door open for a few minutes until the combustion chamber and flue start to heat up Fig 53 Wood arrangement Fig 54 Wood ignition Open the regul...

Страница 27: ...ght specified in FEATURES page 35 Adjust the combustion air regulator 2 Once it is closed the ignition valve 3 forces the hot combustion gas under the hot plate and around the inside of the oven to the benefit of oven heating and greater radiant heat output of the cooker Fig 59 Bed of embers Fig 60 Log on embers 12 3 STOVE REFILLING Load the stove when embers have formed in the combustion chamber ...

Страница 28: ...mply with the specifications 12 4 BAKING When the stove has been working close the start up valve 3 and wait till the oven reaches the needed temperature We remind that the oven temperature is proportional to burning rate and needs a constant burning on order to avoid temperature leaps inside the oven Stove s ovens are endowed with a thermometer which checks the temperature in the position they ar...

Страница 29: ...0 KOOK 67 4 0 KOOK 70 4 0 If there are draught issues smoke and odour coming out of the cooker after the ignition valve 3 has been closed act as follows Open the cleaning cap under the oven by undoing the two screws 8 mm spanner see Fig 62 page 26 Using the poker turn the valve under the oven by 90 so that the flue gas path is shortened see Fig 63 page 26 Fig 62 Remove the screws Fig 63 Turn the v...

Страница 30: ...anned in time with your Autorized Technical Assistance Service After a long ineffective time before turning on the stove check if there are obstructions in the fume exhaust If the stove had been using continuously and intensely the whole system chimney included must be cleaned and checked more frequently In case of replacement of damaged pieces please ask for the original spare part at the Autoriz...

Страница 31: ...CLEANING For cleaning external and inner parts of the stove do not use steel wools muriatic acid or other corrosive and abrasive materials 13 6 CLEANING OF PAINTED METAL PANELS To clean painted metal panels use a soft cloth Do not use degreasant agents like alcool diluents acetone gasoline because these could irremediably damage the varnish 13 7 CLEANING OF CERAMIC PANELS Some stove models has an ...

Страница 32: ...r stainless steel top may be altered yellowish colour Polish the stainless steel parts with specific products for stainless steel that can be purchased see Fig 72 page 29 Fig 72 Cleaning the stainless steel 13 12 FUME PASSAGES CLEANING KOOK 60 4 0 KOOK 70 4 0 Clean on a yearly basis and if necessary every month the inside of the oven flue gas pass Fig 73 Locking lever Fig 74 Oven door removal Open...

Страница 33: ...ASS Clean on a yearly basis and if necessary every month the inside of the side flue gas pass Fig 78 Cleaning with brush Clean the side fume passages with the brush provided see Fig 78 page 30 13 15 FANS CLEANING For models with ventilation clean every the year the room fan from ash or dust which can cause a blade unbalance and a greater noise As this operation is so delicate it must therefore be ...

Страница 34: ... remains and carefully dry it before bolting it again For an efficient oven light it is necessary to execute a periodical light protection cleaning 13 19 HEART BREAK KOOK 60 4 0 KOOK 67 4 0 KOOK 70 4 0 Probable cast iron or refractory heart break are due to an excessive overheating caused by too much fuel or by too much combustion air Have the damaged elements immediately replaced in order to avoi...

Страница 35: ... page 32 Remove the steel profile see Fig 84 page 32 Remove the broken refractory material and replace it see Fig 85 page 32 Use exclusively original spare parts 13 21 REPLACING THE STAINLESS STEEL TOP In the event of a replacement proceed as follows Fig 86 Screw removal Fig 87 Screw removal Fig 88 Remove the top Remove the side panels see relative chapter Loosen the 10 screws along the entire per...

Страница 36: ...s completely If the problem persists contact and expert stove repairer who will check the chimney flue efficiency Ambient without air recycling Create immediately a ventilation grid Creation of condensation Large chimney flue section Reduce the chimney flue section with thermal insulater pipes No insulated chimney flue Cover the chimney flue with insluating material Too slow combustion Open air re...

Страница 37: ... Too humid wood Use well seasoned wood Too slow combustion Open air registers in order to increase the fire and fume output temperature Bad quality fuel Use fuel described in FUEL page 13 Cooker overheating Too much wood in the heart red coloured plate or oven over 300 C Close all registers and open the oven door in order to have a faster cooling 15 TECHNICAL DATAS 15 1 WIRING SCHEME For models en...

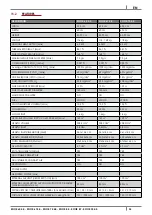
Страница 38: ...TORY DAMPER NO NO NO FUEL WOOD WOOD WOOD WOOD MOISTURE CONTENT Max 13 3 13 3 13 3 LOG LENGTH 33 cm 33 cm 33 cm LOG WEIGHT 1 6 kg 1 6 kg 1 6 kg HEATABLE VOLUME 18 20 C Coeff 0 045 kW Max 149 m3 149 m3 149 m3 HEARTH VOLUME 238 2 dm3 238 2 dm3 238 2 dm3 HEARTH INLET 3 8 dm3 3 8 dm3 3 8 dm3 HEARTH INLET DIMENSIONS WxH 26 1x14 4 cm 26 1x14 4 cm 26 1x14 4 cm HEARTH DIMENSIONS WxDxH 22 9x40x26 cm 22 9x40...

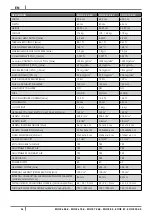
Страница 39: ...UEL WOOD WOOD WOOD WOOD MOISTURE CONTENT Max 13 3 13 3 13 3 LOG LENGTH 33 cm 33 cm 33 cm LOG WEIGHT 1 6 kg 1 6 kg 1 6 kg HEATABLE VOLUME 18 20 C Coeff 0 045 kW Max 149 m3 149 m3 149 m3 HEARTH VOLUME 238 2 dm3 238 2 dm3 238 2 dm3 HEARTH INLET 3 8 dm3 3 8 dm3 3 8 dm3 HEARTH INLET DIMENSIONS WxH 26 1x14 4 cm 26 1x14 4 cm 26 1x14 4 cm HEARTH DIMENSIONS WxDxH 22 9x40x26 cm 22 9x40x26 cm 22 9x40x26 cm O...

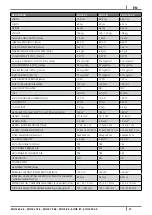
Страница 40: ... WOOD WOOD WOOD WOOD MOISTURE CONTENT Max 13 3 13 3 13 3 LOG LENGTH 33 cm 33 cm 33 cm LOG WEIGHT 2 2 kg 2 2 kg 2 2 kg HEATABLE VOLUME 18 20 C Coeff 0 045 kW Max 180 m3 180 m3 180 m3 HEARTH VOLUME 191 8 dm3 191 8 dm3 191 8 dm3 HEARTH INLET 2 9 dm3 2 9 dm3 2 9 dm3 HEARTH INLET DIMENSIONS WxH 17 2x16 7 cm 17 2x16 7 cm 17 2x16 7 cm HEARTH DIMENSIONS WxDxH 21 5x41 5x21 5 cm 21 5x41 5x21 5 cm 21 5x41 5x...

Страница 41: ...RE CONTENT Max 13 3 13 3 13 3 LOG LENGTH 33 cm 33 cm 33 cm LOG WEIGHT 2 2 kg 2 2 kg 2 2 kg HEATABLE VOLUME 18 20 C Coeff 0 045 kW Max 180 m3 180 m3 180 m3 HEARTH VOLUME 191 8 dm3 191 8 dm3 191 8 dm3 HEARTH INLET 2 9 dm3 2 9 dm3 2 9 dm3 HEARTH INLET DIMENSIONS WxH 17 2x16 7 cm 17 2x16 7 cm 17 2x16 7 cm HEARTH DIMENSIONS WxDxH 21 5x41 5x21 5 cm 21 5x41 5x21 5 cm 21 5x41 5x21 5 cm OVEN DIMENSIONS WxD...

Страница 42: ...NOTE ...

Страница 43: ...NOTE ...

Страница 44: ...y Cadel Via Foresto Sud 7 31025 Santa Lucia di Piave TV ITALY tel 39 0438 738669 fax 39 0438 73343 www cadelsrl com Partner of pellet stoves wood stoves wood cooking stoves thermostoves pellet fireplace inserts Rev 03 2015 ...

Отзывы: