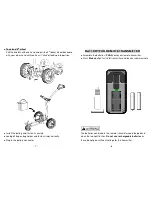
Caddytek Cruiser RC-900 Скачать руководство пользователя страница 13


BATTERY CHARGER


 Before charging, read the instructions. (on back side of charger) 
 For indoor use only, do not expose to rain. 
 If the supply cord is damaged, it must be replaced by the 

manufacturer, its service agent or similarly qualified persons in order 
to avoid a hazard. 

 Disconnect the supply before making or breaking the connections to 

the battery. 

 Batteries contain explosive gases. Prevent flames and sparks. 

Provide adequate ventilation during charging. 

 This appliance is not intended for use by persons (including children) 

with reduced physical, sensory or mental capabilities, or lack of 
experience and knowledge, unless they have been given supervision 
or instruction concerning use of the appliance by a person 
responsible for their safety. Children should be supervised to ensure 
that they do not play with the appliance. 

 This charger is not for recharging non-rechargeable batteries. 
 During charging, the battery must be placed in a well ventilated area. 
 The battery charger must only be plugged into an earthed 

socket-outlet. 

 Do not use for charge any other batteries not specified by the 

manufacturer. 


- 21 -   

BATTERY CARE & MAINTENANCE 


Following are important issue to prolong the life span of the battery: 


  Before the first use of your battery, put it on charge for 24 hours even if 

the battery is already fully charged. 

  Do not place the battery on a concrete floor for charging, have the 

battery raised off the floor on wooden blocks or place the battery on a 
shelf. 

  To fully charge the battery, choose a place where ambient temperature 

is above 10 degrees Celsius (+10ºC). 

  Always recharge your battery as soon as possible after use. 

  Always keep your battery on charge between games, if you play golf 

regularly every week. 

  Never play 18 holes without fully recharging. You will discharge the 

battery below its designated voltage and damage it. 

  Do not drop the battery. Avoid storing the battery in the trunk of your 

car as it might roll around and be damaged. 


STORAGE

: (This also applies for new batteries kept in stock) 

If you know that you will not be playing for next 3 weeks or so. 
REMOVE BATTERY FROM THE CHARGER AND STORE IN A 
PLACE WHERE THE AMBIENT TEMPERATURE IS ABOVE 10 
DEGREES AND LOWER THAN 30 DEGREES CELSIUS. Recharge it 
before your next round or 

every 3 months (No more than 3 months) 

if it is not used in that period.


Disconnect charger from power supply. 


Always contact our service agent before you try to replace the battery 
or the charger. Using an incompatible battery or charger may damage 
the trolley and void your warranty.


                                                        - 22 -   

Содержание Cruiser RC-900

Страница 1: ...Cruiser RC 900 Remote Golf Cart User s Manual Distributor P N 906140 US ...

Страница 2: ...ipment off and on the user is encouraged to try to correct the interference by one of the following measures Reorient or relocate the receiving antenna Increase the separation between the equipment and receiver Connect the equipment into an outlet on a circuit different from that to which the receiver is connected Consult the dealer or an experienced radio TV technician for help This device compli...

Страница 3: ...an be included electromagnetic high voltage power lines cellular phones or CB radios or certain obstructions such as mounds clusters of trees will possible reduce the distance of transmission Take extra care when operating up and down slopes with remote control The batteries contained in the remote transmitter need be replaced when the led light flashes Do not use rechargeable batteries as these d...

Страница 4: ...trolley or while unattended You can also Disconnect battery connector before leaving your trolley This trolley complies with current telecommunications regulations for conforms to CE and FCC but we strong recommend you read this manual completely before you start to use your trolley 3 RELEASE AND ASSEMBLE THE WHEELS To assemble the wheels Insert the wheel on the axle in the direction of the arrow ...

Страница 5: ...core card holder as illustrated 5 OPEN THE TROLLEY Pull the handle upward in the direction of the arrow until you hear the click of it locking into position of main frame mechanism Pull the handle upward and press the upper bag holder downward in the direction of the arrow to let the upper bag holder lock into position E 6 ...

Страница 6: ...bag holder and fasten straps correctly Plug in the battery connector 7 BATTERY FOR REMOTE TRANSMITTER Assemble the batteries 2 AAA onto your remote transmitter Press Brake button first to let transmitter and receiver communicate The batteries contained in the remote transmitter need be replaced when the led light flashes Do not use rechargeable batteries as these do not give sufficient voltage for...

Страница 7: ...shing Remote mode When remote signal not well Red Flashing Manual mode Battery Level Low Red Steady Manual mode Battery Level Critical Green Red When trolley stops by digital cut off system Flashing alternately green red light will be on intermittently NOTE Above red flashing manual mode and steady on manual mode is only work when operate by potentiometer if operate by remote control this red led ...

Страница 8: ... transmitter and continue with remote operation To switch from remote to manual mode switch the on off switch on handle grip to off and back to on again then operate the trolley from potentiometer 11 PRECAUTION Start slowly and take extra care to practice for operation never use higher speed at beginning when start using this remote control operation Do not overload the base pockets of your golf b...

Страница 9: ... lights from battery indicator of transmitter will flash intermittently when scanning and duration for 60 seconds 13 Press Code button after frequency paired Press the Brake button to continue NOTE In case your trolley stops while using the remote control or it doesn t respond well to commands from transmitter or remote signal not well then go straight to set frequency scan TRIM ALIGNMENT FOR MOVI...

Страница 10: ...tton must be turned back to 0 zero position Always switch power off press brake button on remote transmitter and keep potentiometer on 0 zero position on handle grip before leaving your trolley or while unattended 15 BUTTON KEY LOCK To prevent accidentally pressing a button on transmitter and starting the trolley moving you can activate the button lock key lock on the remote transmitter To use but...

Страница 11: ...with your other hand until you hear it click of locking into position Unplug the connector from battery undo the strap and remove the battery 17 Hold the handle up with one hand and have your other hand to pull the upper bag holder upwards Push down the locking lever T and push the upper frame downward to fold the trolley 18 ...

Страница 12: ...the battery must be in the upright position for recharging Do not connect the battery charger to the trolley Never use the battery for any other purpose other than to power this trolley Study charger instruction on back side of charger before charging your battery IMPORTANT NOTICE Please DO NOT leave your battery near parts which might touch the positive and negative pole of the battery if this ha...

Страница 13: ...o prolong the life span of the battery Before the first use of your battery put it on charge for 24 hours even if the battery is already fully charged Do not place the battery on a concrete floor for charging have the battery raised off the floor on wooden blocks or place the battery on a shelf To fully charge the battery choose a place where ambient temperature is above 10 degrees Celsius 10ºC Al...

Страница 14: ...g the strap from battery tray for tighten the handle bar 23 REPACKAGING INSTRUCTION Keep shipping carton in dry place after unpacking your unit Follow the way and position as illustrated above to do repacking your unit for in case should need to be shipped for service or whatever purpose 24 ...

Страница 15: ... available user shall pay cost and shipping for parts needing to be repaired or exchanged There is a 3 month warranty for the battery from the date of your purchase If the battery is properly maintained the battery life is more than 250 charges PROOF OF PURCHASE Proof of purchase in the form of bill of sale invoice or receipt showing the purchase date must be presented to obtain warranty service S...

Отзывы: