background image

Assembly the car


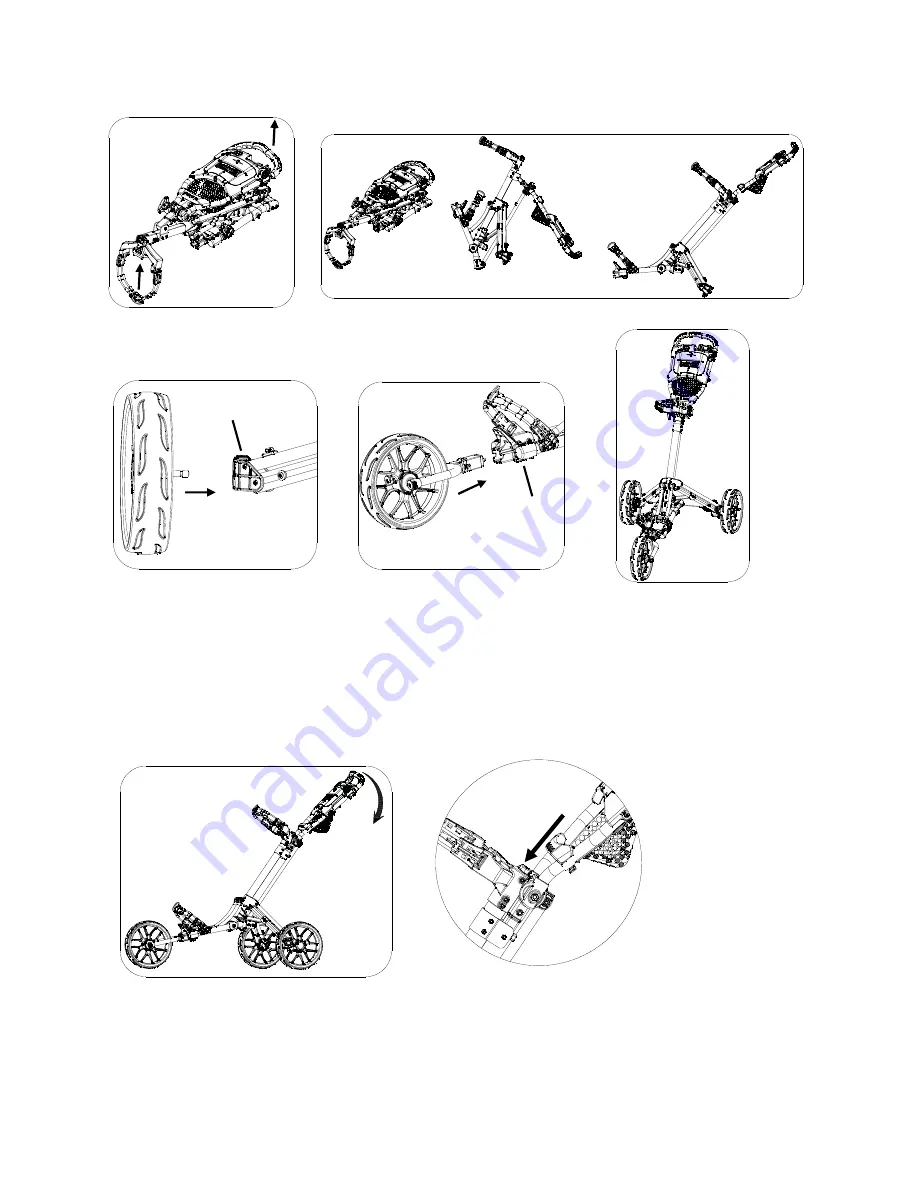
Press the button and fold the cart in the direction of the arrow as in 

Fig.5/6. 

Fig. 5 

Folding the cart 

Folding button 

Fig. 1 

Fig. 6 

Unfolding motion   

Press  the  button  and  insert 

the rear wheels as in Fig.2 

Open  the  handle  up  until  you 

hear the cart 'Click' as in Fig.1 

Fig. 2 

Button 

Press  the  button  and  insert 

the front wheel assembly as 

in Fig.3 

Fig. 3 

Button 

The cart is fully extended 

as shown in Fig.4 

Fig. 4 

Содержание CaddyLite ONE V3

Страница 1: ...CaddyLite ONE V3 User s Manual ...

Страница 2: ...CaddyTek Inc 20175 S Atlantic Blvd C Monterey Park CA 91754 USA www caddytek net ...

Страница 3: ...ctions carefully AVOID INJURY by keeping clear of moving parts while adjusting folding or unfolding this cart ALWAYS make sure the cart is fully extended and locked before use ALWAYS make sure the cart is folded and locked properly before lifting or transporting ALWAYS use the brake when parking the cart DO NOT run while using this cart DO NOT use accessories other than those designed specifically...

Страница 4: ...holder assembly E Basket with cooler F Handle frame G Upper bag holder bracket assembly H Handle height adjusting knob assembly I Main frame J Front connection Rod J1 Main connection Rod K Leg frame bracket L 2 holes right leg frame L1 2 holes left leg frame M 4 holes right leg frame N Lower bag holder bracket assembly O Weight stabilizer P Supporting cable Q Main lower frame tube R Right wheel lo...

Страница 5: ...he cart Folding button Fig 1 Fig 6 2 Unfolding motion Press the button and insert the rear wheels as in Fig 2 Open the handle up until you hear the cart Click as in Fig 1 Fig 2 Button Press the button and insert the front wheel assembly as in Fig 3 Fig 3 Button The cart is fully extended as shown in Fig 4 Fig 4 ...

Страница 6: ... to release as Fig 11 Fig 11 Fig 7 To open the scorecard holder cover Press the button to open the scorecard holder cover as Fig 12 Fig 12 holding slot connecting rod Fig 8 The connecting rod will insert into the plastic bracket when folding is completed as Fig 7 8 Then pull up the front wheel assembly then rotating 90 degree clockwise as Fig 8 1 Fig 8 1 Button ...

Страница 7: ...or the right bolt counterclockwise Please continue doing so until the front wheel is centered CART VEERING TO RIGHT If the cart veers to the right face the front wheel and use the allen wrench provided to make the adjustments You can either screw the left bolt counterclockwise or the right bolt clockwise Please continue doing so until the front wheel is centered Fig 14 Fig 13 4 Fig 15 Right Left ...

Страница 8: ... warranty does not apply to claim of damage to items used in connection with CaddyTek Inc products In the case of deterioration due to normal use we will repair the item for a normal charge CaddyTek Inc is the sole judge of any claim or warranty For customers in North America please contact CaddyTek Inc for the service For customers outside of North America please contact with your dealer for the ...

Страница 9: ...______________________________________ City ______________ State ____________ ZIP ______________ Tel ____________ E Mail____________________ Date of Purchase ______________Name of Store Dealer __________________ Round of Golf per Month _______________ HCAP_______________________ Signed ________________________ Date ________________________ Failure to return this card may result in delayed response...

Страница 10: ...Caddytek Inc 20175 S Atlantic Blvd C Monterey Park CA 91754 USA You can also register your golf cart on www caddytek net Stamp ...

Отзывы:

Похожие инструкции для CaddyLite ONE V3