


NX-480 Wireless Motion Sensor
Page 3
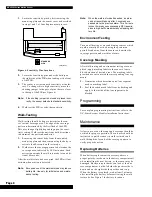
Mounting the Sensor
The sensor can be flush-mounted, incline-mounted, or
corner-mounted depending on the application (see
Figure 4).
Figure 4. Wall Mount Options: use the inclined
position for surface or corner mounting with the
standard lens. Use the flush position for surface or
corner mounting with the animal alley lens.
Use the following procedure to mount the sensor.
1.
Remove the mounting plate by depressing the
button on the top of the sensor body. With the
opposite hand pull the mounting plate away from
the body of the sensor.
2.
Punch out the mounting holes that best fit your
application. See Figure 4 for wall mount options.
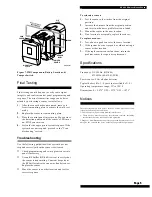
See also Figure 5 to determine which knockouts to
use when mounting the motion sensor. Use the
lower-side holes for corner mounting, or the
lower-back holes for surface mounting with the
standard lens.
For applications without pets, use the lower
mounting holes. For applications with pets, use
the upper mounting holes and the animal alley
lens.
3.
If you desire wall-tamper functionality, remove
the wall-tamper knockout (see Figure 5).
Note:
The wall-tamper switch cannot be used when the
sensor is swivel or corner mounted.
Figure 5. PIR Mounting Plate Knockouts
4.
Mark the location of the required holes on the
mounting surface.
5.
Use wall anchors and screws to secure into
place.Attach the sensor to the mounting plate.
Lens Replacement:
1.
To change the lens, first remove the sensor from
its mounting plate by depressing the button on
the top of the sensor.
2.
Remove the cover by depressing the two tabs on
the top and the one tab on the bottom of the sen-
sor body and sliding the cover off (see Figure 7).
3.
Remove the installed lens by gently placing pres-
sure on the lens from the outside of the lens.
4.
Replace with the appropriate lens by aligning its
notches with the appropriate tabs in the cover.
5.
Install the new lens with the smooth side facing
out and the grooved side facing in.
6.
Replace the cover and then replace the sensor in
its mounting plate.
Setting the Sensitivity
The PIR is set to standard sensitivity at the factory.
This sensitivity is preferred for most applications and
provides the best immunity to false alarms.
CAUTION:
High sensitivity should only be used
in extremely quiet environments
where thermal transients are not
expected.
8362G03A.DS4
FLUSH MOUNT
INCLINED MOUNT
CORNER MOUNT
USE WITH
STANDARD LENS
USE WITH
ANIMAL ALLEY LENS
8362G01B.DS4
WALL
TAMPER
KNOCKOUT


