

Caddon Hives
Page 3 of 3 Jan 2013
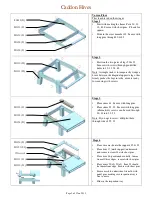
Roof
•
Start with making the frame Parts 02(x2)
& 03(x2). Secure with long pins. (Check
for square)
•
Place roofs 01 onto frame, locating 02
into the grooves. Secure with screws
through 01 into 02
and
secure with long
pins through 01 into 03
•
Position 05(x4). Note the dimensions
13mm. Secure with nails
•
Place metal covers and secure with nails.
(Use a hammer to knock down any sharp
edges)
•
Position 49, and secure with screws.
Secure wasp taps with panel pins
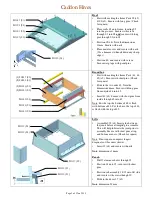
Brood box
•
Start with making the frame Parts (41, 44,
45)(x2). Secure with short pins. (Check
for square)
•
Slide in the two ends 42. Note the
dimensions 6mm..Secure with long pins
from outside 46 into 42
•
Insert 43(x4). Secure with short pins from
inside through 42 into 45
Note: For the top, the bottom of 44 is flush
with bottom of 43. For the base, the top of 43,
is flush with the top of 45.
Lifts
•
Assemble 012 (x4) Insert glue between
the joints before attempting to assemble.
This will help lubricate the joint prior to
assembly Secure with short pins at top
and bottom corners. (Check for square)
Note: If not square, compress longest
diagonal so it becomes shorter
•
Insert 12(x4) and secure with nails
Note: dimensions 16mm
Porch
•
Drill 2 clearance holes through 15
•
Position 14 onto 15, secure with short
pins
•
Position sub assembly 14/15 onto lift side
and secure with screws though 10
•
Slide in the doors 17 (x2)
Note: dimension 28mm
BH012 (X4)
BH010 (X4)
BH049 (X1)
BH003 (X2)
BH001 (X2)
BH002 (X2)
BH005 (X4)
BH017 (X2)
BH014 (X1)
BH015 (X1)
BH045 (X2)
BH044 (X3)
BH043 (X4)
(S) BH047 (X2)
(B) BH042 (X2)
(S) BH046 (X2)
(B) BH041 (X2)


