background image

User’s manual  


CAB EASYFLEX S-Slim L and XL 


Page  3  /  7 


3   Scope of Delivery and Parts list 


User’s manual


4   Safety Instructions 


ATTENTION! Only trained professionals are authorized to inspect the wall, as well as install and remove 
the product! Among others, there is a risk of electric shock, bruises, and crashes! 


•   Your product is not a toy and is not meant for children, because it contains small parts which can be swallowed and can  
 

injure when used inappropriately! 

•   NEVER place the display screen on its front side during installation, lean the display screen against a wall or a sturdy 
 

surface. Placing the display screen on its front side could cause permanent damage! 

•   Install the system and devices attached to it in a way that persons cannot be  injured, or objects not be damaged for example 
 by 

dropping. 

•   Remove the packing materials, because children may cut themselves on them while playing. Furthermore, there is a risk of 
 

swallowing and inhalation of incidentals and insulating material. 

•   We recommend that the wall installation only be performed by qualified technicians. 
•   To avoid accidents it is necessary to check the wall structure before installation, or to carefully look for a safe place for 
 

installation. Look out for live cables embedded in the wall! 

•   The wall must be strong enough at the place of installation to carry at least the fourfold of the total weight of the product, the 
 

audio / video devices, the bracket, and the installation material. 

•   The place of installation must be able to withstand earthquakes, or other strong vibrations. 
•   Avoid places with high temperatures, or humidity, or places which might come into contact with water. 
•   Do not install the product close to openings of air conditioners, or at places with an excessive amount of dust or smoke. 
•   Install it only on a vertical wall. Avoid slant surfaces, because other kind of tensile stress may then interact with the material. 
•   Do not install the product at places subject to vibration, or oscillation. 
•   Do not modify and alter any accessories! Make sure you also read the Chapter “Warranty and Liability”. Do not use any 
 damaged 

parts. 

•   Tighten all screws. Do not use too much force to avoid breakage of screws and over-turning of threads. 

Содержание 52087

Страница 1: ...SYFLEX S SLIM L 58 94 CM 23 37 SCHWARZ BLACK 52087 CAB WH EASYFLEX S SLIM XL 80 160 CM 32 63 SCHWARZ BLACK 52089 Cabstone Pillmannstraße 12 38112 Braunschweig Germany Designed in Germany made in China Hotline 49 0180 5002524 E Mail info cabstone com Web www cabstone com ...

Страница 2: ...nische Daten 7 10 Informationen zum VESA Standard 7 11 Entsorgungshinweise 7 1 Beschreibung und Funktion Ihr EASYFLEX Wandhalter ist aus stabilem pulverbeschichtetem Stahl gefertigt und dient der Befestigung Ihres LED LCD Plasma Bildschirms an stabilen Wänden Die EASYFLEX Modelle sind variabel neigbar Neben den gängigen VESA Standards sind nahezu alle Lochabstände montierbar Ihr EASYFLEX Modell ve...

Страница 3: ...ifizierten Fachkräften ausführen zu lassen Um Unfälle zu vermeiden ist es notwendig vor der Installation die Wandstruktur zu überprüfen bzw sorgfältig eine sichere Stelle zur Montage auszuwählen Achten Sie hierbei auf in der Wand liegende stromführende Kabel oder andere Leitungen und beschädigen Sie diese nicht Die Wand muss an der Montagestelle stark genug sein um ein Gewicht von mindestens dem V...

Страница 4: ...tung behebbaren Funktionsproblemen wenden Sie sich an Ihren Händler zur Reparatur oder zum Austausch wie in Kapitel Gewährleistung und Haftung beschrieben Die mitgelieferten Komponenten sind ausschließlich für eine Montage an einer massiven Stein und Betonwand geeignet Sollte die Beschaffenheit Ihrer Wand abweichen müssen Sie entsprechendes Montagematerial benutzen Ziehen Sie in jedem Fall eine Fa...

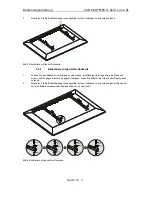
Страница 5: ...ter Rückseite 1 Lehnen Sie den Bildschirm vertikal gegen eine weiche großflächige Unterlage oder eine Wand und sichern Sie ihn gegen Kratzer und gegen Umkippen Legen Sie Bildschirme NIE mit dem Display nach unten ab 2 Montieren Sie die Bildschirmbügel wie abgebildet mit den Haltenasen nach unten zeigend inklusive der für Ihren Bildschirm passenden Abstandhalter M G oder M H Bild 4 Bildschirme mit ...

Страница 6: ...odukt darf nur von einer Fachwerkstatt gewartet werden Schützen Sie die Gelenke vor Schmutz und schmieren Sie diese regelmäßig mit leichtem Maschinenöl Reinigen Sie es nur mit einem trockenen weichen Tuch Gehen Sie beim Reinigen vorsichtig vor um Kratzer zu vermeiden Bei starken Verschmutzungen kann das Reinigungstuch leicht mit Wasser angefeuchtet werden Setzen Sie keine Reinigungsmittel oder Che...

Страница 7: ...iebsanleitung stehenden jeweiligen VESA Standards und den technischen Daten in dieser Anleitung können Sie die möglichen Befestigungspunkte definieren Einige Modelle lassen eine stufenlose individuelle Befestigung zu z B 300 x 300mm für Sony TVs VESA Klasse Befestigungslochabstand von Monitoren MIS D 75 x 75 oder 100 x 100mm MIS E 200 x 100 oder 200 x 200mm MIS F 400 x 200 400 x 400 600 x 200 600 ...

Страница 8: ...EX S SLIM L 58 94 CM 23 37 SCHWARZ BLACK 52087 CAB WH EASYFLEX S SLIM XL 80 160 CM 32 63 SCHWARZ BLACK 52089 Cabstone Pillmannstraße 12 38112 Braunschweig Germany Designed in Germany made in China Hotline 49 0180 5002524 E Mail info cabstone com Web www cabstone com ...

Страница 9: ...iability 5 7 Maintenance Care Storage and Transport 6 8 Troubleshooting 6 9 Specifications 6 10 Informations for VESA Standard 7 11 Disposal instructions 7 1 Description and Function Your EASYFLEX wall bracket is made of firm powder coated steel and is designed to be an attachment of your LED LCD plasma display to solid walls Your EASYFLEX model can be mounted variably A water level is included 2 ...

Страница 10: ...nd that the wall installation only be performed by qualified technicians To avoid accidents it is necessary to check the wall structure before installation or to carefully look for a safe place for installation Look out for live cables embedded in the wall The wall must be strong enough at the place of installation to carry at least the fourfold of the total weight of the product the audio video d...

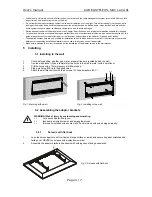
Страница 11: ...cture of your wall is different corresponding installation material must be used In any case consult a specialist Make sure to observe the correct thread size during installation of the display screen to the wall bracket 5 Installing 5 1 Installing to the wall 1 Check before drilling whether gas water or power lines are located behind the wall 2 Use the wall bracket A as a template for the holes i...

Страница 12: ...ogether with a second person End of assembling To remove proceed in reverse order 6 Warranty and Liability The producer grants a 2 years warranty to a new device As the manufacturer has no influence on installation warranty only applies to the product itself If any fault or damage is detected on your device please contact your dealer and provide your sales slip or invoice as evidence of the purcha...

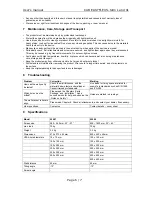
Страница 13: ...ort Keep the product away from children and store it at dry and dust proof places Drill holes are still visible after removing the product After use for a longer time period a spot may remain on the surface Keep the original packing for transport and to avoid damages 8 Troubleshooting Problem Correction Marking How can the wall quality be tested Check the wall thickness and the material below plas...

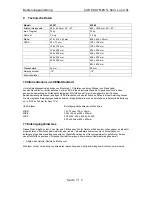
Страница 14: ...Class Hole distance for attachment of monitors MIS D 75 x 75 or 100 x 100 mm MIS E 200 x 100 or 200 x 200 mm MIS F 400 x 200 400 x 400 600 x 200 600 x 400 or 800 x 400 mm 11 Disposal instructions This product should be not disposed together with domestic waste Please return your device free of charge at the end of its service life at public collection points established for this purpose or at the ...

Отзывы: