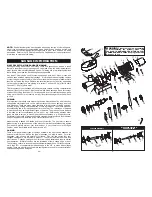
Cabela's 08-2201 Скачать руководство пользователя страница 9

1.  Insert  the 

Head

  into  the 

Gear  Housing 

with the

 Feed Chute 

facing straight up.  You 

will need to line up the slot in the 

Head 

with 

the 

Pin 

inside the 

Gear Housing

.  Be sure the 

Head

 is seated fully into the 

Gear Housing


(Figure 1)

.

2.  Tighten the 

Head Locking Knob 

to lock 

the 

Head

 into place.

3.  Insert the 

Auger, 

with the

 Auger Bearing 

attached,


into  the 

Head 

(Figure  2)

.    Align  the 

Auger Splines 

with the 

Drive Shaft

 of the 

Grinder

.

NOTE:

    Periodically  inspect  the

  Auger 

Bearing

 for wear.  If the 

Auger Bearing

 is 

worn  excessively,  replace  it  immediately  or 

Head

 damage could result.

4.  Place the 

Knife 

onto  the square portion 

of the 

Auger Pin 

(Figure 2)

.  Be sure the blades 

of the

 Knife 

are facing outward.

5.  Place one of the 

Grinder Plates

 onto the 

Auger  Pin

;    align  the  notch  in  the 

Grinder 

Plate

 with the 

Pin

 in the 

Grinder Head

.

6.  Install  the 

Front  Ring  Nut

,  DO  NOT 

OVERTIGHTEN.    Turn  the 

Front  Ring  Nut 

until it makes contact with the

 Grinder Plate

then  make  1/4  turn  more  to  tighten  into 

place.

...INSTRUCTIONS CONTINUED ON NEXT PAGE

GRINDER ASSEMBLY INSTRUCTIONS

WARNING!

  Before cleaning, assembling or disassembling the Grinder, 

make sure the PLUG IS REMOVED FROM THE OUTLET/POWER SOURCE!  

ALWAYS unplug the Grinder when not in use.

Gear Housing

Head

Slot in Head

FIGURE 1

Head Locking 

Knob

FIGURE 2

Head

Auger Bearing

Auger

Auger Splines

Auger Pin

Knife

Grinder Plate

Front Ring 

Nut

NOTE!

   Be sure the blades 

of the 

Knife 

are facing out.

NEVER operate Grinder without the Tray and 

the Tray Guard secured in place.

To avoid serious or fatal injury, NEVER reach 

into any Grinder inlet.

ALWAYS use the Stomper to push meat

into the Grinder Head.

Read & fully understand all instructions

& warnings prior to use.

WARNING!

1.  After grinding the meat following 

the “Grinding Instructions”, mix the 

ground  meat  with  the  sausage 

seasonings.

2.  Follow  the 

“Stuffer  Assembly 

Instructions”  or  the  “High-Speed 

Stuffer  Assembly  Instructions”

  to 

fully  assemble  the 

Grinder

  as  a 

Stuffer

  including  the

  Tray 

and 

Tray Guard.  

NOTE: 


While  one  person  can 

stuff sausage with this 

Grinder

, it 

is recommended that two people perform this operation.  For best results when using the 

High-Speed Stainless Steel 10 mm Stuffing Funnel

 do not grind the meat through the 

4.5 mm


Grinding Plate

.

3.  Place seasoned ground meat into the 

Tray

.  Do not overfill the

 Tray

, place just 

enough meat to leave the 

Feed Chute

 area open.

4.  Slide  a  sausage  casing  over  the 

Stuffing  Funnel

.    See  the 

“Sausage 

Information / Casing”

 section of this manual for more information.

5.  Slide 4”-6” (10-15 cm) of casing from the end 

of the 

Stuffing Funnel 

and tie a knot in the end 

of the casing.  If you are using large diameter 

fibrous casing, hold the closed end of the casing 

tightly against the  end of the 

Stuffing Funnel 

(Figure 17)

.

6.  Make sure the 

Grinder

 is in the “OFF” position. 

Attach the

 Grinder

 to the power supply.

7.  Switch  the 

Grinder 

to  the  forward  “FWD” 

position.  Carefully start feeding ground meat into 

the 

Feed Chute

.  ONLY USE THE STOMPER TO 

PUSH MEAT INTO THE HEAD,  DO NOT USE 

YOUR FINGERS OR ANY OTHER OBJECT.

WARNING!

    The 

Tray  Guard


helps protect the user from serious

personal injury.  NEVER

reach under or around the

Tray Guard

.  ALWAYS

use the 

Stomper

 to 

feed and push meat

into the 

Grinder

.

...INSTRUCTIONS CONTINUED ON NEXT PAGE

STUFFING INSTRUCTIONS

WARNING!

  Before cleaning, assembling or disassembling the Grinder, 

make sure the PLUG IS REMOVED FROM THE OUTLET/POWER SOURCE!  

ALWAYS unplug the Grinder when not in use.

NEVER operate Grinder without the Tray and 

the Tray Guard secured in place.

To avoid serious or fatal injury, NEVER reach 

into any Grinder inlet.

ALWAYS use the Stomper to push meat

into the Grinder Head.

Read & fully understand all instructions

& warnings prior to use.

WARNING!

FIGURE 17

Tray

Guard

Stomper

-9-

-16-

Feed

Chute

Motor

Cover

Feed

Chute

The 

Gear  Housing

  and  the 

Motor  Cover 

may become HOT during operation.   This is 

normal.    DO  NOT  touch  these  parts  during 

operation or until they cool after use.

HOT

DO NO T T OUCH!

Gear

Housing

Содержание 08-2201

Страница 1: ...omponents of this unit are broken or the unit does not operate properly please contact Cabela s Customer Service Retail Store Purchases 1 800 905 2731 U S Canada Catalog and Internet Purchases 1 800 237 8888 All International 1 308 234 5555 DO NOT RETURN THE UNIT TO THE STORE WHERE IT WAS PURCHASED NEVER operate Grinder without the Tray and the Tray Guard secured in place To avoid serious or fatal...

Страница 2: ...e near water or other liquid 3 Unplug this appliance from the electrical outlet when not in use or before putting on or taking off parts and before cleaning 4 Close adult supervision is necessary when any appliance is used near children This appliance is NOT to be used by children 5 NEVER use any accessories or parts from other manufacturers Doing so will VOID YOUR WARRANTY and may cause fire elec...

Страница 3: ...b 0 9 kg lean pork trimming 2 medium onions minced cup cider vinegar 1 tbsp ground oregano 8 oz 0 2 kg beef pork fat Sausage casings cup ground red chili mild or hot 1 tsp ground cinnamon 8 cloves garlic pressed Grind the meat and fat through coarse grinder plate using the grinding instructions Add the onions garlic vinegar and seasonings use chili to taste Mix the ground meat and the seasonings t...

Страница 4: ...7 8888 All International 1 308 234 5555 TYPES OF SAUSAGE Most sausages fall into one of four categories Fresh Smoked Cooked or Dried All sausages except dried require refrigerated storage There is also a sub category of uncooked smoked sausages Among the fresh and uncooked smoked sausages you will find such flavors as kielbasa or Polish sausage Italian sausage breakfast sausage and many others Bot...

Страница 5: ...g drying chilling and the addition of cure ingredients The oldest means of accomplishing this is by introducing salt into the meat The resistance of bacteria to salt varies widely among different types of bacteria The growth of some bacteria is inhibited by salt concentrations as low as 3 e g Salmonella whereas other types are able to survive in much higher salt concentrations e g Staphylococcus F...

Страница 6: ...PRIOR TO USING THIS UNIT YOUR SAFETY IS MOST IMPORTANT FAILURE TO COMPLY WITH PROCEDURES AND SAFEGUARDS MAY RESULT IN SERIOUS INJURY OR PROPERTY DAMAGE REMEMBER YOUR PERSONAL SAFETY IS YOUR RESPONSIBILITY There are basic rules to follow when handling food They are COOK SEPARATE CLEAN and CHILL COOK It s crucial to cook food to a safe internal temperature to destroy bacteria that is present The saf...

Страница 7: ...smission This causes the Grinder to operate at a higher volume and temperature than other Grinders This is normal and will not affect the Grinder s performance This Grinder is equipped with a Circuit Breaker as a safety precaution If the Grinder should stop running follow these steps to remedy 1 Turn the Grinder to the Off position 2 Press the Circuit Breaker Reset Button Figure 19 3 Turn the Grin...

Страница 8: ...ns warnings prior to use WARNING PRIOR TO USE 8 Hold the casing in place with one hand while feeding the sausage mixture through the Grinder As the meat fills the casing gently lay it on a clean dry surface NOTE When using natural casings use a wet surface 9 Do not fill the last 3 4 7 5 10 cm of casing After the entire length of casing has been stuffed twist the open end to close then tie off the ...

Страница 9: ... Assembly Instructions to fully assemble the Grinder as a Stuffer including the Tray and Tray Guard NOTE While one person can stuff sausage with this Grinder it is recommended that two people perform this operation For best results when using the High Speed Stainless Steel 10 mm Stuffing Funnel do not grind the meat through the 4 5 mm Grinding Plate 3 Place seasoned ground meat into the Tray Do no...

Страница 10: ...ad fully understand all instructions warnings prior to use WARNING 7 Insert the neck of the Tray into the Feed Chute Figure 14 8 Loosen the Allen Screws in the Tray Guard until the screw ends are flush with the Tray Guard Figure 4 9 Align the curved ends of the Tray Guard with the curved sides of the Tray The hole on the Tray Guard will line up with the hole in the Tray 10 The tabs of the Tray Gua...

Страница 11: ...nder make sure the PLUG IS REMOVED FROM THE OUTLET POWER SOURCE ALWAYS unplug the Grinder when not in use NEVER operate Grinder without the Tray and the Tray Guard secured in place To avoid serious or fatal injury NEVER reach into any Grinder inlet ALWAYS use the Stomper to push meat into the Grinder Head Read fully understand all instructions warnings prior to use WARNING HIGH SPEED STUFFER ASSEM...

Страница 12: ...t Ring Nut DO NOT OVERTIGHTEN Turn the Front Ring Nut until it makes contact with the Flange then make 1 4 turn more to tighten into place INSTRUCTIONS CONTINUED ON NEXT PAGE Gear Housing Head Slot in Head FIGURE 7 Head Locking Knob FIGURE 8 Head Auger Bearing Auger Auger Splines Auger Pin Front Ring Nut Flange 7 Insert the neck of the Tray into the Feed Chute Figure 9 8 Loosen the Allen Screws in...

Отзывы: