background image

22

22

Adjustments

5.2 

Adjusting the Printing Mechanism

Major adjustment of the printing mechanism beyond format-based settings is only required if the printhead assembly 

has been removed or parts in this area have been replaced. Excluded from this is the replacement of the printhead, 

after which readjustment is generally not required.
The following print quality imperfections may indicate maladjustment of the printing mechanism:
•  Print image too light
•  Print image is spotty
•  Print image lighter on one side
•  Horizontal lines not parallel to the horizontal label edges
•  Clear lateral drift of the transfer ribbon

i

Notice! 

Print image errors can also arise from wrinkling of the transfer ribbon. This is why you should check the 

transfer ribbon feed path and the head locking system for correct adjustment before making adjustments to 

the printing mechanism 

 Operator's Manual.

The adjustment of both print unit can be carried out in the same manner and comprises the following procedures in 

the order specified:
1.  Prepare the label printer for adjustment 

 5.2.1 on page 22.

2.  Adjust the position of the printhead 

 5.2.2 on page 23.

3.  Adjust the printhead pressure 

 5.2.3 on page 24.

4.  Adjust the transfer ribbon feed path 

 5.2.4 on page 25.

5.  Perform a final test 

 5.2.5 on page 25.

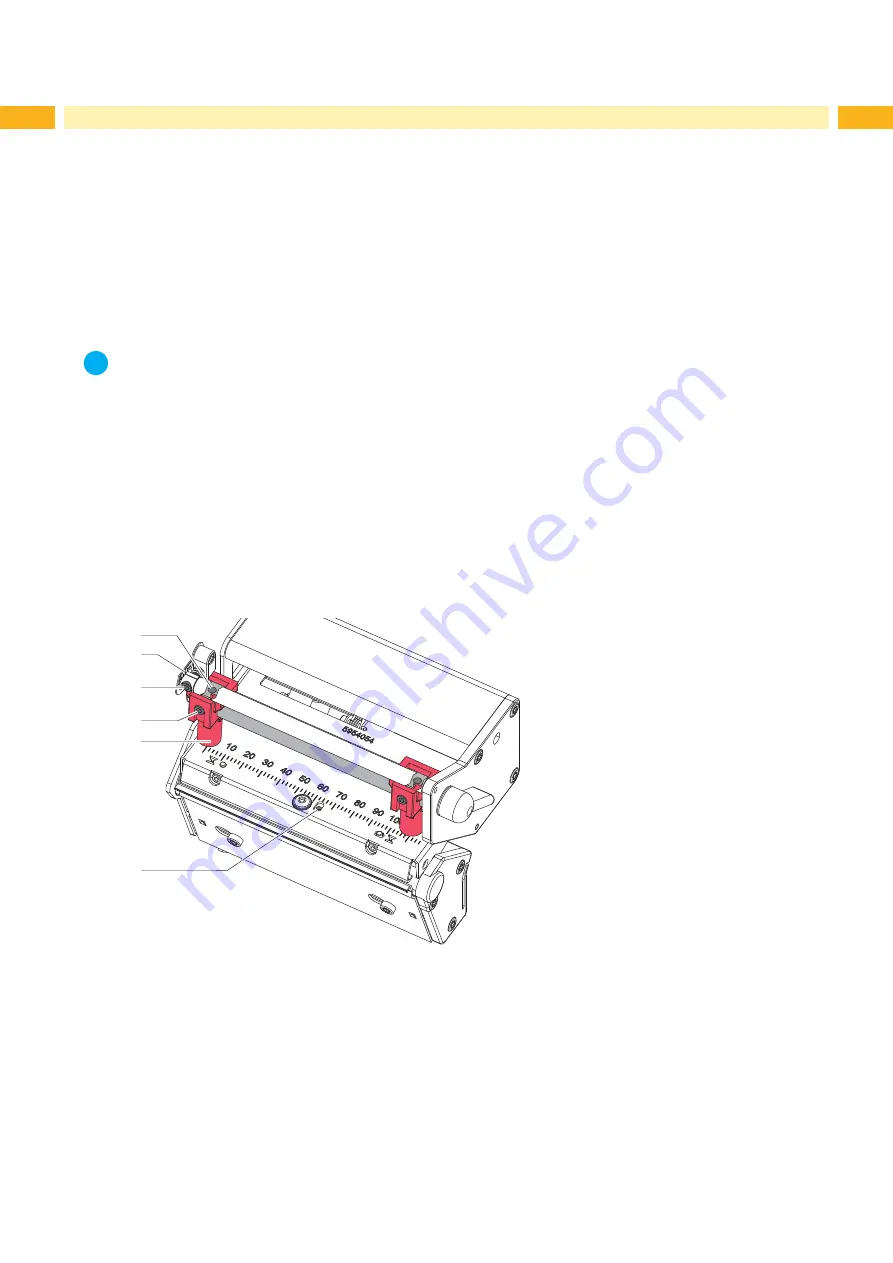
5.2.1  Preparing the Printer for Adjustment

2

3

4
5

1

6

Fig. 20 

Preparing the printer for adjustment

1.  Load labels and transfer ribbon which extend across the entire printing width.
2.  In the printer configuration, set the 

Heat level

 parameter to -5 and the 

Print speed

 parameter to 100 mm/s.

3.  Move the transfer ribbon deflection to the central position (2) with the screw (3).
4.  Loosen screws (4) and position the plungers (5) in such a way that the adjustment screws are accessible through 

the holes (1) of the square axis.

5.  Loosen the screw (6) for the printhead bowing with an Allen key (1.5 mm) and turn it counterclockwise until turning 

becomes perceptibly easier. This should occur after a maximum of a half a rotation.

6.  Continue with the adjustment of the printhead position 

 5.2.2 on page 23.

Содержание XC Series

Страница 1: ...Service Manual Label Printer XC Series ...

Страница 2: ...ns Deliveries and performances are effected under the General conditions of sale of cab Service Manual for the following products Germany cab Produkttechnik GmbH Co KG Postfach 1904 D 76007 Karlsruhe Wilhelm Schickard Str 14 D 76131 Karlsruhe Telefon 49 721 6626 0 Telefax 49 721 6626 249 www cab de info cab de France cab technologies s a r l F 67350 Niedermodern Téléphone 33 388 722 501 www cab de...

Страница 3: ...g the Label Sensor 16 4 6 Replacing the CPU 17 4 7 Replacing the Power Supply Unit 18 5 Adjustments 19 5 1 Measuring and Adjusting the Winding Torques 19 5 1 1 Measuring the Winding Torques 19 5 1 2 Adjusting the Slipping Clutches 21 5 2 Adjusting the Printing Mechanism 22 5 2 1 Preparing the Printer for Adjustment 22 5 2 2 Adjusting the Printhead Position 23 5 2 3 Adjusting the Printhead Pressure...

Страница 4: ...pment special fittings Time Information in the display 1 2 General Safety Instructions This service manual is intended for use by qualified service and maintenance personnel For more operation and configuration information refer to the user or configuration manual Follow the general safety rules below Keep the area around the device clean at all times Work with safety in mind Parts of device that ...

Страница 5: ...maintenance work Find out where the emergency and power switches are so that they can be quickly thrown in an emergency Disconnect the current supply before carrying out the following work Installing or removing power units Working in the immediate vicinity of open power supply components Mechanical check of power supply components Modifying circuits in the device Test the zero potential of the de...

Страница 6: ...ry Phillips head screwdriver size 1 Precision circlip pliers A0 Precision circlip pliers A1 Cylindrical dynamometer spring scale 0 10 N Digital multimeter 2 2 Removing and Installing the Rear Cover 1 2 3 2 4 4 3 5 5 6 Fig 1 Removing and Installing the Rear Cover Removing rear cover 1 Open front cover 1 2 Loosen screws 2 3 Close front cover 4 Lift and remove the rear cover 3 Installing rear cover 5...

Страница 7: ... sensor assembly via the tab 5 toward the rear cover until it stops 4 Unplug the cable 1 from the connector of the label sensor 2 5 Press the latch 3 and slowly pull label sensor outward via the tab 5 That way at XC6 a distance plate 3 is pushed out of label sensor guide 6 Clean label sensor and sensor units 4 with brush or cotton swab soaked in pure alcohol 7 Push label sensor back via tab 5 8 XC...

Страница 8: ... 5 Printing line 6 Pins Fig 3 Structure of the printhead XC4 Attention The printhead assembly is precisely aligned at the factory X X Do not loosen the screws 4 under any circumstances Attention The printhead can be damaged by static electricity discharges and impacts X X Ground your body e g by wearing a grounded wristband X X Do not touch contacts on the plug connections 2 3 X X Do not touch pri...

Страница 9: ...Remove printhead 1 from the printhead mounting bracket 9 if necessary 6 Loosen both plug connections 2 3 on the printhead Installing the printhead 1 Attach plug connections 2 3 2 Position printhead in printhead mounting bracket 8 in such a way that the pins 6 are secured in the corre sponding holes in the printhead mounting bracket 8 3 Lightly keep printhead mounting bracket 8 on the print roller ...

Страница 10: ... printing line 5 with hard objects or your hands i Notice The printhead replacement will be described for the upper printhead The procedure applies for the lower printhead in the same manner but the print roller must be removed additionally 7 4 4 1 2 3 6 6 Fig 6 Replacing the upper printhead XC6 Removing the printhead 1 Lift the printhead 2 Remove labels and transfer ribbon from the printer 3 Ligh...

Страница 11: ...nt units 8 9 to the lower printhead carriage and re mount the lower print roller 3 Swing the adjustment elements 11 sidewards to uncover the slots 10 in the printhead carriage 4 Put in the printhead into the printhead carriage and swing down the printhead assembly by hand and hold it 5 Position the printhead in such a way that the threaded holes 4 of the printhead are centered into the slots 10 of...

Страница 12: ...n the screws 6 7 and remove the plates 5 9 3 Remove the print rollers 2 3 4 Slide new rollers 2 3 onto their shafts 1 and turn slightly the rollers until the shafts engage in the hexagon sockets of the print rollers 5 Set the plates 5 9 in place and fix them slightly with the screws 6 7 6 Tighten the screws 6 7 each in order i e a b then c 4 Replacing Assembly Units ...

Страница 13: ...lipping clutches Danger Risk of death via electric shock X X Before opening the rear cover disconnect the device from the mains supply and wait at lease one minute until the power supply unit has discharged Removing the slipping clutch 1 Unplug the printer from the electrical outlet 2 Remove the rear cover 2 2 on page 6 3 Remove the snap ring 3 4 Pull coupling 1 or brake 2 from the winder axis Ens...

Страница 14: ...upling 5 1 2 on page 21 6 Install the rear cover Installing the brakes on the transfer ribbon supply hubs 1 2 3 4 5 6 1 2 3 4 5 6 Fig 12 Brakes on the upper left side and lower right side ribbon supply hubs 1 Check the correct positioning of spring 6 and pin 4 on the winder axis 5 2 Slide the brake 2 onto the winder axis 5 in such a way that it fits on the hexagonal profile of the pin 4 3 Ensure t...

Страница 15: ...crews 9 an remove wall spacer 8 3 Remove snap ring 6 4 Remove brake block 2 from pin 1 and pull spring 5 out of the brake block 5 Insert spring into the new brake block 6 Push brake block onto pin 1 in such a way that pin 4 will grasp into the hole on the backside of the brake block and spring 5 will be pressed against the flap 3 of the brake lever 7 Secure the snap ring 6 8 Re mount the roll reta...

Страница 16: ...stops 4 Unplug the cable 1 from the plug on the rear end of the label sensor 2 5 Unscrew the screws 3 and remove the side plate 4 6 Pull out the label sensor 2 via the tab 5 toward the cover side At XC6 that way the distance plate 6 is pushed out of label sensor guide Installing the label sensor 1 Insert the label sensor 2 into the guide from the front cover side and slide it toward the rear cover...

Страница 17: ...ions from the CPU 1 7 Remove the four fixing screws 2 from the CPU 8 Remove the CPU Installing the CPU 1 Place CPU 1 onto the retainers 3 2 Secure the PCB with four screws 2 3 Insert all plug connections on the PCB 4 Install the rear cover 5 Restore all interface connections on the back of the printer 6 Connect the power cable at the rear of the printer 7 Update the firmware if necessary 8 Adjust ...

Страница 18: ...ply unit 1 Unplug the printer from the electrical outlet 2 Remove the CPU 4 6 on page 17 3 Unplug the cables 5 6 4 Remove two screws 3 on the back of the printer 5 Remove two screws 4 6 Remove the power supply unit Installing the power supply unit 1 Insert the power supply unit 1 and secure the PCB with two screws 4 2 Secure the metal bracket 2 of the power supply unit to the back of the printer w...

Страница 19: ...e of the transfer ribbon during label transport the prevention of wrinkles in the feed path of the transfer ribbon If the winding torque differs from the set value it must be adjusted 5 1 2 on page 21 5 1 1 Measuring the Winding Torques Measurement of the winding torque at the transfer ribbon take up and supply hub occurs by determining the pulling forces on a test collar attached to the winder Th...

Страница 20: ...upply unit has discharged 1 Unplug the printer from the electrical outlet 2 Remove the rear cover 2 2 on page 6 3 Remove the transfer ribbon from the printer 4 Attach the test collar 3 to the winder 4 5 Turn the knurled nut 2 counterclockwise to clamp the test collar 6 Wind the cord attached to the test collar around the test collar several times 7 Secure spring scale 10 N 1 at the end of the cord...

Страница 21: ...e power supply unit has discharged 1 2 1 Unplug the printer from the electrical outlet 2 Remove the rear cover 2 2 on page 6 3 Press the knurled ring 1 of the slipping clutch toward the housing wall The lock 2 of the knurled ring is released 4 Turn the knurled ring while pushing it and release it in the desired position 5 Ensure that the tabs of the lock are located completely in the grooves of th...

Страница 22: ...ut in the same manner and comprises the following procedures in the order specified 1 Prepare the label printer for adjustment 5 2 1 on page 22 2 Adjust the position of the printhead 5 2 2 on page 23 3 Adjust the printhead pressure 5 2 3 on page 24 4 Adjust the transfer ribbon feed path 5 2 4 on page 25 5 Perform a final test 5 2 5 on page 25 5 2 1 Preparing the Printer for Adjustment 2 3 4 5 1 6 ...

Страница 23: ...es must be parallel to the front edge of the labels 2 If the printhead is not aligned properly loosen the screw 3 about one quarter turn 3 Use the screws 2 to align at XC4 the lines on the printhead with the tips of the grooves 1 at XC6 the front edges of the slides 4 to the front edge of the printhead mounting bracket 5 Screw 2a effects the inner half of the printhead and screw 2b the outer half ...

Страница 24: ...heat level is to be reduced in the printer configuration until the print image is only barely recognizable Under these conditions inaccuracies become clearly visible during adjustment 3 Create print samples with the test function Test grid Configuration Manual or a similar print pattern 4 Adjust the adjustment screw 1a or 1b clockwise in small increments on the side with the weaker print image unt...

Страница 25: ...ance from the disk of the winder as the supply roll is from the disk of the supply hub 2 If the ribbon runs inward or outward turn the corresponding screw 3a or 3b clockwise in small increments Wait until the ribbon feed path has stabilized after each step of the adjustment 3 Check the ribbon feed path for wrinkles 4 If wrinkles arise on the inside turn the screw 1 counterclockwise If wrinkles ari...

Страница 26: ...ath Check the label feed path The labels should be fed along the inner guides without bending and damaging If the material drifts sideward adjust the eccentric 1 Loosen screw 4 Turn the eccentric 2 with an Allen key in small steps on the axle 1 The hexagonal notch 3 can be used as pointer Position 3a maximum outward displacement of the label feed path Position 3b maximum inward displacement of the...

Страница 27: ... 25 Adjusting the belt tension up to SN 120132 1 Unplug the printer from the electrical outlet 2 Remove the cover 2 2 on page 6 3 For adjusting the ribbon rewinder drive belts 3 6 Loosen screw 2 5 Turn the tension bracket 1 4 in such a way that the belt 3 6 is tensioned tightly Tighten screw 1 4 4 For adjusting the print roller drive belt 9 Loosen screw 7 Turn the tension bracket 8 in such a way t...

Страница 28: ...age 6 3 For adjusting the ribbon rewinder drive belt 3 Loosen screws 1 Push the tension bracket 2 in such a way that the belt 3 is tensioned tightly Tighten screws 1 4 For adjusting the print roller drive belt 4 Loosen screws 6 Push the stepper motor 5 in a position that the belt 4 is tensioned tightly Tighten screws 6 5 Install the rear cover 5 Adjustments ...

Страница 29: ... 2 3 1 2 3 Fig 27 Adjusting the head switches i Notices Every print unit has its own head switch The error message can be caused by both of the switches X X When the error message occurs wrongly check both switches 1 Unplug the printer from the electrical outlet 2 Remove the rear cover 2 2 on page 6 3 Lock printheads 4 Slightly loosen screws 1 of the head switch 2 5 Move the head switch housing an...

Страница 30: ... the power supply unit has discharged 1 2 3 4 Fig 28 Adjusting the magnetic clutch 1 Unplug the printer from the electrical outlet 2 Remove the rear cover 2 2 on page 6 3 Loosen screw 3 4 Pull armature disk 1 in direction to the slipping clutch 5 Insert the distance caliber 0 1 mm 4 between armature disk 1 and chassis of magnetic clutch 2 6 Slide armature disk 1 against the chassis so that the dis...

Страница 31: ... power supply unit has discharged 3a 4 2 1 3b 4 2 1 6 5 6 5 Fig 29 Eccentric in saver mode Fig 30 Eccentric in print mode 6 5 7 Fig 31 Checking distance eccentric ball bearing 1 Unplug the printer from the electrical outlet 2 Remove the rear cover 2 2 on page 6 3 Lock the printhead 4 Loosen the screws 1 at the clock wheel 5 Turn axle 2 in such a way that the eccentrics 5 lift the printhead via the...

Страница 32: ...ent points on the CPU Fig 34 on page 36 No voltage at either measurement point The power supply unit may be defective Replace the power supply unit No voltage at one measurement point The CPU may be defective Replace the CPU Replace LCD Display Replace PCB Navi Button The display is not functioning but the navigator pad is functioning Replace LCD Display The navigator pad is not functioning but th...

Страница 33: ...U VMOT Motor voltage is too low Check motor voltage at the measurement point Vmot Fig 34 on page 36 Voltage too low Replace the power supply unit Voltage is correct Replace the CPU 24 V 24 V too low Check voltage at measurement point 24V Fig 34 on page 36 Voltage too low Replace the power supply unit Voltage is correct Replace the CPU 24 V ext 24 V at peripheral connection too low Disconnect perip...

Страница 34: ...34 34 7 Block Diagram Fig 32 Block diagram ...

Страница 35: ...35 8 Layout Diagram CPU Fig 33 Layout diagram CPU components side ...

Страница 36: ...36 36 8 Layout Diagram CPU Fig 34 Layout diagram CPU soldering side with measuring points ...

Страница 37: ...ed path 26 Label sensor cleaning 7 replacing 16 Layout diagram CPU 35 M Magnetic clutch 30 31 P Power supply 18 Printhead position 23 Printhead pressure 24 Printhead replacement PX4 8 PX6 10 Printing mechanism 22 Print roller 12 Protective devices 5 Pulling force 19 R Rear cover 6 Ribbon feed path 25 Ribbon saver mechanics 31 S Safety instructions 4 Sensor ribbon saver 31 Slipping clutch adjusting...

Отзывы: