CM2 Sidescan Sonar User Manual
16. CM2-WIN-300 Winch
recess; some force may be required. If the slip ring unit is accidentally pulled out of its recess during this
process, secure it again afterwards with flexible silicone sealant.
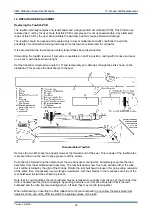
Remove the 4 M6 fasteners holding the bearing support assembly to the two cross braces.
Slide the bearing support assembly, together with the winch drum, off the motor shaft.
Separate the bearing support assembly carefully from the winch drum. On earlier units, where the handle is
not removable from the bearing support assembly, this operation requires some manipulation of the handle
and its fasteners. On later units the handle is secured to the bearing support assembly by 3 M5 screws;
these screws should be loosened temporarily.
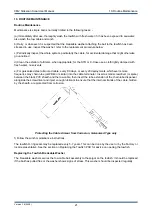
On the inside of the hub identify the pair of wires between the end of armoured tow cable and the rear of the
slip ring unit. Cut this pair of wires so as to LEAVE A LENGTH of approximately 100mm still attached to the
slip ring unit.
Undo the cable grip on the tow cable and remove the cable from the drum.
Feed the new cable through the slot in the drum. Attach a cable grip to the tow cable to prevent it being
withdrawn (in normal use several cable turns must always be present on the drum because the cable grip is
not intended to hold full towing forces)
Attach the 2 insulated wires to the pair of wires projecting from the slip ring unit, insulating the joints with
heatshrink sleeving. Polarity is not important.
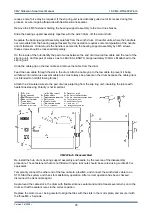
CM2 Winch Disassembled
Re-install the hub, drum, bearing support assembly and handle, by the reverse of the disassembly
procedure. Those fasteners that are not fitted with nylon lock nuts should be secured using Loctite 243 or
equivalent.
Temporarily connect the other end of the tow cable to a towfish, and connect the winch deck cable to an
STR. Start the system and check for satisfactory operation. After correct operation has been checked,
disconnect the deck cable again.
Seal around the cable slot in the drum with flexible silicone sealant and wind at least several turns on to the
drum so that the sealant cures in the correct position.
Replace the motor cover, being careful to align the tabs with the slots in the motor plate, and secure it with
the three M4 x 6 screws.
Version 3.6 (2008)
35

