background image

UK


32 


Antiscalant must be dosed in relation to the content of salts, lime etc. in the water and shall be adjusted 
on starting up the plant. 0,4 ml of concentrated antiscalant per m³ raw water must be dosed, i.e. if you 
have a 1 % solution, the pump shall dose 40 ml/m³.  
A flow checking device is installed on the outlet of the dosing pump. This indicates if there is flow or not. 
Note! If the flow fails, the check device will register this and stop the plant plus trigger the alarm. (Check 
the flow check device and restart the RO plant).  
 
For adjustment of this device, carry out the following steps: 

1.


Let the dosing pump operate for approx. 15 minutes until it is warm and all air has been dis-
placed from the pump. 

2.


Disconnect the dosing monitor cable (to shortly deactivate the dosing monitoring). 

3.


Turn the dial to the left (”-”). 

4.


Set the desired operating pressure on the pressure line. 

5.


Set the desired dosing amount on the running pump (via frequency and stroke length). 

6.


Reconnect the dosing monitoring cable. 

7.


The ”Flow” on the pump LCD-monitor flashes for every pump stroke. 

8.


Slowly turn the dial of the dosing monitor to the right (”+”), until ”Flow” stops flashing. 

9.


Turn the dial back a little once more until ”Flow” starts flashing again. 
Now turn the stroke length of the pump back approx. 20 % (scale parts) (note the old value) – 
”Flow” should stop flashing. If not you must turn again the dial of the dosing monitor slowly to 
the right (”+”), until ”Flow” stops flashing. Note: ”flow” vanishes from the display when the Reed 
switch has been switched off (when the float is in top position). 

10.


Reset the stroke length to the old value – ”Flow” should start flashing again. 

11.


Check that the dosing nipple (dosing location) is tight, and then the plant is ready for operation. 

 
Important! The stroke length of the dosing pump must not be set at a value below 50 %. 


Every week the reservoir must be emptied and rinsed and new antiscalant filled in. 


Every third month the reservoir mus tbe rinsed and cleaned before filling in new antiscalant. 

 
Above-mentioned dosing amounts are calculated on basis of our standard dimensioning conditions; if 
you are in doubt, BWT will be pleased to calculate the correct amounts for your plant. 


Option 16 – Frequency control of HP-pump 

13.8.16


Part No.: 421072005 
for Pro 2030-2080


Frequency-controlled high-pressure pump will be 
suitable when a specific permeate flow is re-
quired. 


Option 17 – Concentrate flow meter 

13.8.17


Part No.: 451405100 
for Pro 2030-2080


To give a more vaied picture of the capacity of 
the RO unit, you may install an optional concen-
trate flow meter.


Содержание PERMAQ PRO 2000

Страница 1: ...BWT PERMAQ PRO 2000 Reverse Osmosis Plant www bwt group com Installation and Operating Manual UK...

Страница 2: ...UK 2...

Страница 3: ...y of Alarm Conditions 13 9 2 11 Settings 14 10 TECHNICAL SPECIFICATION 15 10 1 Technical specifications 15 10 2 Technical data 16 11 FUNCTIONAL DESCRIPTION 17 12 REPLACEMENT OF MEMBRANES 17 13 ANNEX 1...

Страница 4: ...ore installing and starting up the plant Correct installation and operation will also form the basis of a factory warranty The BWT PERMAQ Pro 2000 plant with its compact and fin ished design is easy t...

Страница 5: ...close proximity of the plant placed in such a way that the overflowing water does not cause any damage If there is no floor drain which has been dimensioned to the full capacity of the RO unit near t...

Страница 6: ...e is then a risk it will get sucked back into the plant in case of a stoppage Important It should never be possible for the outlet hose to become bent or in any other way clogged as it would dam age t...

Страница 7: ...mpera ture is 8 C for an BWT PERMAQ Pro 2030 it means that the permeate capacity will be 6 below the normal 1700 l h i e 1598 l h When the requested pressure and permeate capacities have been obtained...

Страница 8: ...is operating Then adjust valve V3 so that the concentrate flow becomes 20 30 again see chapters 7 1 and 7 2 Biannually Check of pump Follow the manufacturer s instructions Check pipelines and con nect...

Страница 9: ...UK 9 9 2 Troubleshooting This section deals with the problems that may arise on the plant The plant capacity has dropped 9 2 1...

Страница 10: ...UK 10 The quality of the treated water is higher than 20 S cm 9 2 2 Alarm Low feed water pressure 9 2 3...

Страница 11: ...UK 11 Alarm Transport pump 9 2 4 Indication Level low 9 2 5...

Страница 12: ...e plant is not operating 9 2 7 Alarm The transport pump stops and starts 9 2 8 Check AQUA Flex s manual chapter 6 Troubleshooting Hard water is measured at the soft water tap 9 2 9 Check softening pla...

Страница 13: ...2 4 ALARM Too low feed water pressure Nothing is working permanent condition Section 9 2 3 Too low feed water pressure HP pump stopped TP pump is working Automatic restart 3 times if feed water pressu...

Страница 14: ...a start up delay of the pump Use of DIP switch No 1 High pressure pump No 2 Transport pump No 3 Selection of BWT PERMAQ Pro 2000 model No 4 6 Transport pump Factory settings ON OFF switch F2 Fuse Hig...

Страница 15: ...0 Bar V1 Ball valve control Brass V2 Needle valve recirculation Brass V3 Needle valve concentrate Brass V4 Ball valve check valve PVC V5 option Needle valve mixing Brass V7 option Ball valve CIP Brass...

Страница 16: ...tivity S cm 20 Weight full kg 129 163 176 186 214 229 Power connection V Hz 400 50 Power consumption kW m 3 4 1 8 1 8 1 3 1 2 1 1 Pipe inlet inch Concentrate outlet mm 14 Permeate outlet mm 1 Width De...

Страница 17: ...the outside of the membrane is placed When the new mem brane is to be fitted this V cup seal must be fitted at the same end of the membrane as the former one i e if the V cup seal is located at the t...

Страница 18: ...X 13 1 P I Diagram 13 2 Layout drawings 13 3 Wiring diagram 13 4 Start up test 13 5 Operating journal 13 6 Spare parts list BWT PERMAQ Pro 2000 13 7 Spare parts drawing 13 8 Options 13 9 Declaration o...

Страница 19: ...UK 19 13 1 P I Diagram...

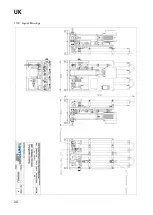
Страница 20: ...UK 20 13 2 Layout Drawings...

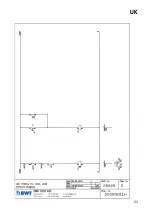
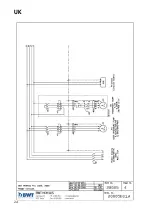
Страница 21: ...UK 21 13 3 Wiring Diagram...

Страница 22: ...UK 22...

Страница 23: ...UK 23...

Страница 24: ...UK 24...

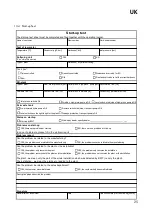
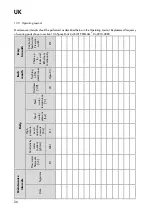
Страница 25: ...of technician Date Time consumption for the start up hours Start up test The start up test sheet must be completed and filed together with the operating journal Test of raw water YES Time controlled...

Страница 26: ...BWT PERMAQ Pro 2010 2080 Every 6 month Control of feed water Pressure switch PS1 Check up for leaks and RO plants functionality Each month Flushing of the membranes Open V3 Daily Hardness dH V4 Feed w...

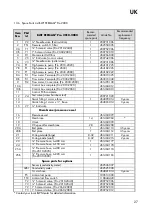
Страница 27: ...mplete 12 V4 Test valve water hardness test 200721020 13 Quick fitting 14 mm elbow 1 454090014 3 years 14 Quick fitting 14 mm x Base 454065014 3 years 15 V7 Ball valve Membrane pressure vessel 16 Pres...

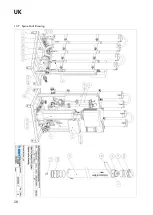
Страница 28: ...UK 28 13 7 Spare Parts Drawing...

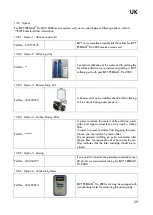
Страница 29: ...f the softening unit in case of lacking water pressure Option 4 Carbon Filter Filter 13 8 4 Part No In order to reduce the content of free chlorine pesti cides and organic solvents you may install a c...

Страница 30: ...ssure switch used for control ling start and stop of the BWT PERMAQ Pro 2000 Option 9 Mixed bed 13 8 9 Part No If a water quality 0 5 S cm is required we recom mend a BWT HOH Demi Mix a mixed bed unit...

Страница 31: ...8 14 Part No 451405112 for Pro 2010 2040 Part No 451405114 for Pro 2060 2080 The quality flush system monitors that the RO plant produces permeate 20 S If the limit value is exceed ed the poor permeat...

Страница 32: ...tle once more until Flow starts flashing again Now turn the stroke length of the pump back approx 20 scale parts note the old value Flow should stop flashing If not you must turn again the dial of the...

Страница 33: ...t bwt dk www bwt dk Herewith declares that BWT PERMAQ Pro 2010 2020 2030 2040 2060 and 2080 is in conformity with the provisions of the Machinery Directive Directive 2006 42 EC is in conformity with t...

Страница 34: ..._________________________________________________________________ ________________________________________________________________________________ _____________________________________________________...

Страница 35: ..._________________________________________________________________ ________________________________________________________________________________ _____________________________________________________...

Страница 36: ...33 1 4922 45 00 Fax 33 1 4922 45 45 E Mail bwt bwt fr BWT Belgium NM Leuvensesteenweg 633 B 1930 Zaventem Tel 32 2 758 03 10 Fax 32 2 758 03 33 E Mail bwt bwt be BWE esk Republika s r o Lipovo 196 Ces...

Отзывы: