


BV-Q-17
EN 13
Disabling connection:
To unpair a
device that is already paired, press and
hold the PLAY/PAIR ►
(11) key for a few seconds.
Volume control for
mode:
Increase and decrease volume using the VOL
-
(8) or VOL
+
(9)
keys on the unit or using the volume controls on your
enabled device.
*Note that if there is no playback, ensure that neither the unit nor
your
device are set to zero volume and the correct de-
vice for playback is paired.
• USING THE AUDIO LINE IN CINNECTION (AUX-INPUT)
- You can connect the audio output of an external device such as
a MP3-player to this unit, to listen to the sound of that device
through the high quality amplifier of this music system.
- To connect the external device please use a standard stereo
headphone (3.5mm to 3.5mm plugs) cable to connect the “head-
phone-out or audio line-out” of the device to the aux-input socket
of this unit.
- Select the function to “aux in” by pressing the FUNCTION (10)
key once.
- Switch on the external device (eg. MP3-player).
- Start playback of the external device and adjust the volume con-
trol of the unit to the desired level.
- Remember to switch off the unit and the external device when
you are finished using the external device.
• OPERATION RADIO
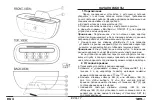
- Press the “ON/ OFF” key once to switch on the unit.
- Press the FUNCTION (10) key repeatedly until the display shows “FM”
- Extend and adjust the fm-wire antenna to obtain the best reception.
- Use the PLAY/PAIR ►
key (11) to select the desired mode (ste-
reo/ mono). In some cases, where reception is poor, it may be ad-
visable to select “mono” mode, to improve clarity of the radio signal.
Manual frequency adjustment (scan mode)
- Press (and immediately release) the BACK/
(4) or NEXT/
(5)
keys to “scan” (manually adjust) the radio frequency “up” or
“down” by 1-step at a time.
- The radio digital display will indicate the exact frequency at each
step’s position.
- When a desired frequency or station is reached. It can be saved
into one of the “memory” positions. (see “radio memory” section).
Automatic frequency adjustment (seek mode)
- Press and hold (for 2 seconds) the BACK/
(4) or NEXT/
(5)
keys to “seek” (automatically adjust) the radio frequency “up” or
“down” to the next available radio station.
- The radio digital display will indicate the exact frequency of the
next station that is found.
- When a desired station is reached. It can be saved into one of the
“memory” positions. (see “radio memory” section).
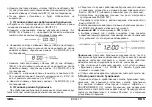
• STORE FM RADIO STATIONS
- At any time, the currently displayed station or frequency can be
stored into one of the memory positions.
- Press MEMORY key (6) until “P01” flashes in the display.
- Press BACK/
(4) or NEXT/
(5) keys to select desired memory
position. (there are total 20 memory positions).
- Press MEMORY key (6) once to save the selected station into the
selected memory position.
- To recall any saved memory, simply press memory key once
then select the memory positions by pressing BACK/
(4) or
NEXT/
(5) keys the saved radio-band will be recalled.
- To clear the memory of any position, simply save a new station to
the same memory position
• USB CHARGING FUNCTIONS
This unit is equipped with a dc 5v usb charging port on the back
panel. To utilize this feature, simply connect the device you would
like to charge (eg. Smartphone or tablet) to a suitable usb cable
and plug it Into the usb charging port. (this function is only active
when the unit Is plugged into an ac adaptor). The external device
will be charged automatically when it is successfully connected,
even during playback
Содержание BV-Q-17
Страница 2: ...BV Q 17 RU 2 FM 87 108 20...
Страница 4: ...BV Q 17 RU 4 1 15 ON OFF 7 7 2 SET 9 3 4 5 12 24 SET 9 4 5 SET 9...
Страница 16: ......


