Bushnell VOYAGER 78-6000 Скачать руководство пользователя страница 4

TELESCOPE USE

SELECTING AN EYEPIECE:

1.


You should always start viewing with the lowest power eyepiece, which in this case is the 25
mm lens. Note: the base power of each eyepiece is determined by the focal length of the
telescope objective element, which for this model is 1000 mm.  A formula can be used to
determine the power of each eyepiece: 

telescope OBJECTIVE mirror focal length 

EYEPIECE focal length = MAGNIFICATION

 (e.g. Using the 25 mm lens, the calculation

would look like this:   1200 mm 

÷

 25mm = 48x or 48 power.)


2.


Offered as an accessory for this telescope is a Barlow lens (model #78-0105). Barlow lenses
are used to double or triple the power of your telescope by placing your Barlow between the
focusing tube and the eyepiece. Using the example above, a 2x Barlow lens would give you a
total power of 96x or 96 power. (48 x 2 = 96x or 96 power).  Other accessories available
include a 9mm eyepiece (model #78-0101) that would give you 133x or 133 power or 266x
when used in conjunction with the Barlow accessory and a standard camera adapter (model
#78-0104) for photographing the night sky.

FOCUSING TELESCOPE:

1.


After inserting the eyepiece, aim the main telescope tube at a land-based target at least 200
yards away (e.g. A telephone pole or building). Fully extend focusing tube by turning Rack &
Pinion Focusing Mechanism


(1)


2.


While looking through selected eyepiece (in this case the 25 mm), slowly retract focusing
tube by turning Rack & Pinion Focusing Mechanism


(1) until object comes into focus.

ALIGNING FINDERSCOPE:

1.


Look through low-power 1.25" format eyepiece (9) and establish a well-defined target (see
focusing telescope section).

2.


Looking through Finderscope (8), alternate tightening each


Finderscope Adjustment Screw

surrounding the Finderscope (8) in the Finderscope Mount until crosshairs of Finderscope (8)
are precisely centered on the same object already centered in Main Telescope Tube's field of
view as seen through the 1.25" Format Eyepiece (9).


3.


Now, objects located first with the Finderscope (8) will be centered in the field of view of the
main telescope as seen through the 1.25" Format Eyepiece (9).

COLLIMATING THE TELESCOPE

Good alignment or collimation of the telescope's optical components will guarantee the most
optimum viewing.  

This telescope body comes preassembled from the factory and

precollimated.  Therefore collimation should not be required.

   However, due to its great

importance there are a few steps that you can take to ensure that your telescope is properly
collimated.

1.


Remove the 1.25" Format  Eyepiece (9) from the Rack and Pinion Focusing Mechanism (1).

2.


Look into the Rack and Pinion Focusing Mechanism (1) with the eyepiece removed.  You will
see the secondary mirror located a few inches inside the end of the telescope tube (nearest the
Rack and Pinion Focusing Mechanism).  Since it is a mirror, you will see a reflection of the
large primary mirror (7).  That mirror will show an image of the secondary mirror and your
eye.  Each image will be centered in a concentric set of images starting with the image of the
Primary Mirror (7), the secondary mirror, and your eye.

3.


Please refer to the diagram to see what to expect.

Содержание VOYAGER 78-6000

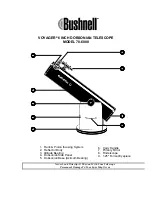
Страница 1: ...he Sun With Your Telescope Permanent Damage To Your Eyes May Occur 1 2 3 4 5 6 7 8 9 1 Rack Pinion focusing System 2 Reflector Body 3 Altitude Bearing 4 Dobsonian Side Panel 5 Dobsonian Base Azimuth Bearing 6 Carry Handle 7 Primary Mirror 8 Finderscope 9 1 25 Format Eyepiece ...

Страница 2: ...2 of 2 Includes the unassembled Dobsonian base and hardware TELESCOPE ASSEMBLY INSTRUCTIONS Remove all components from the cartons and identify all components You will need a phillips screwdriver and two adjustable wrenches for assembly ASSEMBLING THE DOBSONIAN BASE 1 Remove the Dobsonian base components from the carton and verify that all five components are included You should have two circular ...

Страница 3: ...lescope Body 2 and Finderscope 8 from carton 2 Remove nuts located near the Rack Pinion Focusing Mechanism 1 on Reflector Telescope Body 2 3 Attach Finderscope 8 to Reflector Telescope Body 2 by inserting the screws extending from the Reflector Telescope Body 2 into the holes in the base of the Finderscope 8 4 Refasten nuts so that Finderscope 8 is secure 5 Take Reflector Telescope Body 2 with att...

Страница 4: ...ect comes into focus ALIGNING FINDERSCOPE 1 Look through low power 1 25 format eyepiece 9 and establish a well defined target see focusing telescope section 2 Looking through Finderscope 8 alternate tightening each Finderscope Adjustment Screw surrounding the Finderscope 8 in the Finderscope Mount until crosshairs of Finderscope 8 are precisely centered on the same object already centered in Main ...

Страница 5: ...s an object sure to please any budding astronomer or experienced veteran When you have developed proficiency at this level other objects become good targets Saturn Mars Jupiter and Venus are good second steps to take 2 The first thing you need to do after assembling the telescope as planned is center the desired object in the finderscope s cross hairs Provided you did a reasonable job aligning the...

Страница 6: ...range as it sets on the horizon It s because you are looking through a considerable more amount of atmosphere than you would directly overhead Note If objects high in the sky are distorted or wavy you are probably viewing on a very humid night During nights of unstable atmosphere viewing through a telescope can be frustrating if not impossible Astronomers refer to crisp clear nights as nights of g...

Страница 7: ...n characteristic of most astronomical telescopes Since telescopes are used for astronomical viewing orientation is not important The image in the finderscope will also be upside down and reversed 2 How do I determine the power my telescope The power of your telescope can be determine by dividing the focal length of the objective lens by the focal length of the eyepiece The eyepiece focal length is...

Страница 8: ...medy 1 I ve completed the set up yet I cannot see anything Check to see if objective lens cover and all other lens covers have been removed Try to view an object that is 200 or more yards away If there is more than one eyepiece included with the telescope use the lowest power highest number eyepiece to begin viewing Use the Rack Pinion Focusing Mechanism to bring the object you are trying to view ...

Страница 9: ... not cover damages caused by misuse or improper handling installation or maintenance of the product Any return made under this warranty must be accompanied by the items listed below 1 A check in the amount of 15 00 to cover the cost of handling 2 Name and address for product return 3 An explanation of the defect 4 Product should be well packed in a sturdy outside shipping carton to prevent damage ...

Отзывы: